Maintaining the data acquisition system
With a bit of routine maintenance, the data acquisition system should provide years of dependable data collection. Here we describe basic maintenance operations that will help ensure that your system delivers the performance that you expect.
Sensor maintenance
Each sensor has specific maintenance requirements. Refer to the manufacturer's documentation for maintenance instructions.
Updating software
Periodic software (the Blueprint Utility) and firmware (the embedded software that runs on the DAqM and DRM) updates will be available. Each DAqM and DRM runs embedded firmware. Updates to the firmware are handled through the Blueprint Utility. Go to licor.com/support/Biomet-System/software.html and download the latest version. Install the software on your computer and launch the app. Then:
- Click Tools > Update Firmware.
- The current firmware version (included with the Blueprint Utility) and version running on your DAqM or DRM will be displayed. If your firmware is not up-to-date, you can install the new version onto your DAqM and DRM.
- Select your DAqM or DRM from the list.
- We recommend starting with the last one in the chain.
- Click Update.
- Repeat this until all of your DAqMs and DRMs are updated.
Your configuration will be preserved during the update. As an added precaution, you can save the configuration to your computer before updating the firmware.
Replacing the DRM fuses
Each power in on the DRM is protected by a fuse. A voltage surge in excess of 40 volts on either the main or battery input may cause the corresponding fuse to open.
Caution: Always wear a grounding strap when handling circuit boards. Failure to ground yourself may result in electrostatic discharge through the circuit board, which will damage components. A grounding strap to an earth ground will ensure that static electricity is discharged safely.
To access the fuses:
- Remove the seven terminal strips from the DRM.
- If they are wired, make a note of where the power connectors attach and which terminals are connected to DATA IN and DATA OUT so it is easy to reconnect them.
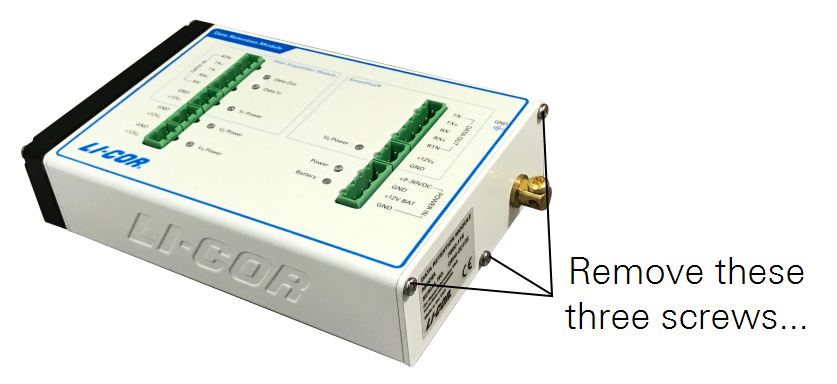
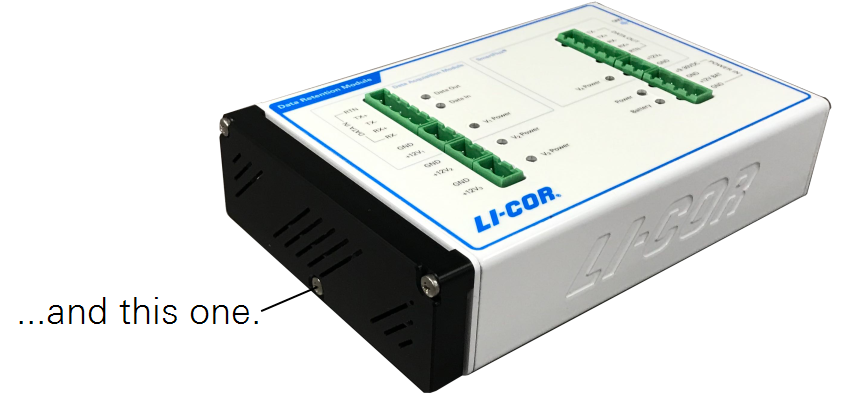
- Remove the three screws from the right side of the DRM, and set aside the end plate. Remove the bottom screw from the left side of the DRM.
- Slide the bottom plate out of the DRM enclosure.
- It fits tightly, so you may have to work it out.
- Remove the four screws that hold the circuit board to the DRM.
- You can leave the four-wire connector attached.
- Flip over the circuit board so that you can see the components on the board.
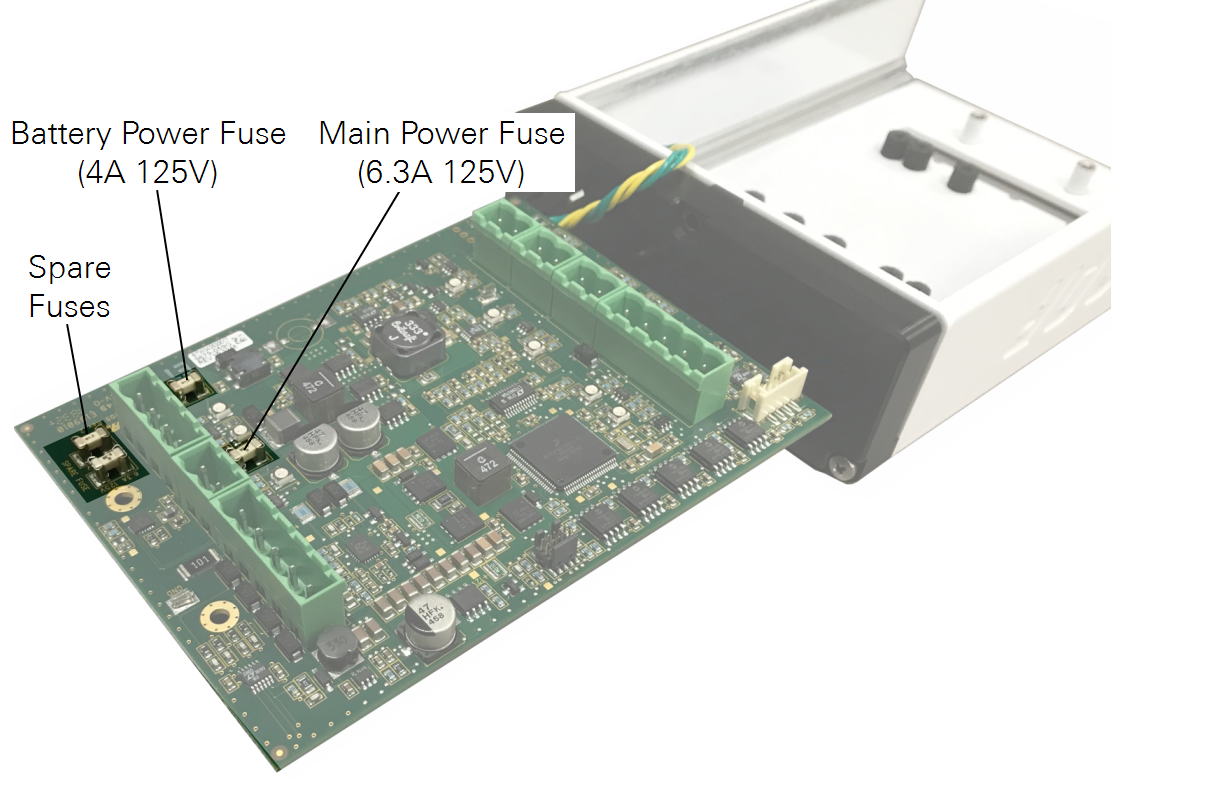
- The two fused circuits and two spare fuses are labeled on the circuit board. The main fuse is a Littel Fuse Nano2® 6.3A 125 V very fast acting fuse (LI-COR part number 348-15374). The power out fuse is a Littel Fuse Nano2® 4A 125 V very fast acting fuse (LI-COR part number 348-11746).
- Measure the resistance across the fuses.
- If the fuse is bad, replace it with a spare fuse with a spare. For good measure, check the resistance of the replacement fuse to verify that it is good.
- Reassemble the DRM.
- Test the DRM fuse.
- Power on the DRM to see if the issue is corrected. Before powering it on with everything attached, it is a good idea to figure out why the fuse blew in the first place to avoid blowing another fuse.
Replacing the backup battery fuse
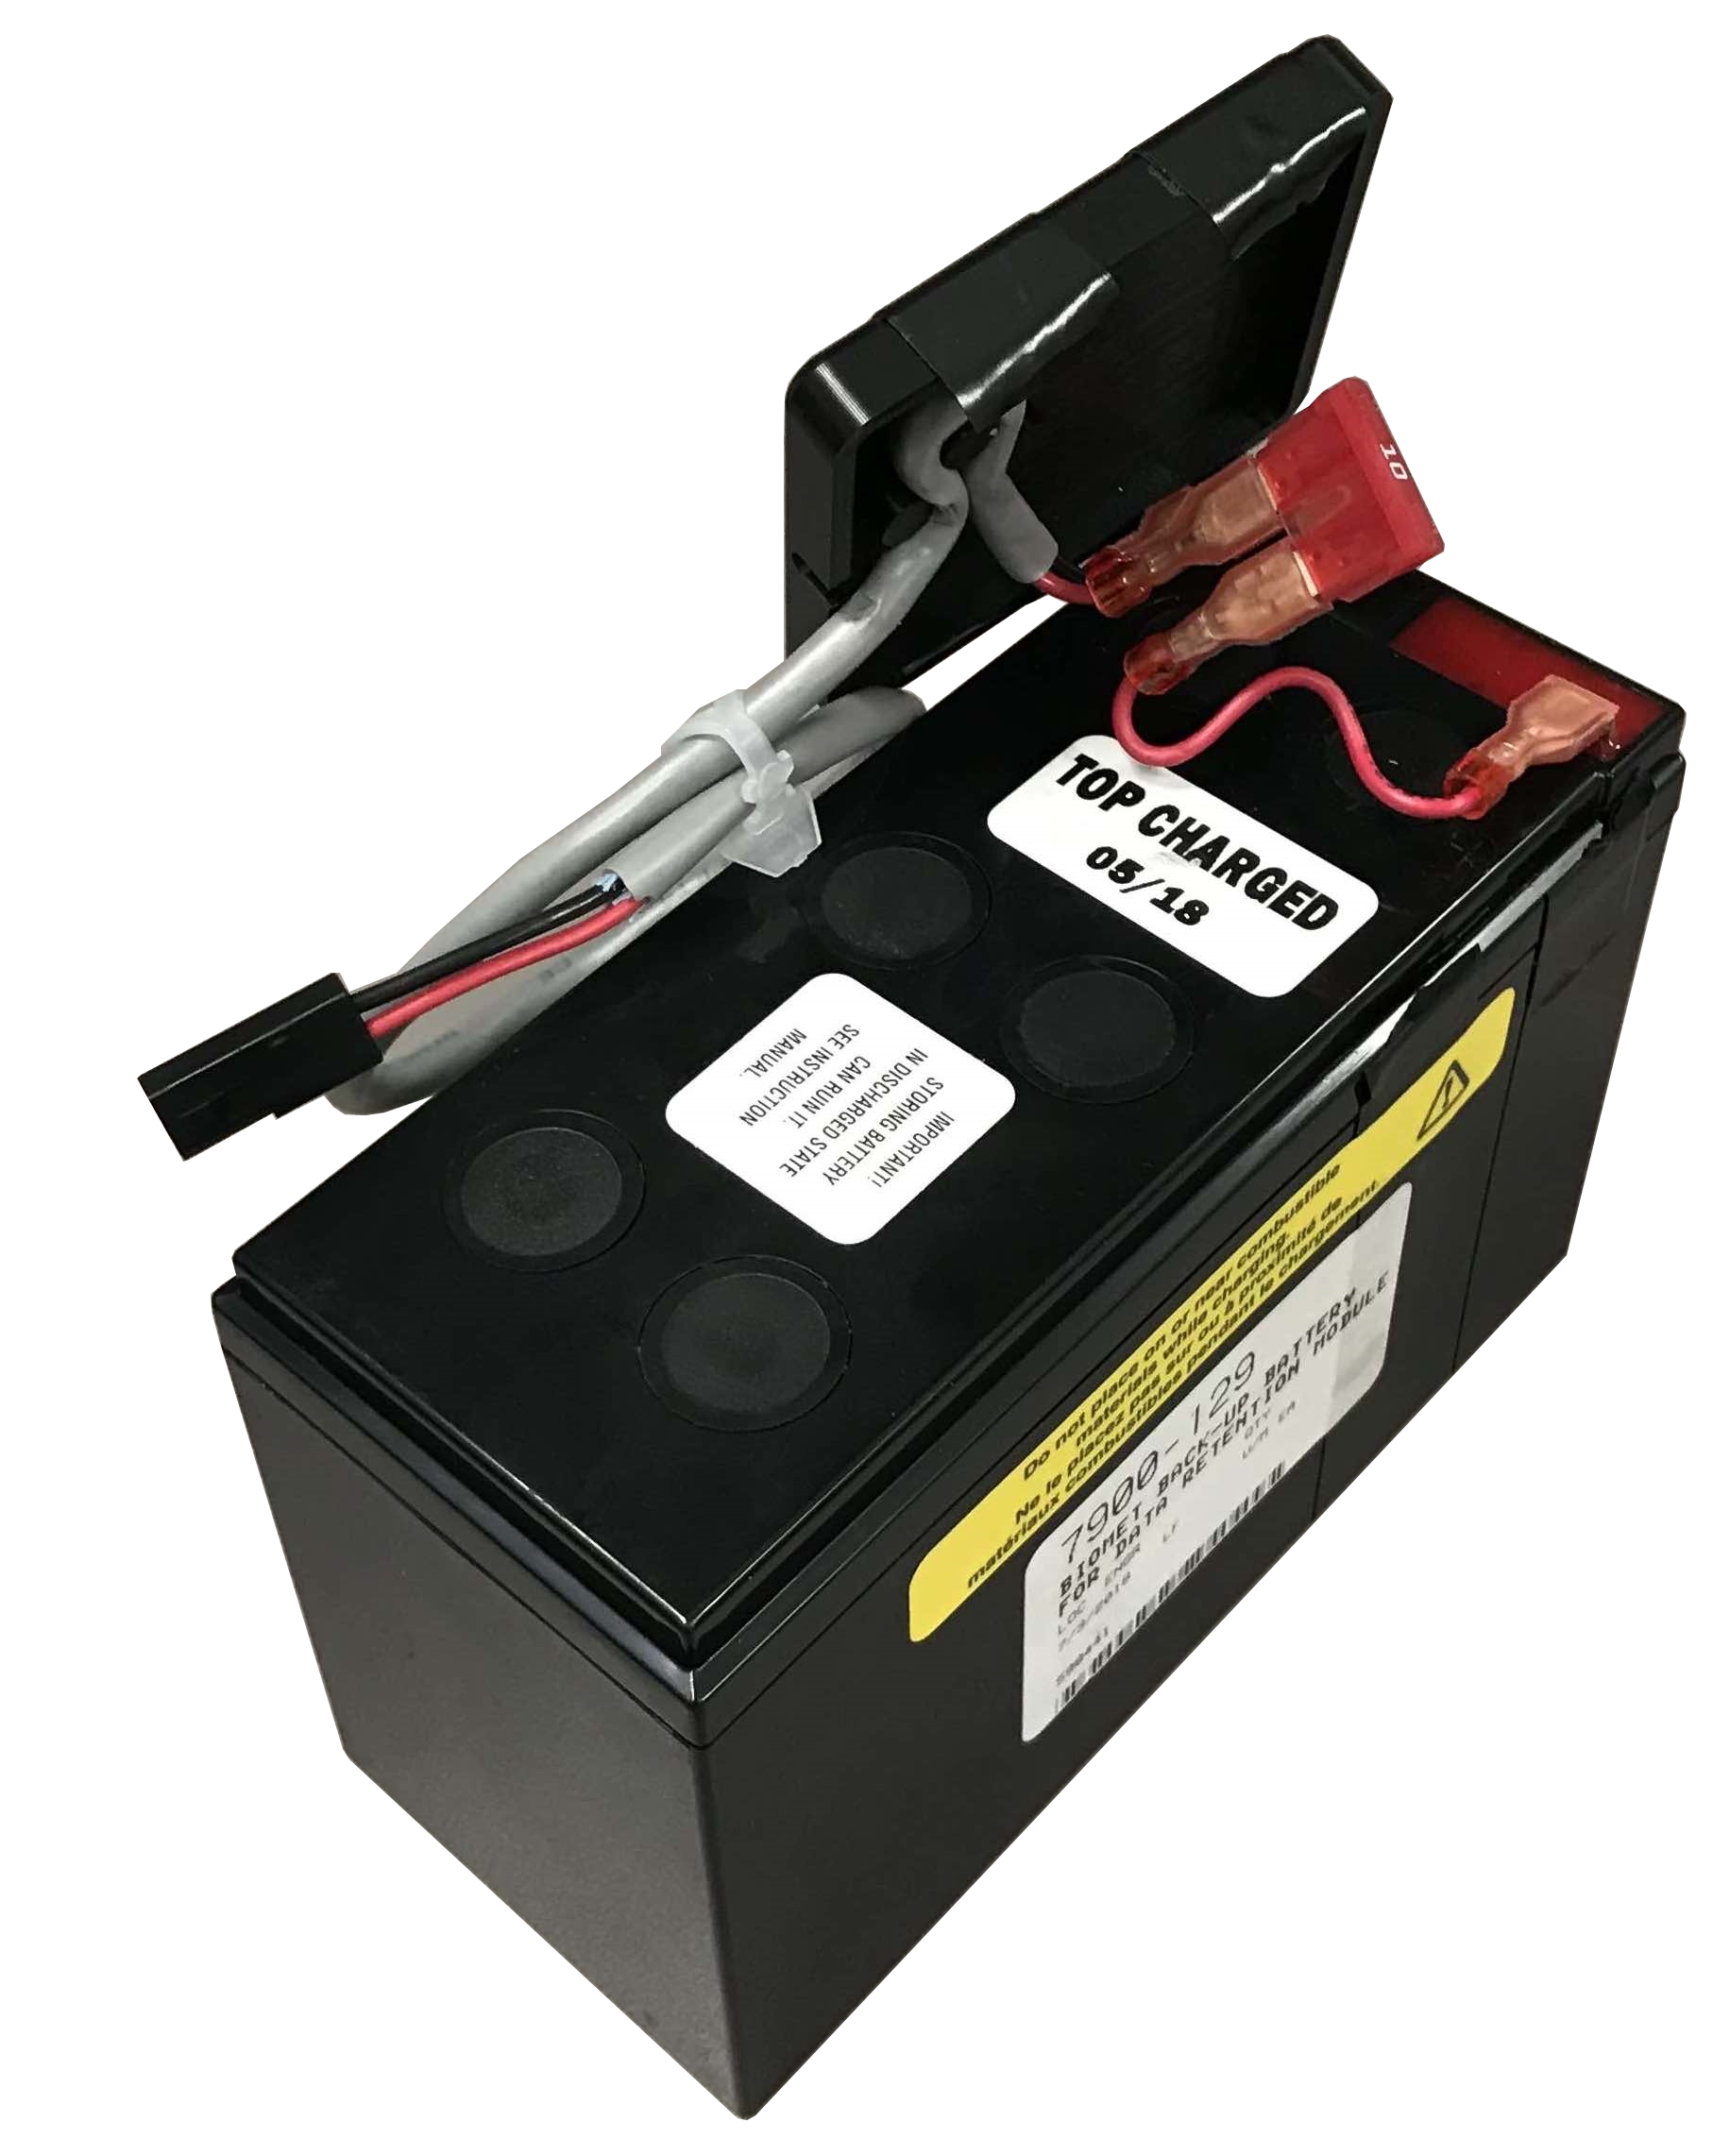
The backup battery has a 10 amp fast burning fuse. The fuse will open if the battery is connected with reversed polarity. If the fuse is open, the battery will neither charge nor provide power and the output will be 0 volts on a voltmeter. To replace the fuse, cut the black electrical tape that is wrapped around the battery, freeing the plastic cap. The fuse is under the cap.
In older batteries, the fuse is soldered in place. In newer ones, the fuse terminals insert into spade terminals. Inspect the fuse — it will be evdient if it is blown. Replace it with a 10-amp fast acting automotive fuse (Bussman ATC-10 for example), which is available at most automobile parts stores. Test the battery voltage after replacing the fuse. Reassemble the battery.
Each DAqM has a unique internal calibration file. Although you should not need to update the calibration or recalibrate the DAqM under normal circumstances, you have the option to upload a calibration file if something unexpected happens. Contact LI-COR technical support if you suspect that there are issues with the calibration and to obtain a copy of your calibration data. To load it on a DAqM:
- Click Tools > Send Calibration.
- Select the DAqM from the drop-down list.
- Drag the calibration file into the interface.
- Click Send Calibration to load it.