Configuring the communication system
Your data plan should have a public static IP address, which means the address is available over the internet at large (public), and will not change (static).
Satellite data plans can be quite costly, and we recommend planning to use your data conservatively. For example, it may be very expensive to transfer raw eddy covariance data over the satellite connection.
Logging in
Note: Sometimes network terminals such as the Hughes 9502 device take a few minutes to establish communications. If the device seems unresponsive, wait a few minutes and try again.
If you have trouble connecting, refresh the window (press F5) or try a different web browser. Firefox, Google Chrome, and Edge all seem to work, but your mileage may vary.
- Turn off your computer's wireless internet.
- Some laptops have a hardware switch that you can switch off. Others require you to change a software setting.
- Connect the gateway to your computer with a standard Ethernet cable (part number 616-06116) and power it up.
- In an internet browser, enter 192.168.128.100 in the address bar.
- This will connect to the web browser with the interface.
- Enter the default user name and password to log in:
- User Name: <leave blank>
- Password: <leave blank>
IMPORTANT: To protect your data and system, it is important to change the password. See the manufacturer's documentation for more information.
Checking the signal strength
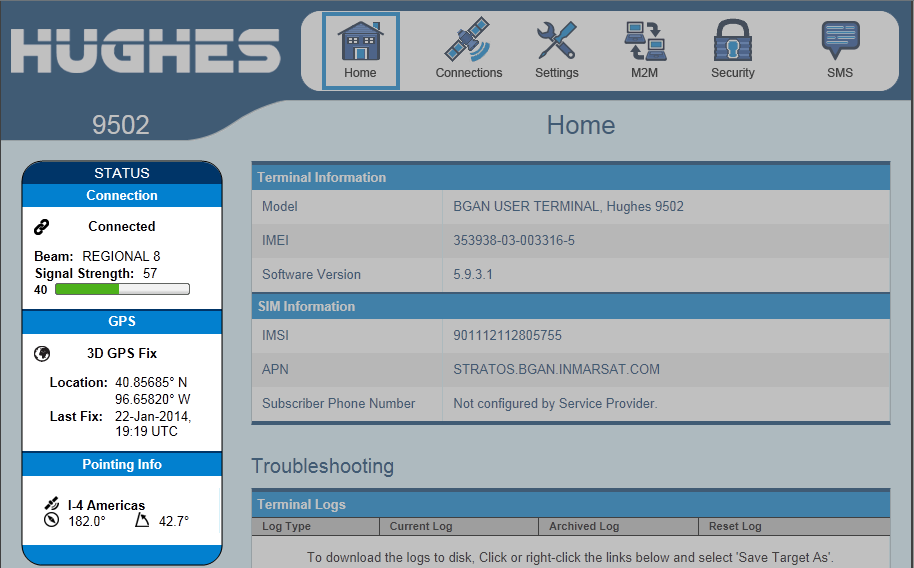
The signal strength is indicated on the home page. The terminal will register with the network, which will be indicated in the status column at the left of the display. See Pointing the antenna to optimize the signal strength.
Caution: Be careful to avoid data overage charges! You can easily transfer many megabytes of data over the satellite terminal, which may incur large data charges.
Pointing the antenna
The antenna must be outside and have an unobstructed view of the southern sky in the northern hemisphere, or the northern sky in the southern hemisphere. The minimum useful signal strength is 50 db.
Warning: For safety reasons, do not attempt to align the antenna without enabling alignment mode. Alignment mode disables all transmissions from the antenna, ensuring that the antenna is safe to approach and handle from all sides. To enter alignment mode, power on the terminal and then short press (less than 2 seconds) the black button. The terminal will indicate that it is in alignment mode by blinking the three LEDs. Short press a second time to exit pointing mode.
With a PC
You can get the azimuth and elevation angle by powering up the device, letting it get a GPS fix, and then checking the pointing information in the software.
- Get the GPS fix.
-
- Orient the antenna.
- Assemble the system as described in Configuring the communication system and then connect a laptop/PC as described in Checking the signal strength. The WebUI will provide the orientation and elevation angle after the terminal registers its location with the GPS satellites.
- Optimize signal strength.
- Orient the antenna toward the horizon at the angle displayed in the WebUI (see Figure 3‑1). Adjust the orientation until you have the best possible signal strength.
- Short press the button to exit alignment mode.
Without a PC
You can use a pair of headphones to point the antenna.
- Enter Pointing Mode.
- Power up the unit and short press (<2 seconds) the function button 15-20 seconds after startup (the power LED will be flashing). After the short press, all three LEDs will blink, indicating the unit is in pointing mode.
- Listen for the tone.
- Insert a pair of stereo headphones into the headphone jack and listen for tones. As the signal strength increases, the pitch of the tone will get higher and faster. Tighten the antenna at a position that provides the strongest signal.
- Short press the button to exit alignment mode.
Configuring the Hughes 9502 terminal
The steps below describe how to configure the terminal.
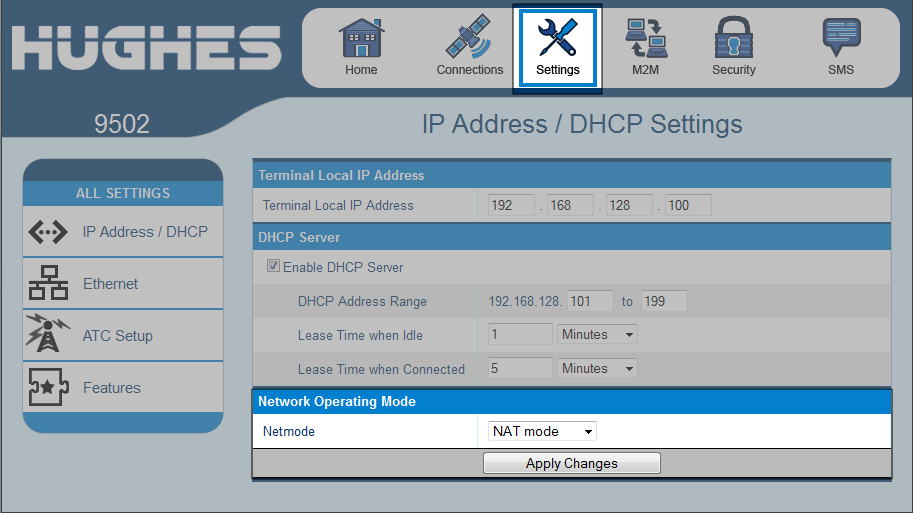
- Under Settings > IP Address/DHCP, verify that the setting is NAT mode.
- Note: Do not use relay mode. Relay mode leaves the terminal open to hackers on the internet, and may lead to unintended data charges or other undesirable outcomes.
- Configure Always On Context.
-
- Always On context: set to ON
- Static ACA IP Address: Enter 192.168.128.201 (or whatever you set in the LI-7500x, LI-7200x or other instrument).
- APN Config: Select the appropriate setting (depends upon your provider, it may be telespazio.bgan.inmarsat.com, DS1.bgan.inmarsat.com, or something similar).
- Click Apply Changes. Reboot the terminal when prompted.
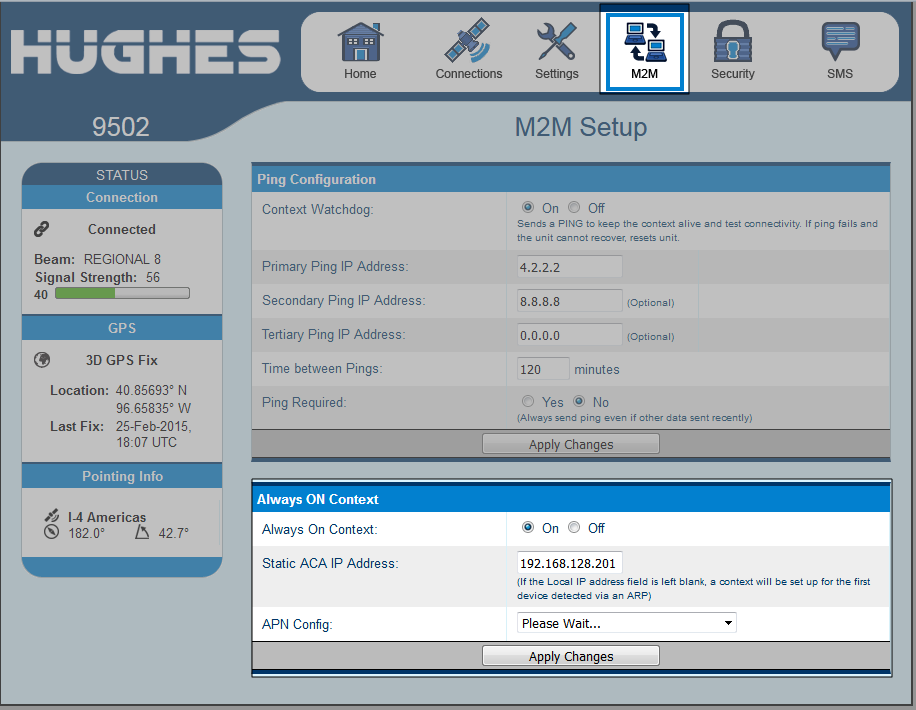
- Set the Content Watchdog to ON and configure the settings.
- The BGAN M2M terminal includes a mechanism that can be used to periodically verify the network connectivity and take action if a problem is detected. Watchdog pings are used to detect connectivity and, because they are bits of data just like any other data, they require an active connection in order to be transmitted. The ping mechanism will also act to keep alive the PDP context to prevent it from being torn down. The ping mechanism has the following configuration parameters:
-
- Context Watchdog: Set to ON to keep the connection active
- Primary Ping IP Address: 4.2.2.2 (pings a public web server)
- Secondary Ping IP Address: 8.8.8.8 (optional; pings a Google server)
- Tertiary Ping IP Address: optional
- Time between Pings: Set to the desired number of minutes. All IP traffic generated using the Content Watchdog is rated and charged in the same manner as other traffic generated by the terminal. Based upon a single 30-byte ping and a 30-byte response, data will be used at the following rates:
-
Ping Interval Estimated Monthly Usage 15 minutes 400 KB 30 minutes 200 KB 60 minutes 100 KB 120 minutes 50 KB - Ping Required: If not set, then the system will not try pinging on timer expiration if user data was transmitted within the watchdog period.
- Test the configuration.
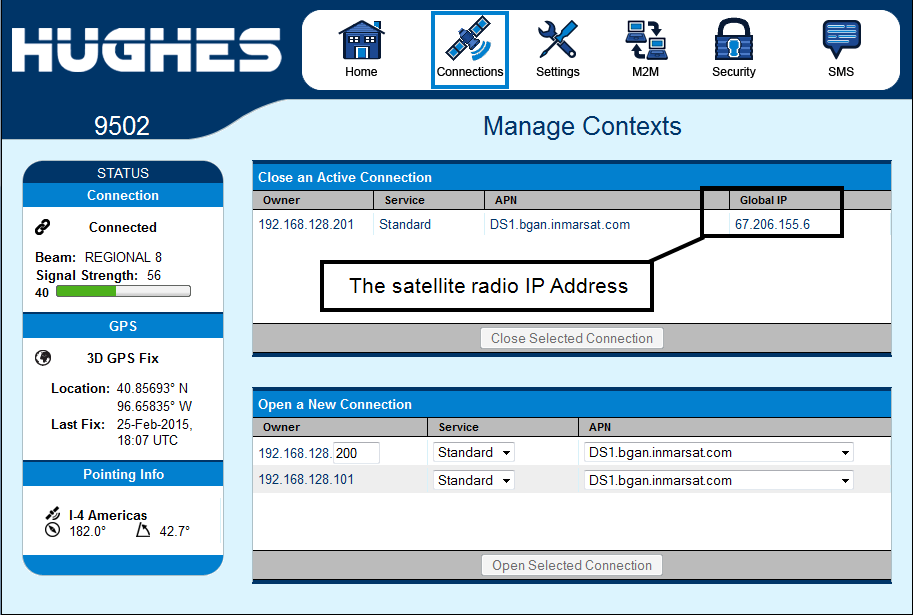
- Open the WebUI and go to Connections > Manage Context page. Once the connection is established the display will be similar to the image shown in Figure 3‑2.
Viewing the IP address
When your computer is connected to the device and you are logged in (assuming the terminal is connected to the network), you can view the IP Address under the Connections > Manage Contexts tab: