Using the StarDot PhenoCam in Eddy Covariance Systems
Printable PDF: Using the StarDot PhenoCam in Eddy Covariance Systems
(EC_InstallGuide_StarDot-Cam-17913.pdf)
Download this content as a pdf.
Note: The StarDot NetCam SC (PhenoCam) has been replaced by a new model - the NetCamLIVE2. The NetCamLIVE2 is a direct replacement and is supported by SmartFlux 2 and 3 Systems (firmware v2.4.2 and newer).
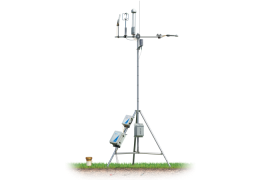
The StarDot PhenoCam is a weather-resistant web cam that can be installed in LI-COR eddy covariance systems to take scheduled photos for record keeping and evaluation of site phenology. PhenoCam images can be saved to a USB drive or uploaded to FluxSuite where you can view imagery from a site remotely. In this document, we describe how to install the PhenoCam, how to configure it, and how to configure your eddy covariance system to save images and upload them to FluxSuite.
What's what
The PhenoCam package and mounting kit include the following hardware components.
| Description | Quantity | Part Number |
|---|---|---|
| StarDot PhenoCam Package | 1 | 7900-165-151 |
| Camera (NetCamLIVE2) | 1 | - |
| Camera Enclosure | 1 | - |
| Enclosure Mounting Arm | 1 | - |
| 15-meter Power & Data Cable | 1 | - |
| Power Cable Adapter | 1 | 392-18024 |
| 30-meter Power & Data Cable | optional | 392-18100a |
| 60-meter Power & Data Cable | optional | 392-18001a |
| Mounting Hardware Kit | optional | 9979-067 |
| Mounting Plate | 1 | - |
| Brackets | 2 | - |
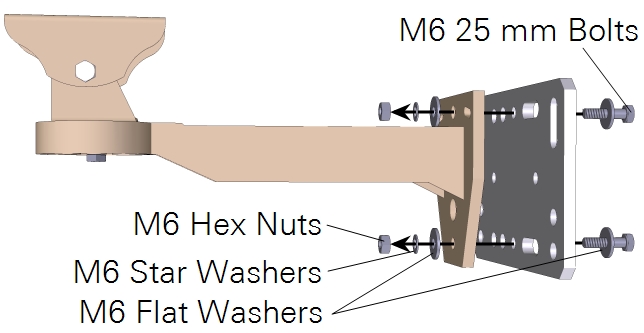
| Bolts (M6 25 mm) | 2 | - |
| Flat Washers (M6 18 mm) | 4 | - |
| Star Washers (M6 11 mm) | 2 | - |
| Hex Nuts (M6 10 mm) | 2 | - |
| U-Bolts (M8 64 mm) | 2 | - |
| U-Bolts (M8 35 mm) | 2 | - |
| Star Washers (M8 11 mm) | 8 | - |
| Flat Washers (M8 24 mm) | 8 | - |
| Hex Nuts (M8 13 mm) | 8 | - |
Configuring the PhenoCam
Download the StarDot Tools application from http://www.stardot.com/downloads and install it on your Windows computer. Also acquire the latest embedded and Windows interface software for the LI-7500A/RS/DS, or LI-7200/RS from licor.com/support. Update the embedded software on your instrument and the PC application before connecting to the PhenoCam.
The PhenoCam network2 provides extensive documentation for using this model of camera. Refer to their documentation (https://phenocam.nau.edu/webcam/) to configure the device according to those standards. Here, we provide basic instructions for configuring the device for LI-COR eddy covariance systems.
Note: We recommend that you assemble and configure the system in a lab or office prior to taking it to the field.
- Power on the camera and connect the network cable to your network or computer.
- Launch the StarDot Tools application.
- Download it from http://www.stardot.com/downloads and install it on your Windows computer. Launch the app and it will present all of the PhenoCams that are on your network. Identify the one you want to configure and record its ID and IP address.
- Enter the IP Address into a web browser address bar.
- The browser will display a recent image from the camera as well as some menu links.
- Click Config in the lower left of the page and log in when prompted.
-
- User Name: admin
- Password: admin
- Configure the image capture/upload timing.
- Click the Network tab and configure the settings:
-
- Under IP Assignment, select Manual.
- Set the IP Address: A unique address that is compatible with the devices in your system (Table 1‑2).
- Set the Subnet Mask: 255.255.255.0, typically.
- If you are using a cellular or satellite gateway to access your system remotely, under Network, set the IP Address to that of the cellular or satellite gateway. This will be provided by your service provider.
| Device | Public Start Port | Public End Port | Protocol | Host IP | Private Start Port |
|---|---|---|---|---|---|
| Phenocam | 7980 | 0 | TCP | 192.168.13.203 | 80 |
For security purposes, and if your camera is on an unsecured network, you should change the port setting under Web Server > Port. Changing this setting may cause issues with devices that connect to the camera, like a cellular gateway, and you'll have to configure the port settings in these devices as well. In addition, we recommend that you change the default password for improved security.
Connecting the PhenoCam to your EC System
In the LI-7500A/RS/DS and LI-7200/RS PC software, connect with the gas analyzer that will be part of your eddy covariance system.
- Assemble the components and connect the camera to the EC system network switch.
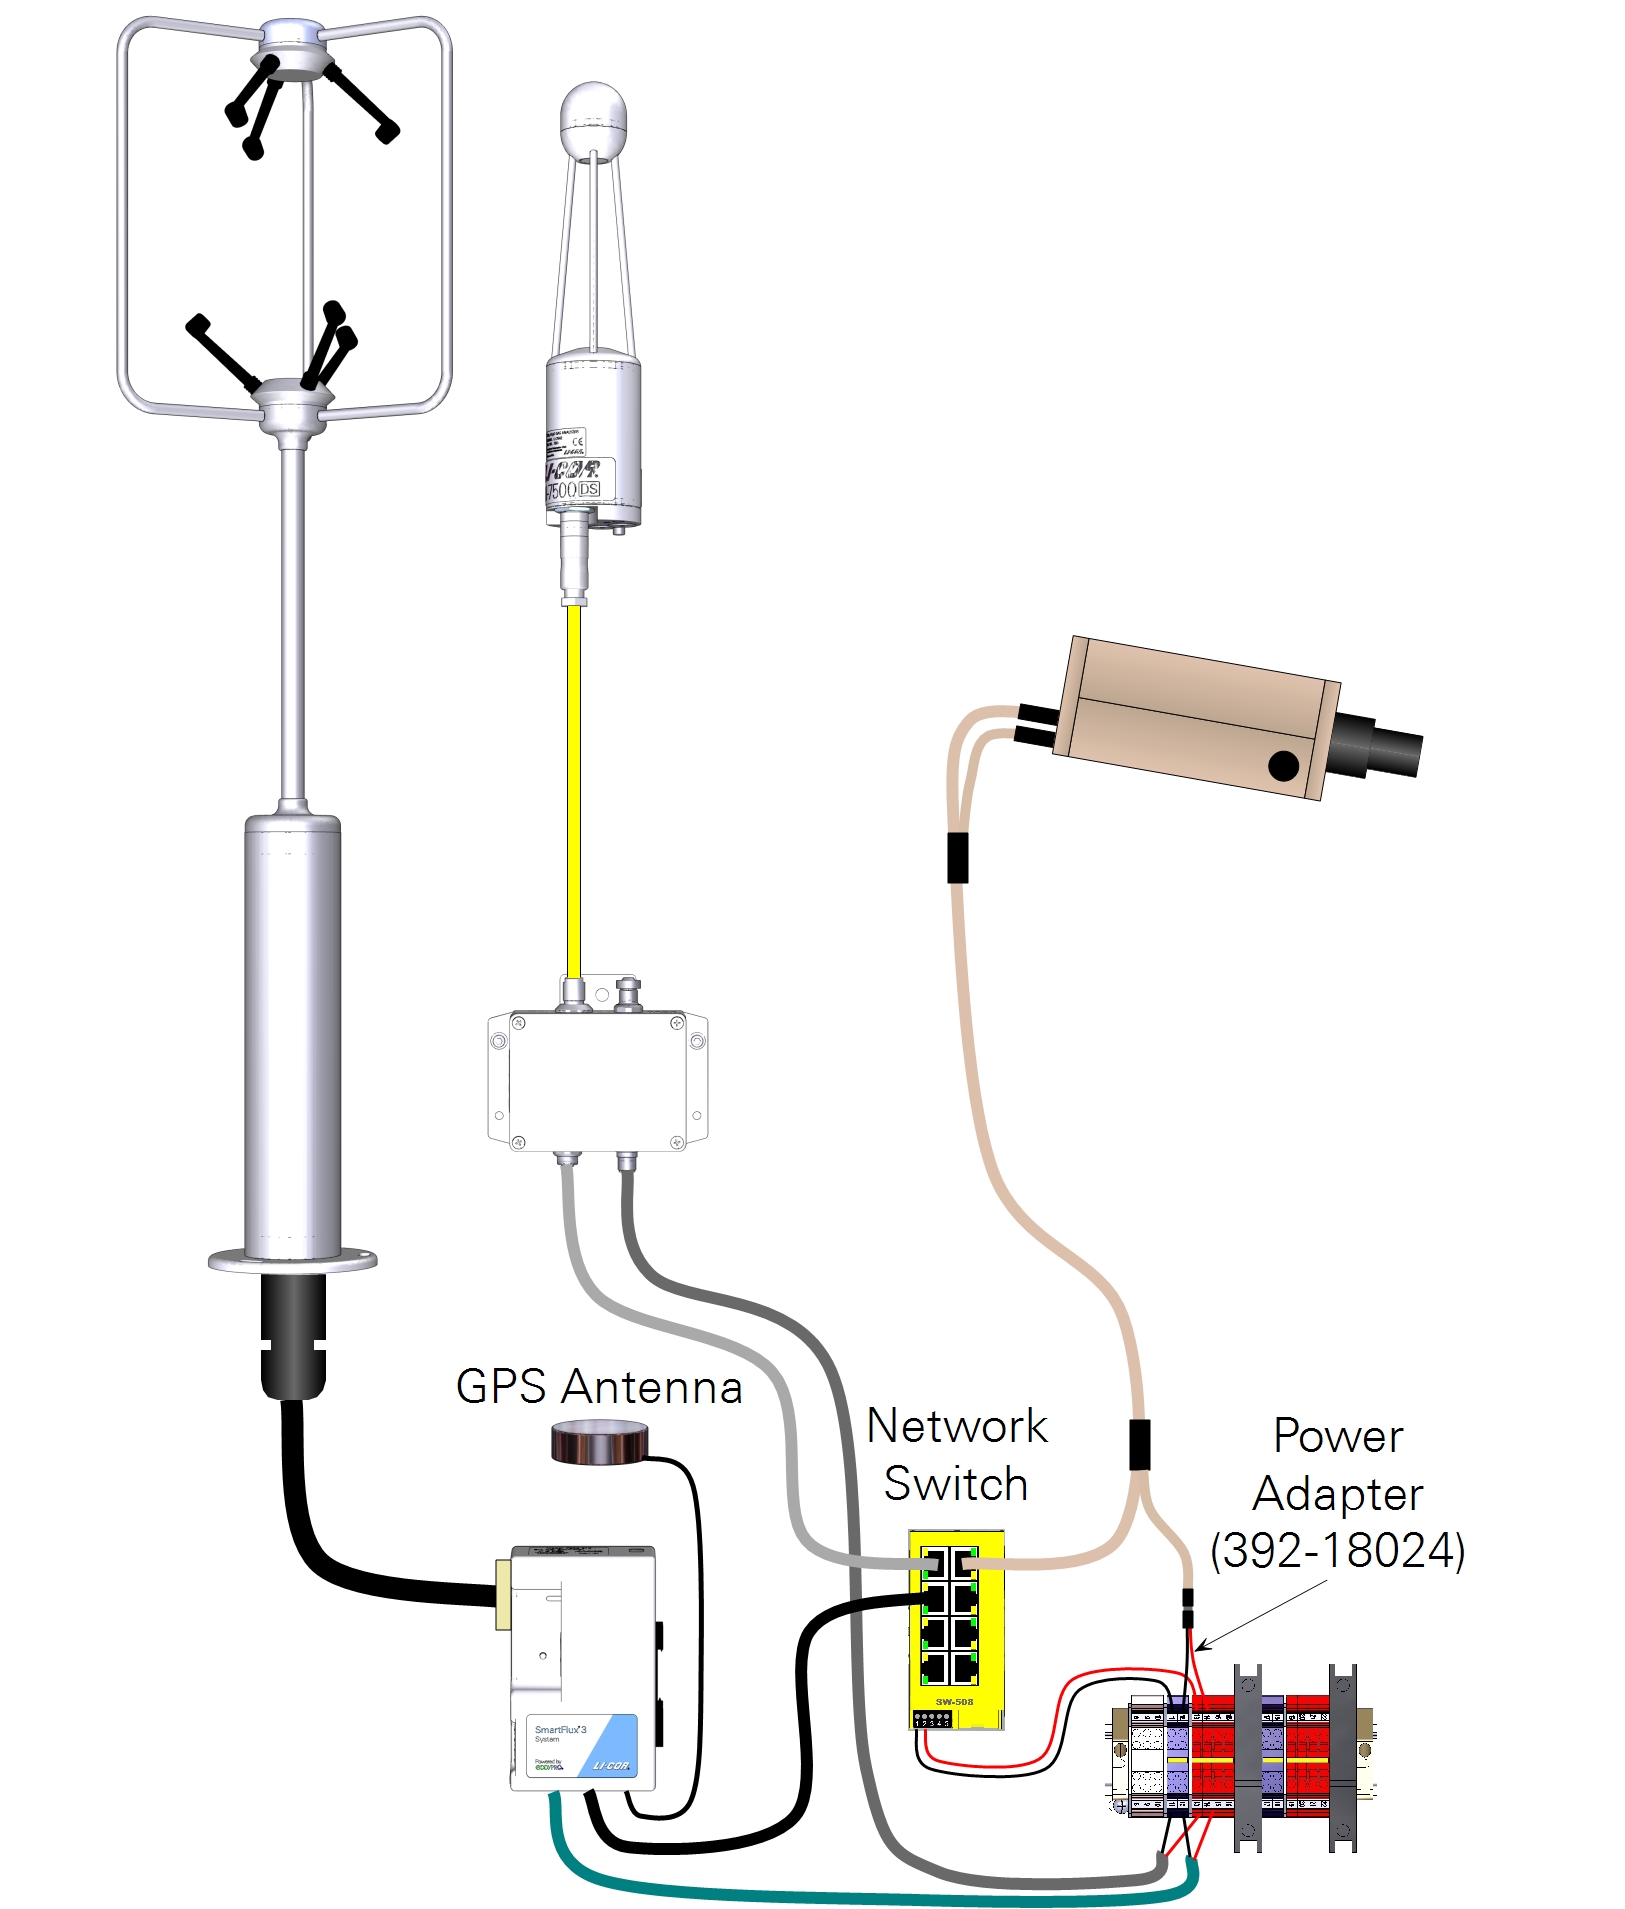
- Power on the system.
- Be sure that the camera is powered with 12 VDC.
- Click the SmartFlux button.
- Select the PhenoCam tab.
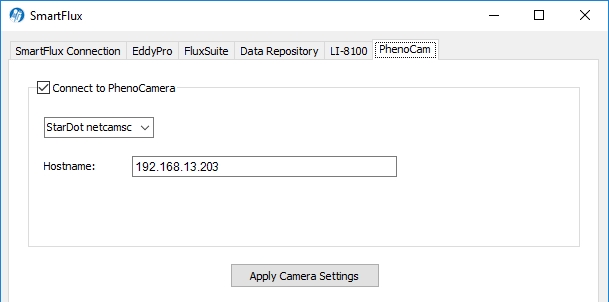
- Check Connect to PhenoCam.
- Select StarDot Camera from the menu.
- Enter the Hostname or IP Address of the camera in the HostName field.
- Click Apply Camera Settings.
In this configuration, the system will store one image to the USB drive each day until about 7% of the capacity is occupied by images, at which time the old images will be deleted to make space for the new ones. If you use the FluxSuite server, your images will be posted once daily.
Installing the PhenoCam at a site
The camera enclosure can be mounted to vertical post or horizontal mast with diameters from 2.5 to 6 cm (1 to 2.375 inches).
Mounting the camera
Below we offer some recommendations for the camera position. These guidelines are adapted from the PhenoCam network. See https://phenocam.nau.edu/webcam/ for details.
- Direct the camera to the north (in the northern hemisphere) to avoid lens flare and shadowing.
- Mount the camera at a height of 5 to 10 meters above the canopy.
- The camera angle should be less than horizontal to obtain the ideal balance of sky and canopy. The image should capture about 20% sky and 80% canopy. Be sure to include the horizon in the image.
- Mount the camera securely to prevent movement.
To install the camera:
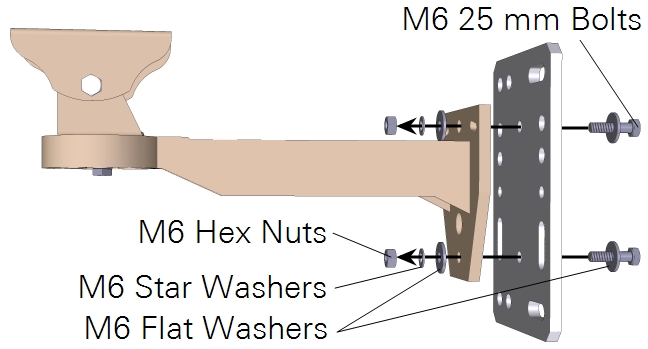
- Connect the StarDot PhenoCam Bracket to the mounting plate.
- The orientation of the plate will depend on whether you are connecting it to a vertical mast or horizontal cross arm.
- For mounting to a horizontal cross-arm:
- For mounting to a vertical mast:
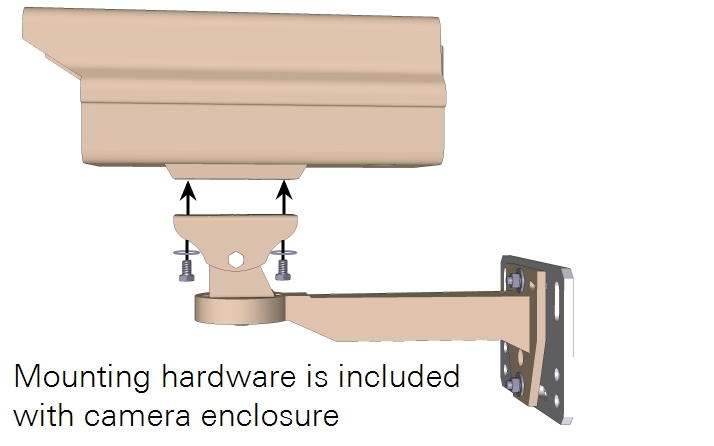
- Attach the camera enclosure to the mounting arm.
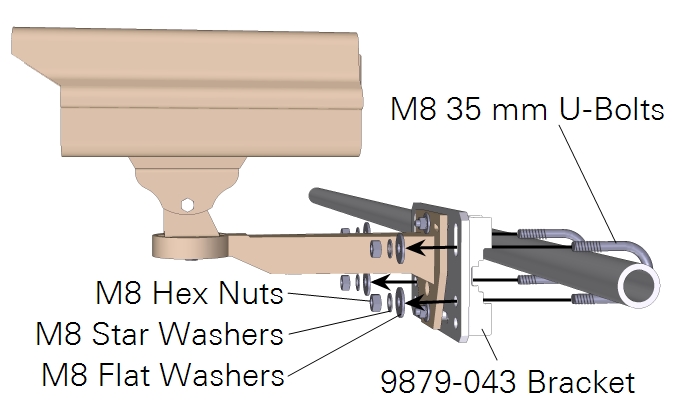
- Attach the assembly to the mast or cross-arm.
- For a 1 inch mast or crossbar, use the small U-bolts. For a larger mast or crossbar, use the large U-bolts.
- For mounting to a horizontal cross-arm:
- For mounting to a vertical mast:

- Set the camera in the enclosure close to the window.
- Remove the gland plug from the camera enclosure and route the power/data cable through the opening.
- Connect the power/data cable to the camera, and to the power supply and network switch.
- Close the enclosure.
- Cover cable opening in the camera enclosure with putty to prevent insects from colonizing the enclosure.
Note: Not all of the mounting hardware will be used.
Adjusting the focus
After installing the camera, you should adjust the focus so that you collect high-quality images. The camera focus is adjusted by manually turning a ring on the lens, so you'll need to do this at the site. We recommend, however, that you familiarize yourself with the focus procedure in the lab before going to the field. We also recommend using a computer with a large, high resolution display, rather than a smart phone with its small display when adjusting the focus. This will help you see whether the images is in focus or not. To adjust the focus:
- Install the camera and adjust its position to get the desired view.
- Connect to the camera using a computer.
- Enter the IP address into the address bar.
- Scroll down and click Config in the lower left of the page. Log in when prompted.
- Under the Image tab, Processing subtab, set the Resolution to 688x480 NTSC Focus Mode (30 fps), then click Apply.
- Click Pop-up Live Image to view a large, high-resolution image.
- While viewing the image, have an assistant adjust the focusing ring until the image is in clear focus.
- The focus is very sensitive — small adjustments are all that is needed
- When you are satisfied with the focus, tighten the set screw to lock the focusing ring.
- Restore the desired image settings.
- Set the Resolution to 1296x960 QFULL* or your desired setting.
Now the camera configuration should be suitable for recording images of your site. There are additional settings that you can configure, such as the exposure and the color balance. These are described in literature provided by the PhenoCam network.