Maintenance
The LI-1500 is designed for low maintenance and generally requires little servicing beyond keeping it clean and replacing the batteries.
- Cleaning: The instrument display and keypad can be cleaned with a moistened non-abrasive cloth when necessary.
- Storage: When storing the LI-1500 for a long period of time, remove the "AA" batteries.
Updating the firmware
Check your firmware (embedded software) version number and release date by navigating to MENU > Firmware > Info. The latest firmware is available for download at licor.com/support/LI-1500/software.html. Download the software and save the firmware file (something like v1_2_0.img) to a directory on your computer. Next follow these steps:
- Connect the LI-1500 to your computer with the USB cable.
- It will appear as a mass storage drive named LI-1500.
- Copy the new firmware file to the LI-1500 root directory.
- Next, "eject" the LI-1500 mass storage drive as you would for any USB mass storage device.
- Disconnect the LI-1500 from your computer.
- On the LI-1500, navigate to MENU > Firmware > Upgrade.
- Select the new firmware file and press OK. The new firmware file will take several minutes to install. Press OK when the firmware update is complete.
Optional: Delete the older .img file versions to avoid the risk of downgrading to an older firmware version by mistake.
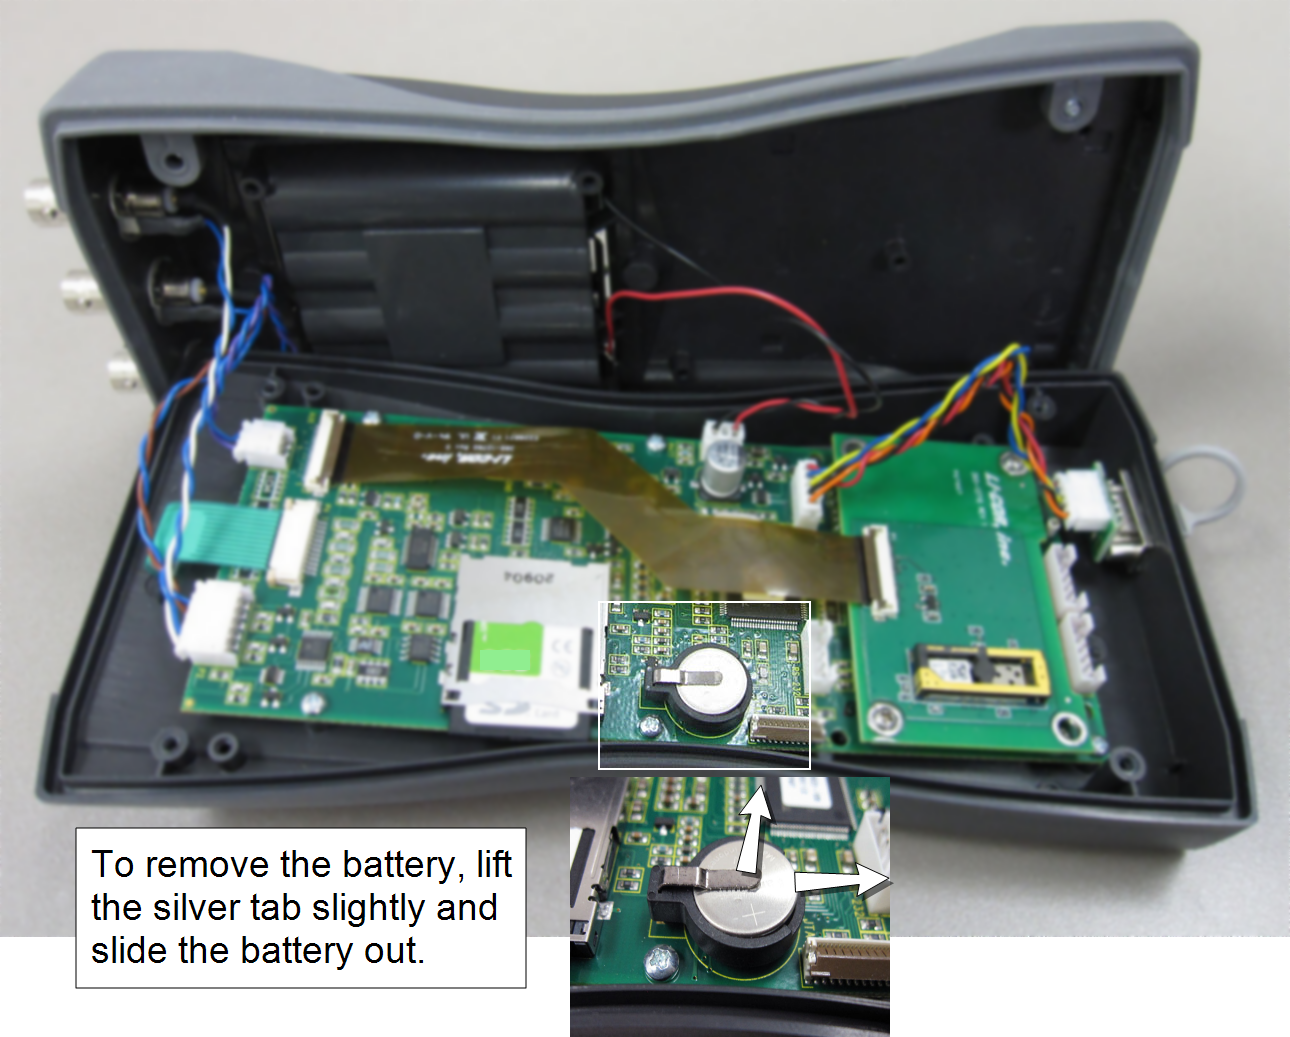
Replacing the internal lithium battery
The following steps describe how to replace the internal lithium battery. The battery should last up to seven years. Use a BR1225 watch battery (part number 442-08614).
- Using a #1 Phillips screwdriver, loosen the four screws that secure the top and bottom of the control unit.
- The four screws are located in the corners of the back of the control unit, under the gray protective rubber. Nudge the rubber out of the way of the screws.
- Gently separate the two halves.
- The battery is in a round coin-cell battery holder (Figure 6‑1).
- Lift the silver tab slightly and slide the battery out.
- It may be necessary to lift the battery slightly.
- Slide the new battery into the holder with the positive (+) terminal facing up.
- Join the top and bottom halves of the control unit.
- Be sure the rubber seal is seated properly.
- Gently tighten the four screws that hold the two halves of the case together.
- Be very careful not to over tighten the screws, as they may strip the plastic. If a torque screwdriver is available, torque the screws to 4 in.-lbs. (0.5 newton meters).