Perforated Calibration Plate
Printable PDF: Perforated Calibration Plate
Instructions for Using the Perforated Calibration Plate.
When do you need to calibrate?
- After installing a new lamp (let it run for several hours first).
- After replacing extremely worn or cloudy belts.
- When a large change in ambient operating temperature occurs.
- As a result of obvious misadjustment.
CAUTION: Improper adjustment can seriously decrease the accuracy of finely detailed samples such as roots, compound leaves, or complex margins (see discussion below).
Due to the optical characteristics of the lamp and lens, early calibration discs read higher in the center of the measurement zone than nearer the sample guides, when the LI-3100 was configured for low resolution (1 mm2). However, samples that have a very high ratio of edge to area (i.e., conifer needles, small irregular leaves, roots, etc.) exhibited the opposite effect. In addition, incorrect calibration resulted in larger errors with these samples.
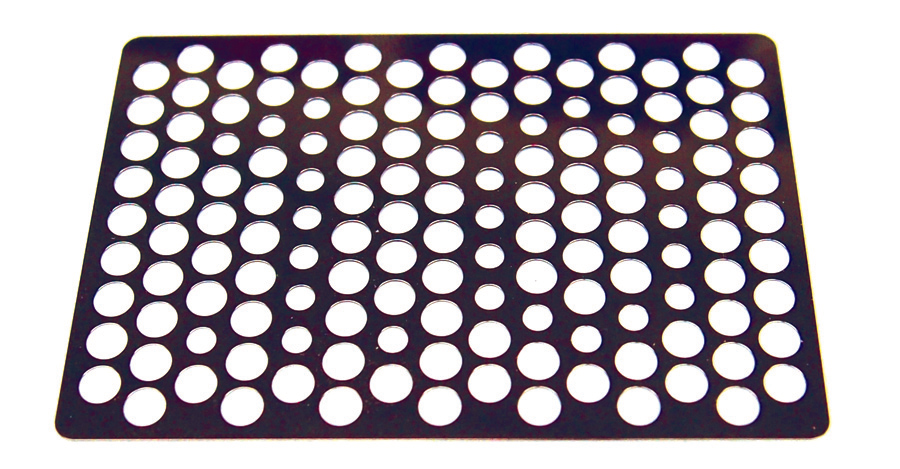
To address this issue, LI-COR designed a new style 10 cm2 calibration plate with a higher edge-to-area ratio. You will find that the calibration adjustment is very sensitive to small changes with this new calibration standard. This “edge-intensive” perforated plate is run through the area meter in a number of positions along the measurement width, after which the round calibration discs are run through in a similar fashion; the round discs should still produce results within the basic accuracy specifications.
Thus, you can view the response of the instrument to the different extremes of sample geometry, and is assured of a better calibration. In addition, for exacting measurements, you can see which area of the measurement zone yields the highest precision and accuracy.
Calibration Procedure
- Start the lamp and allow it to warm up for 5 minutes or more. Make sure that the camera position and lens settings match the marks indicated for 0.1 mm2 resolution (see instruction manual, Section 4.2). If transparent belt flaws, or debris on the belt is causing spurious counts on the display, you may need to clean or replace the belt, as necessary.
- Run the 10 cm2 perforated plate through the area meter at least 10 times, and average the readings. Repeat over all of the areas of the sample width area. For example, use 5 zones from front to back, and repeat to total 10 readings. If the error exceeds 2%, carefully turn the CAL screw a small amount, clockwise to increase, or counterclockwise to decrease. Avoid changing the adjustment too much. It is better to perform several trials, as normal sampling statistics will cause each trial to vary slightly.
- As a confirmation, perform the same 10 measurements with a round calibration disc. The errors should remain within the specified limits. It is not necessary to turn the CAL screw until the errors are zero; turning the screw more than a few degrees can actually increase errors in measurement accuracy.