
Configuring with the command-line interface
The command-line interface is a simple way to access all of the functions available in the anemometer, starting with important information about how you save changes to the anemometer configuration.
Applying configuration changes
Each time the LI-550 is powered up, it gets a copy of configuration parameters from non-volatile memory (Flash) and places it in temporary volatile memory (RAM) for operational access.
When you make changes to parameters using the serial menu or command-line, the changed parameters are updated in the temporary volatile memory, but they are not updated in the non-volatile memory. This means these changes are lost when the unit restarts, because the LI-550 replaces the parameters in the volatile memory with a fresh copy of the parameters saved in the non-volatile memory.
If you do not want the changes to be lost, copy the parameter changes saved in volatile memory to the non-volatile memory using the nvwrite command. The changes will then be remembered during a restart.
Restoring default settings
If, after making changes to non-volatile memory, you want to restore the permanently saved parameters to their original default values, this can be done by using the command factoryrestore YES in the expert menu mode.
Basic and expert mode commands
After connecting with either a terminal program or the TriSonica application (select the Terminal tab), press Ctrl + C to enter command-line interface (CLI) mode. The LI-550 will stop sampling and provide a prompt: >. If no input is given within one minute, the LI-550 returns to sampling mode and changes are not saved in non-volatile memory. Details of all available commands and their parameters are accessed within the command-line interface by typing help at the prompt. The LI-550 command-line interface is self-documented. You can download the current firmware release notes at licor.com/support/LI-550/software.html.
When expert mode is enabled (from the command-line, type expert enable to enable or expert disable to disable), additional commands are present in the help menu. These commands enable more advanced settings and configurations that may be outside of the normal operating settings. We recommended that you understand the effects of these commands before use. Changes made in expert mode are stored as described in Applying configuration changes
help
Displays a list of command-line interface commands. The command help followed by the name of another command displays detailed help for that command (e.g., help baudrate)
| Command | Description |
|---|---|
| help | Displays commands available in the command-line interface. |
| command | e.g., help baudrate, help declination, and so on. |
exit
Type exit to leave the command-line interface and return to sampling mode.
| Command | Description |
|---|---|
| exit | Leaves the command-line interface and returns to sampling mode. |
averagesize (expert mode only)
Set or show the size of the average of samples.
This command specifies the number of internal samples to average before generating an output. When combined with the samplerate command, it affects the output data rate. For simplicity, it is better to use the outputrate command in the basic menu.
- Example: averagesize 8
- Reply: None. Sets average number to 8.
baudrate
Shows or sets the current baud rate. Type the word baudrate followed by the desired rate (must be a valid baud rate of 9600, 19200, 38400, 57600, 115200, 230400) and press return. Add the word now to change the baud rate immediately. Otherwise, the baud rate is placed in memory to be written to non-volatile memory using the nvwrite command and used on the next reset.
Note: In order for the LI-550 or LI-560 to communicate with the terminal program, the baud rate (and parity) for both needs to match. Changing the baud rate (or the parity) in the anemometer memory (whether volatile or non-volatile) does not change the baud rate (or parity) in the terminal program. If you choose to change the baud rate (or parity) in the LI-550 or LI-560, be sure to make a matching change in the Terminal Program's settings.
bootloader update
To check or update the bootloader.
calibrate
To calibrate the precise length of the acoustic path between pairs of transducers. This length is a defining component in the detection and calculation of wind speed and direction. Actual air temperature, relative humidity, and absolute pressure variables are included in the calculation of the acoustic path length. The subcommands allow you to input specific values for each variable. Absolute pressure is an insignificant variable in this calculation, but you can make this entry if required under a specific test protocol.
You can calibrate the LI-550 to local conditions or test conditions using the calibrate command by following steps in User calibration.
| Command | Description |
|---|---|
| calibrate | When sent with a parameter, initiates the calibration. |
| temp | Temperature in Celsius inside the calibration chamber. |
| rh | Relative humidity percent inside the calibration chamber. |
| p | Absolute pressure in hPa (millibars). |
If relative humidity and pressure are omitted, the internal humidity and pressure sensors are used if their values are available. Otherwise, an relative humidity value of 50% is used for humidity and 1013.25 hPa is used as the absolute pressure value.
compasscalibrate
Type compasscalibrate yes to initiate the compass calibration. This command runs for 10 second. During that time rotate and tilt the anemometer in as many different orientations as possible, being sure to have rotated the unit fully in the X, Y, and Z directions. See Compass calibration for more details.
dataformat
Sets or displays the output format value for communicating with various systems.
decimals
Set the number of decimals places of a display parameter or a group of parameters. Enter decimals to view a list of the current settings and parameters that can be changed. Enter decimals followed by the parameter and the number of digits after the decimal. You can use the name of a single parameter or a group as listed by the decimals or display command. The parameter is case sensitive. For example, to set wind speed to three decimals, send decimals S 3.
declination
Type declination to view the current declination offset in degrees clockwise from magnetic north. To set the declination to 6°, for example, enter declination 6 and press return.
diagnostic
Type diagnostic to for a report on problems found with the anemometer. Type diagnostic details for a more detailed diagnostic output. A transient problem that triggers a diagnostic (momentary blockage of a transducer) will be resolved automatically after a moment if the issue goes away (the blockage is removed). The diagnostic clear command clears the the internal record of error counts, which can help diagnose if the problem is recurring or only happening at startup.
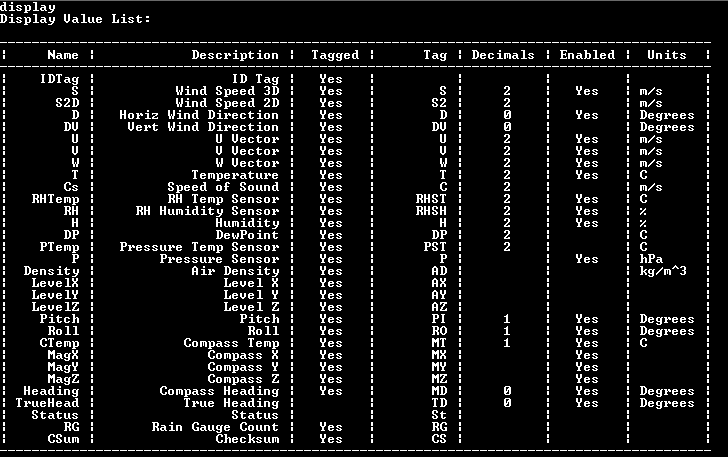
display
The display command shows a table indicating the name and description of each parameter available, whether it is tagged or not, what the tag value is, number of decimals displayed, whether the signal is enabled to be added to the serial output string, and the units for each measurement. See Table 4‑1 for a full list of parameters, tags, and units.
distance (expert mode only)
Set or show the distance between transducers. This is one of the settings that is changed during a calibration. We do not recommend altering this setting. If you enter a value as a single number, it will be applied to all four distances. If you enter four values, they will be applied respectively to the four distance values. The designed mechanical distance between transducers of a LI-550 is 0.03486 meters. See User calibration for more information.
- Example: distance
- Reply: Distances for four paths.
The offset is also set during factory calibration. All four should be close to zero. Similar to distance, if you enter one number, it is applied to all four paths. If you enter four numbers, they will be applied separately to each path.
ewma
Set or show the exponentially weighted moving average values.
expert
Type expert enable to access advanced menus, as described in Basic and expert mode commands. Type expert disable to return to normal mode.
factoryrestore (expert mode only)
Returns the instrument to the factory default settings. Enter factoryrestore YES and press return to apply the changes immediately.
hide
Similar to the show, tag, untag, and decimals commands, the hide command is to view a list of display parameters or groups available to be hidden. It also provides a list of all values currently being displayed. When used with a parameter, the hide command removes that parameter from the list of displayed variables.
The parameter can be the name of a single parameter or a group as listed by the show or display command. The parameter is case sensitive.
- Example: hide IDTag
- Reply: None; removes the IDTag from the data stream.
humiditycalibrate (expert mode only)
Gets or sets the slope and offset humidity calibration factors. This command allows you to add your own slope and offset values to the humidity sensor output. Note that the humidity is transferred through the Gore-Tex® vent on the bottom of the LI-550 and can take several minutes to equalize with there is a rapid change in humidity. Using the command without parameters returns the current slope and offset values. Providing the slope and offset parameter values sets these values for the humidity sensor.
- Example: humiditycalibrate
- Reply: Humidity Calibration: Slope = 1.000000, Offset = 0.000000
- Example: humiditycalibrate slope 1.0
- Reply: None; sets humidity calibration slope to 1.0.
kalmanfilter (expert mode only)
Enable or disable kalman filtering.
levelcalibrate
To calibrate the level while on a known level surface. Place the anemometer upright on a level horizontal surface. Enter levelcalibrate YES to execute the command. Do not disturb the unit during calibration. If the device detects that it is too far from level, it will automatically cancel the calibration. See Level calibration for more details.
lowpower (expert mode only)
Sets or shows the low power parameters.
| Command | Descritpion |
|---|---|
| lowpower | Returns the current lowpower status and internal trigger setting. |
| enable | Enables low power mode |
| disable | Returns to normal mode |
| wakerate mSec | Sets the internal wake up rate using an internal RC timer, which is not highly accurate (firmware v2.5 and newer: 1 ≤ Sec < 131,071; firmware v2.4 and older: 200 ≤ mSec < 32768). |
| extwake enable | Use the trigger to signal a wake from low power mode |
| extwake disable | Disable the trigger signal as a wake up signal |
- Example: lowpower
- Reply: Low power status and internal trigger setting.
nvwrite
Writes parameter data to non-volatile memory. Writes to flash memory to preserve the configuration during power down. See Applying configuration changes for more details.
offset (expert mode only)
Set or show the offset values for all paths. These are calibration factors set during the calibration cycle. If you enter the value as a single number, it will be applied to all four distances. If you enter four values, they will be applied respectively to the four distance values. The offset value compensates for variations in manufacturing.
orientuv (expert mode only)
Set or view the UV wind vector output coordinate system. Options are std, ati, otsm.
Note: There are different possible definitions for the meanings of the U and V axes. The std setting defines positive U as being from the west, and positive V as being from the south. This is the default output coordinate system. The ati setting defines the positive U as being from the north, and positive V as being from the west. The otsm setting matches the original TriSonica Mini output definition of positive U as being from the north, and positive V as being from the east.
outputrate
Type outputrate to view the current setting. Enter outputrate followed by the desired rate to set the parameter. For example, outputrate 5 will set the rate to 5 Hz.
paramdelim (expert mode only)
Gets or sets the parameter delimiter for all display parameters. The measurement delimiter is a single character displayed immediately after the parameter value is displayed. This value is controlled by the paramdelim command. The default delimiter is a space character.
parity
Show or set the current parity setting. Parity can be applied immediately or written to flash for the next reset. Options include odd, even, and none. Append the command with now to apply the change immediately. Otherwise, the setting is placed in memory to be written to non-volatile memory using the nvwrite command and used on the next reset.
Note: In order for the LI-550 or LI-560 to communicate with the terminal program, the baud rate (and parity) for both needs to match. Changing the baud rate (or the parity) in the anemometer memory (whether volatile or non-volatile) does not change the baud rate (or parity) in the terminal program. If you choose to change the baud rate (or parity) in the LI-550 or LI-560, be sure to make a matching change in the Terminal Program's settings.
pressurecalibrate (expert mode only)
Gets or sets the slope and offset pressure calibration factors. This command allows the Users to add their own slope and offset values to the pressure senor output. Note that the pressure is transferred through the Gore-Tex® vent on the bottom of the TSM and can take several seconds to equalize when there is a rapid change in pressure. Using the command without parameters returns the current slope and offset values. Providing the slope and offset parameter values sets these values for the pressure sensor.
- Example: pressurecalibrate
- Reply: Pressure Calibration: Slope = 1.000000, Offset = 0.000000
- Example: pressurecalibrate slope 1.0
- Reply: None; sets pressure calibration slope to 1.0.
programupdate
Puts the TriSonica into update mode. In update mode, you can update the program, using a serial terminal emulation program such as Tera Term, using the YModem protocol. See Firmware updates.
protocol (expert mode only)
Show or set the current serial protocol setting. The command only works for the LI-550P, where the EIA422 signals are brought out to the connector. This is the software command to select between EIA232 and EIA422 modes. The now parameter makes the change immediately, otherwise the change happens after a system reset. LI-550P and TSM-PM only.
raingauge (expert mode only)
Sets or displays whether the rain gauge function is enabled.
samplerate (expert mode only)
Set or get the internal sample frequency. This command changes the internal sampling rate. When combined with the averagesize command, affects the output data rate. For simplicity, it is better to use the outputrate command in the basic menu.
shadowcorrect (expert mode only)
Enable or disable the shadow correction calculations of the LI-550P and LI-550F. 1 = enable, 0 = disable. We recommend that you keep the correction enabled. It is enabled by default.
show
Similar to the hide, tag, untag, and decimals commands, the show command is to view a list of display parameters or groups available to be shown. When used with a parameter, the show command adds that parameter to the list of displayed variables. The parameter can be the name of a single parameter or a group as listed by the show or display command. The parameter is case sensitive.
- Example: show IDTag
- Reply: None; adds the IDTag to the data stream.
systemreset
Enter systemreset followed by return to immediately reset the device.
tag
Similar to the hide, show, untag, and decimals commands, the tag command is to view and set the ID tags applied to a parameter or group of parameters. When used with a parameter, the tag command adds that parameter to the list of displayed variables. The parameter can be the name of a single parameter or a group as listed by the show or display command. The parameter is case sensitive.
tagdelim (expert mode only)
Gets or sets the tag delimiter for all display parameters. The tag delimiter is a single character displayed immediately after the parameter tag and is controlled by the tagdelim command. The default delimiter is a space character.
tagid (expert mode only)
Sets the ID of the Tag of a display parameter. The identifier can be a maximum of 8 characters. See Change the tagID (the Tag column) for details.
Assuming you have connected to the device and data are streaming in the terminal program:
-
Press ESC to view the menu.
-
Press W to enter the command line interface, and type YES when prompted.
-
Type expert enable to enter expert mode.
-
To change the tagid:
- Example: tagid Cs SoS will set the
TagIDfor speed of sound to SoS. - Reply: None.
- Example: tagid Cs SoS will set the
-
Type display to view the new TagID.
View the list of tags and verify that the changes are applied.
To change it back:
- Example: tagid Cs C will set the
TagIDfor speed of sound to C. - Reply: None.
triggertype (expert mode only)
Get or set the trigger parameters (LI-550P only). Triggering can be internal or external and can be adjusted to trigger on the rising or falling edge of the external signal. Use the triggertype command and the parameters posedge and negedge to make this selection. The three trigger modes are available.
| Trigger | Description |
|---|---|
| Internal Trigger | The LI-550P uses its own internal timer for sample triggering and runs asynchronous to other instruments. The LI-550F has only internal triggering. |
| External Trigger | When an external trigger is received, the LI-550P takes the number of samples specified in the averagesize command at the configured samplerate. When this sampling is complete, the output is generated and transferred over the serial port. The LI-550P then waits until the next trigger before sampling again. If the trigger is too fast to complete all the samples, the LI-550P will shorten the number of samples taken to maintain the external trigger rate. |
| Sync | The sync trigger mode adjusts the internal trigger sampling to align with the sync trigger, otherwise the LI-550P operates on its internal trigger. For instance, this is useful for aligning samples to a GPS pulse-per-second clock so multiple instruments can trigger simultaneously without being connected to the same trigger. Sync pulses can have a very long time between pulses. |
trisonicaid
Enter trisonicaid to view the current ID setting. Enter trisonicaid 001 to set the ID to 001, for example. Enter trisonicaid clear to remove the ID. The trisonicaid may be up to 40 characters in length to accommodate a UUID.
units
The command sets or displays the units value for all adjustable parameters. Enter units to view the units available for measurements. See Table 4‑1 for a full list of parameters and the units.
To change units for a parameter, enter units followed by the name (see Table 4‑1), followed by the new units.
- Example: units P kPa will set pressure units to kPa.
- Reply: None.
Units can be set for a single parameter or a family of units.
- Example: units si will apply international (si) units to all parameters.
- Reply: None.
| Command | Description |
|---|---|
| units | Displays and configures the units |
| si | Set all parameters to default metric units (m/s, C, hPa, kg/m^3) |
| sae | Set all parameters to the sae units (mph, F, psi, lb/ft^3) |
| velocity | Units for velocity (mps, kph, mph, fps, or kts) |
| temperature | Units for temperature (C and F) |
| pressure | Units for pressure (kPa, hPa, Pa, Bar, mBar, psi, atm) |
| density | Options for density are si and sae |
untag
Similar to the hide, show, tag, and decimals commands, the untag command is to view a list of display parameters or groups that can be untagged. Enter untag to view a list of all available parameters that can have the tag removed from the display output. Enter untag followed by a parameter to remove the tag from a display parameter or a group of parameters.
The parameter can be the name of a single parameter or a group as listed by the show or display command. The parameter is case sensitive.
version
Type version to see the firmware version, serial number, and other details.
wd540
Type wd540 to view the current settings. Type wd540 enable to apply the 540° mode; Type wd540 disable to return to normal 0 - 360° mode.
The LI-550 default horizontal wind direction parameter reports wind direction as 0 to 360 degrees. If you want to display horizontal wind direction data on a time-series graph, horizontal wind that is approaching the anemometer from near north (0/360) appear as large directional changes rather than gradual changes.
To avoid this display issue, apply the wind direction scale command (wd540) parameter. This prevents the graph from showing large directional shifts when crossing 359° to 0°. When the wd540 parameter is applied, the firmware recognizes two representations of 360 degrees: a 0-to-360-mode, and a 180-to-540-mode. The anemometer begins in the 0-to-360-mode. When the wind direction crosses 360 or 0 degrees, the firmware shifts to 180-to-540 mode. The anemometer stays in the 180-to-540 mode until the wind direction again crosses either 180 or 540, which causes the anemometer to return to 0-to-360-mode.
Configuring items in the display list
The previous section describes some parameters available in the display list. This section describes with examples how you change some of these settings along with the expected reply.
Tag a parameter (the Tagged column)
Using check sum (CSum) as an example:
-
While data stream into the terminal window, press ESC to view the menu.
-
Press W to enter the command line interface, and type YES when prompted.
-
Type expert enable to enter expert mode.
-
To change the CSum tag parameter:
- Example: Enter tag CSum to change
Taggedfrom blank toYES. - Reply: None.
- Example: Enter tag CSum to change
-
Type display to view the new Tag setting.
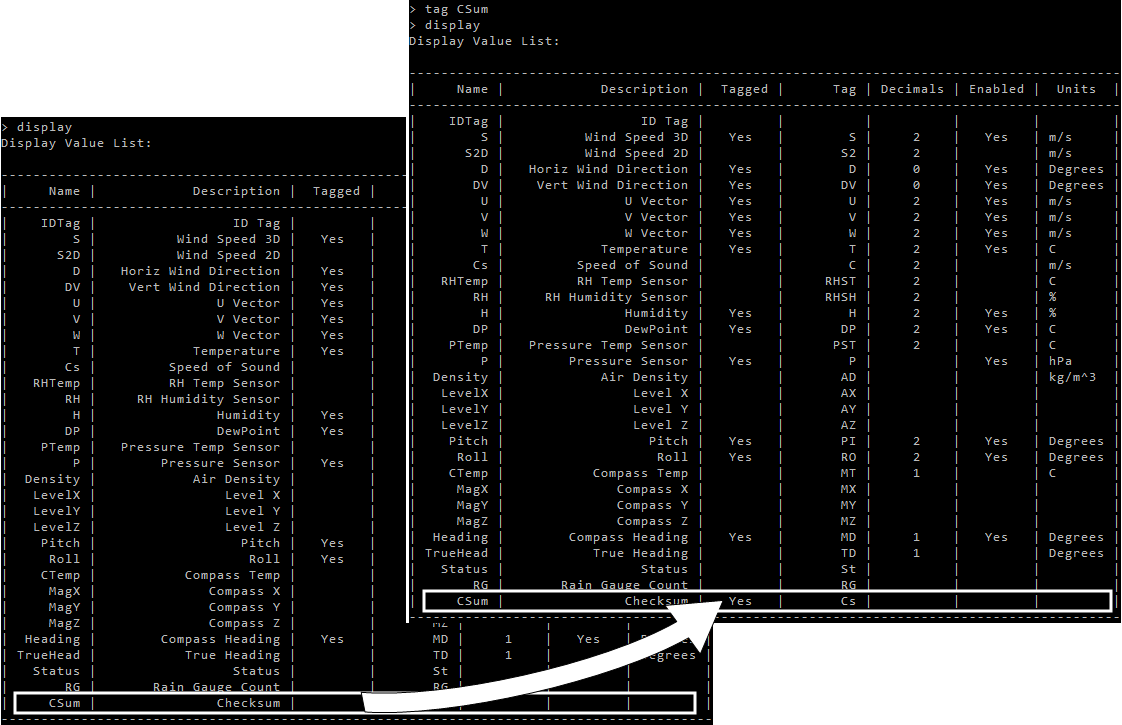
View the list of tags and verify that the changes are applied.
Change the tagID (the Tag column)
Using check sum as an example, this will change the tag that identifies CSsum:
-
To change the CSum tag ID from Cs to Check:
- Example: Enter tagid Cs Check to change
TagfromCstoCHECK. - Reply: None.
- Example: Enter tagid Cs Check to change
-
Type display to view the new Tag setting.
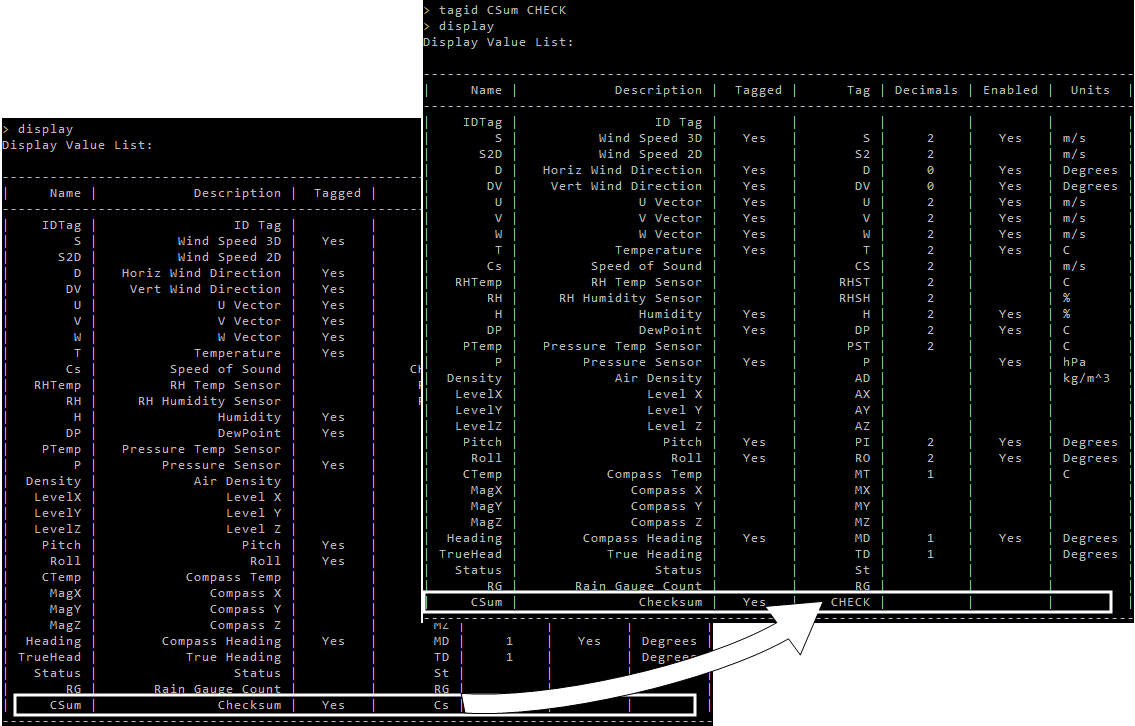
View the list of tags and verify that the changes are applied.
Change the Enabled status
Using check sum as an example, this will set the output status of CSum:
-
To set the CSum Enabled status to Yes:
- Example: Enter show CSum to change
Enabledfrom blank toYES. - Reply: None.
- Example: Enter show CSum to change
-
Type display to view the new Tag setting.
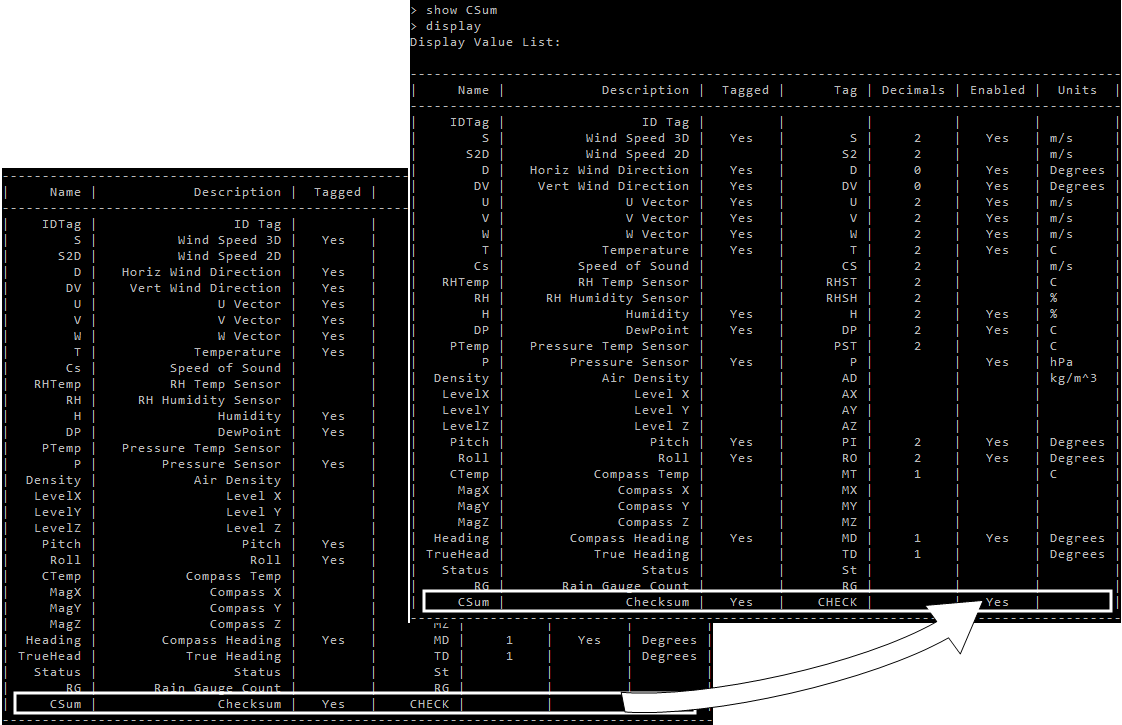
View the list of tags and verify that the changes are applied.
Application programming interface
The LI-550 provides an Application Programming Interface (API), which is a method to simplify computer command automation. It is a variation on the command-line interface and uses the same commands as the command-line interface. The API commands are sent to the LI-550 during sampling mode. The command is enclosed in curly braces { and } without a carriage return or line feed character. One command per set of curly braces is allowed. The open curly brace { instructs the LI-550 that a API command is starting, and the close curly brace } indicates the end of the command. When the close curly brace } is received, the command is executed and the results returned within the curly braces.
Note: This is not compatible with the JSON protocol.