Configuring with the menu interface
This section describes how to communicate with the LI-560, how to define which variables appear, how variables are labeled, and how often data packets arrive. The serial connection (See Support: LI-560 TriSonica® Sphere Ultrasonic Anemometer) allows you to interact with the anemometer in several ways. The choice of method is largely up to you, though some advanced settings are only available through expert mode of the command-line interface. The options are:
Main menu
After connecting (see Connecting to the anemometer) and entering a terminal display, press ESC to bring up the Main Menu.
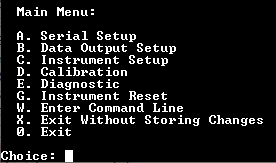
Note: Not all settings are accessible from this menu (see Configuring with the command-line interface).
If the menu has been inactive for one minute, the sensor returns to sampling mode and changes are not stored in the non-volatile memory. Press a key to stay in menu mode.
Serial setup
From the main menu, press A to enter the serial setup menu where you can configure the baud rate, parity, and serial protocol.

| Menu Option | Description |
|---|---|
| Baud Rate | Press A to toggle between the available baud rates. |
| Parity | Press B to toggle the parity settings. |
| Protocol | Press C to toggle the serial protocol settings. |
Data output setup
From the main menu, press B for a list of output parameters, indicating whether they are enabled, how many decimals are displayed, the units for the parameters, and the data tag. See Table 4‑1 for a list of parameters available from the LI-560.
From this menu, press the letter key to access submenus that control the parameter. Most menus present options that can be toggled by pressing the corresponding letter key.
Instrument setup
From the main menu, press C to set the data output rate, orientation, and trigger parameters.
| Menu Option | Description |
|---|---|
| Data Output Rate (Hz) | Opens a menu to set the output rate. Options include 10 Hz, 5 Hz, 2 Hz, 1 Hz, 2 seconds, 5 seconds, and 10 seconds. |
| OrientUV | Toggles between standard, OTSM, and ATI. See orientuv. |
| Trigger | Toggles between internal, external, and synchronizing. |
Calibration
From the main menu, press D to start calibration of wind and level.
| Menu Option | Description |
|---|---|
| Wind Sensor | Calibrates wind measurements. See Support: LI-560 TriSonica® Sphere Ultrasonic Anemometer. |
| Level | Calibrates the level. See Level calibration. |
Diagnostic
From the main menu, press E to run built-in diagnostics and display the results. If everything is as expected, the device responds with No Problems Found. If issues are detected, the device will deliver a more specific message with guidance to solve the problem (e.g., Check for blockage on Transducer 1).
Instrument reset
From the main menu, press G to reset the instrument, clearing all volatile memory, restoring to all settings to previously saved settings.
Enter command line
From the main menu, press W to enter the command-line mode. Previous changes are not saved when you enter command-line mode. See Configuring with the command-line interface for details.
Exit without storing changes
From the main menu, press X to apply the changes temporarily and exit the menu. Changes made up to this point are not stored in the non-volatile memory and will be lost when the instrument is restarted.
Exit
From the main menu, press 0 (zero) to exit the menu and store changes in non-volatile memory. Changes made up to this point are retained even after a system reset or restart.