
Calibration Issues
This section describes the calibration issues for the various sensors in the LI-6400. While some sensors require no such attention, others require periodic user or factory service (Table 18‑1).
Managing Calibration Data
Before discussing details about the various user-calibrations that need to be performed, it is important to cover some basic concepts of managing calibrations on the LI-6400.
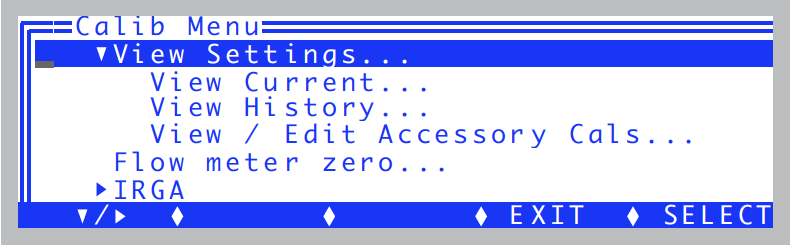
The Calib Menu has three entries for managing calibration data (Figure 18‑1): "View Current...", "View History...", and "View/Edit Accessory Cals..."
View Current
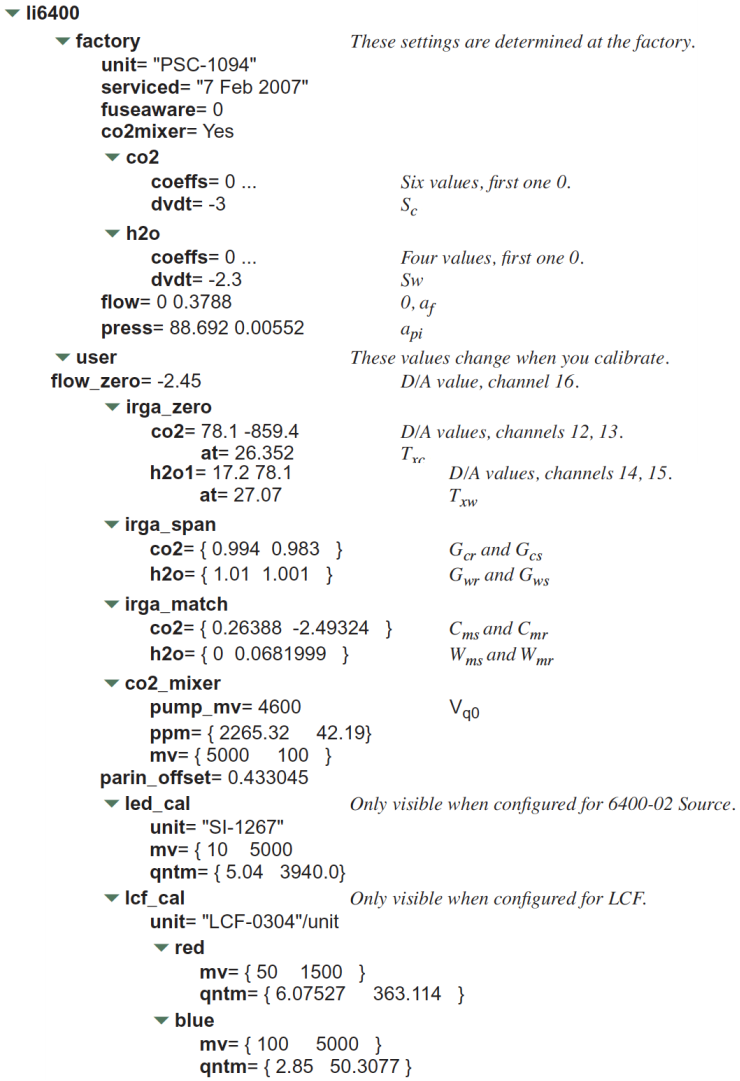
View Current shows the current state of the calibration tree (Figure 18‑2).

The <factory> node contains factory settings, and the <user> node shows values that are set by the user in response to performing the various calibration routines described in this chapter. The whole tree is shown below.
For Power Users
The View Current screen has some hidden capability that comes in handy if you know what you are doing. To edit any node, press ctrl + e. To reset the flow meter and IRGA zeros to zero, and the IRGA spans to 1.0, press ctrl + x. To show the normally hidden <accessories> node (and allow direct edits), press ctrl + a. If there are changed nodes, f3 (Save) and f4 (Revert) will be active.
The <factory> values are stored in the file /dev/.factory, the <user> values in /dev/.user, and the <accessory> values in /dev/.accessories. Also, the "at factory" line of the cali history (described below) is in the file /dev/.fuser. These files are normally set at the factory. If a unit was upgraded to version 6.1 in the field, these files are generated automatically the first time OPEN runs. There is a routine named LoadCalXML that runs when OPEN starts. If .factory, .user, or .accessories is missing from /dev (which will be the case for a field upgrade), it will generate them (and .fuser) from the old version calibration files, /dev/parm0 and /dev/parm1.
View History
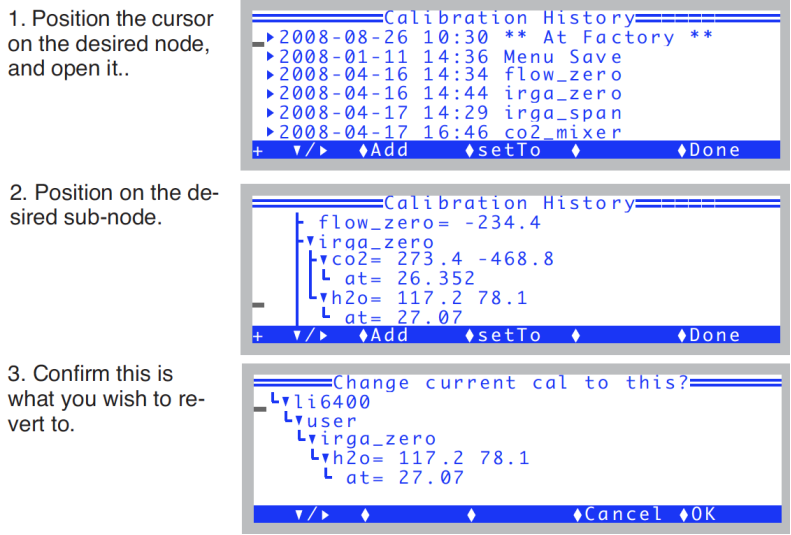
Each time you perform a user calibration (zeroing the flow meter, zeroing the IRGAs, etc.) an entry will be added to the calibration history file (/dev/.history). You can view this file using the View History program (Figure 18‑3).
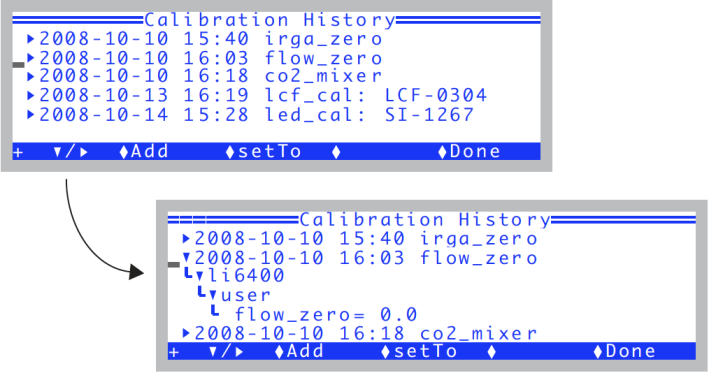
Each entry in the file is a node that expands to show what changed as a result of that calibration.
The top entry in the history file will be labeled **At Factory**, and it will reflect the state of the user calibration when the unit was last at the factory. The history file does not grow forever - when it gets above a certain size1, it will drop some of the earliest entries to make room. Since the **At Factory** entry is stored separately (/dev/.fuser), it will never be dropped, and will always appear first in the list, regardless of its date.
The function keys available in View History are shown in Table 18‑2, and described in more detail following the table.
Add
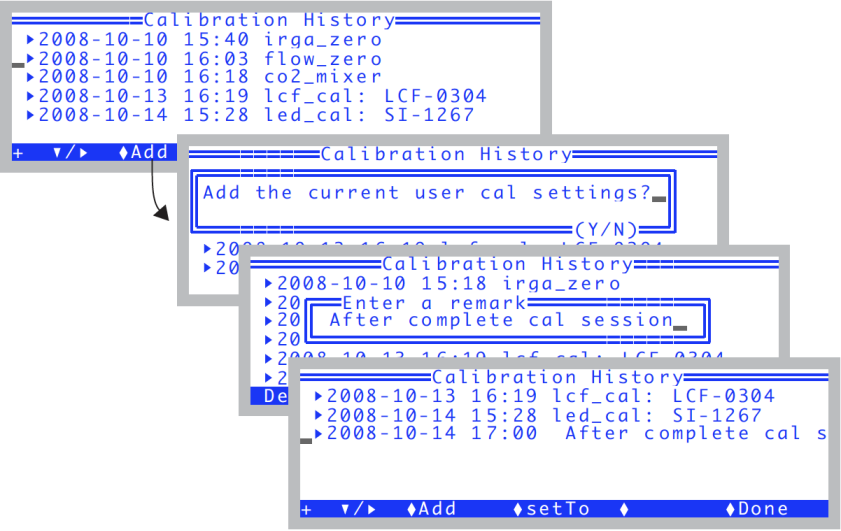
The Add key (f2 or just A) will add the entire <user> node to the history file in one "event". This is useful for capturing the current state of your machine (the entire <user> node) into a single history file record. You are prompted for a label.
setTo
The setTo key (f3 or just T) will let you revert back to whatever calibration settings the cursor is currently sitting on (and all subnodes from that). For example, if you want to revert the entire <user> node (and subnodes) back to the **At Factory** settings, put the cursor on the **At Factory** and press setTo. However, if you all you wanted was to revert the H2O zeros, for example, then open the **At Factory** node, and put the cursor on <li6400> <user> <irga_zero> <h2o> node, then press setTo, as shown in Figure 18‑5.
Edit
The Edit key (f1 level 2, or just E) will let you edit the label for the main table entry node that the cursor is currently sitting on (or in, if it is expanded). You cannot edit the label for the **At Factory** node at the top of the list, however.
Save
The Save key (f3 level 2, or just S) is visible if you have made changes to the history file contents. The file is not actually updated until you save it, however.
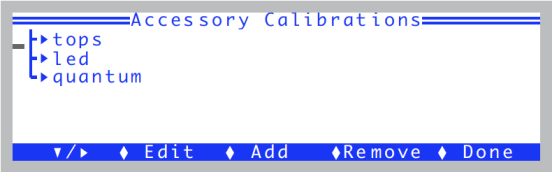
View / Edit Accessories
Accessories are considered to be anything that may or may not be attached to the LI-6400 that has calibration information that OPEN needs to know about. The screen is shown in Figure 18‑6.
A typical accessories node fully expanded is shown below:
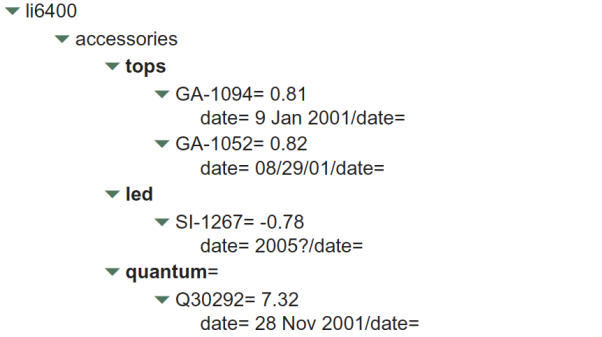
The three kinds of sub-node under accessories are shown in Table 18‑3.
| Node | Serial number | Description |
|---|---|---|
| tops | GA- GB- |
Chamber tops with GaAsP light sensors. |
| led | SI- | 6400-02, -02B Sources |
| quantum | Q | External quantum sensors |
Adding an Accessory
To add an accessory, it doesn’t matter where the cursor is, just press Add (or f3, or just A). You will be prompted for a serial number (Figure 18‑7), the calibration value, and the date.
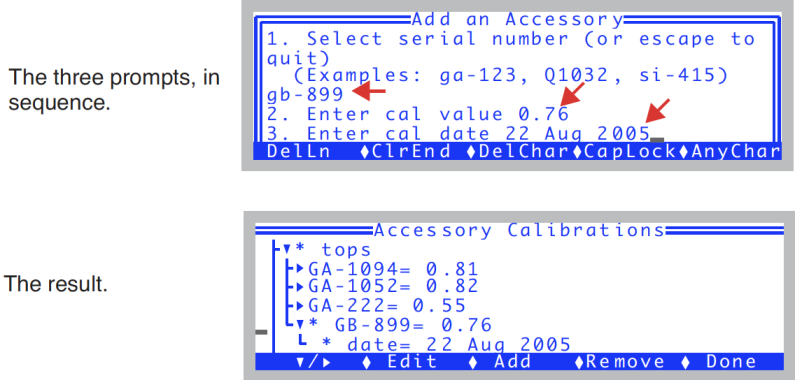
The serial number should start out with ga-, gb-, si-, or q. Upper or lower case does not matter. The program will use the serial number prefix to put the accessory into the right node2. The cal value comes from the accessory’s calibration sheet. If you cannot find the calibration sheet, contact LI-COR. The cal date also comes from the cal sheet, but this is not important. It is only there for your reference; whatever string you enter, if any, will be dutifully put in the date node.
Edit
Use the Edit key (f2, or just E) to change any value or date in the list. You cannot edit a serial number with Edit. If you need to do that, use Add and Remove as necessary.
Remove
The Remove key (f4, or just R) will remove any single accessory.
Saving
When you press Done (or escape, for that matter), the accessories list will be saved to the file /dev/.accessories.