
Instructions for using external sensors with the LI-6400/XT.
It is sometimes desirable to log auxiliary sensor data while running the LI-6400 system. For example, a user may wish to monitor conditions outside the leaf cuvette during measurement of photosynthesis. Furthermore, some users may want to control chamber conditions such as temperature or photosynthetically active radiation (PAR) based on external conditions. In this note we demonstrate how to connect a humidity sensor and an air temperature sensor to the LI–6400; we then give an example of how the LI-6400 chamber conditions may be controlled using inputs from one or several external sensors. Finally, we make some comments concerning continuous unattended logging.
Using an External Humidity and Air Temperature Sensor with the LI-6400
The Vaisala Humitter 50Y* relative humidity and air temperature probe (Vaisala, Woburn, MA) is used here as an example of an external sensor because it is simple to connect to the LI–6400 and program the spare channels for it. However, other humidity probes or temperature sensors (such as thermocouples) may be more suitable for these measurements depending on your requirements. The user is only limited by the range of the differential input channels (±5V) and the resolution requirements of the experiment (low resolution = 270 mV and high resolution = 60 mV with AvgTime= 4).
There are two general steps to using external sensors with the LI–6400: 1) properly connecting the sensor wires to the 37–pin auxiliary port, and 2) configuring the LI–6400 software to process the signals. Follow these 6 steps to set up the auxiliary port and the software:
- Connect the external sensors to the auxiliary port.
- Add the spare analog channels being used to the Configuration File.
- Change the Compute List File to accommodate the new calculations and store the results.
- Edit and store the Displays File to include external sensors.
- Edit and store the LogList to record the additional sensor information.
- Store the Configuration File with the new Compute List, Displays, and LogList.
NOTE: The procedure for configuring the system software requires OPEN version 2.0 or greater, and may vary between different software versions. The description given here is for OPEN software version 2.0.
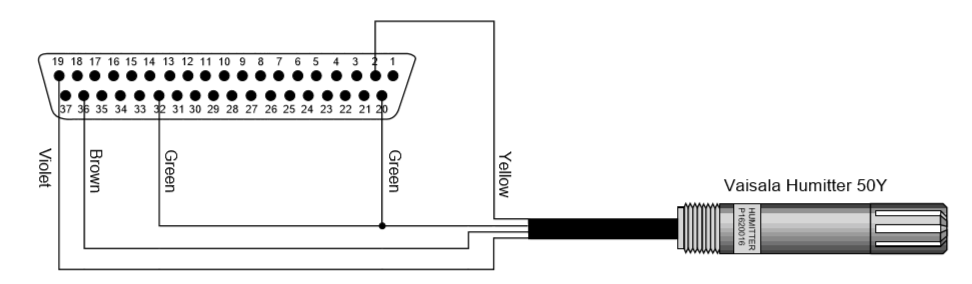
- Connect the external sensors to the auxiliary port.
- Pin assignments for the 37-pin auxiliary port are given in the LI-6400 manual. The pin numbers are stamped on the connector. In this example we have configured the connector to use differential input channels 20 and 21. The differential ground of the sensors is tied to the digital ground because the Vaisala 50Y has no separate ground.
- Add the spare channels to the Configuration File.
- From the initial startup screen go to the Config Menu and enter the Config Editor. Press Add (f2) and the Master List of configuration options will appear. Scroll to the UserChan= command and press Select (f5). Repeat this process of adding a user channel to the config list 1 more time. You will have two entries that appear as UserChan= 0 0 0. Highlight the first entry and press Edit. Press 0, 5, then L. Your entry will now appear as
-
UserChan= 20 5 0
Edit the remaining channel to look like this:
UserChan= 21 5 0 (Press 1, 5, L)
- User channels 20 and 21 are now configured for the humidity and temperature sensors, respectively; they use differential ground number 5 (which is tied to the digital ground on pin 20); and the resolution is set to low (0).
-
Store this as “X_Sensors Config” by pressing the labels key and then choosing StoreAs (f5). Press the labels key and then choose OK (f5) to implement this Config file. For further information about config files see LI-6400 Technical Note #3.
- Change the compute list to accommodate the new calculations. Select User Compute List Editor from the Config Menu. Add channels 20 and 21, plus decimal time to the Compute List. Assign decimal time to user variable ID 01; user variable ID's 91 and 92 will be the humidity and temperature, respectively.
- Below is a sample of how the first 3 items in the Compute List can be programmed to accomplish this (include all spaces):
-
##01F5 “Hrs” “Decimal hrs. of OBS Time”
“$ GETTDS TIME ROT 3600. / SWAP 60. / + +”
##91F1 “xRH” “external humidity”
“chan20_mv * 0.1”
##92F2 “xTair” “external temperature”
“chan21_mv * 0.1 – 40”
- “Hrs” will allow us to record the observation time in decimal hours, which we will need when plotting data against time. “xRH and “xTair” are the values of external humidity and air temperature, respectively. Store this new compute list file by pressing Escape and S to store it in a new file name. Let’s call this new Compute List file “X_Sensors Compute”. When you Quit the Editor and are asked if you want to implement this new file, type Y for yes. For further information about Compute List Files see LI-6400 Technical Note #2 - Defining Equations for OPEN.
- Add the external sensors to the Display file. Since we want to view the status of our sensors in the New Measurements Display, enter New Msmnts from the OPEN screen, and press the Display Editor function key (level 6, f4). Follow these steps to add and store the two new sensors to a display definition:
-
- Press Display Editor (f4).
- Press Add (f2) to add an additional display line.
- Use the arrow keys to highlight xRH.
- Press Select (f5).
- Select xTair, then Escape to quit after adding the two variables.
- Press OK (f5). When prompted to store the changes, press Y. Name the new Display file “X_Sensors Displays”, and press Select. When you return to the New Measurements screen, you can put this line on the screen by pressing the letter associated with this new line. The new line will be displayed at the end of the Display Editor list.
- Edit and store a new LogList file.
- In order to log data from the external sensors, we must edit the LogList file. While still in New Msmnts, select the Loglist Editor function key (level 5, f5).
- Add and store the new channels to the LogList file according to the procedure outlined in the Primer on pages 4-9 and 4-10. When finished, name this new LogList file “X_Sensors Output”.
- Store the new Config File.
Access the "X_Sensors Config" file again by selecting Config Editor in the Config Menu. Press labels and then press StoreAs (f5). Name the file "X_Sensors Config" if it is not already named. It should look similar to the following list (depending, of course, on the optional accessories you may have installed):
UserChan= 20 5 0
UserChan= 21 5 0
LightSource= “Sun+Sky” 1.0 0.19
AREA= 6
STOMRAT= 1
ComputeList= “X_Sensors Compute”
Displays= “X_Sensors Display”
StripDefs= “Photo & CV” (or whatever you want this to be)
LogFormat= “X_Sensors Output”
Now OK this configuration to store your changes and the system software is ready.
Using External Sensor Inputs to Control Leaf Chamber Variables
LI–6400 Technical Note #7 (Environmental Control) describes how to control cuvette variables such as light, temperature, and humidity from external sensors. For our example, assume we want to drive the block temperature from the external air temperature sensor that was configured as shown in the section above. Controlling the block temperature will indirectly control the air temperature in the cuvette, since both temperatures are coupled by the vigorous mixing between the optical bench and the cuvette. From the New Msmnts screen, enter level 2 and press f4 to open the Temperature Control Options and Targets menu. Use the arrow keys to highlight Block Temp and press Enter (or just press B). Enter the target value for the temperature by typing #92 and pressing Enter, (or just press # and then Enter. A menu will appear with a list of available target channels, from which you can select channel 92). This will cause the block temperature to track the Vaisala external air temperature sensor.
It may be possible to track external humidity also, depending on the transpiration rate of the leaf and whether or not you have a CO2 injector, which provides a greater dynamic range of flow control. It is not advisable to program the system to lock in on a variable target while an AutoProgram is controlling that same variable. The AutoLog program should work fine when the sampling intervals are several minutes apart if you choose to match the analyzers. A complete discussion of this subject is found in LI-6400 Technical Note #7 and will not be covered here.
Continuous Unattended Recording with the LI-6400.
Recording continuous unattended measurements is as simple as enabling the AutoLog program and logging samples at fixed intervals for any specified number of samples. Alternatively, when Log is pressed, if you do not enter a file name and press Escape at the prompt, data can be logged to memory or to the COM port.
If you log data to the COM port, you must run a program on your PC (such as the LI-COR 1000-90 COMM program) to capture the incoming ASCII data. The following precautions should be taken when operating the LI-6400 continuously:
- The length of time the LI–6400 will run from a single 6400–03 rechargeable battery depends on what is being powered (see page 2–14 in the LI-6400 Primer). For long–term operation it is necessary to plug in one fully charged battery and connect the other battery jack to the battery charger with the 9960–062 cable.
- If the interior temperature of the analyzers falls below the ambient dew point temperature, water will condense on the interior surfaces of the analyzers. This typically occurs at night. Therefore, if you run the system outside during the night it may be wise to configure the block temperature to track external air temperature, or a temperature 2 to 5 °C greater than the external temperature. Furthermore, cover the console and sensor head to prevent dew formation on the instruments.
Selected List of Sensor Suppliers
Cole-Parmer Instrument Company
7425 North Oak Park Avenue
Niles, IL 60714
Phone: 708-647-7600
FAX: 708-549-1700
Omega Engineering, Inc.
P.O. Box 4047
Stamford, CT 06907-0047
Phone: 203-359-1660
FAX: 203-359-7700
Rotronic Instrument Corp.
7 High Street
Huntington, NY 11743
Phone: 516-427-3994
FAX: 516-427-3902
Vaisala Inc.
100 Commerce Way
Woburn, MA 01801-1068
Phone: 617-933-4500
FAX: 617-933-8029
Yellow Springs Instruments
1725 Brannum Lane
P.O. Box 465
Yellow Springs, OH 45387
Phone: 513-767-7241
FAX: 513-767-9353