
Tour #4: Matching
We now take a look at the single most important issue for making a worthwhile measurement with the LI-6400: it’s something we call matching.
What is Matching? Photosynthesis is computed from the difference in CO2 between the reference and sample cells of the IRGA. That difference tells us how much CO2 the leaf has taken out of the air. Similarly, the difference in H2O tells us how much water vapor the leaf has contributed, and from that we get transpiration and conductance. If the sample and reference cells are not matched, that is, if they do not report the same concentrations when seeing the same air stream (an empty chamber, for example), then the computations of photosynthesis and transpiration will be wrong.
A simple method of seeing how well the IRGAs are matched is to close the leaf chamber empty (no leaf), and compare sample and reference readings. Unfortunately, it is not always convenient to empty out the chamber - suppose you wish to check the match at each step in a light curve - so the LI-6400 has a method of routing the air that has exited the leaf chamber into the reference cell, allowing the reference and sample cells to see the same air without affecting what is going on in the chamber. We call this match mode, and there is an illustration of the match valve and how it changes the flow schematic in the next chapter (Figure 3‑42).
The Match Valve
First, we will get you acquainted with where the match valve is and how it moves.
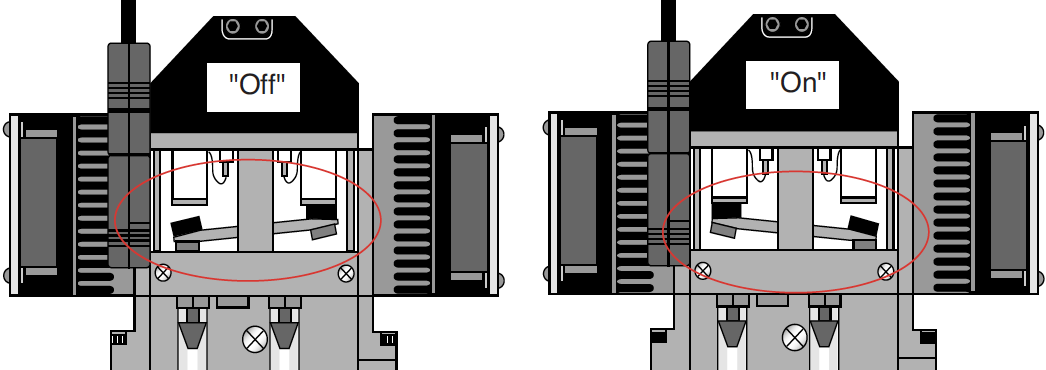
Experiment #1 Making the Match Valve Move
Start from OPEN’s main screen. If you are in New Measurements mode, press escape.
- Find the Diagnostics and Test menu
- Press f1 (Home Menu), navigate to and open the Diagnostics & Tests node.
- Launch Match Valve Tester
- Scroll down to Match Valve Tester, and press enter (or f5 Select).
- Press f1 to move the valve
- Turn the sensor head over so you can see the valve. It should change positions each time you press f1 (Toggle).
- If your match valve is not behaving properly, see Match Valve Problems.
- That’s all
- Press escape to get back to OPEN’s main screen. The match valve will return to the OFF position automatically when you exit the test program.

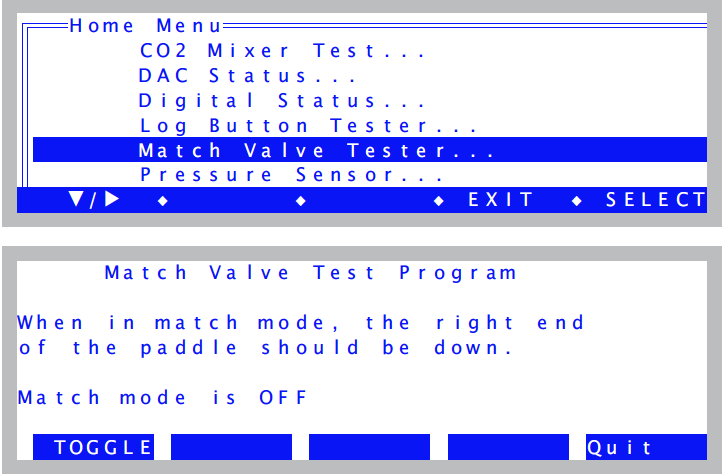
Match Mode
The match valve is just a valve, whereas match mode refers to the software and display screen that do something useful with that valve.
Experiment #2 Match Mode in New Measurements
Match mode can be entered manually during New Measurements mode, and allows you to check how well the IRGAs are matched, and to match them if you choose. This occurs without changing the conditions a leaf sees in the chamber.
- Start with stable conditions in New Measurements mode
- Set a flow rate of 500 μmol s-1. If you have a functioning CO2 mixer, set it up for controlling reference CO2 to 400 μmol mol-1. (If you do not, just set CO2 scrub to full). Set desiccant midway between scrub and bypass. Close the chamber, and wait for CO2S and CO2R to stabilize.
- Enter match mode
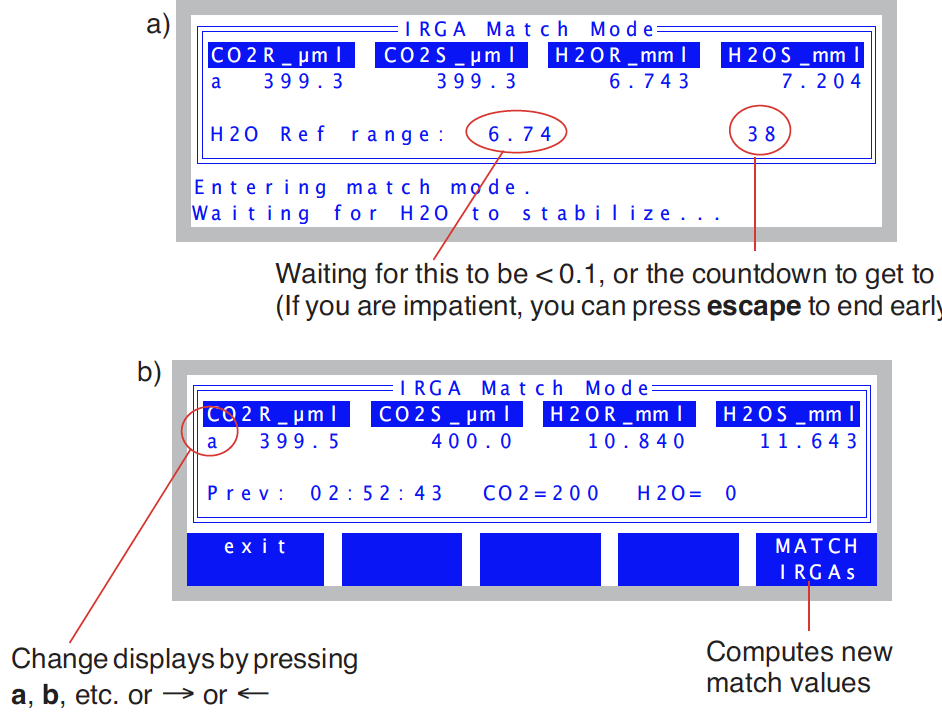
- Press 1 f1 (Match). You will see a transition display (a in Figure 3‑44) for a few seconds, followed by the match mode display (b in Figure 3‑44).
- Match the IRGAs
- If there are significant differences between CO2R and CO2S, or between H2OR and H2OS, you can remove them by pressing f5 (MATCH IRGAs).
- Once you press MATCH IRGAs, you are still in match mode, and you can verify that the IRGAs do now more or less agree. If you matched at an inopportune time and the agreement is not so great, you can press MATCH IRGAs again, as often as you wish.
- What actually happens when you press MATCH IRGAs is just mathematical: two correction factors, one for CO2 and one for H2O, are computed for the sample cells. So, CO2S and H2OS will be the values that you see change.
- Exit, and compare again.
- Press f1 (exit) to leave match mode, and then compare sample and reference back in New Measurements mode.
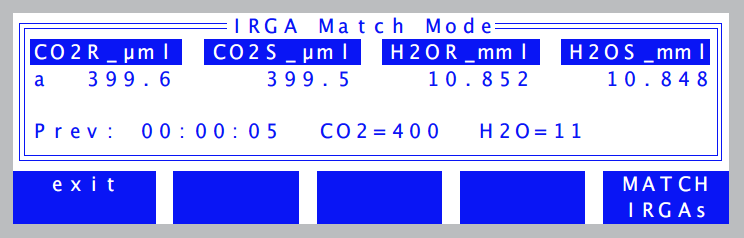
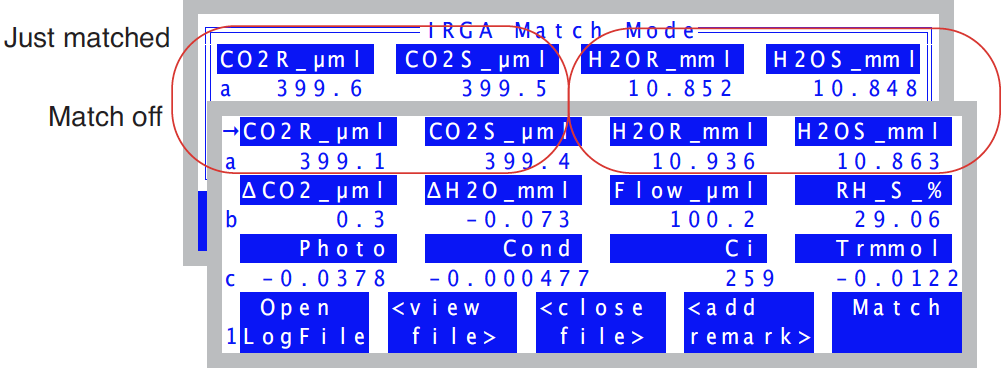
Notice in Figure 3‑46 that the sample concentrations barely changed when match mode was exited, and that’s a good thing, since the match valve position should not change sample concentrations. The reference concentrations, however, did change slightly: CO2R dropped 0.5 μmol mol-1, and H2OR increased by 0.12 mmol mol-1. If there were a leaf in the chamber, the reference changes would have been much bigger, but the chamber was empty. So why were there any changes in the reference concentrations?
Well, what we have just done is test the chamber for leaks, diffusion, cleanliness, and anything else that might alter the H2O and CO2 concentrations of air passing through it. Certainly diffusion is the likely cause of the CO2 change, since the air surrounding the chamber in this particular case was (I am opening the chamber now to check...) 550 μmol mol-1, so there would be a small influx of CO2 through the gaskets. (For more on this, see Diffusion Leaks). The reason for a water change is less clear: it’s not likely a diffusion issue, since the water gradient through the gasket was minimal. Most likely the slight H2O losses through the chamber were due to ad- or absorption by chamber surfaces - especially any dirt on those surfaces.
Points to Remember
- A measurement is only as good as the match.
- Sample concentrations should not change when entering or leaving match mode. If you match, however, that will change them.
- Comparing reference concentrations in and out of match mode when the chamber is empty is a sensitive test for chamber leaks and cleanliness.
Experiment #3 Matching at different concentrations
If you match at one concentration, do you have to match again if the concentration changes? Let’s find out.
- Match at a low concentration
- Set the mixer for a 200 μmol mol-1 reference concentration, and let it stabilize. Then enter match mode and match the IRGAs. (If you just did the previous experiment, where you matched at 400 μmol mol-1, note the difference, if any, changing from 400 to 200 made.)
- Change to a high concentration
- Now set the mixer for 1500 μmol mol-1. When the mixer finally stabilizes, compare CO2S and CO2R. CO2S is likely to be slightly lower than CO2R due to diffusion losses out of the chamber gasket (assuming the ambient concentration is lower than 1500 μmol mol-1). Next, we’ll remove the diffusion difference by going in to match mode.
- Enter match mode
- We will not match, but just want to compare CO2S and CO2R when they are seeing the same airstream.
- How close are they? If the difference is a few tenths of a μmol mol-1, then you can feel proud or lucky, because ideally, that’s what it should be. However, if it is more (or a lot more) than that, then it is an indication that the IRGAs are not very well zeroed and/or spanned, and you might want to spend some time going over User Calibration (Zero and Span) on page 18-10 in the instruction manual.
- Go back to normal
- Exit match mode, and set the mixer for 400 μmol mol-1. Whether or not your system happens to be well calibrated at the moment, however, does not mean it will always be that way, so changing concentrations is one thing that should always trigger a little voice in your head that says “check the match”. And that brings up the question: how do you know what the conditions were the last time you matched?
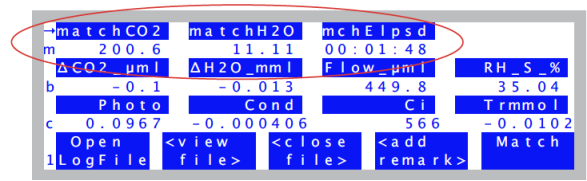
- View display line ’m’
- The default version 6.2 displays have previous match information on display line m (Figure 3‑47).
- If your display configuration does not have these values on line m, then you can add them easily enough: See Display Editor on page 6-6 in the instruction manual; the items you want to add have system IDs -112, -113, and -114.
Experiment #4 “Matching is so easy. What could possibly go wrong...”
- Low and slow
- Set the flow rate to 30 μmol s-1. You’d normally not do this, but we are forcing an issue.
- Enter match
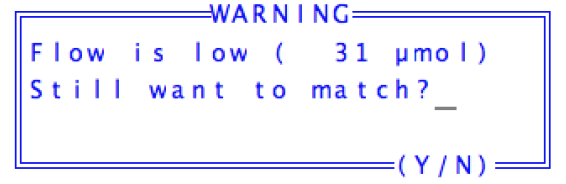
- Press f5 (level 1). You should get this message (Figure 3‑50):
- (You can press n, then set the flow back to 500 μmol s-1).
- Why is flow important? The lower the flow rate to the sample cell, the longer it will take to flush out the reference cell when the match valve turns on. That is why there is a 45 second potential wait during the transition. At the limit, of course, is no flow, and matching cannot work without flow through the sample cell. So we warn about flows that are < 50 μmol s-1 (with mixer) or < 100 μmol s-1 (no mixer).
- Make a bad starting point
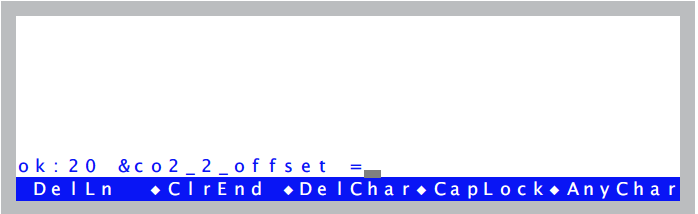
- To illustrate the next point, we need to create a situation1 with very poorly matched IRGAs, so we will do it with a little behind the scenes magic: 1) Press escape to OPEN’s main screen. 2) Press k, and a little ok: prompt will appear. 3) Type this: 20 &co2_2_offset = (there is a space after the 20, and one before the =).
- Press enter. If nothing happens, that’s good. (If there is an error message, type it again, but correctly). Then press escape to get back to the main screen, then return to New Measurements. Set the mixer to control on CO2R to 400 μmol mol-1.You should now have a very poorly matched IRGA, with CO2S about a 20 μmol mol-1 greater than CO2R.
- Fix it by matching
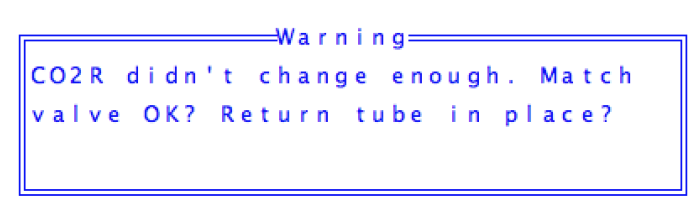
- Press 1 f5 to enter match mode. After the transition period, you should see this warning message (Figure 3‑50):
- What is this all about? When match mode is entered, the system has some expectations for what should happen: mainly, CO2R should move toward CO2S. If someone had forgotten to install the return tube that connects the chamber to the match valve, or if the match valve fails to move, that would prevent CO2R from changing, and that is why the warning message provides the hints that you see.
- However, we got that message with an empty chamber, and poorly matched IRGAs. The lesson is that this message does not necessarily mean a hardware issue. Any time you enter match mode with a difference between CO2R and CO2S of > 10 μmol mol-1, and the CO2R value changes less than 1.5 μmol mol-1 during the transition, the "CO2 didn’t change enough" message will appear.
- Proceed with the match
- Press enter to clear the “CO2R didn’t change” warning. Then press f5 to match the IRGAs and fix our mismatch problem...
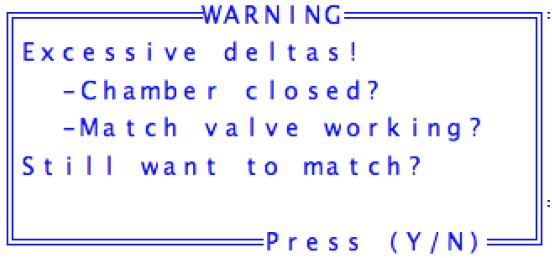
- ...and you will get another warning (Figure 3‑51):
- When you attempt to match and the difference in CO2 is > 10 μmol mol-1 or the difference in H2O is > 1 mmol mol-1, then this message appears. This message is designed to prevent matching when you should not, since that large of a difference could be due to the mixer valve not functioning or other problems.
- Press Y to complete the match, and then exit match mode.
- Change the mixer target
- Drop the mixer target from its current 400, down to 200 μmol mol-1.
- Enter match mode now. (Hurry - Don’t wait!)
- Once through the transition period, you should get the leak warning (Figure 3‑52):
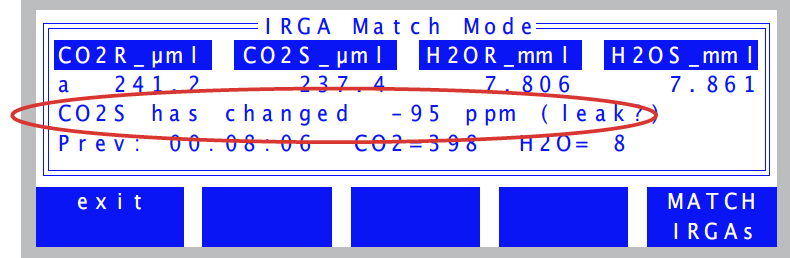
CO2S should remain constant while in match mode, unless there is a leak. Now, this was clearly not caused by a leak, but the system assumes that you are acting rationally, and entering match mode right after a mixer change is not a rational act. You can do it, and it does not hurt anything (as long as you wait for things to stabilize before actually matching), but you will be warned.
This warning can have causes besides the obvious (leaks, opening the chamber, etc.): it could be the leaf being measured. If the light level changes while in match mode, photosynthesis will change, and CO2S will change.
The threshold for this message to appear is 3 μmol mol-1. Some of the thresholds and actions involved in match mode are configurable. This is described in Matching Variations on page 16-19 in the instruction manual.
Points to Remember
Warning messages have multiple potential causes. It’s worth figuring out why a warning appeared so you can decide if it can be safely ignored or not.