
LED Light Source
Printable PDF: 6400-02B LED Light Source installation instructions for the LI-6400/XT
Instructions for installing the 6400-02B LED Light Source onto the LI-6400/XT Portable Photosynthesis System.
Important: The 6400-02B LED Light Source is a high voltage device. Never use the light source if it is not attached to the LI-6400 sensor head. Do not use the 6400-02B in rainy conditions. Please note, too, that when operated at maximum power, the source may produce light levels above that which can be accurately measured by the PAR sensor in the lower leaf chamber.
- Unhook the PAR sensor connector from the port on the side of the sensor head by gently pulling straight out. You will need to remove the tripod mounting bracket, if attached, to access the connector.
- Remove the upper half of the leaf chamber cuvette using the 3/32” hex key provided in the spare parts kit. The upper half of the leaf chamber is secured by two long screws that can be seen in front of the cuvette.
- Before installing the lamp assembly, transfer (or install new) air passage O-rings from the upper leaf chamber cuvette to the lamp assembly.
- Install the lamp assembly with the two long screws from Step 2. Attach the lamp connector and PAR sensor connector as shown in Figure 2. Make sure the PAR sensor is attached to the connector near the rear of the analyzer housing, not to the log switch connector.
-
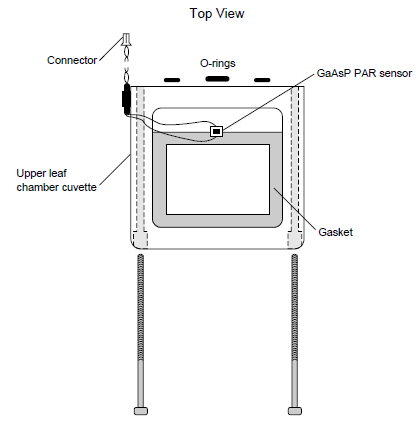
- Figure 1‑1. Remove the two screws from the upper leaf chamber cuvette.
-
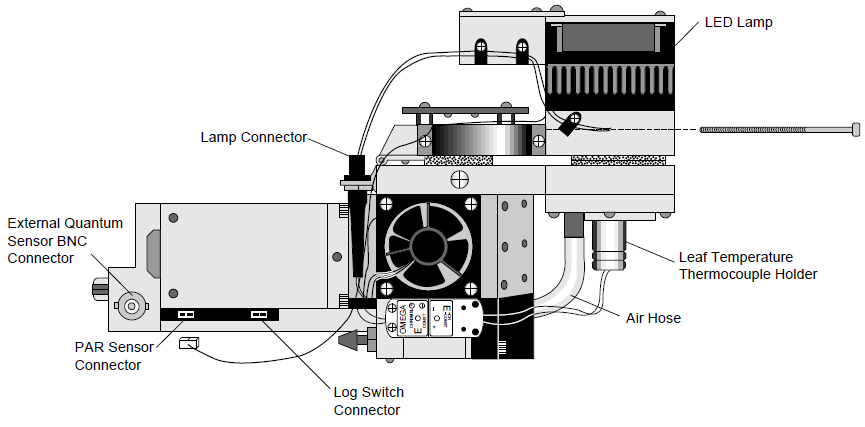
- Figure 1‑2. Attach the lamp and PAR sensor connectors.
- There is a calibration factor for your LED source that must be entered into software. This value has been entered for you if your 6400-02B was factory installed; you may want to verify it, however. The calibration factor can be found on the calibration sheet included with the 6400-02B under CalPARLED=value. To enter a new calibration factor, follow these steps:
- NOTE: The 6400-02B requires OPEN V2.5.4 or above. See below for instructions using OPEN V3.0 or above.
To Install:
- Go to the Config menu and select Option Installer.
- Select Add Item (f2).
- Select 6400-02 LED Light Source.
- Enter the light source serial number, calibration value, and calibration date (from the cal. sheet) when prompted, and press Y when prompted to confirm the values.
- Press Make Config (f3). Answer the ensuing questions to build an appropriate configuration for the light source. (This is documented in Technical Note #16, starting on page 16-4). At the end, you can save this configuration under the name of your choice.
- Exit the Option Installer, and select “Reset to User Configuration” from the Config Menu. Choose the configuration named in Step 5e.
OPEN V3.0 or above:
- Go to the Config menu and select the Installation menu. Choose “6400-02 or 02B LED Light Source” and answer the questions at the prompts.
- When prompted “Build a Configuration file”, press Y, and answer the questions.
- When prompted “Store this Configuration”, press Y. You can adjust the name if you’d like.
- To implement this new configuration, select “Reset to User Configuration” from the “Reset Menu” in the Config Menu.
Note: Once Step 1 is done, you can enable the light source for any configuration simply by choosing “Light Source Control” from the Utility Menu, pressing Pick Source (f1), and selecting the desired light source from the list of options, which will include an entry for each LED source that is installed.
If the LED Source Flashes ON and OFF...
If, after installation, you observe the source flashing on and off within about a 3 second interval, check the following:
Is the detector cable plugged in?
Are you using the correct CalParLED= value in your configuration file? (This value is positive for red-only sources, and negative for red/blue sources. If you have a mismatch, the source will blink, and you will observe negative ParIn values (default display line G) while the light is on.
Note on Replacing Gasket Material: The spare parts kit for your LI-6400 contains two types of replacement gasket materials; a white foam material (part #6564-156) and black neoprene material (part #6564-028). Do not use the black neoprene gasket material with the 6400-02B; black gaskets create an unacceptably large non-uniformity in illumination across the leaf. Follow the instructions in the LI-6400 Instruction Manual for complete instructions on replacing the foam gaskets.