
Before You Begin
The LI-6400's memory board contains the system software for operating the instrument, including the LPL operating system, and all of the "disks" seen by the file system. In addition, it contains some instrument specific calibration files. Therefore, before changing memory boards, it is necessary to download them from the old board, and then upload them onto the new board once it is installed. In addition, you may have data or configuration files that you want transferred from the old memory board to the new one. Do the following steps to prepare for these transfers:
Important: The new 6 MB memory board requires LPL version 3.2 or later. (It is shipped from the factory with the latest software already installed.) DO NOT install any version of LPL older than 3.2, or the board will not function.
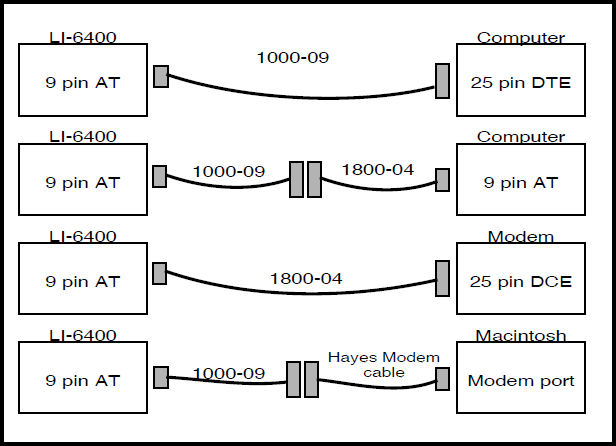
- Connect the LI-6400 to a PC
- This requires one or both of the 1000-09 and 1800-04 cables that are shipped with the LI-6400.
- Put the LI-6400 into File Exchange mode
- From power on, press escape when asked if the chamber/IRGA is connected. This will get you to the LPL screen. Then press X to enter file exchange mode.
- Place the 6400-906 Support Diskette into the computer
- Make sure the write protect is off. This diskette contains one file (EW.EXE) and two empty directories (DEV and USER).
- Change to current directory to the diskette's drive
- If the diskette is in the A: drive, for example, type A: and press Enter.
Calibration Information
To capture the instrument's calibration information:
At the DOS prompt, type the following and press Enter
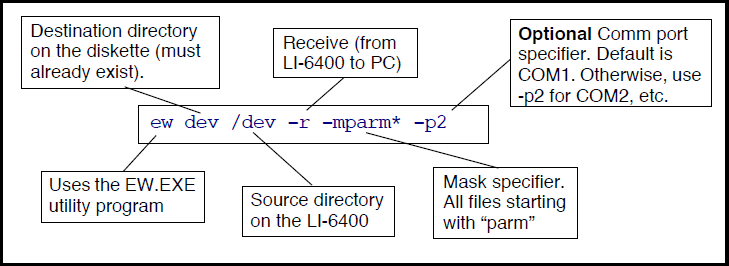
The files parm1 and parm0 will be written to the directory A:/DEV on the diskette. After you've installed the new memory board, you will need to transfer them back.
Data and Configuration Files
If you have data files and configuration files that you want transferred to the new memory board, then do this next step as well, to get them onto the diskette.
To capture all data and files on the user disk:
At the DOS prompt, type the following and press enter
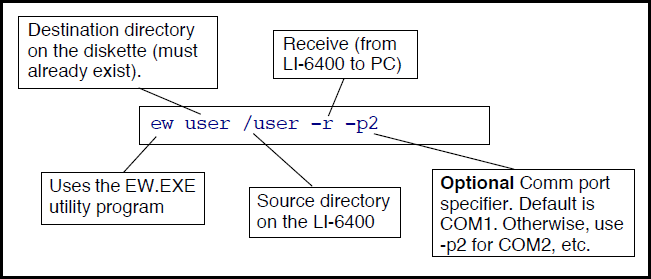
All files and directories on the /user disk will be transferred to the directory A:/USER on the diskette.
For more information about using the EW utility program, see Chapter 11 of Using the LI-6400.
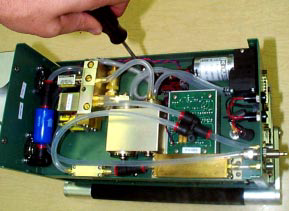
Disassembly and reassembly
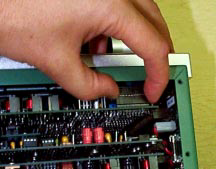
- Power the LI-6400 off, and disconnect all cables and batteries
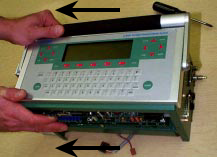
- Remove the console bottom shell
- This is done by removing the 8 screws (9 on early versions) from each of the console sides, then lifting the console out of its bottom shell.
- Unplug the display and keyboard connectors
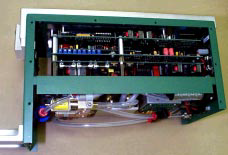
- Turn the console upside down and disconnect all flow board connectors
- All of the connectors in question go through a square hole to the flow board.
-
- The underside of the console, showing the connector well from which all connectors should be unplugged, and the 4 screws that should be removed that hold the board assembly in place.
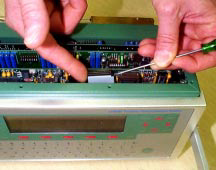
- Remove the board assembly retaining screws
- Unplug the board assembly
- All of the boards in the assembly connect to the back plane board at the right end of the console. Unplug these boards by hooking your fingers on the stand-offs on the back of the assembly and pulling (and rocking back and forth gently) the assembly out of the connectors.
-
- Unplug the board assembly from the back plane board by pulling (and rocking side to side gently) on the board stand-offs.
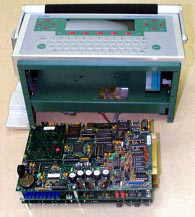
- Slide the board assembly out of the console
- Be careful that the display and keyboard cable and connectors don't snag on the boards as you slide them out of the console.
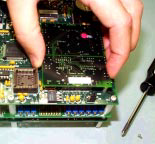
- The memory board that you are going to replace is in the upper left corner of the top board in the assembly.
-
- Remove the memory board screw, and lift board out
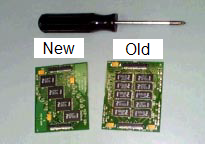
- Install the new board
- The orientation can be deduced from the hole for the screw on the corner of the board.
- Slide the board assembly back into the console
- Be careful not to snag the keyboard and display connectors and cables.
- Re-connect the keyboard and display connectors
- Make sure the connectors are centered. If you are off a pin to the left or right, you can do damage when you turn on the power. Also, the display connector has two rows of pins, so make sure the connector gets onto both of them.
- Re-seat the board assembly
- Line up the edge connectors of the three boards, and push them into the back plane board by pushing on the stand-offs between the boards.
- Install the retaining screws
- Turn the console over, and re-install the four screws. The board assembly has to be fully seated before the screw holes line up.
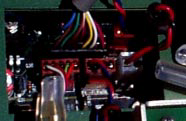
- Reconnect the flow board connectors
- Refer to Figure 9. Note the labels on the flow board by each connector.
Test the New Board
- Power on the LI-6400 with escape held down
- This should bring up the boot screen. (Described in Using the LI-6400 on page 5-18, or in Tech Note 1, page 1-3.) If the display remains blank, re-check your display connector.
- Adjust display contrast if necessary
- Press ↑ and ↓ as necessary (and if necessary) to adjust the display contrast.
- Press S
- This will create a /dev/parm1 on the new memory board.
- Press R
- This will run the LPL application. The display should say
Initializing...for a few seconds, then askIs the chamber/IRGA connected?. When thus prompted, press escape, and get to the LPL screen.
Re-install Files
To re-install the calibration, configuration, and data files
- Connect the LI-6400 to a PC, and put the LI-6400 in File Exchange mode
- Redo the steps on page 1.
- Install the calibration files
- On the PC, type
ew dev /dev -mparm*(The same as Figure 2, but without the-rswitch.) If you are not using COM1, then add the-pswitch to specify the port (-p2 for COM2, etc.) The file parm0 and parm1 that were captured earlier will be copied to the new memory board. - Install the /user files
- On the PC type
ew user /userThe same as Figure 3, but without the -r switch.) If you are not using COM1, then add the -p switch to specify the port (-p2 for COM2, etc.) The files that were earlier put on the A:/user directory on the diskette will be copied to the LI-6400.