Step reference
This section provides a reference for steps used in background programs.
# - comment
A comment is just that, and is there to clarify things for the user.

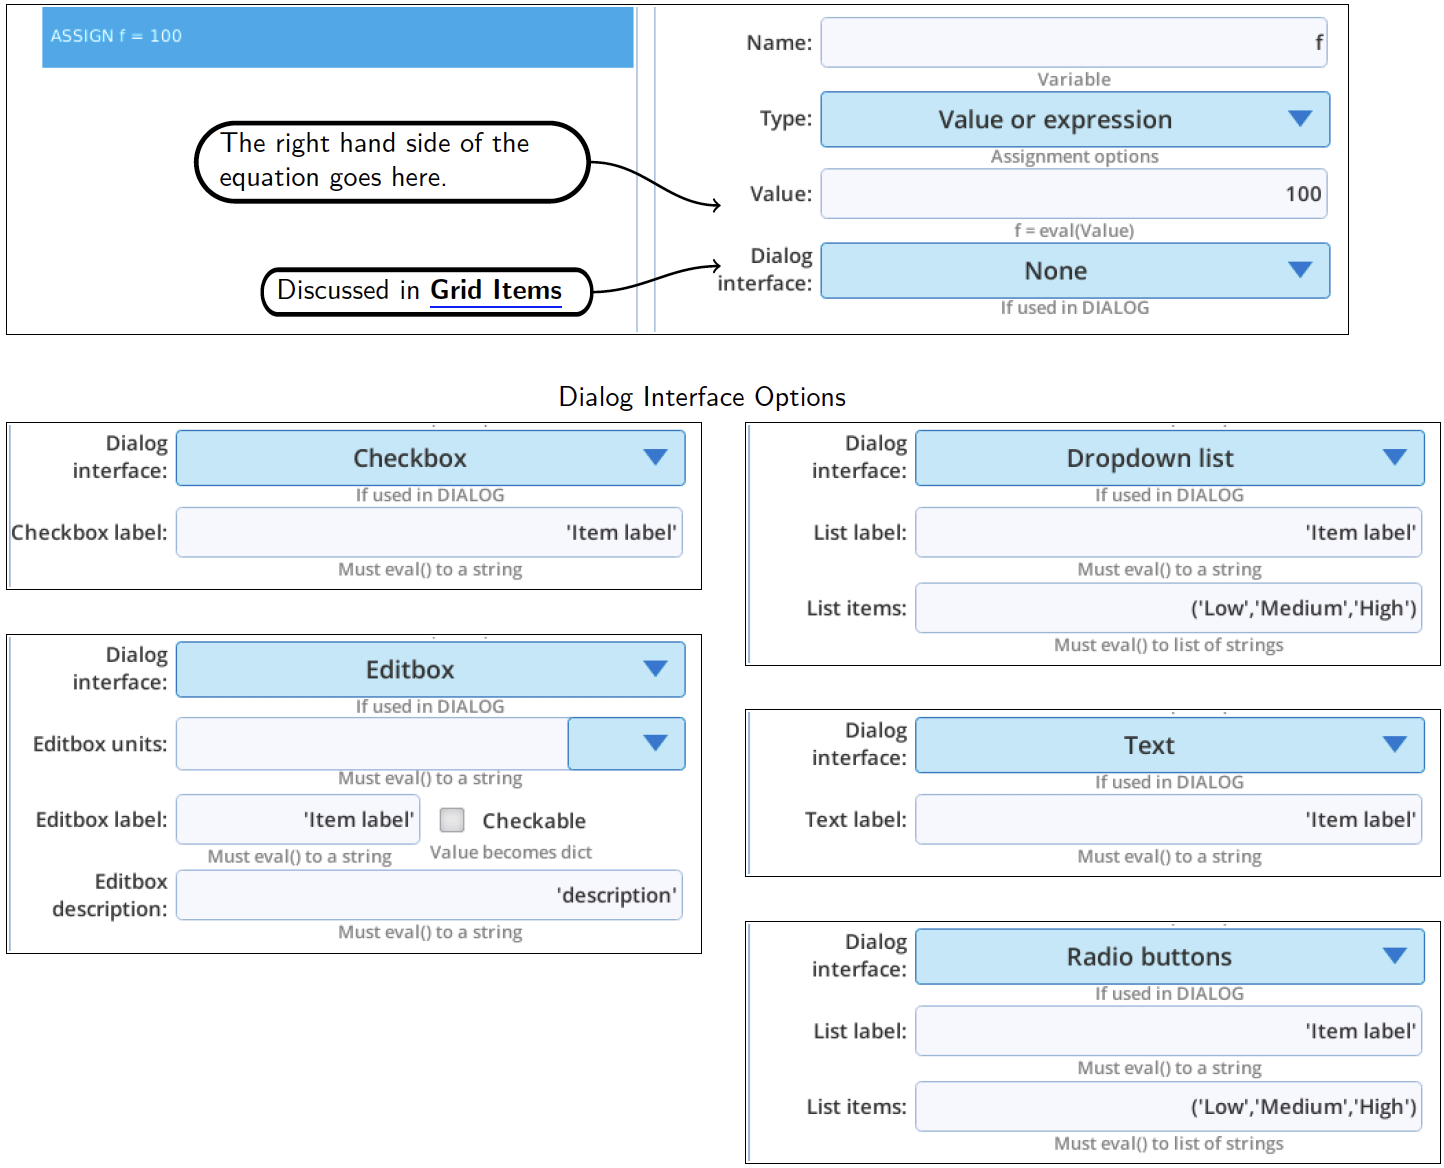
ASSIGN
ASSIGN creates a local variable for your program, which you name in the Name field. There are numerous options:
Value or expression
The Value entry is evaluated with the Python eval() statement, and the result assigned to the variable specified in Name entry. The result of the eval() determines the Python type (str, float, int, list, etc.) of your variable. Values assigned to an expression have 5 interface options for appearing in DIALOG.
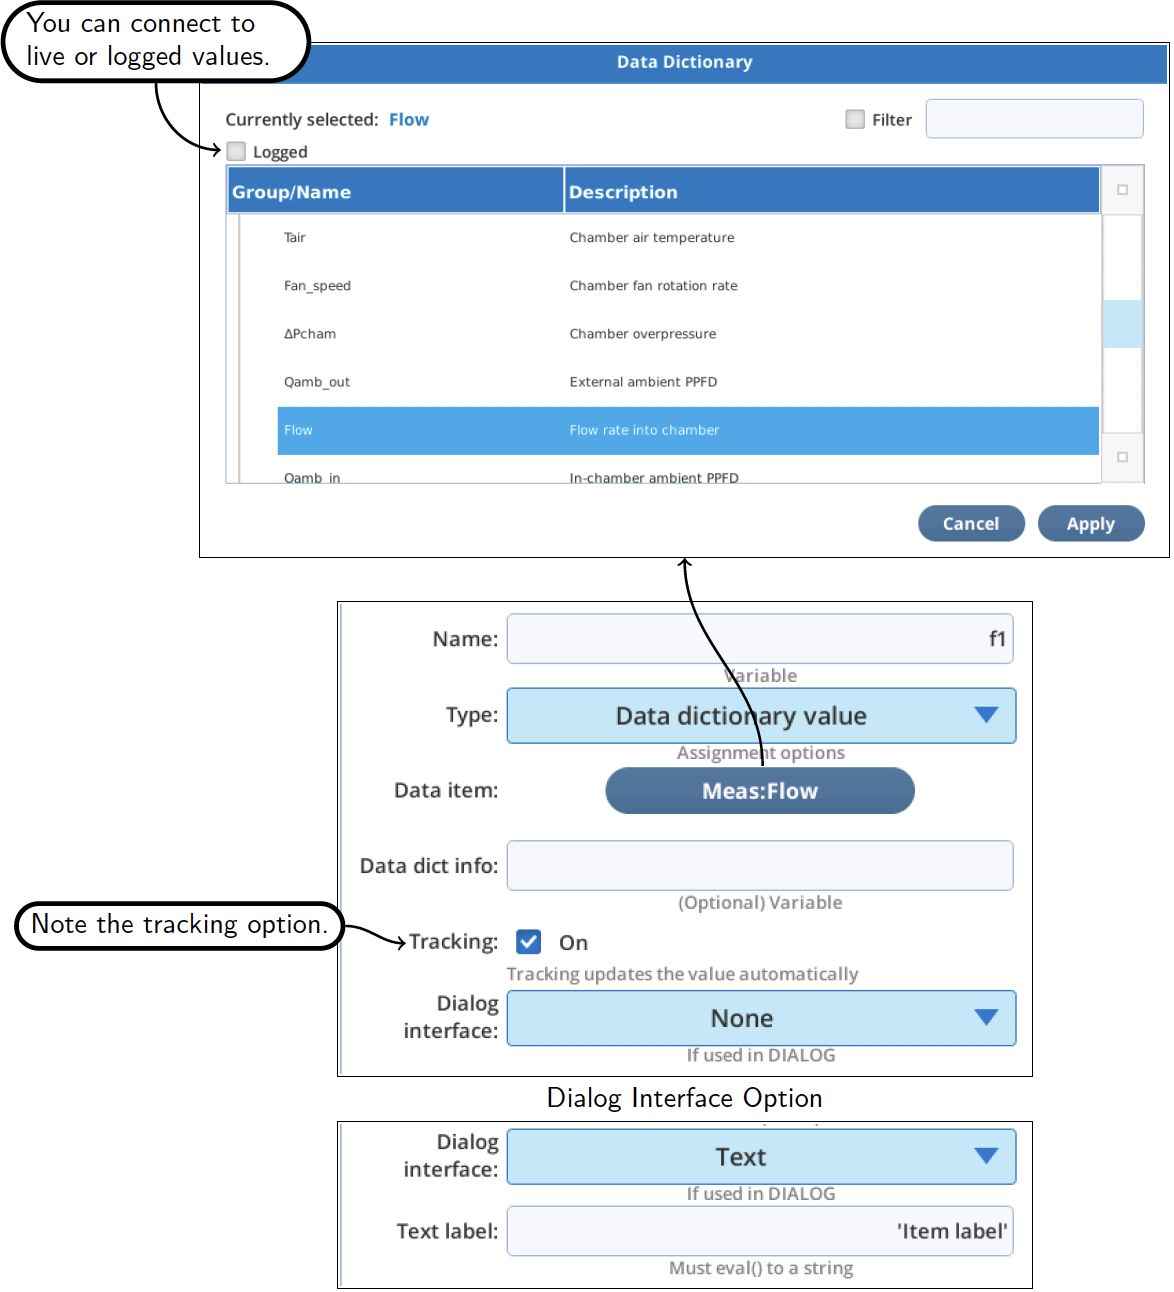
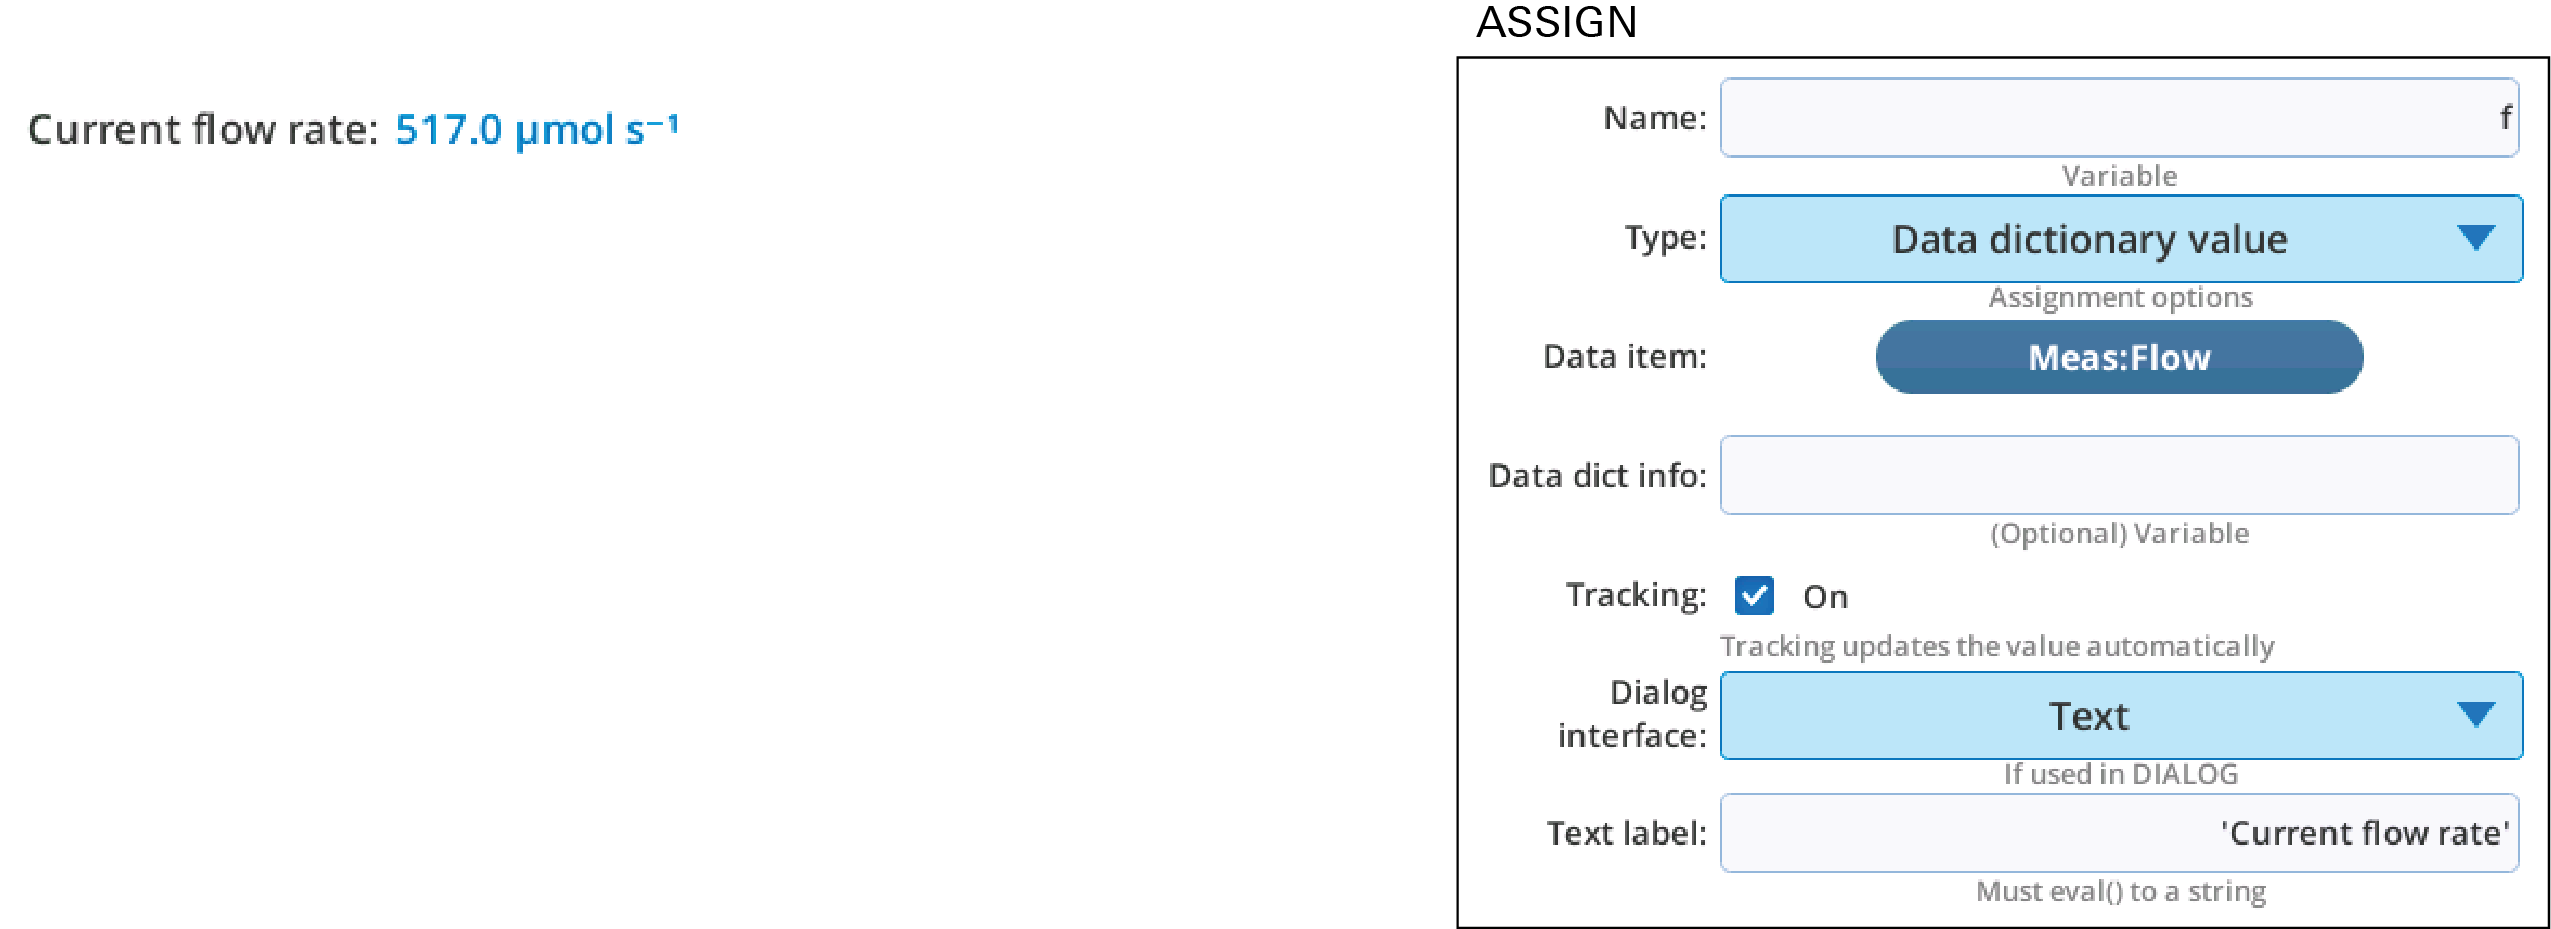
Data Dictionary value
A local variable can be assigned to anything that can be found in the Data Dictionary (Figure 12‑81). The assignment can be a 'snap shot' (capture the value, and keep it) or tracked (variable continually updated automatically).
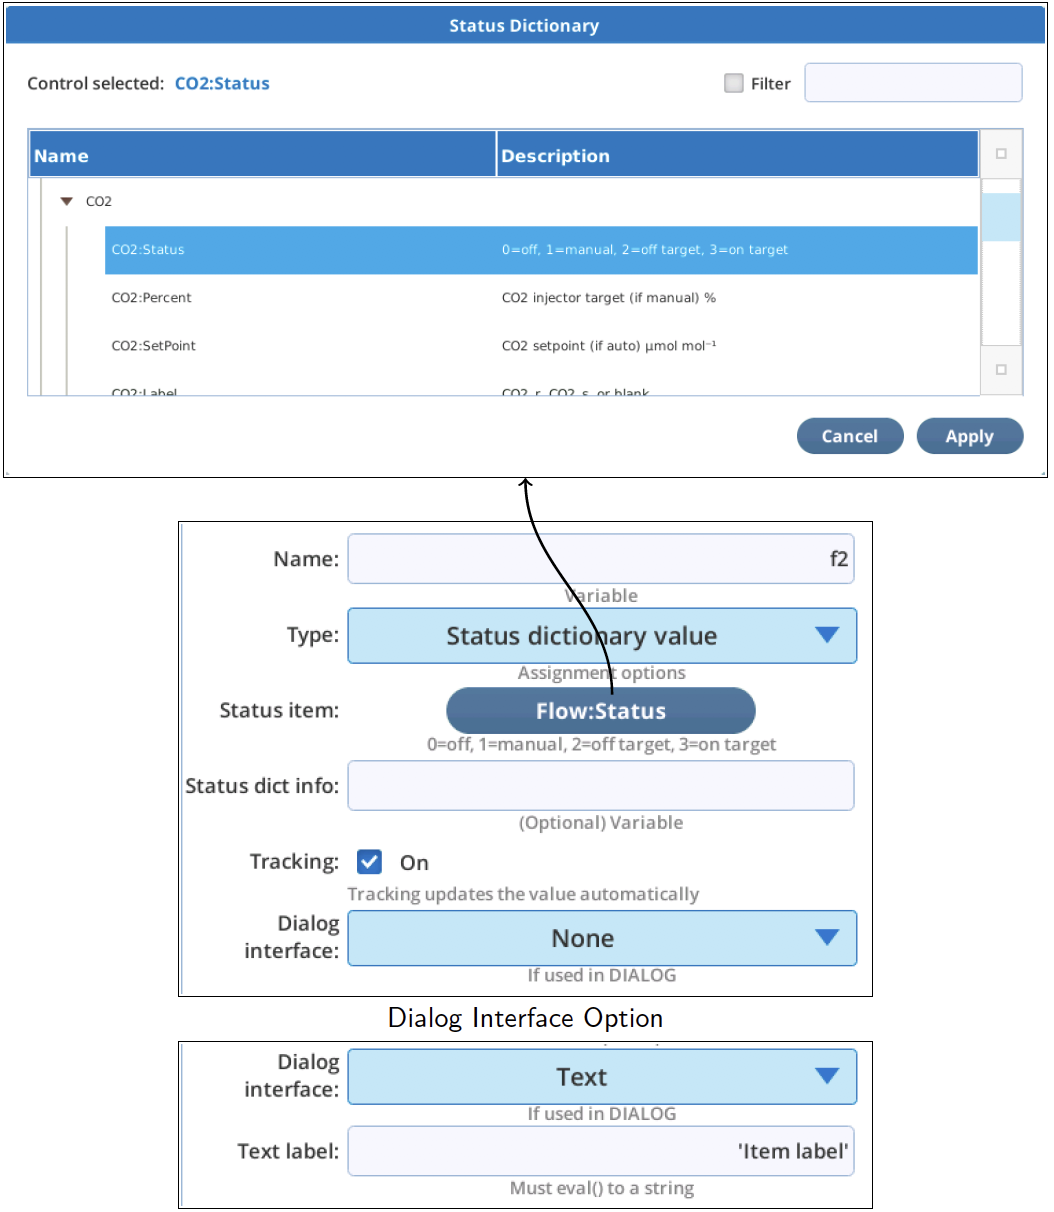
Status Dictionary value
A local variable can be assigned to anything that can be found in the Status Dictionary (Figure 12‑82). The assignment can be a 'snap shot' (capture the value, and keep it) or tracked (variable continually updated automatically).
(Advanced) Topic and Key
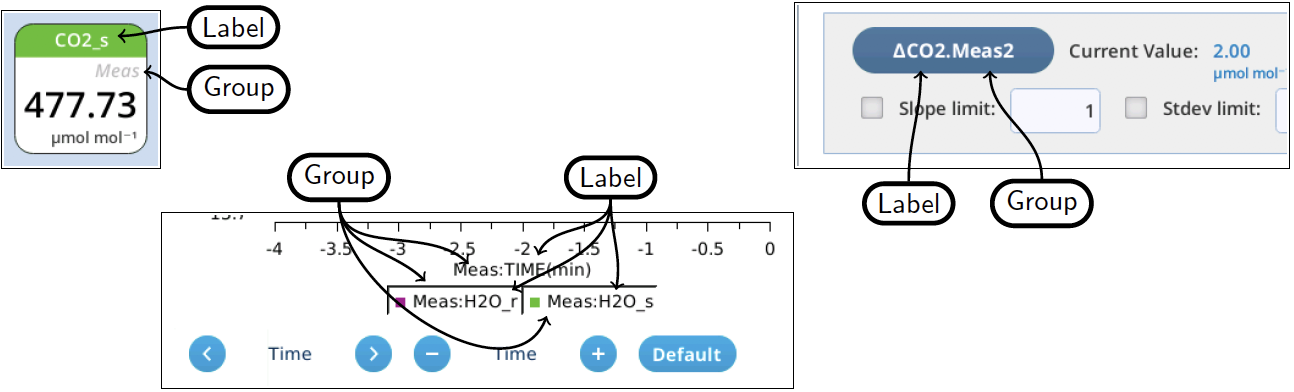
The Topic and Key option provides a general purpose method to get to almost any item (or groups of items), even if they are not in the Data or Status Dictionaries. Most values of interest have a topic and name (key). Every item in the Data Dictionary also has a group and label. The system's Data Dictionary shows group, label, name, and topic (Figure 12‑83).
- Topic: the topic under which this item is published in internal LI-6800 communications. Except for its appearance in the Data Dictionary, topic is otherwise hidden from the user interface.
- Name: the unique (for that topic) identifier for this item.
- Group: A collection of items.
- Label: Often the same as Name, but can be different.
Group and Label are often used as identifiers (Figure 12‑83).
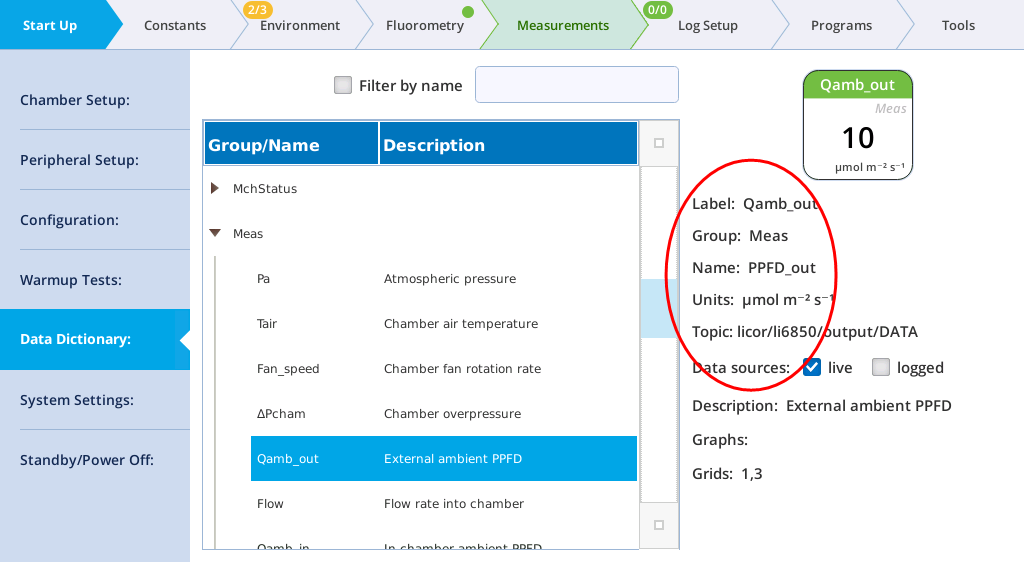
In Figure 12‑84, we are looking at the entry for Qamb_out, but that is just it’s screen label. It’s real name is PPFD_out, and it can be gotten via the topic (licor/li6850/output/DATA), or the group (Meas).
Figure 12‑85 shows how to use ASSIGN [Topic and Key] to access the entire collection of items in group Meas:
What can you do with this? Here is an example: the program /home/licor/apps/examples/LogMeas.py illustrates how to log everything in the Meas group to a comma separated file, with elapsed time, as fast as new data sets are available.
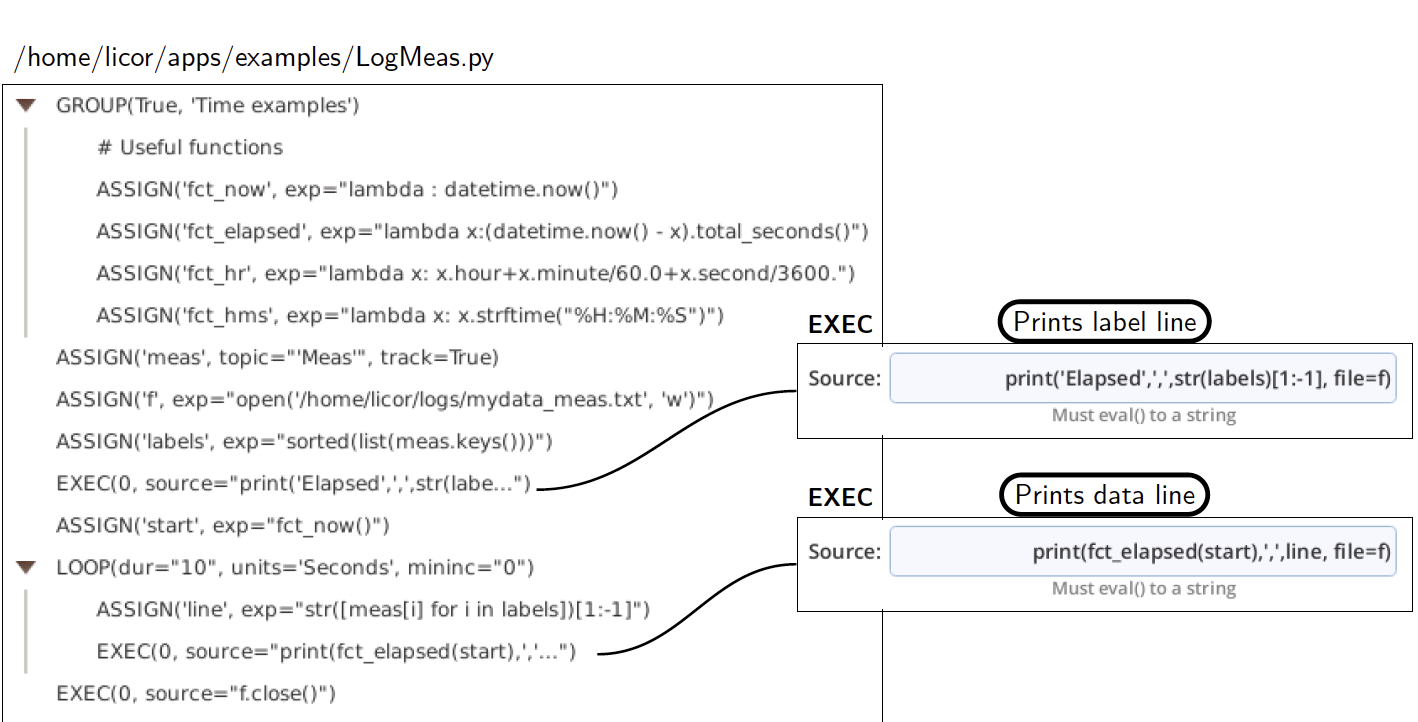
The output of this program is shown in Listing 12‑3.
Listing 12‑3. Listing of /home/licor/logs/meas values.txt.
Elapsed , 'CO2_r', 'CO2_s', 'Fan_speed', 'Flow', 'H2O_r', 'H2O_s', 'Offset', 'Offset2', 'PPFD_in', 'PPFD_out', 'Pchamber', 'Press', 'TIME', 'Tchamber', 'Tleaf', 'Tleaf2'
0.044217 , 162.356, 164.168, 0, 600.006, 4.26871, 4.24712, 0, 0, 0.811979, 11.1801, -0.00557787, 97.3788, 1549397993.6, 26.6202, 21.6749, 997.995
0.276225 , 162.335, 164.184, 0, 599.989, 4.26887, 4.247, 0, 0, 0.819595, 11.1801, -0.00569272, 97.3789, 1549397994.1, 26.6191, 21.686, 997.981
0.788974 , 162.331, 164.182, 0, 599.983, 4.26883, 4.24701, 0, 0, 0.830257, 11.1801, -0.00573881, 97.3794, 1549397994.6, 26.6181, 21.7068, 997.96
1.219423 , 162.33, 164.191, 0, 599.989, 4.26866, 4.24707, 0, 0, 0.853101, 11.1801, -0.00577292, 97.3796, 1549397995.1, 26.6173, 21.7342, 997.934
1.85875 , 162.337, 164.201, 0, 600.013, 4.26838, 4.24726, 0, 0, 0.869853, 11.1801, -0.00571798, 97.3801, 1549397995.6, 26.6169, 21.7587, 997.926
2.278488 , 162.359, 164.205, 0, 600.005, 4.26831, 4.24704, 0, 0, 0.86224, 11.1801, -0.0057185, 97.3801, 1549397996.1, 26.6169, 21.7815, 997.928
2.801033 , 162.367, 164.202, 0, 600.037, 4.26825, 4.24704, 0, 0, 0.854626, 11.1801, -0.00566928, 97.3802, 1549397996.6, 26.6169, 21.795, 997.928
3.281008 , 162.386, 164.218, 0, 600.009, 4.2684, 4.24721, 0, 0, 0.847013, 11.1801, -0.00566537, 97.3798, 1549397997.1, 26.6169, 21.8024, 997.926
3.809381 , 162.402, 164.22, 0, 600.015, 4.26823, 4.24701, 0, 0, 0.837876, 11.1801, -0.00561485, 97.3793, 1549397997.6, 26.6169, 21.7904, 997.924
4.261619 , 162.42, 164.214, 0, 600.008, 4.26816, 4.2471, 0, 0, 0.822646, 11.1801, -0.0055487, 97.3793, 1549397998.1, 26.6169, 21.7655, 997.922
4.794935 , 162.444, 164.221, 0, 600.03, 4.2682, 4.24693, 0, 0, 0.810461, 11.1801, -0.00549713, 97.3787, 1549397998.6, 26.6164, 21.7421, 997.929
5.244639 , 162.491, 164.239, 0, 600.011, 4.26834, 4.24663, 0, 0, 0.810461, 11.1801, -0.00545026, 97.3785, 1549397999.1, 26.6156, 21.7197, 997.943
5.888604 , 162.547, 164.228, 0, 600.003, 4.26827, 4.24641, 0, 0, 0.807415, 11.1801, -0.00548854, 97.3784, 1549397999.6, 26.6146, 21.6891, 997.945
6.246275 , 162.608, 164.239, 0, 599.998, 4.26845, 4.24642, 0, 0, 0.792185, 11.1801, -0.00545416, 97.3788, 1549398000.1, 26.6135, 21.6532, 997.938
6.887768 , 162.666, 164.233, 0, 599.985, 4.26856, 4.24679, 0, 0, 0.778478, 11.1801, -0.00550391, 97.3785, 1549398000.6, 26.6125, 21.6257, 997.939
7.343789 , 162.712, 164.229, 0, 600.01, 4.26845, 4.24664, 0, 0, 0.770865, 11.1801, -0.0055724, 97.3789, 1549398001.1, 26.6117, 21.6039, 997.946
7.768044 , 162.746, 164.234, 0, 600.008, 4.2684, 4.24698, 0, 0, 0.766297, 11.1801, -0.00558334, 97.3792, 1549398001.6, 26.6112, 21.5872, 997.95
8.230504 , 162.761, 164.235, 0, 599.988, 4.26836, 4.24708, 0, 0, 0.77391, 11.1801, -0.00564896, 97.3795, 1549398002.1, 26.6109, 21.574, 997.953
8.756039 , 162.752, 164.235, 0, 599.962, 4.26828, 4.24725, 0, 0, 0.780001, 11.1801, -0.00570001, 97.38, 1549398002.6, 26.6111, 21.5457, 997.95
9.268605 , 162.711, 164.223, 0, 599.997, 4.26825, 4.24755, 0, 0, 0.780001, 11.1801, -0.00577735, 97.3802, 1549398003.1, 26.6117, 21.5073, 997.944
9.797924 , 162.667, 164.235, 0, 600, 4.26832, 4.24757, 0, 0, 0.781524, 11.1801, -0.00581069, 97.3799, 1549398003.6, 26.6126, 21.4895, 997.945
(Advanced) XML value
There are a number of "lower-level" values that come from communication with the actual hardware devices (console, head, fluorometer). Many of these are repackaged and available through the Data or Status Dictionaries, but not everything. To access (get and set) these, it is necessary to use an XML interface.
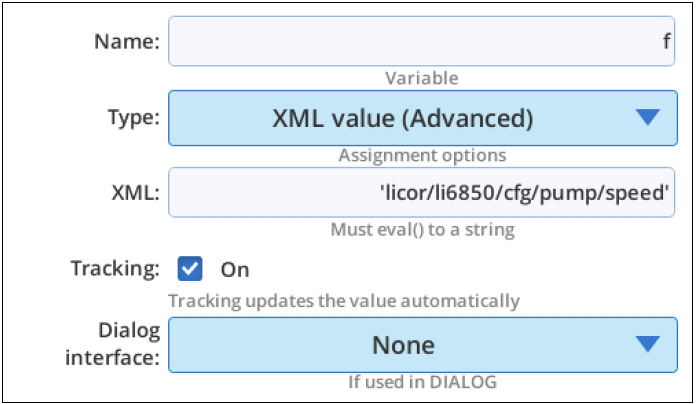
This XML entry licor/li6850/cfg/pump/speed is a shorthand for selecting the XML value at
<licor><li6850><cfg><pump><speed>value</speed></pump></cfg></li6850></licor>AUTOENV
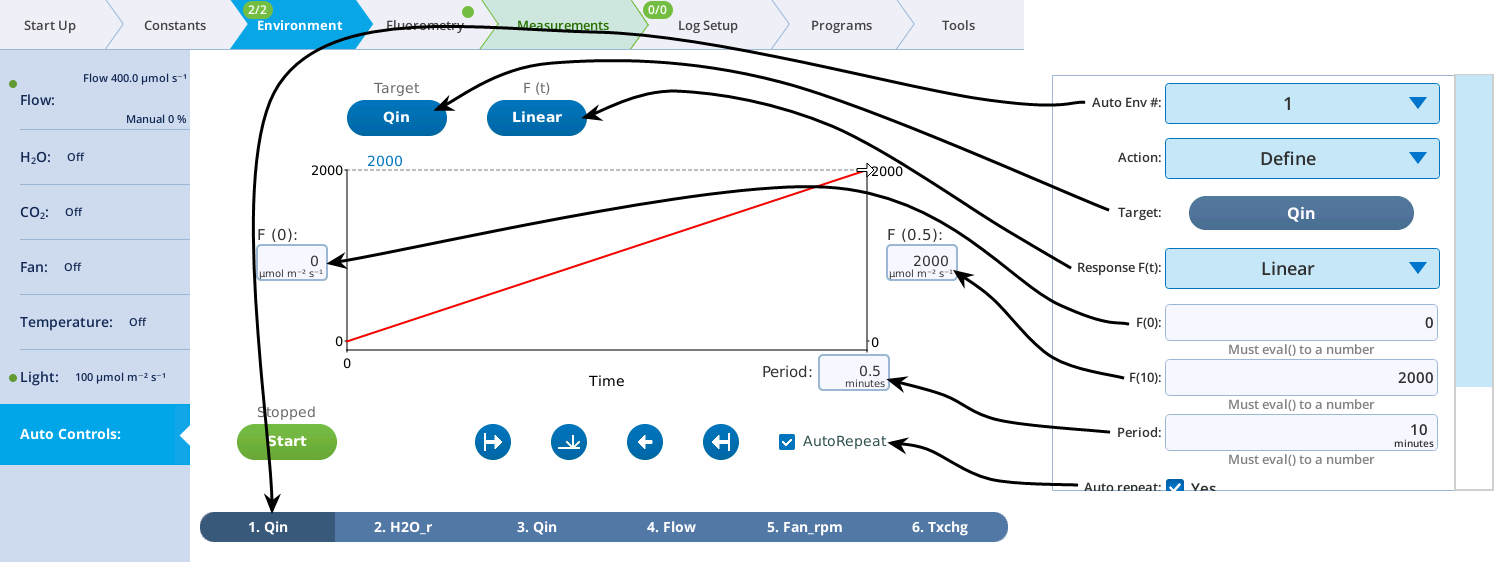
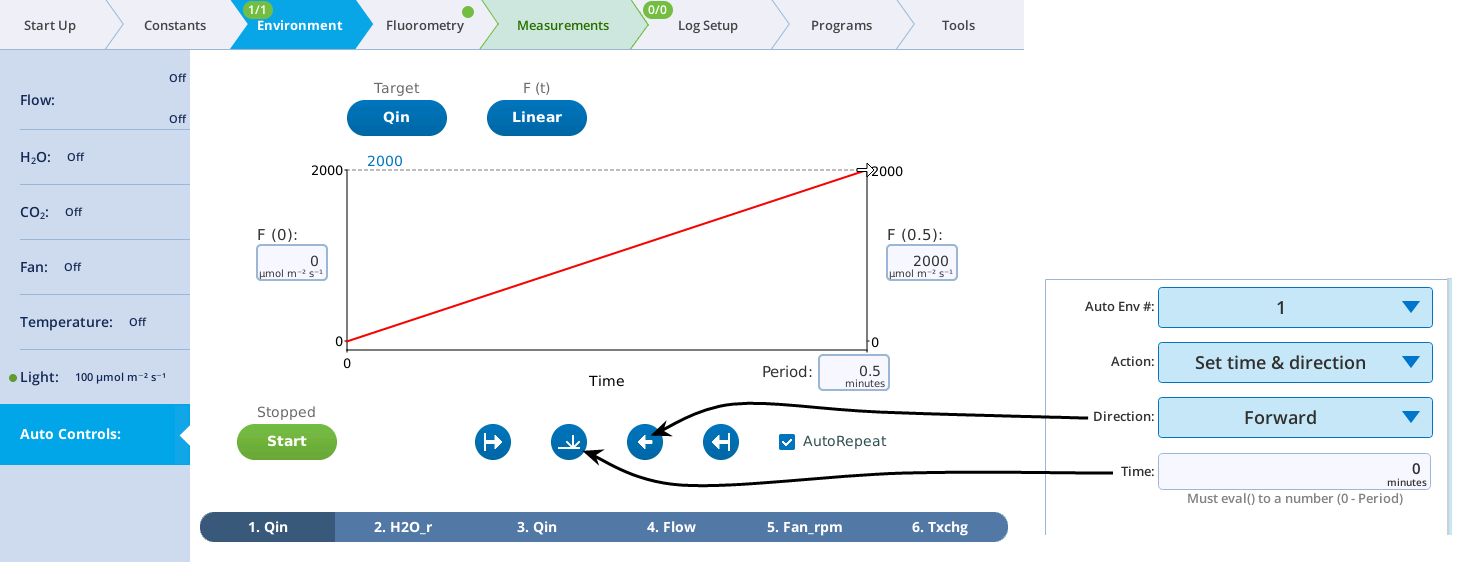
AUTOENV provides a means for a BP to configure and control any of the six Auto Controls. There are four sub-options ('Actions') for an AUTOENV step, and are illustrated in the figures below.
A BP can configure and start an AutoEnv, but note that once running, the AutoEnv is independent of the BP that started it; it will keep running when the BP ends, unless the BP stops it or the AutoEnv hits an end with AutoRepeat off.
With Action set to Define (Figure 12‑88), you can configure everything relating to the Y-axis.
With Action set to Set time & direction (Figure 12‑89), you can set direction and location on the time axis.
With Action set to Start or Stop (Figure 12‑90), you can turn the AutoEnv on or off.
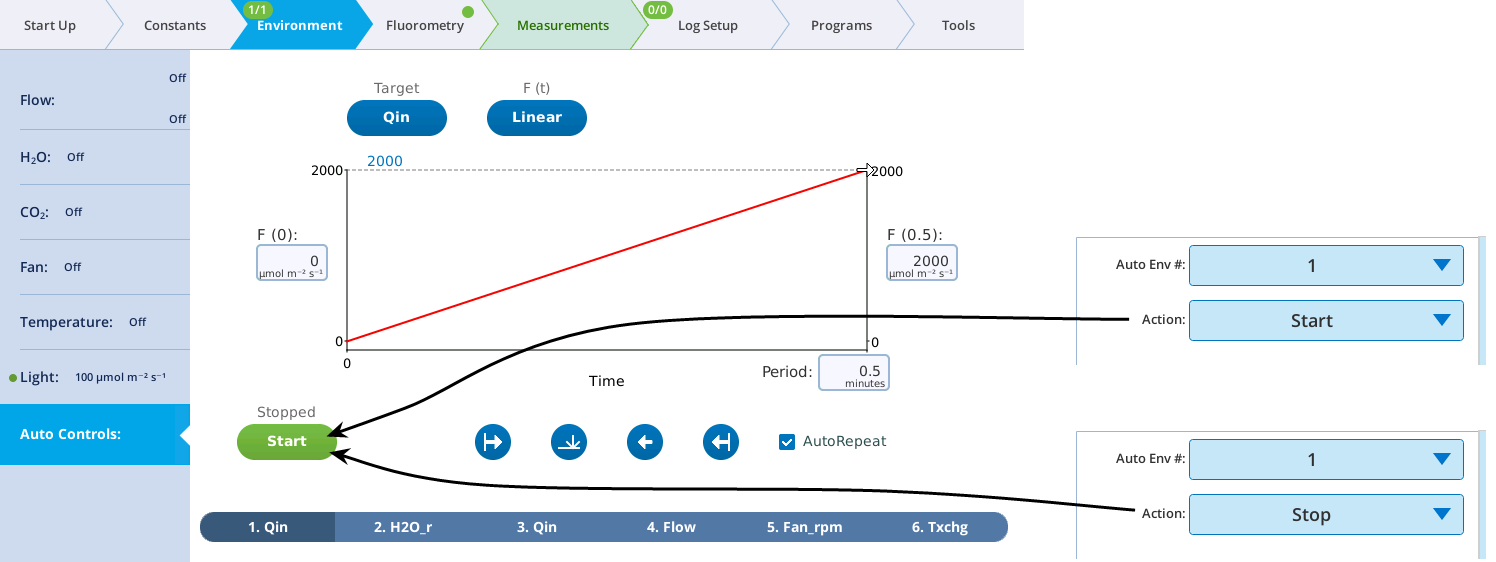
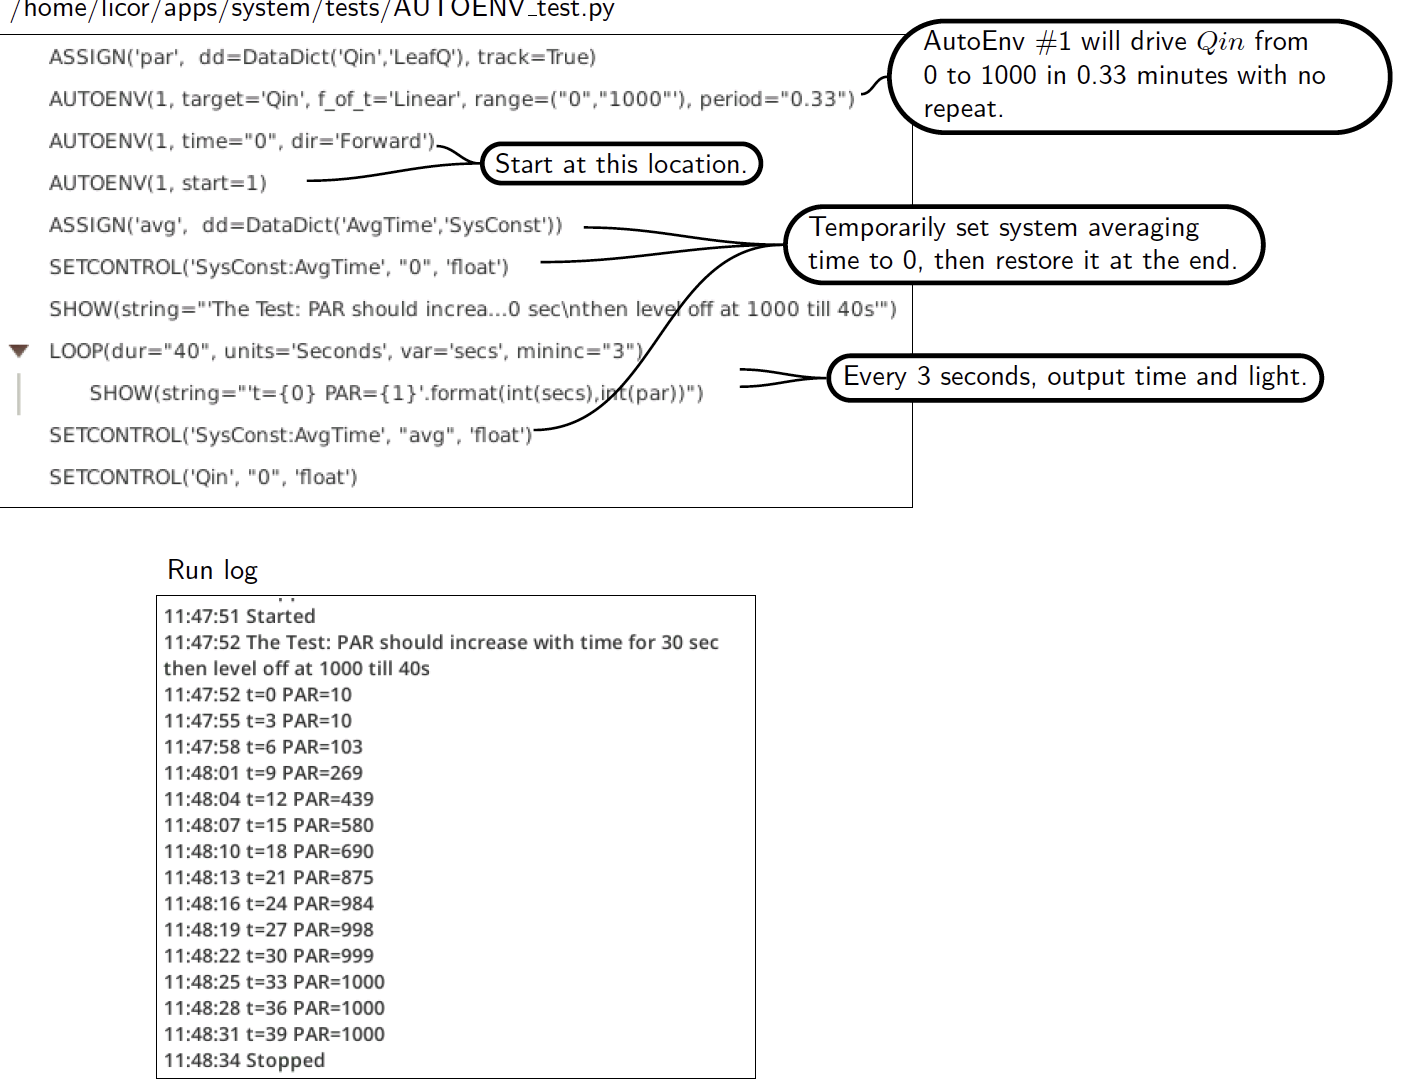
Figure 12‑91 illustrates the use of AUTOENV.
Note that there is nothing in the AUTOENV user interface that actually captures the current state of any AutoEnv; it is write-only, basically. You can, however, get a dictionary of AutoEnv configuration information via ASSIGN[Topic and Key], using the topic licor/li6850/scripts/autoenv/x/constants where x is 1, 2, ... 6.
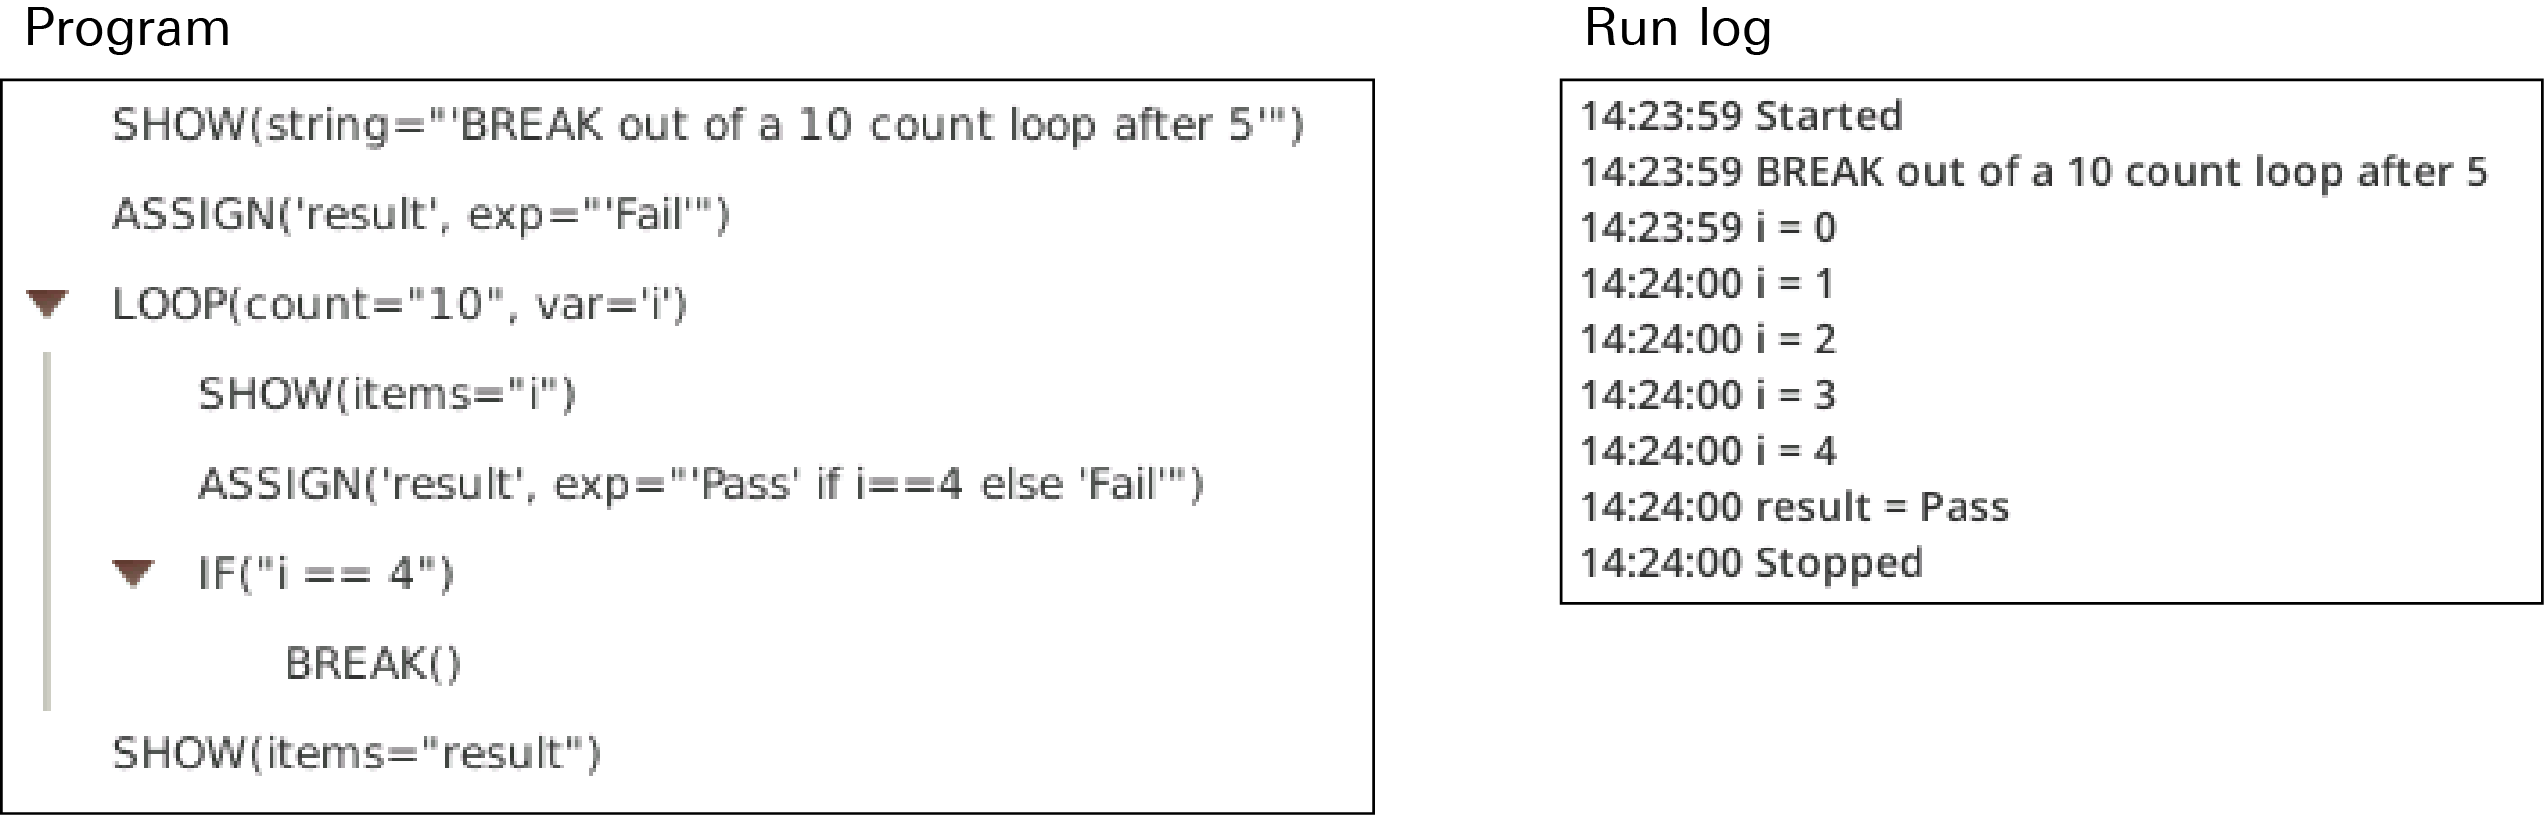
BREAK
BREAK provides a way to exit from a LOOP or WHILE (Figure 12‑92).
CALL and DEFINE
DEFINE is the BP equivalent of a subroutine or function. It defines a collection of program steps that can be called from anywhere (CALL), and have parameters passed to it.
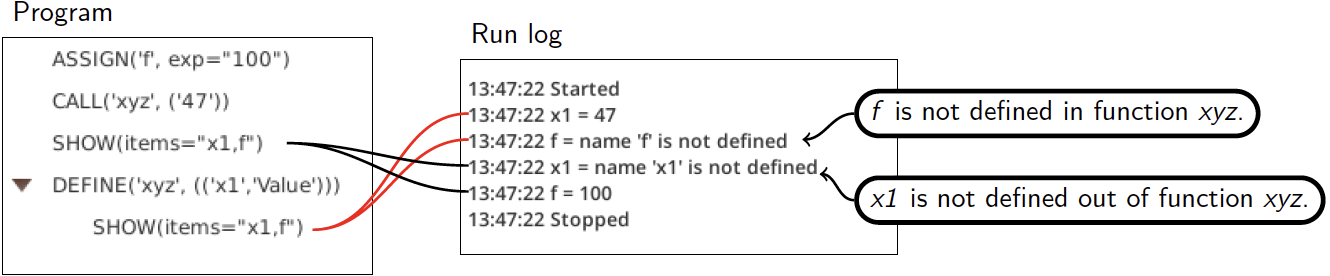
Variable scope
User defined variables are local to the main program, or to the DEFINE function in which they are created (see EXEC for a method to make variables that are global in scope).
Passing by value or reference
Part of designing a DEFINE is specifying for each argument whether it is passed by value or reference.
Normally you pass by value, which means it is the value of the argument in the CALL statement that is important. You can use an expression or variable for that argument in the calling statement (e.g., CALL Something(x1, x2/16.2)).
Passing by reference forces you to use a variable name, and any changes to the value of that variable are "passed back" to the calling context. Figure 12‑94 illustrates. The DEFINE PassByTest takes two arguments, val is pass-by-value, ref is pass-by-reference. The function doubles both values that are passed in. In the calling context, this does not affect the pass-by-value variable a, but does affect b, which gets the final value of ref.
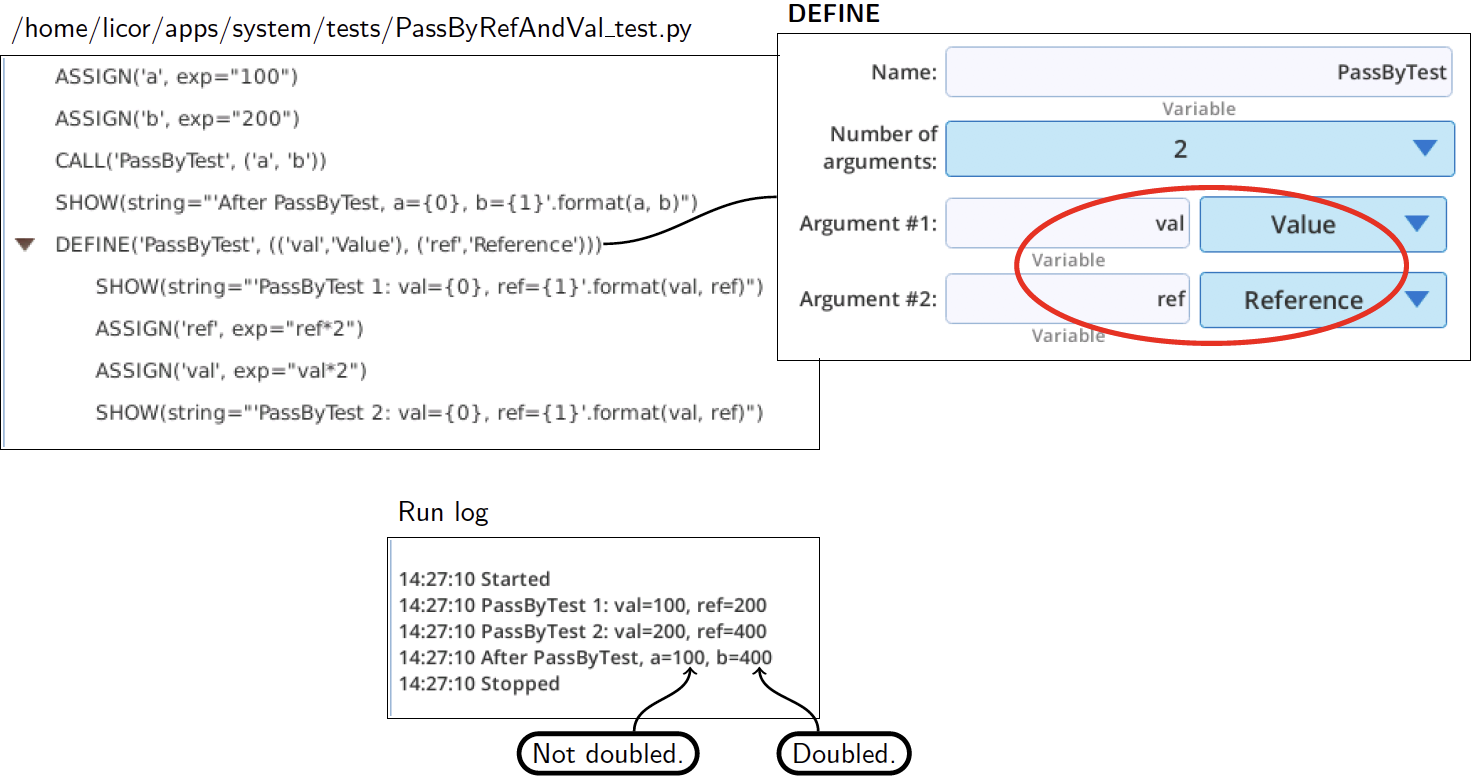
Thus, passing by reference is typically the method to use if you want to get some information back from a DEFINE, rather than just pass information to it.
DIALOG
DIALOG displays a dialog box for obtaining input from the user (Figure 12‑95)
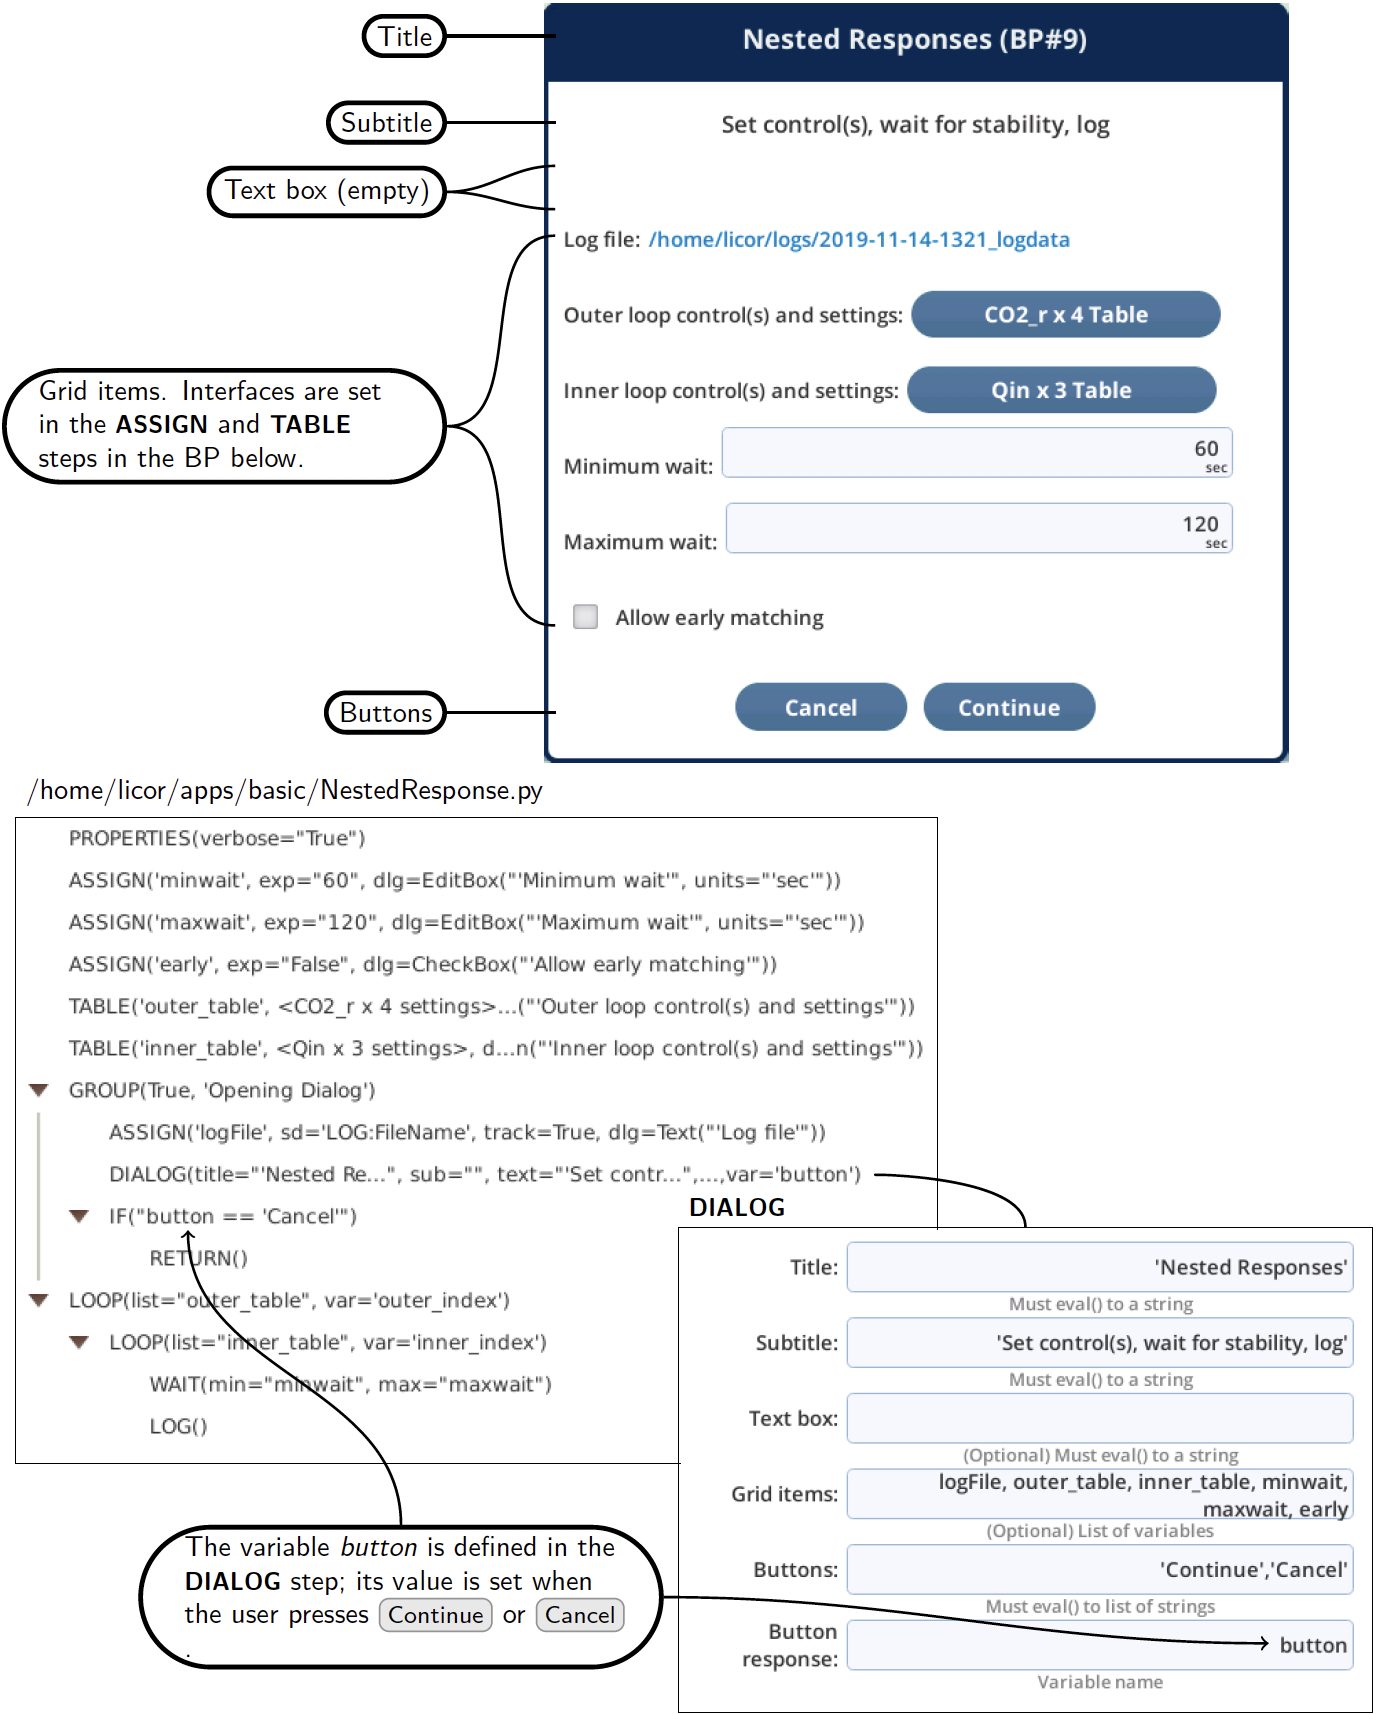
The DIALOG's setup interface (Figure 12‑95 bottom) allows you to specify the dialog's parameters:
- Title should be a string, or string variable name. The system always appends "(BP#n)" to the title, where n is the BP's pid number.
- Subtitle should be a string or a string variable name.
- Text box (optional) should be a string or string variable. To force line breaks, embed a nn (backslash n) in the string.
- Grid items (optional) is a list of variables whose values can be edited in the dialog.
- Buttons is a list of button labels. In no list is specified, an "OK" button will be provided.
- Button result name. The BP variable that will contain the label of the button the user taps (closing the dialog). The DIALOG step will create this variable if it doesn't already exist.
While the dialog is displayed, the BP is in a wait state until the user presses one of the dialog's buttons.
Grid items
Grid items are items with a user interface, and can be added to a dialog by including one or more variable names in the Grid items list of the DIALOG's configuration. Each name is used to access the current value of the variable, and the Dialog interface information that was in the ASSIGN or TABLE setup for that variable.
A Checkbox (Figure 12‑96) is an appropriate interface for a variable that can have a True or False value. The item label tells how the check box is to be labeled.
A Dropdown list (Figure 12‑97) is appropriate for letting the user select from a scrollable list.
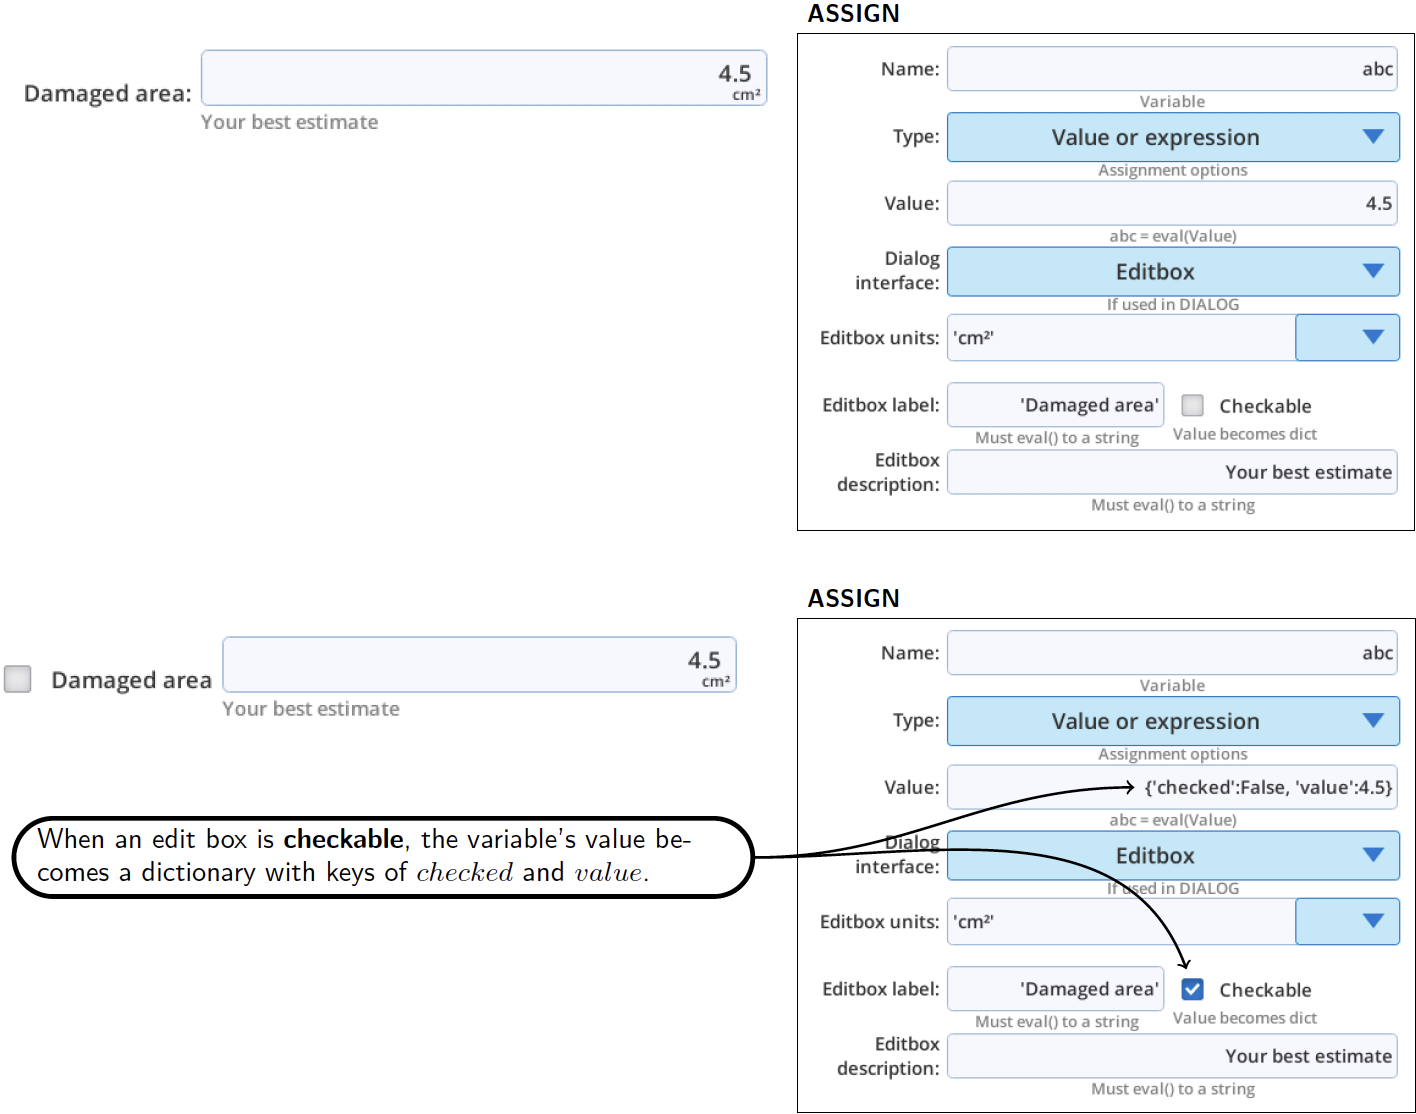
An Editbox (Figure 12‑98) is suitable for strings or values. There is also a checked option.
The Radio buttons option (Figure 12‑99) is appropriate for letting the user select from a small selection. If your label and list of items is too long, it will not all be visible in the dialog box.

The Text dialog option (Figure 12‑100) is not editable, but is useful for showing the current value. This is the only dialog option available for all ASSIGN items.
The Table and Text summary dialog options (Figure 12‑101) are available for variables assigned to the TABLE; one is editable, one is not.
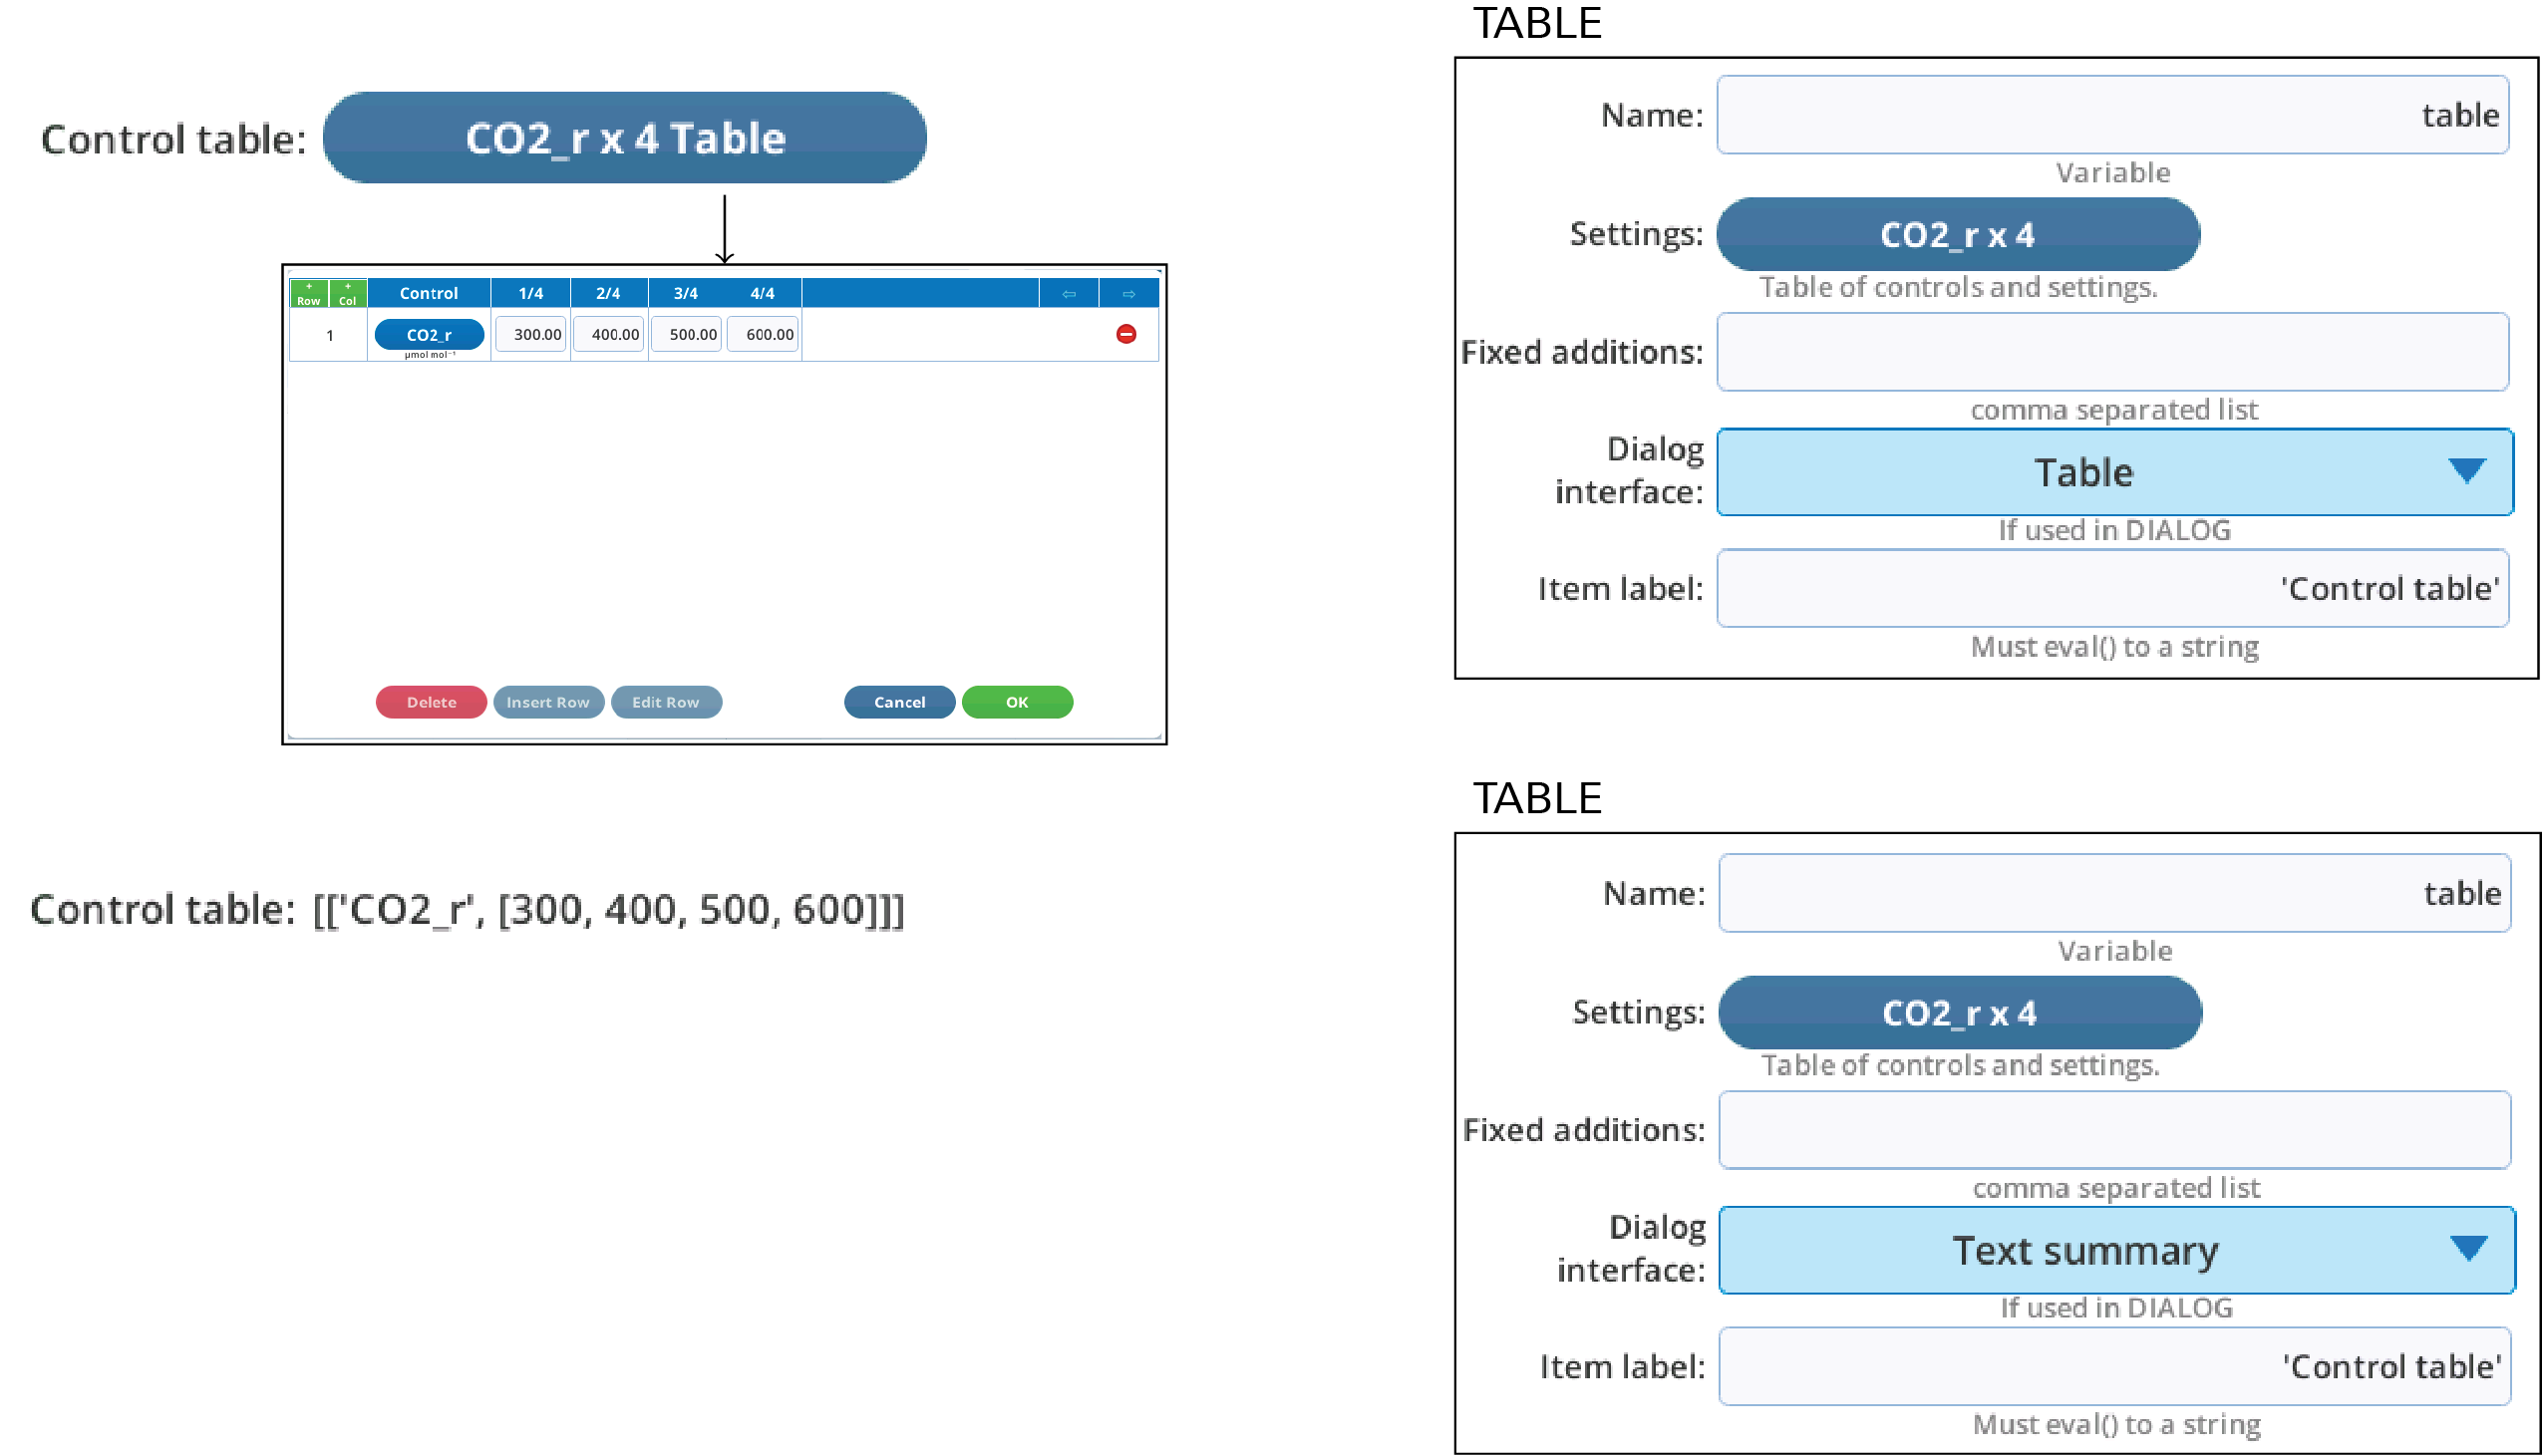
_dlg variables
When you enable Dialog interface information in an ASSIGN or TABLE step, the system creates a second BP variable based on the Name field. For example, in Figure 12‑101, a variable named table is created that points to the control table, but because there is dialog interface information enabled, a second variable named table_dlg is created that contains that information. This auxiliary variable is always named for the Name entry, with _dlg appended.
_dlg variables can be accessed and manipulated, just like any other variable. You could include one in a SHOW statement, for example, to learn its structure. You can also create them explicitly, if you want to include a information in a Dialog for a variable that was not created by ASSIGN or TABLE.
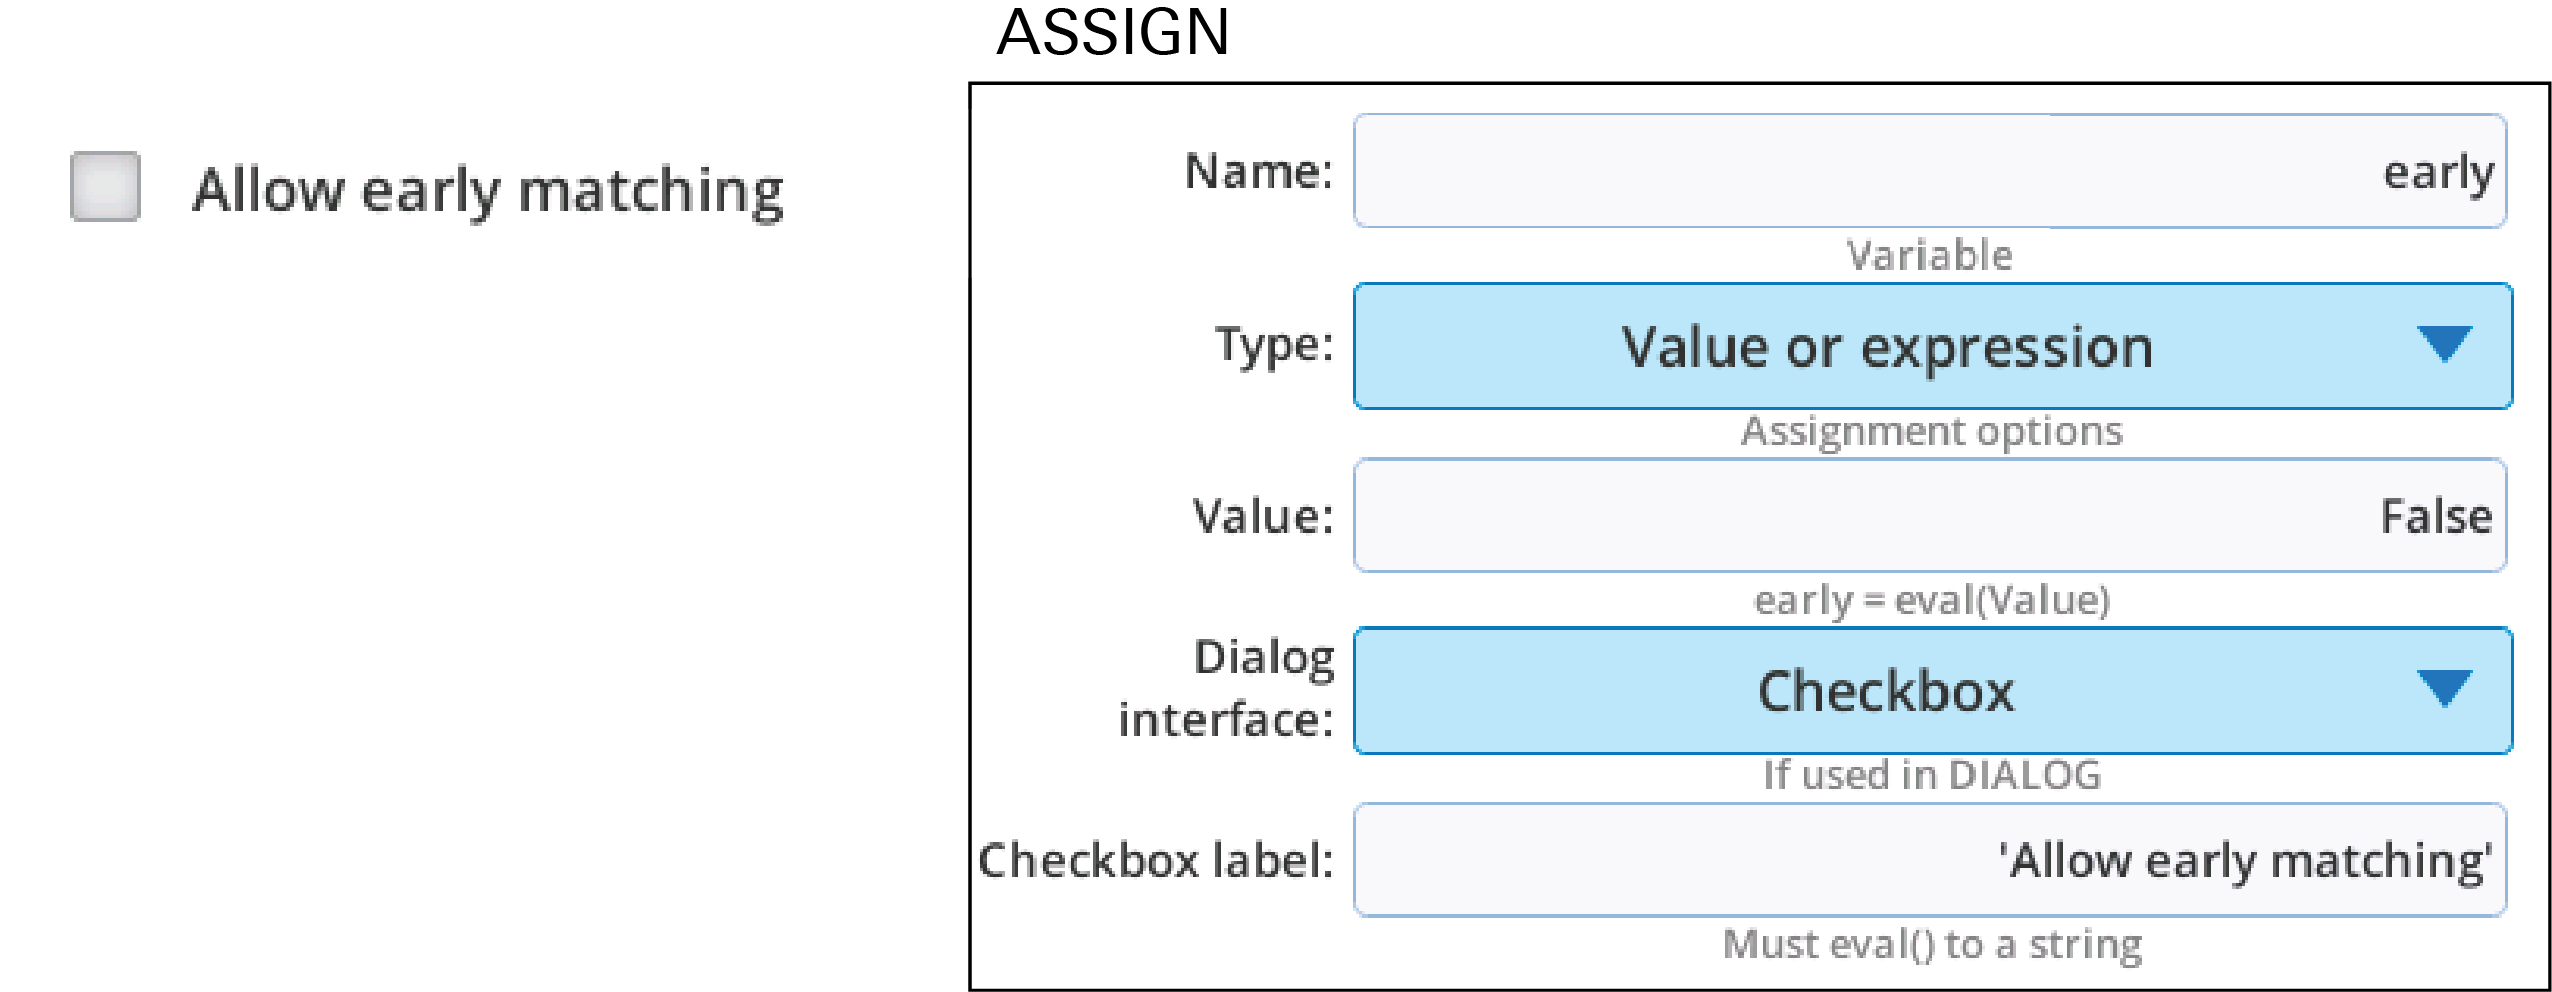
To illustrate, the check box configuration in Figure 12‑96 is doing this Python equivalent:
xyz = False
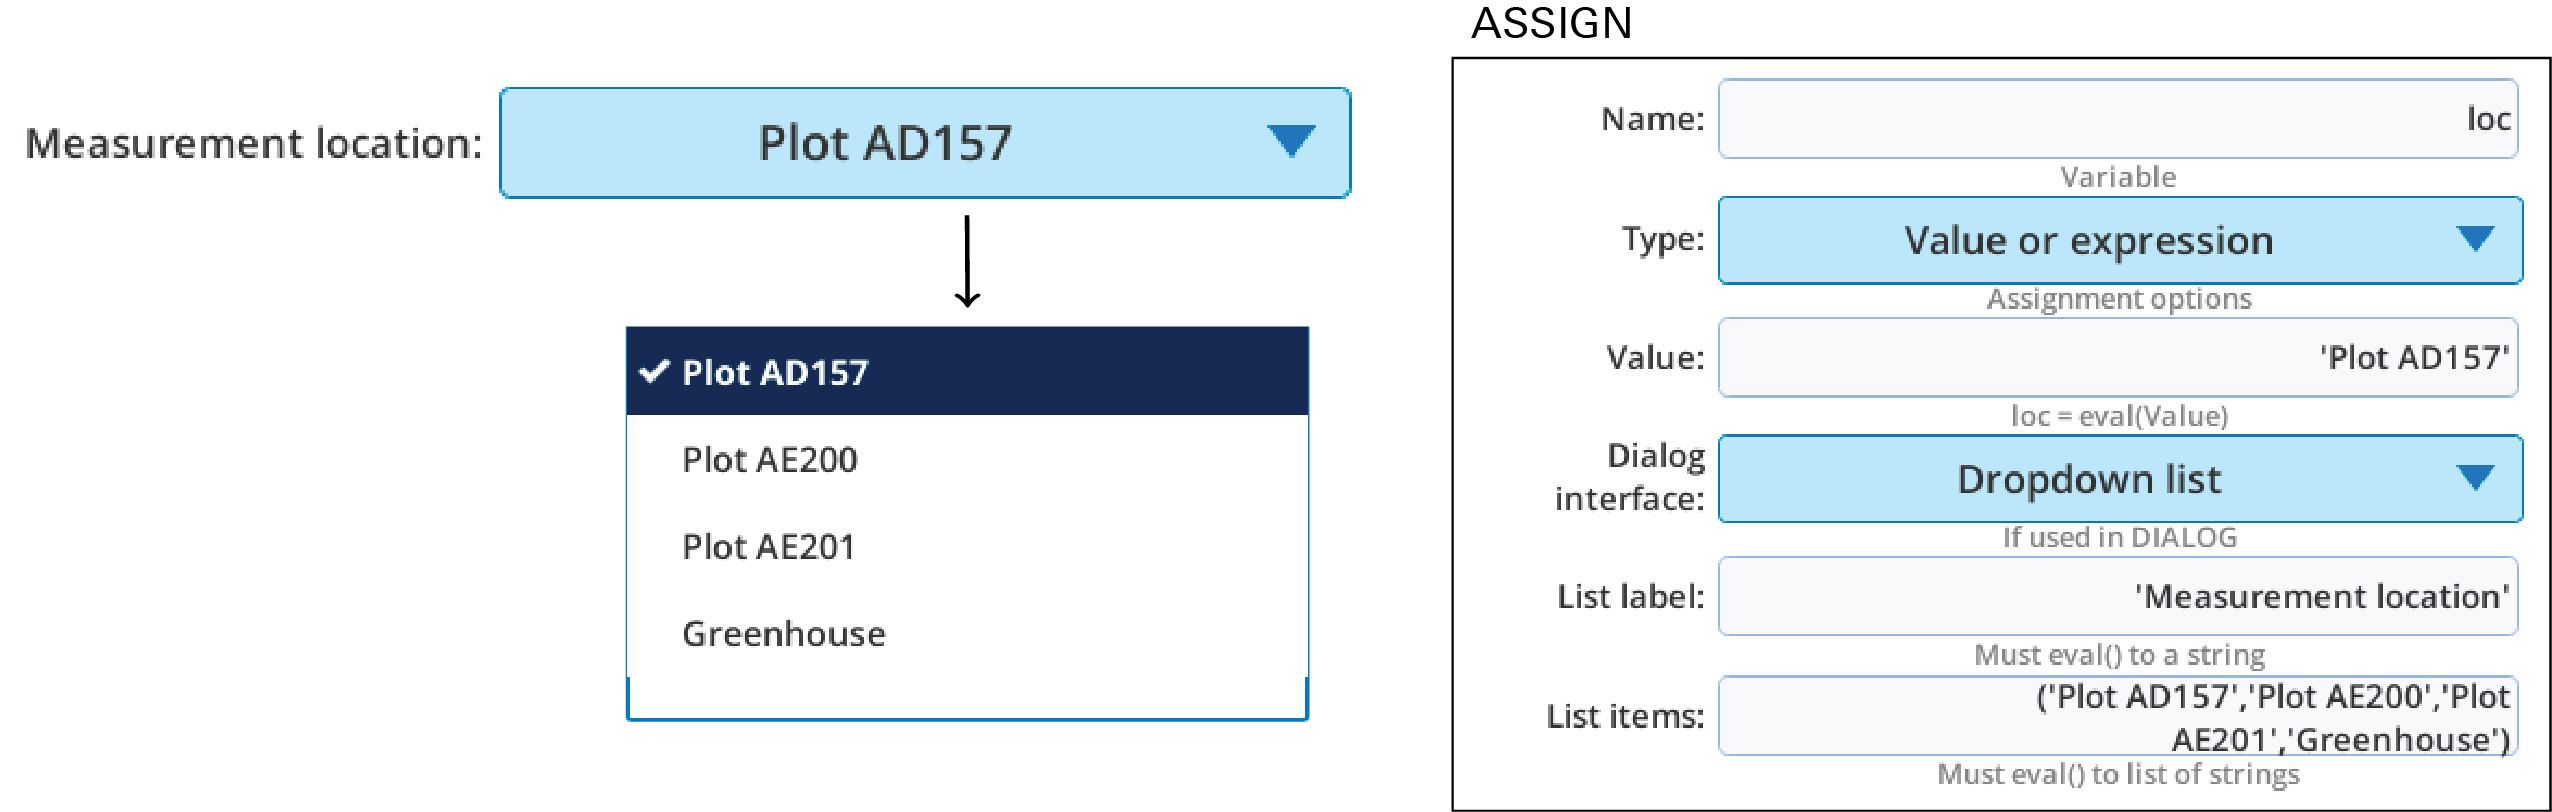
xyz_dlg = {'interface': 1, 'target': 'early', 'label': 'Allow early matching'}The drop down configuration in Figure 12‑97 is doing this Python equivalent:
loc = 'Plot AD157'
loc = 'Plot AD157'
loc_dlg = {'interface': 3, 'values': ('Plot AD157', 'Plot AE200', 'Plot AE201', 'Greenhouse'),
'label': 'Measurement location', 'target': 'loc'}
The edit box configuration in Figure 12‑98 is doing this Python equivalent:
abc = 4.5
abc_dlg = {'target': 'abc', 'description': 'Your best estimate', 'units': 'cm\u00b2',
'interface': 2, 'label': 'Damaged area', 'checkable': False, 'width': 0}
The checkable version of edit box does this:
abc = {'value': 4.5, 'checked': False}
abc_dlg = {'target': 'abc', 'description': 'Your best estimate', 'units': 'cm\u00b2',
'interface': 2, 'label': 'Damaged area', 'checkable': True, 'width': 0}
The radio button configuration in Figure 12‑99 is doing this Python equivalent:
loc = 'Plot AD157'
loc_dlg = {'interface': 8, 'values': ('Plot AD157', 'Plot AE200', 'Plot AE201', 'Greenhouse'),
'label': 'Where', 'target': 'loc'}
Things to consider
Some facts about DIALOGs:
- When a DIALOG statement is encountered in the BP, the dialog is presented. It remains on the screen until the user presses one of the displayed buttons. If no buttons are specified, there will be one OK button by default.
- While a DIALOG is being displayed, BP program execution remains on the BP's DIALOG step even if the user interacts with editable items (check boxes, edit boxes, etc.).
- BP variables editable by a DIALOG receive their updated values as they are edited. Including a Cancel button, for example, does not mean that pressing Cancel undoes any edits that may have been made. (You can support that behavior, of course, but you have to program for it outside of the DIALOG step.)
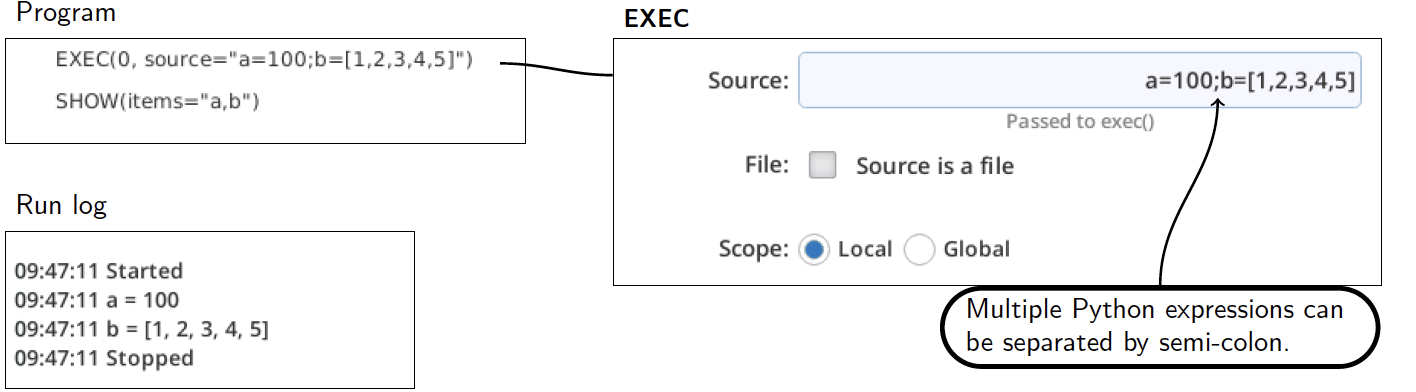
EXEC
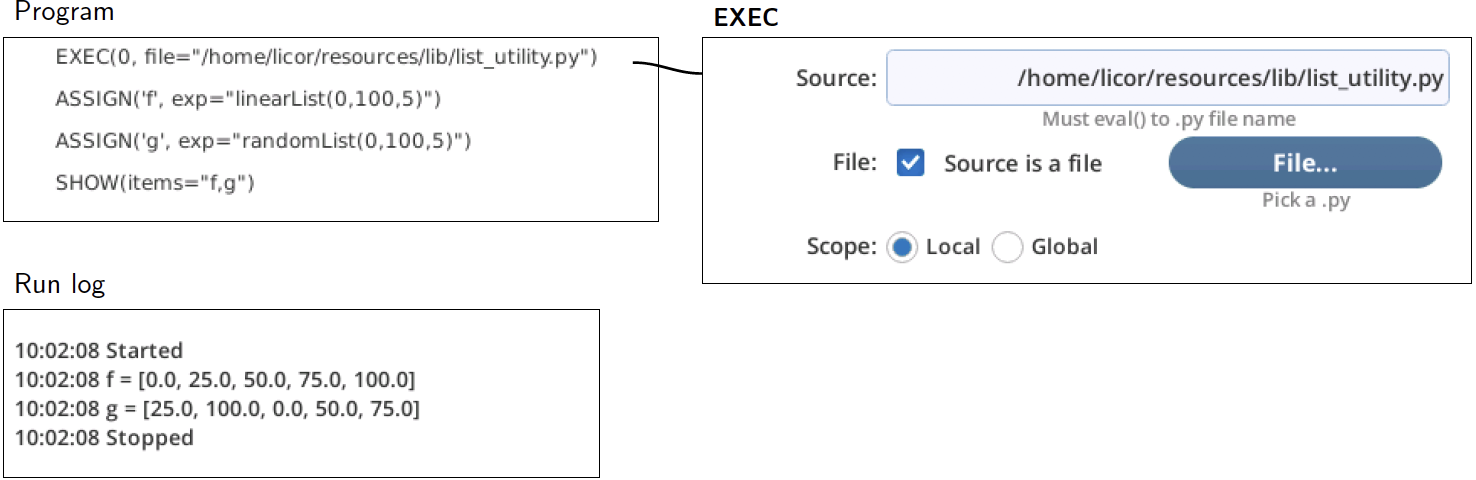
EXEC performs the Python exec() function on the text in the 'Source' entry box, or on the file named by ‘Source’. A simple example in Figure 12‑102 illustrates: we use EXEC to define two variables.
More complicated code can be put in a separate file and referenced by the EXEC. Figure 12‑103 illustrates how to add this capability to a BP.
Local vs global
If the Scope setting of an EXEC is Local, then variables defined in the EXEC are available only from the context in which the EXEC occurs. The Global option means whatever is defined in the EXEC is available anywhere (e.g., in any function) in the rest of the program. See Figure 12‑104.

MyFct subroutine.GROUP
A GROUP is a container for program steps. It has an ‘Enabled’ property that determines whether or not the contained steps execute at run time. Thus, GROUP provides a convenient way to enable/disable sections of your program.

IF, ELSE IF, ELSE
The IF step can be made into any of three types: IF, ELSE IF, and ELSE.
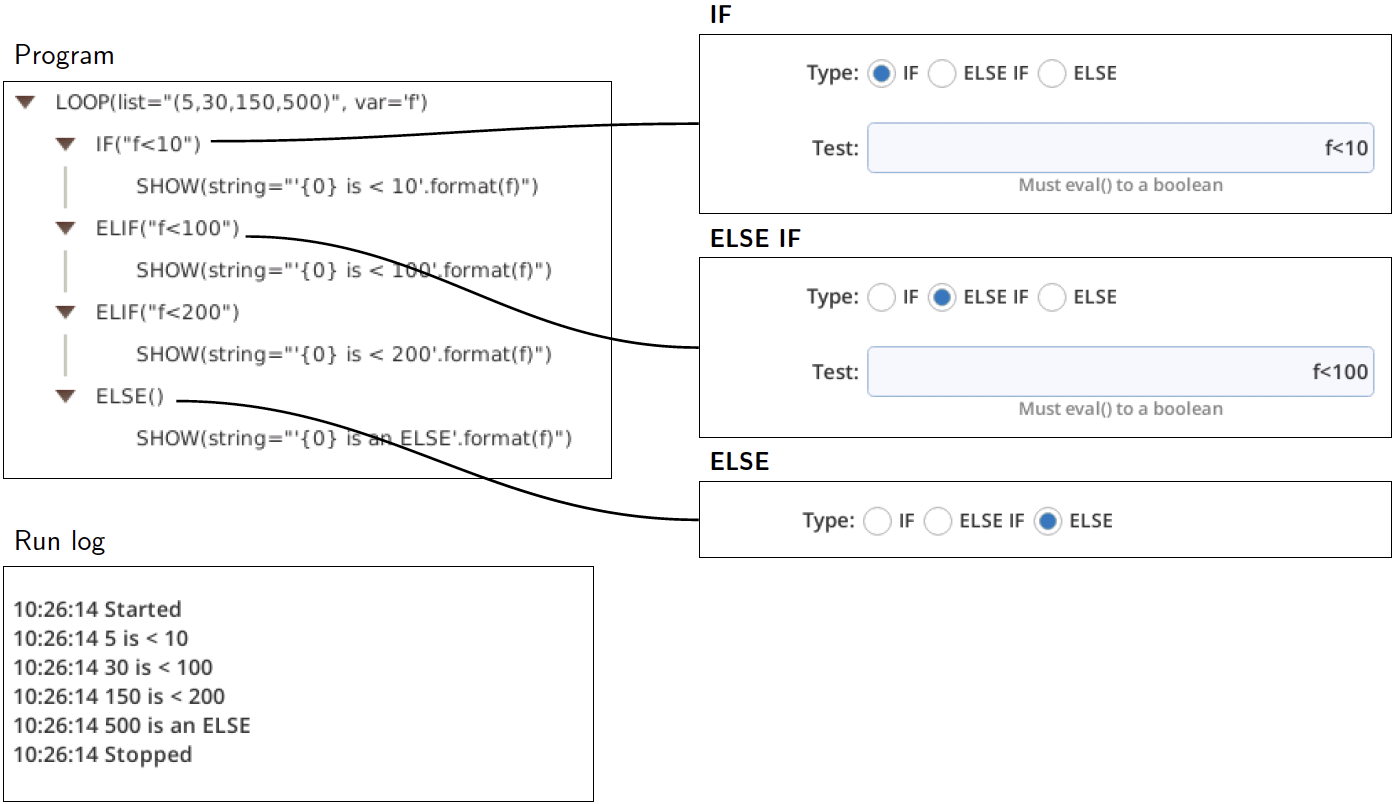
While building a BP, there is nothing that ties any of these IF variations together, so it is up to you to arrange them appropriately.
- IF always marks the start of a new IF structure.
- After the IF, there can be as many ELSE IFs as you need.
- ELSE is optional, there can be only one, and it must come last.
If there is a misplaced ELSE or ELSE IF, then you will get an error message:

LOG
The LOG statement cover all aspects of the normal LI-6800 log operations; it can open a log file, log a remark, log data, or close the file.
Open file
Figure 12‑107 illustrates opening a log file with a programmatically determined name. You can use File... to select an existing file, and modify the name in the edit box, or just type the name or expression into the edit box.
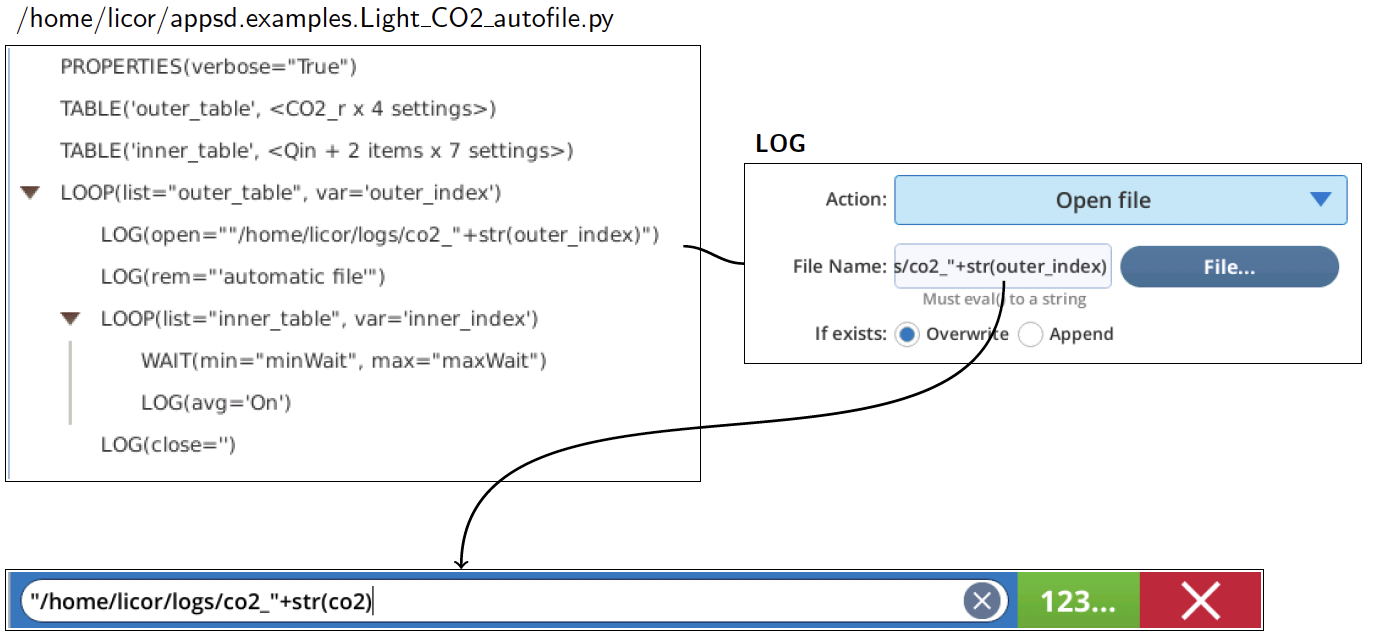
If a log file is already open when a LOG [Open file] is executed, the file will be closed first, and the new file opened.
Record remark
Adds a remark string to the file. This is skipped if no log file is open.
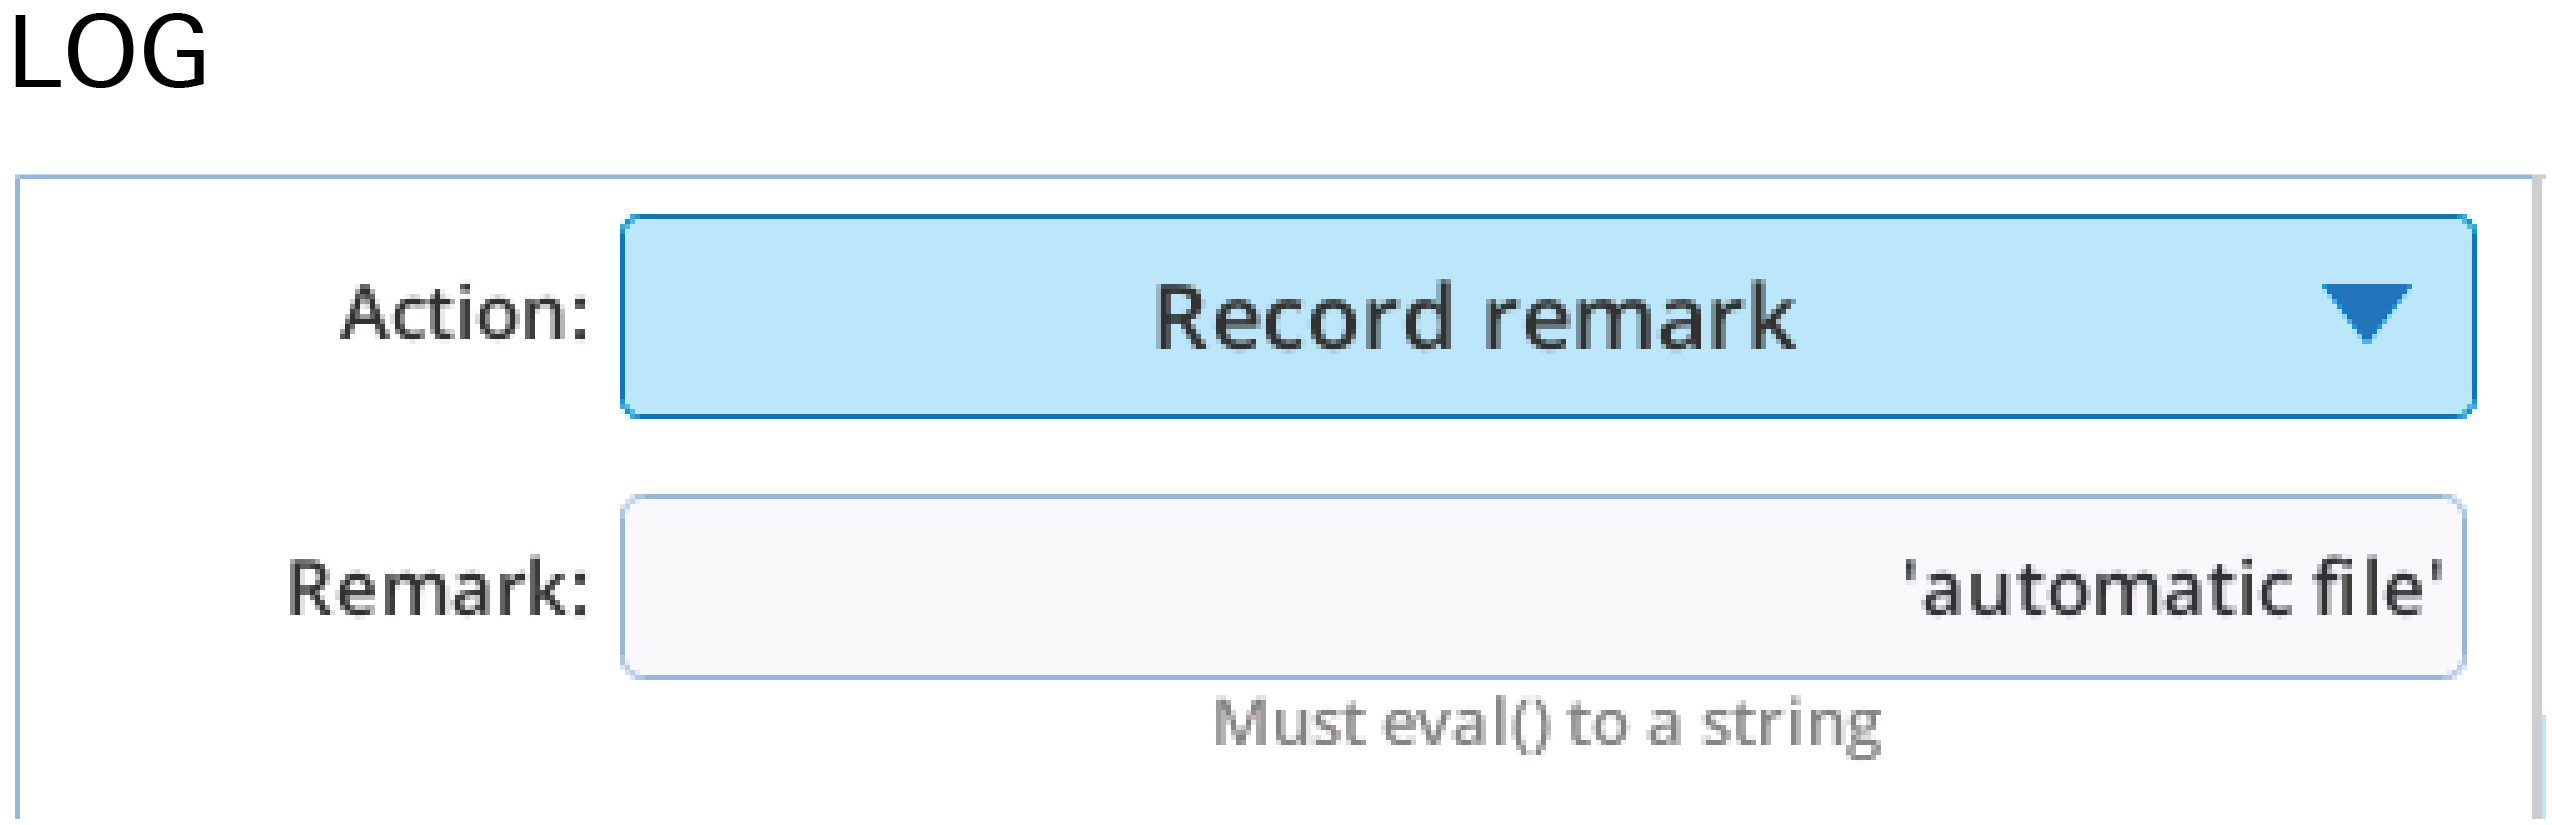
If you wish for some reason to retrieve the latest logged remark, it is available via LOG:LastRem in status dictionary.
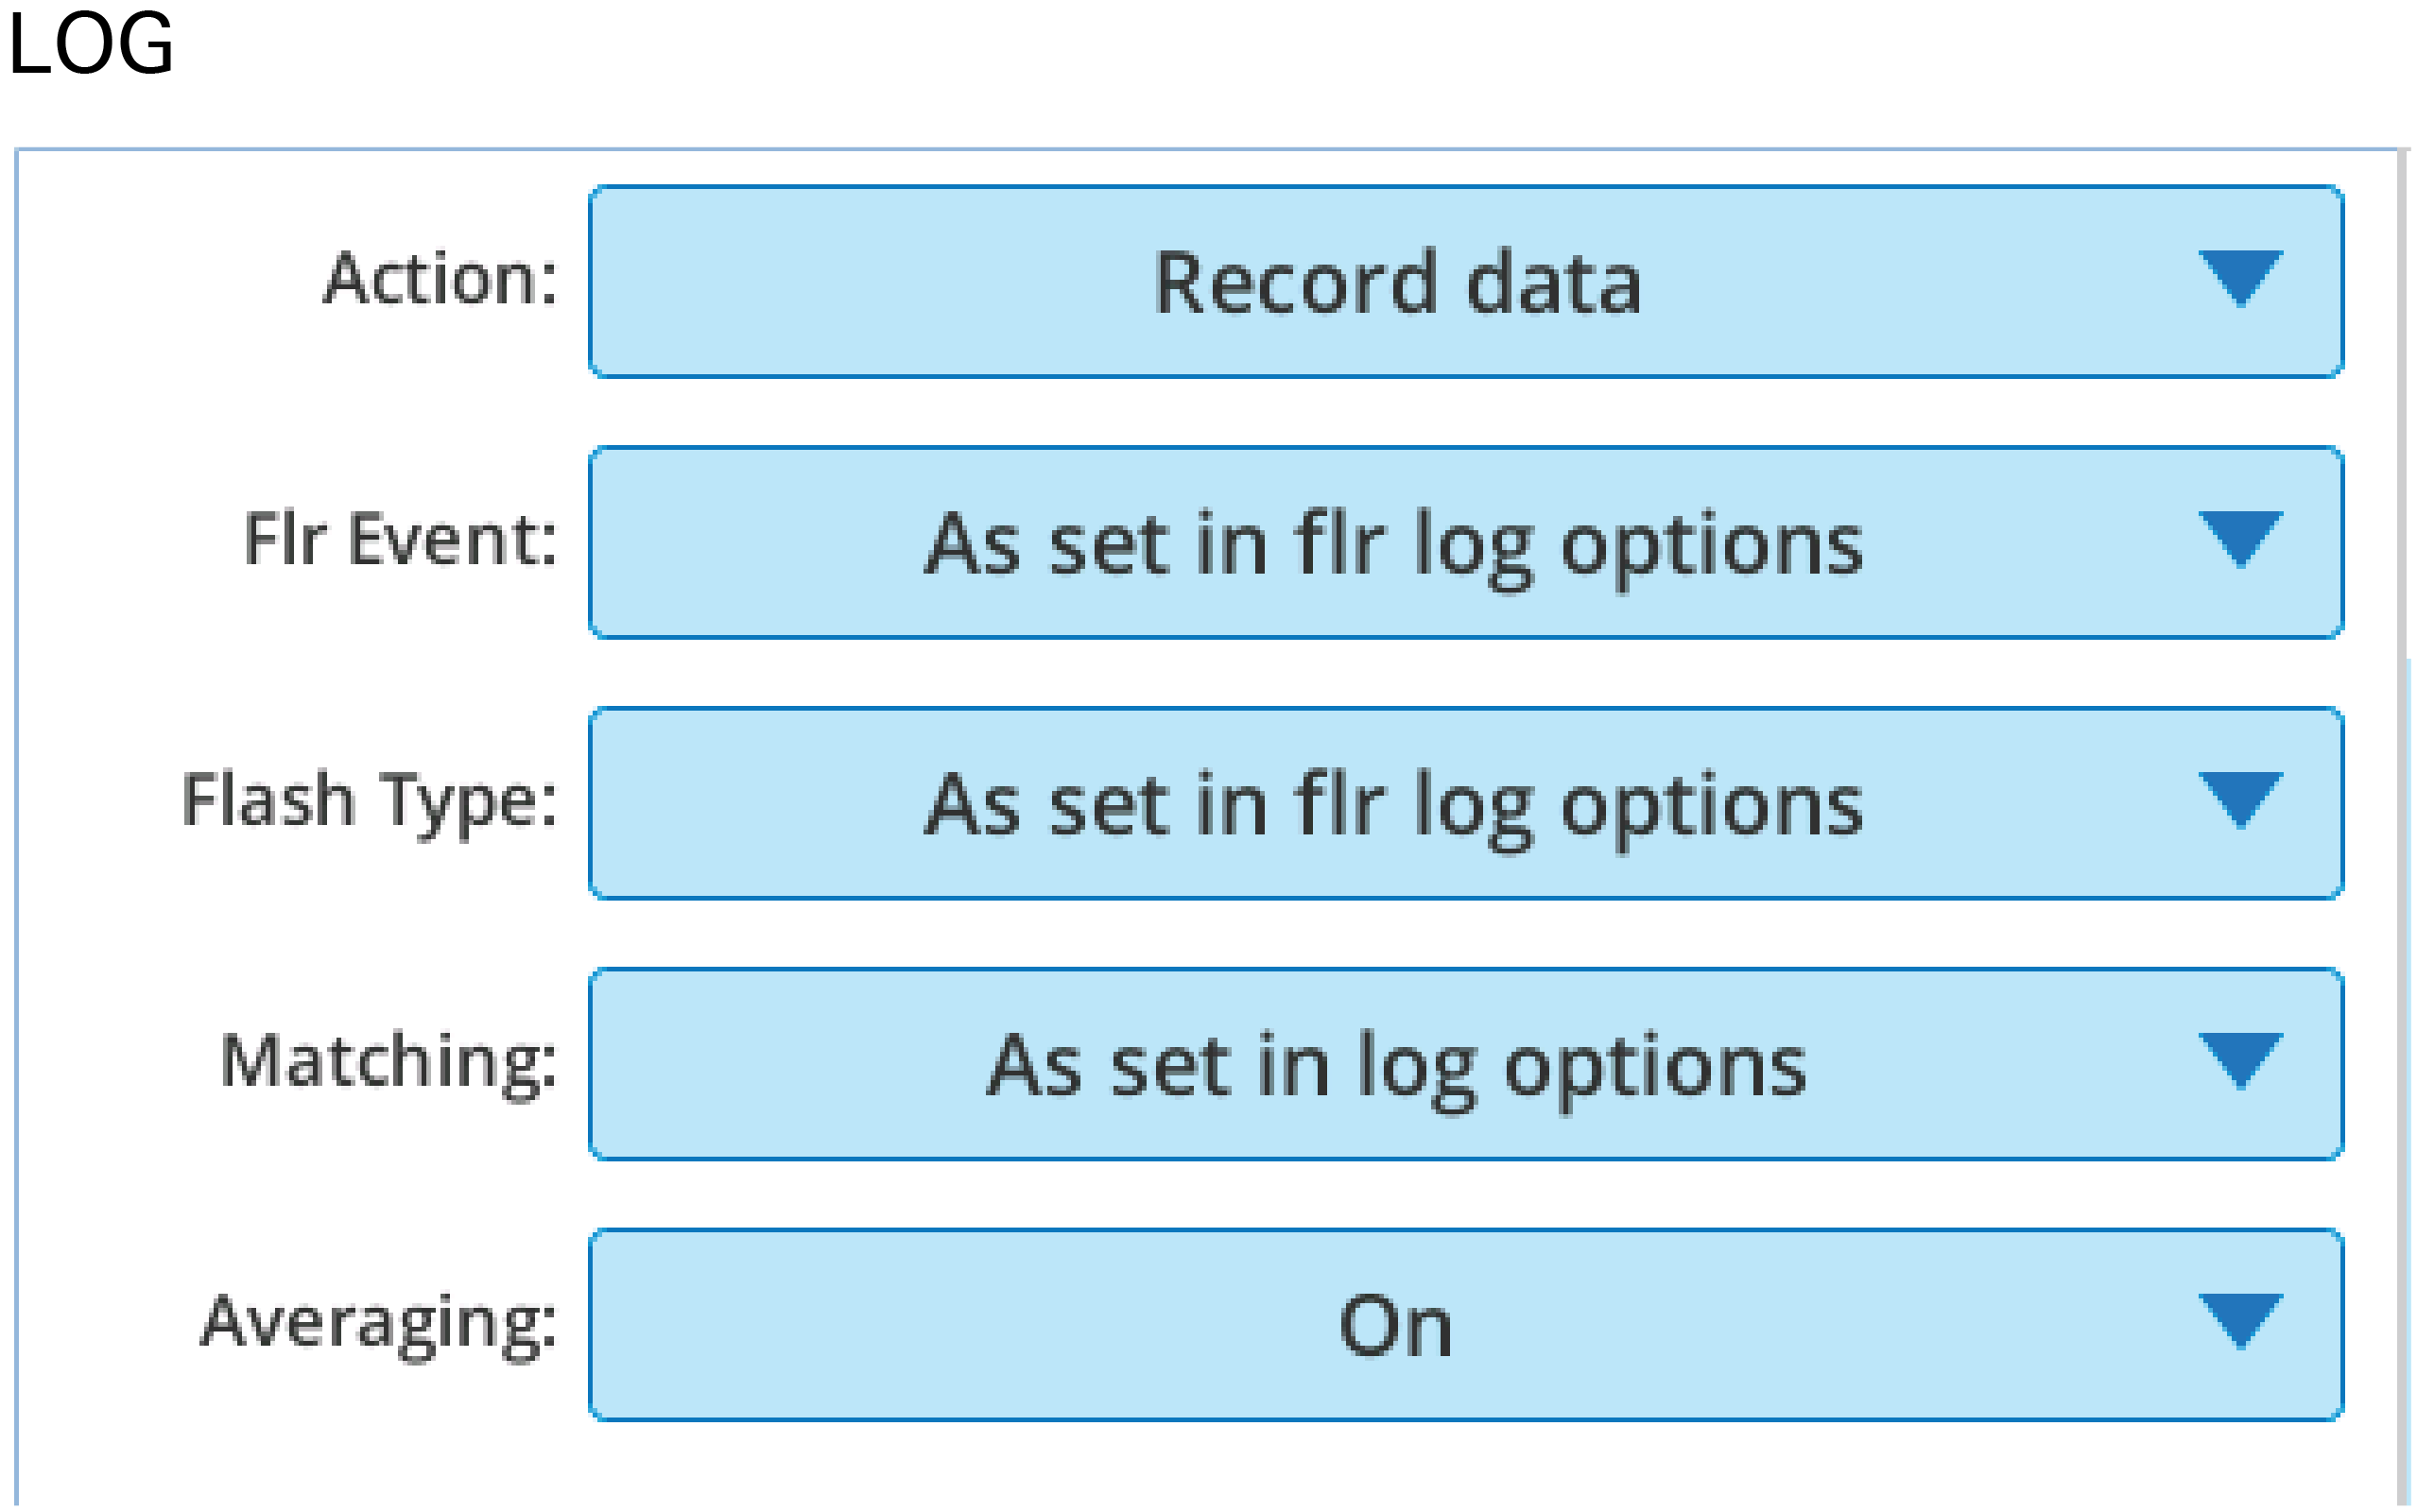
Record data
LOG[RecordData] triggers a log event, or is just skipped if no log file is open. You can override the current log options for this event if you so choose.
Close file
The LOG[Close file] option takes no parameters. If no file is open when this is executed, it does nothing.

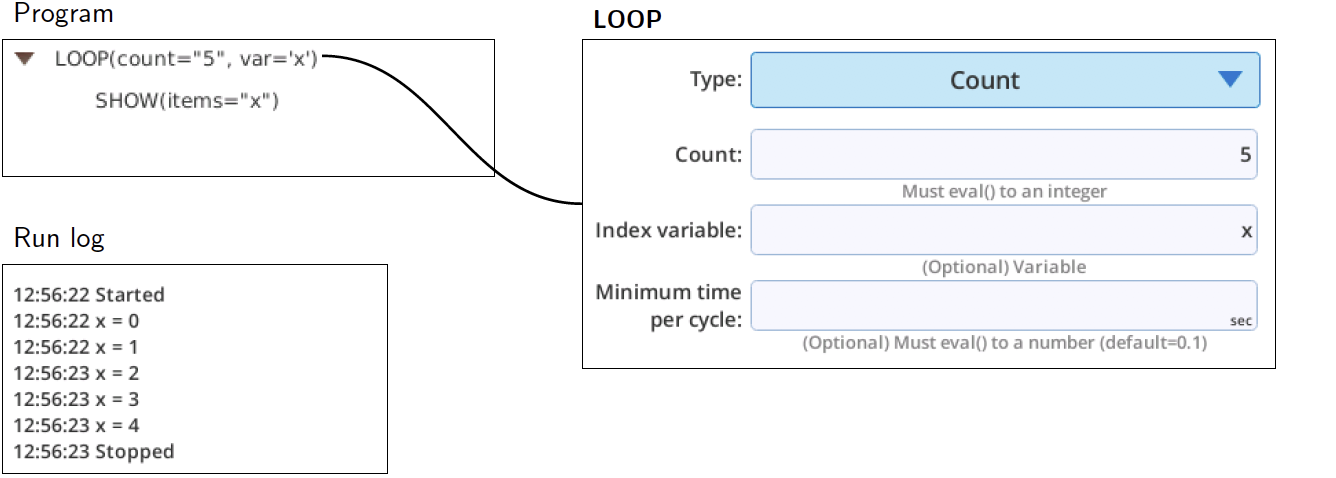
LOOP
LOOP contains steps that execute repeatedly. It comes in five types: Count, Duration, Control, List and File.
Count
If you wish to cycle a fixed number of times, use the LOOP [Count] option. You can define a variable to access the count (0, 1, ...). You can regulate the loop with ‘Minimum time per cycle’, otherwise it will be limited 0.1 seconds.
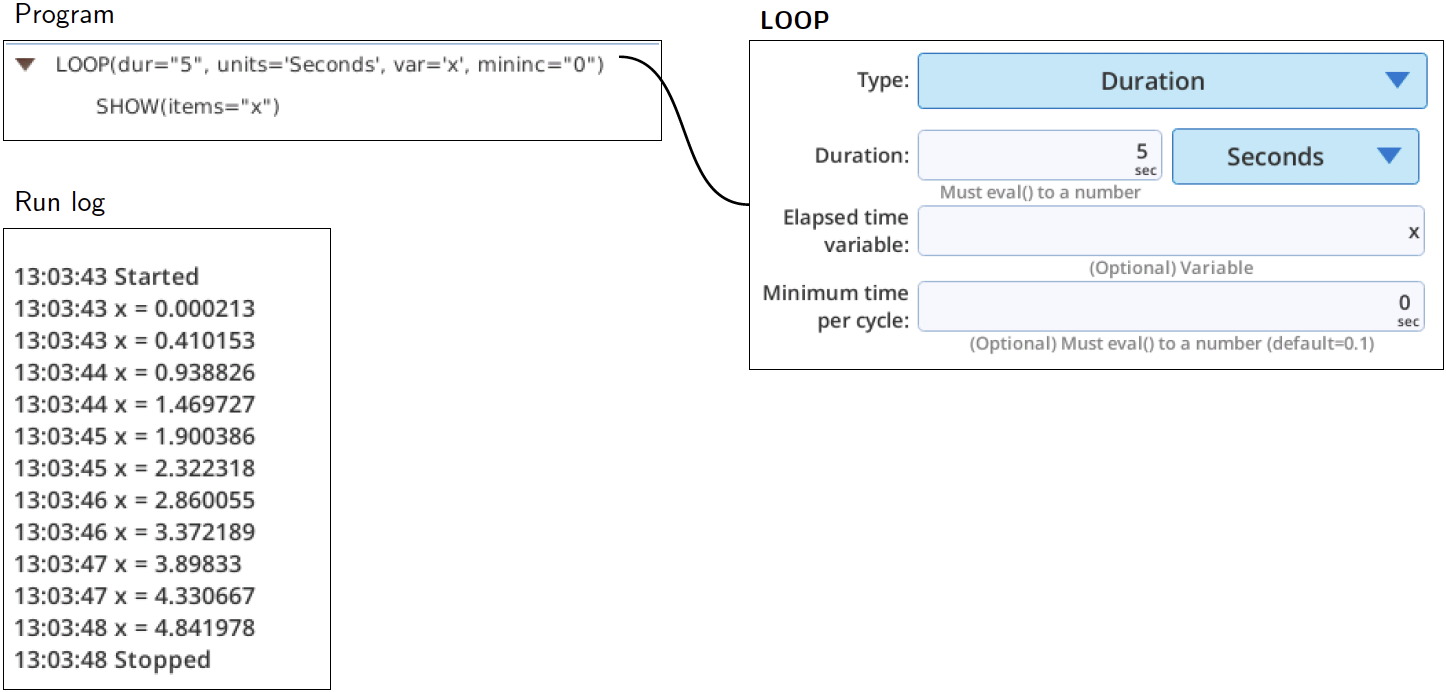
Duration
If you wish to cycle for some time duration, use the LOOP [Duration] option. You can define a variable that contains the number of seconds that program execution has been in the loop.
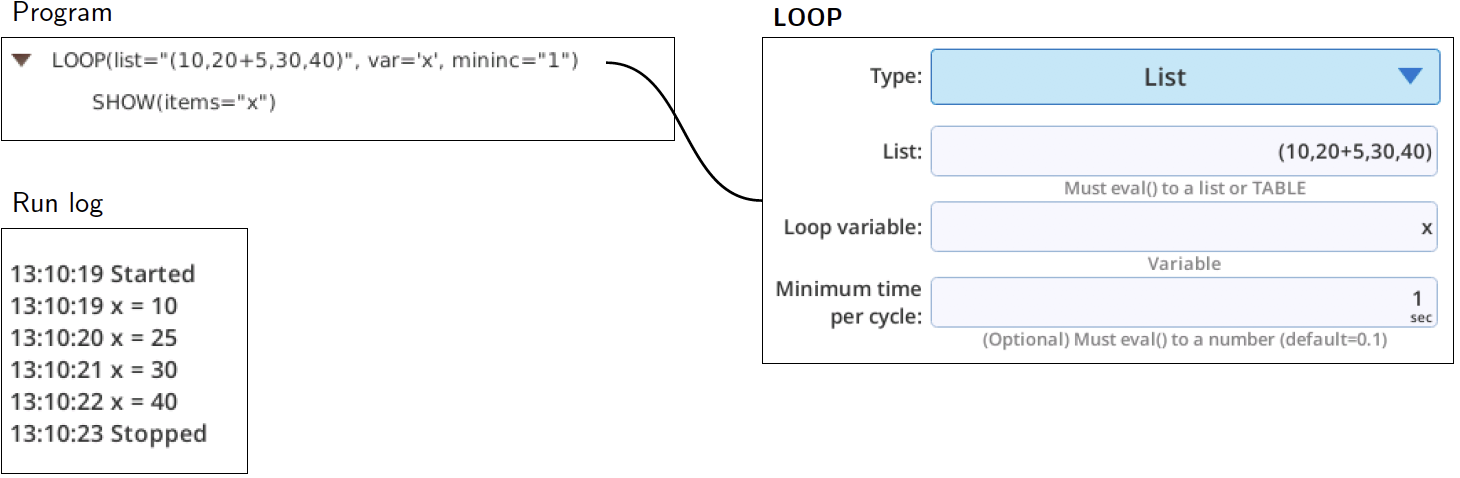
List
If you wish to cycle through a list of items of any type, use LOOP [List]. On each pass through, the associated variable that you name is assigned to an item from the list. It also works on Table variables.
File
If you wish to process lines in a file, one at a time, use LOOP [File]. It a file, and executes the loop once for each linen in the file. You define a variable that will contain the line for each loop. If you wish, you can have the line parsed, in which case the variable will be a list of the items found.
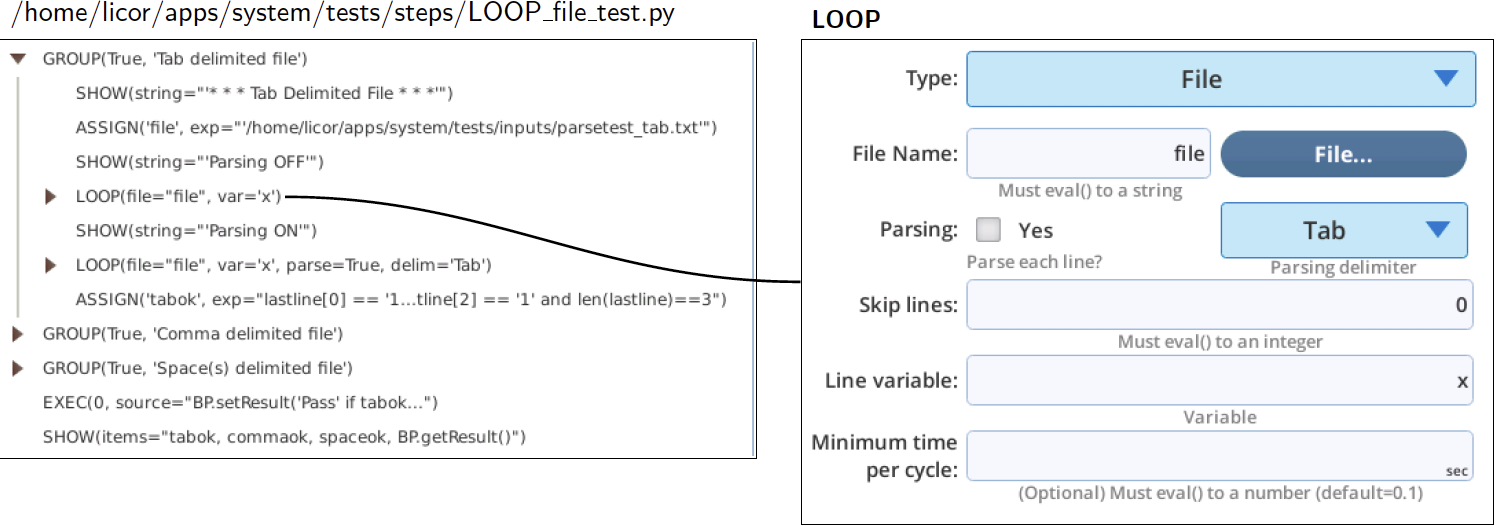
See /home/licor/apps/system/tests/LOOP_file_test.py. This program parses three sample input files, listed below (spaces and tabs are shown as printable characters in the space and tab files). The files reside in /home/licor/apps/system/tests/inputs/.
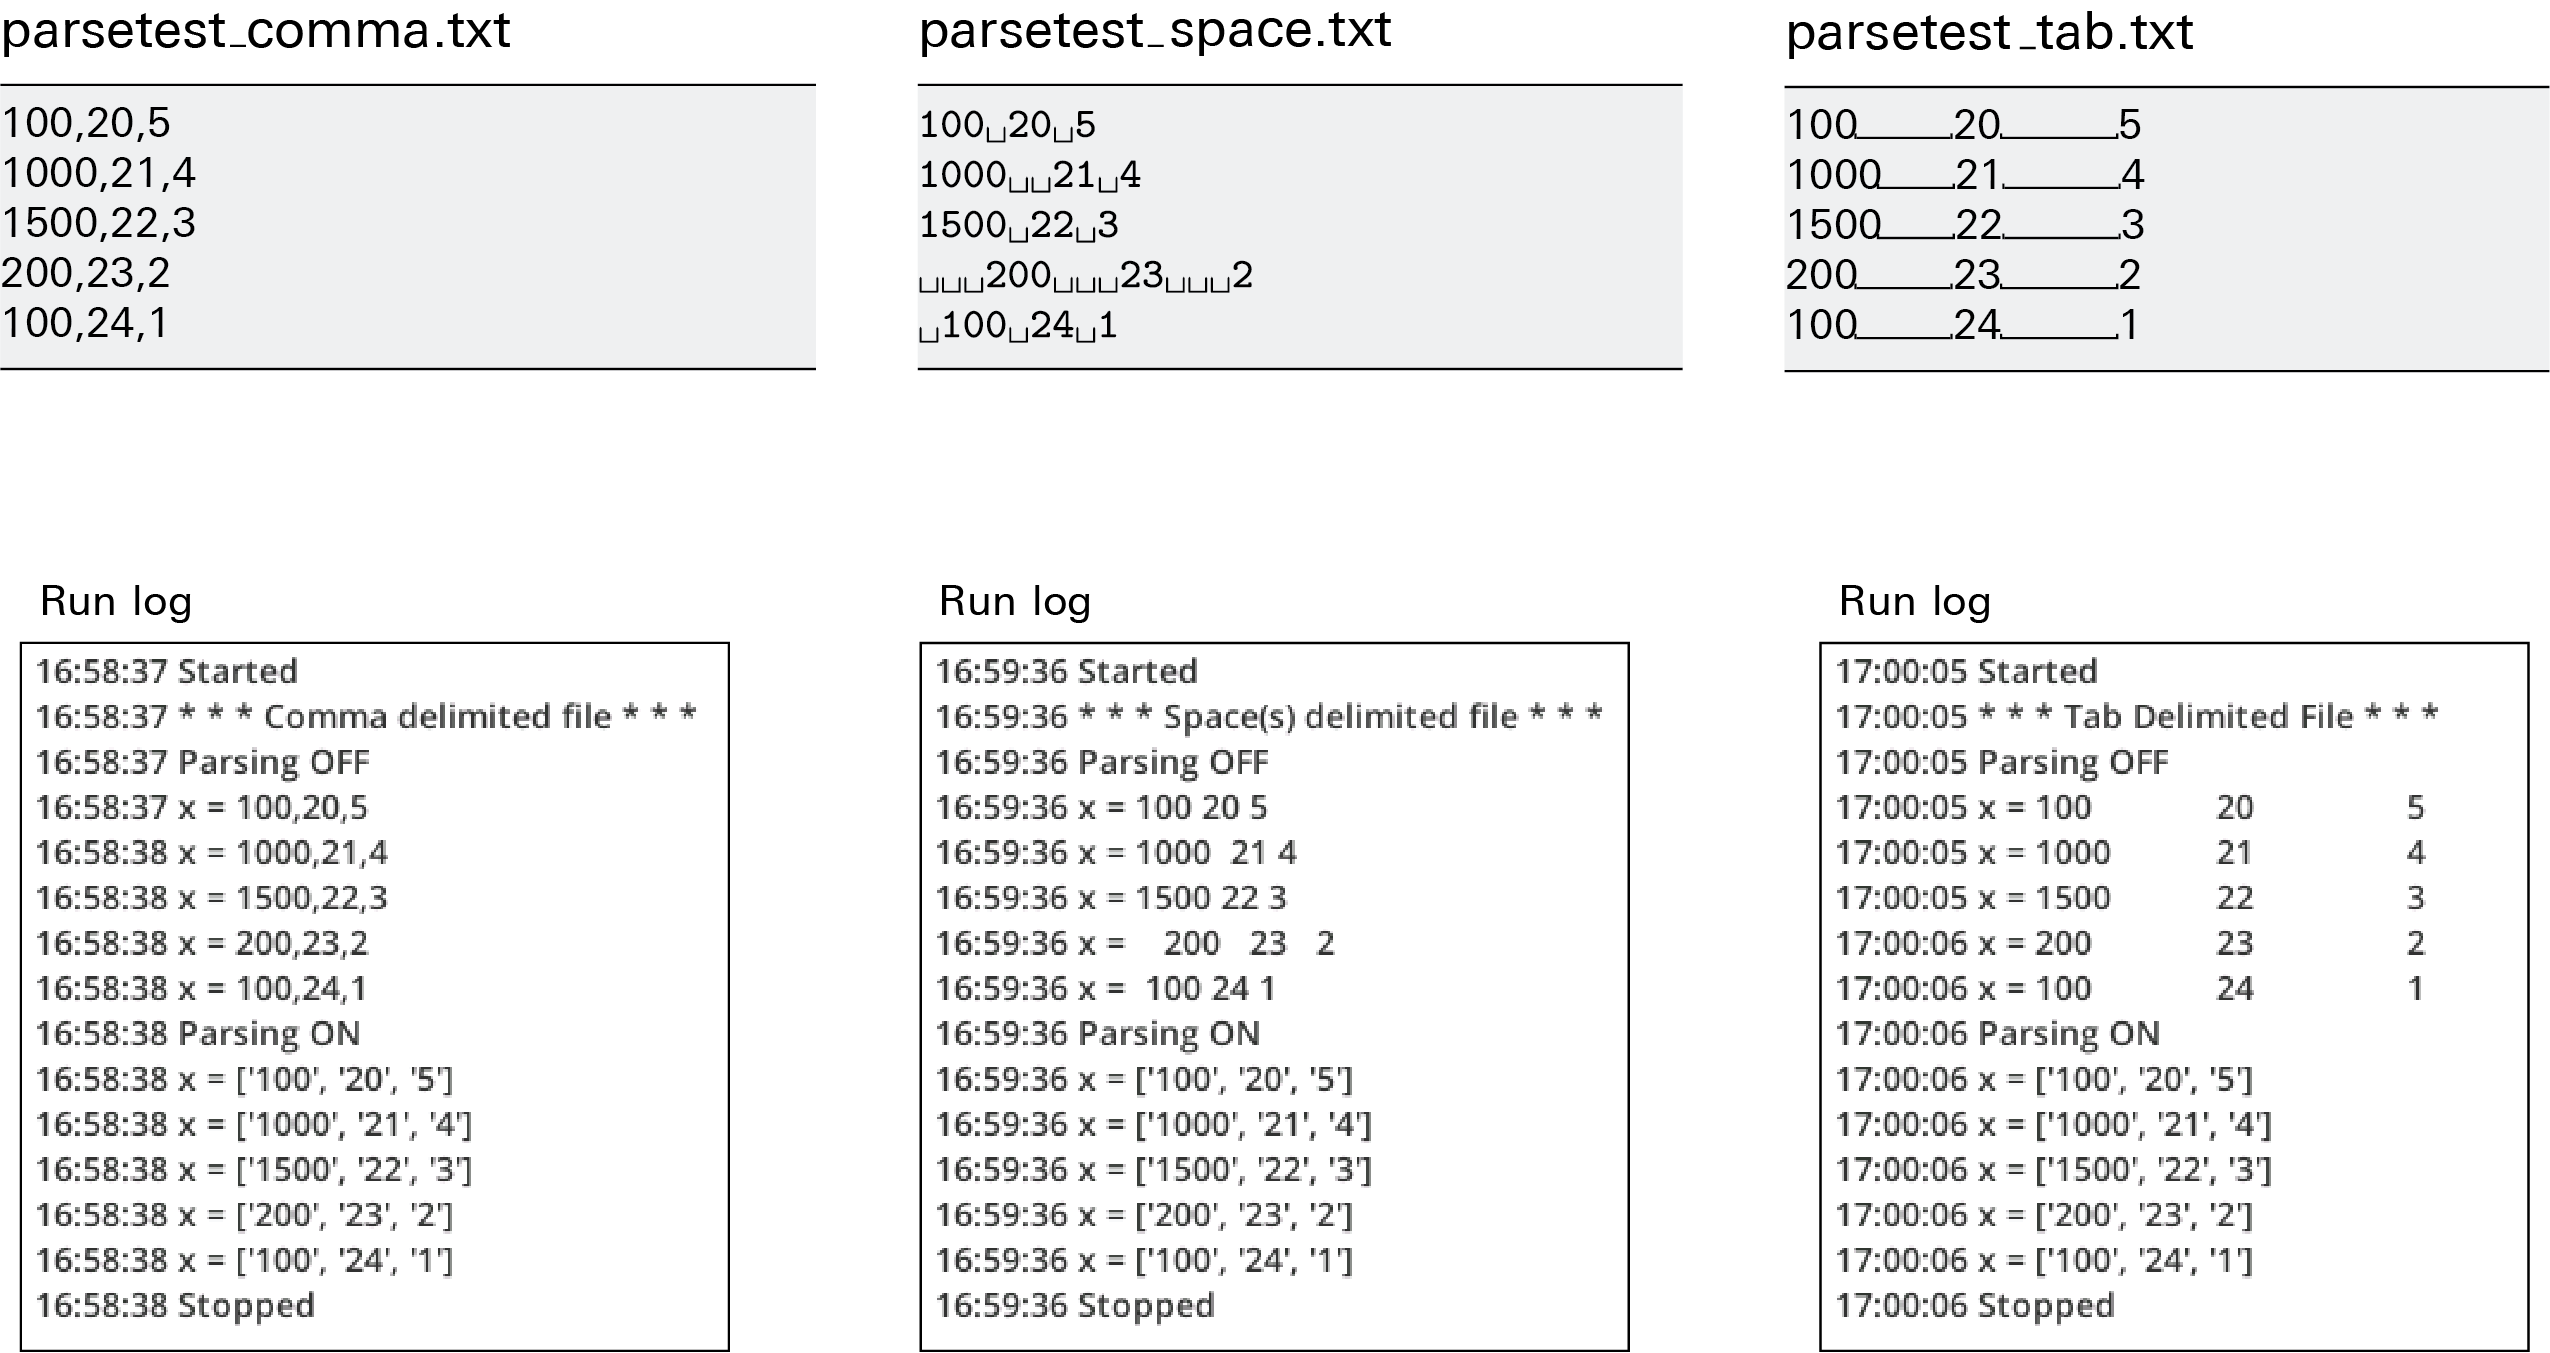
Note that in each case, the unparsed line is always a string, and the parsed pieces are always strings. Turning a string into a number in Python is easy (float() function), but you may not need to. If you were using these values to set a control, the SETCONTROL controls will do the conversion for you.
PROPERTIES
The PROPERTIES lets you programmatically pause a BP, and also controls the BP’s verbosity (run log output).
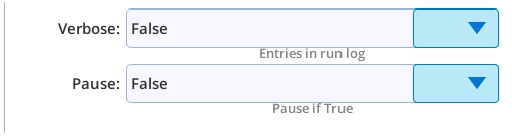
Verbose, which defaults to off, controls how much gets written to the run log. With Verbose set to False, the only output to the run log will be start and stop messages, SHOW output, and warnings and errors. With verbose set to True, nearly every step will contribute to the run log.
If the Pause property is true, the BP will pause when it encounters that step while running. This is useful for debugging purposes (see Debug mode), or indefinitely pausing a program until the user wishes to resume.
RETURN
The RETURN step exits a DEFINE, or exits the main program.
There are no parameters associated with RETURN. If you wish to return a value from a DEFINE, use the pass-by-reference feature for a passed parameter (see Passing by value or reference).
RUN
RUN is how a BP can launch another BP.

SETCONTROL
SETCONTROL allows you to set a control or system constant. The button in the Target line will access the control dictionary. The Value line will have slightly different looks depending upon the control.
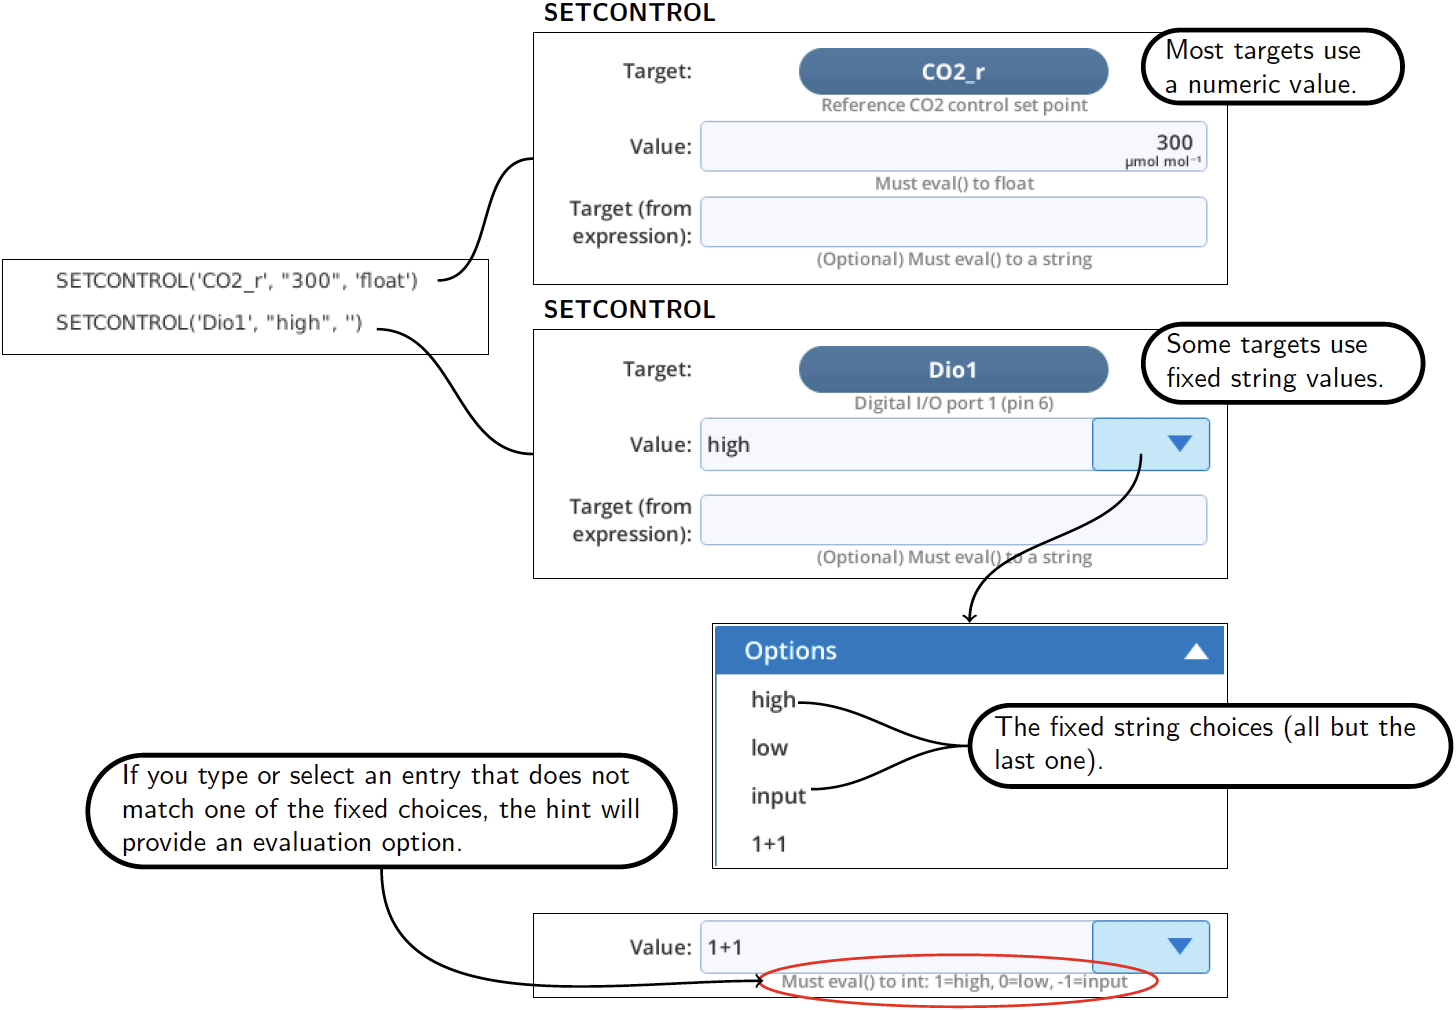
If you wish to select the target at run time instead of at design time, then use the Target (from expression) field. This will override whatever the button label is. For example, if you wish to read targets and values from a file, you could put a SETCONTROL in a loop that reads the le, and each pass through the loop sets target to x[0] and value to x[1], assuming x held the parsed line, and each line held 2 items: target (string) and value (number or expression).
When the 'Value' is a ComboBox, as in the Dio1 example above, the non-fixed entry allows you to select the choice at run time, rather than design time. Table 12‑4 illustrates some entry choices for Dio1.
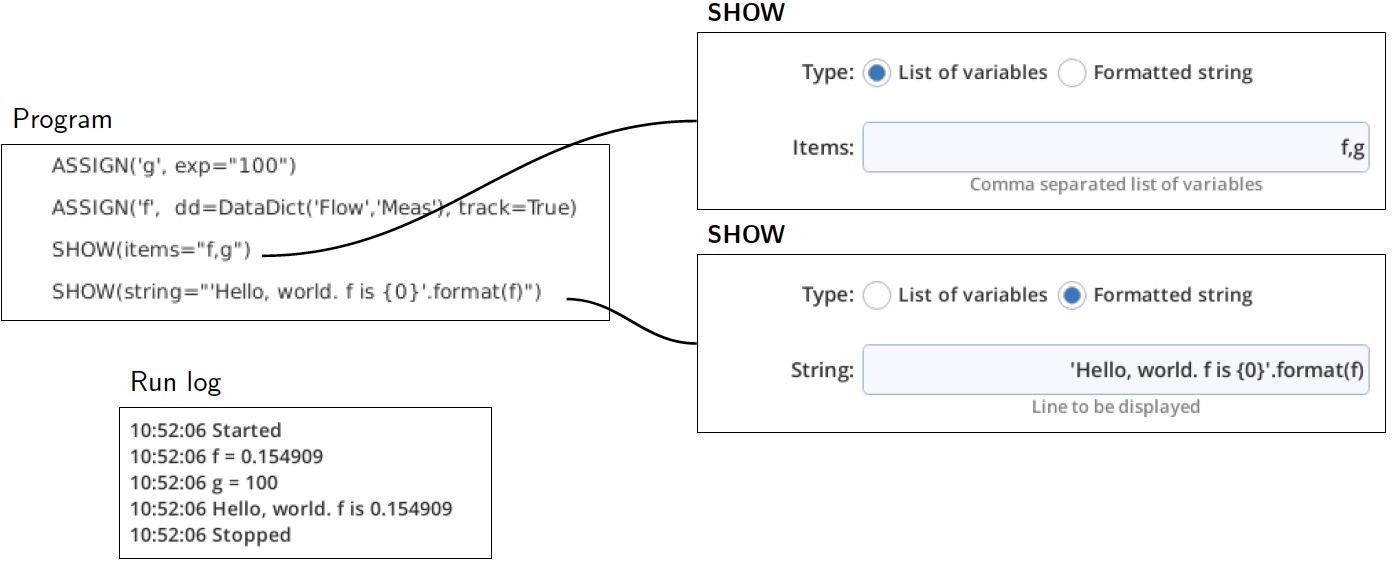
SHOW
SHOW prints to the run log. You can specify a list of variables, or specify a formatted string.
TABLE
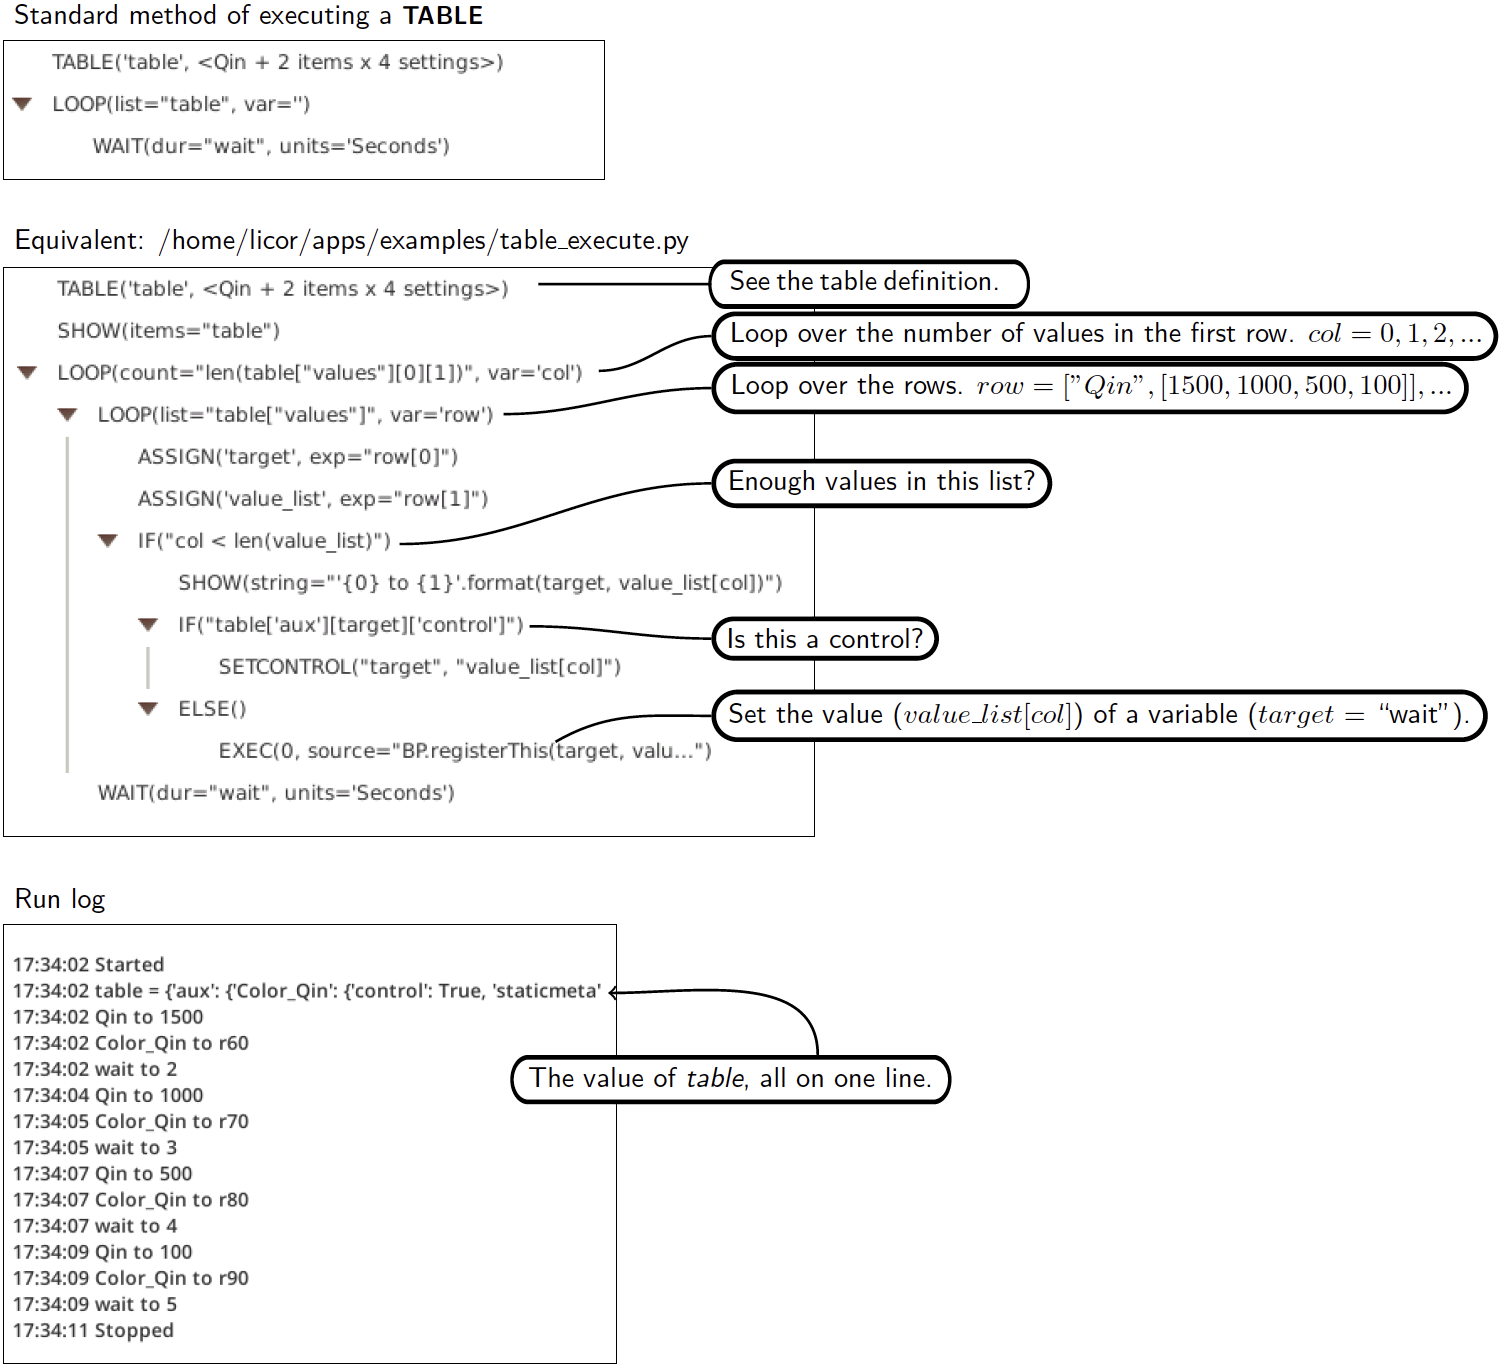
A TABLE is a named control table that can be executed by making it the target of a LOOP [List].
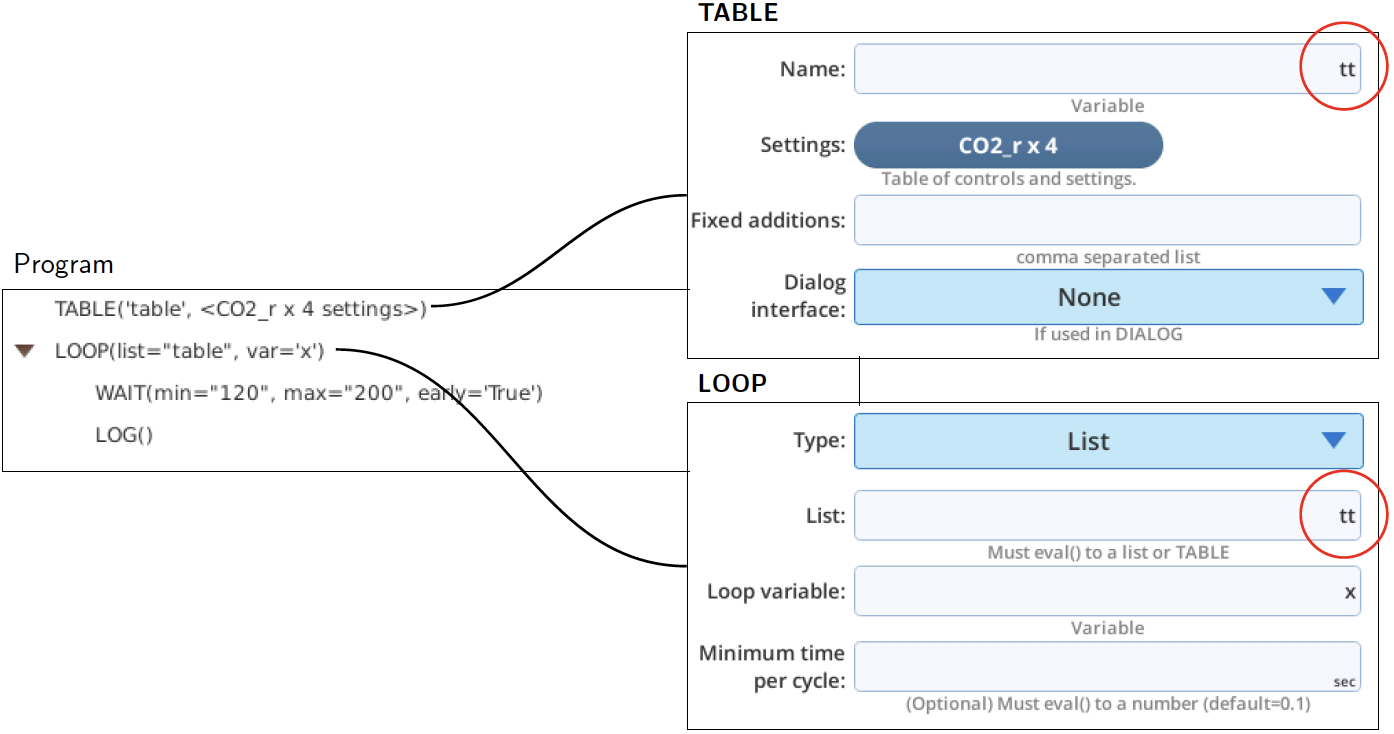
The LOOP will loop over the number of settings found in the top row of the table. Each pass through, it sets the table's row targets (top to bottom), to the value in that row's column. If an entry is blank, it skips that target. Thus, if only the first column in the table for a particular row has an entry, that value will only be set once.
Structure of a TABLE variable
Consider a TABLE with two controls, one for light intensity, and one color, and an auxiliary constant for wait times (Figure 12‑121).

A variable table is a Python dictionary with two keys:
- "values" - a list, each item is a tuple containing a string (the target) and a list (list of setpoints).
- "aux" - a dict, with keys corresponding to the strings (targets) in the "values" list. The keys for each item are:
- "control": True or False
- "staticmeta": True or False. If True, there will also be keys for "units" and "format".
Listing 12‑4. An example of a TABLE variable.
{
    "values": [
        [
            "Qin",[1500,1000,500,100]
        ],
        [
            "Color_Qin",["r60","r70","r80","r90"]
        ],
        [
            "wait",[2,3,4,5]
        ]
    ],
    "aux": {
        "Color_Qin": {
            "control": True,
            "staticmeta": False
        },
        "wait": {
            "units": "mins",
            "format": ["f",1,2],
            "control": False,
            "staticmeta": True
        },
        "Qin": {
            "control": True,
            "staticmeta": False
        }
    }
}
Custom executions
If you need to customize how a TABLE is handled during run time, then you should start with Figure 12‑122 which illustrates the functional equivalent of the standard processing that LOOP [List] provides.
WAIT
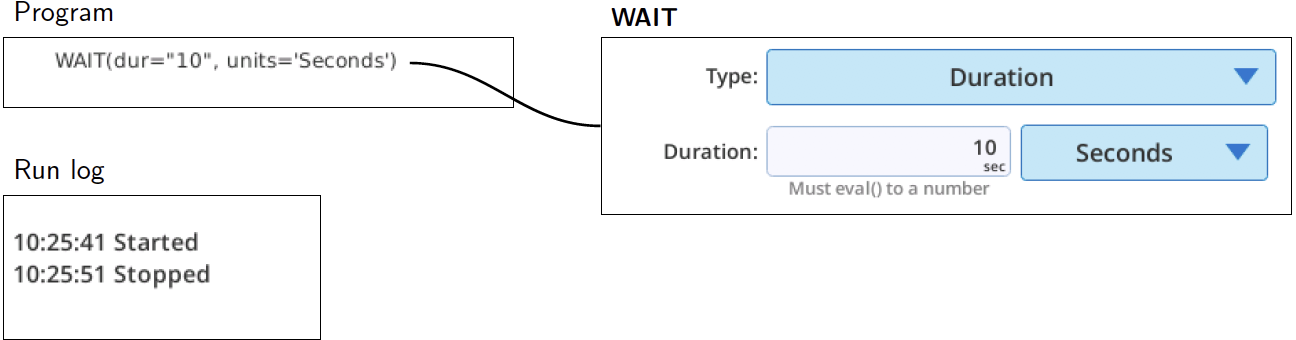
WAIT has three types: Duration, Stability, Until a time of day, and for an Event or condition. All but the last type of wait will put a countdown on the Start screen and/or Monitor screen (when selected).

Duration
WAIT [Duration] suspends execution for the specified amount of time.
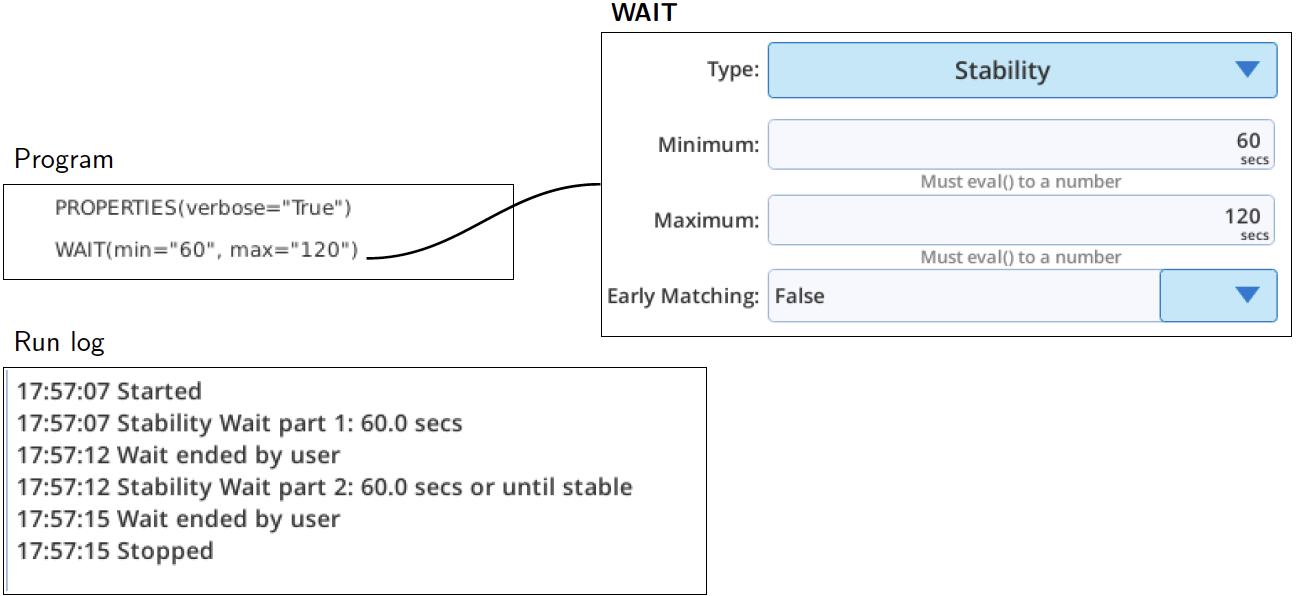
Stability
WAIT [Stability] has two parts. Part 1 is the minimum time. From the end of that until the maximum time, the wait will be terminated if the current stability definition is met. In the interval between 30 seconds after the start of the wait, and 60 seconds before the maximum time, a match will occur if Early matching is True, and if the reference IRGAs (Cr and Hs) meet the following stability criteria:
12‑2

Until
WAIT [Until] waits for a time of day. Figure 12‑126 shows multiple ways to achieve the same thing.
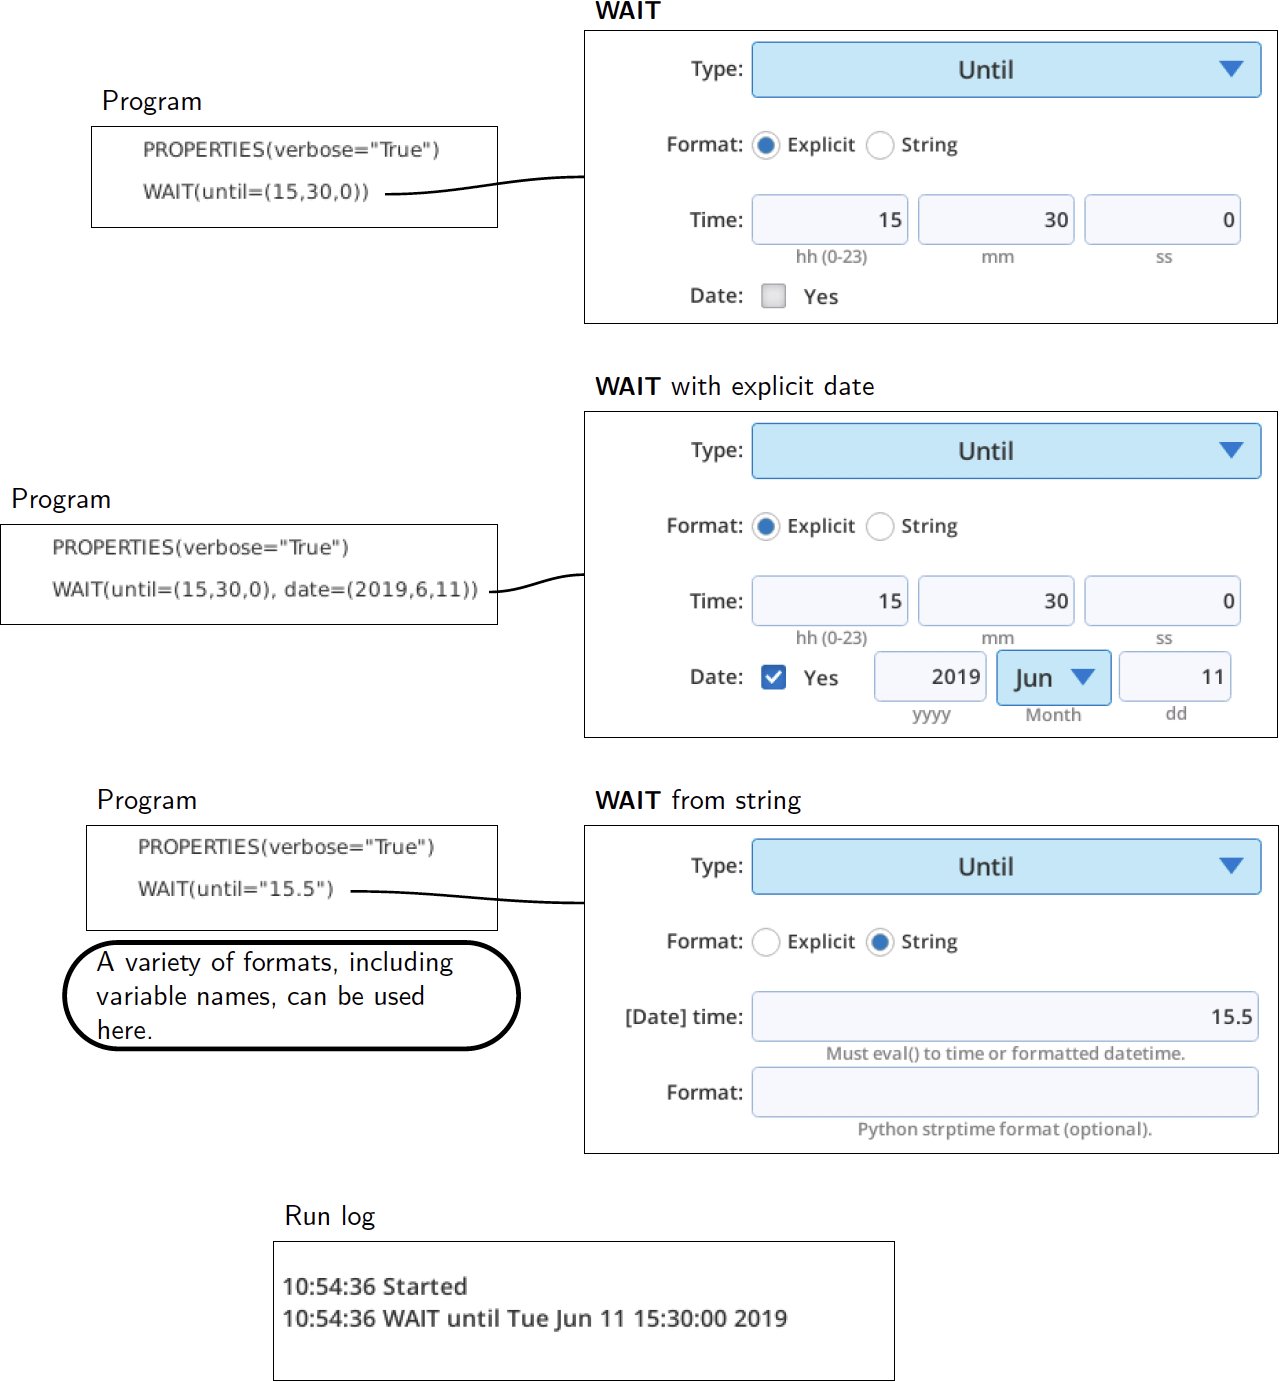
If no date is specified and the specified time has passed when the statement executes, the program will wait until the next day.
The ‘String’ format (lower left in Figure 12‑126) is an alternative way to specify time and date; the advantage is that allows you to programmatically specify it if you choose. To include a date, specify the stop time1 in the 'Format' box. Otherwise, just specify the string as decimal hours, or hh:mm, as illustrated in Table 12‑5.
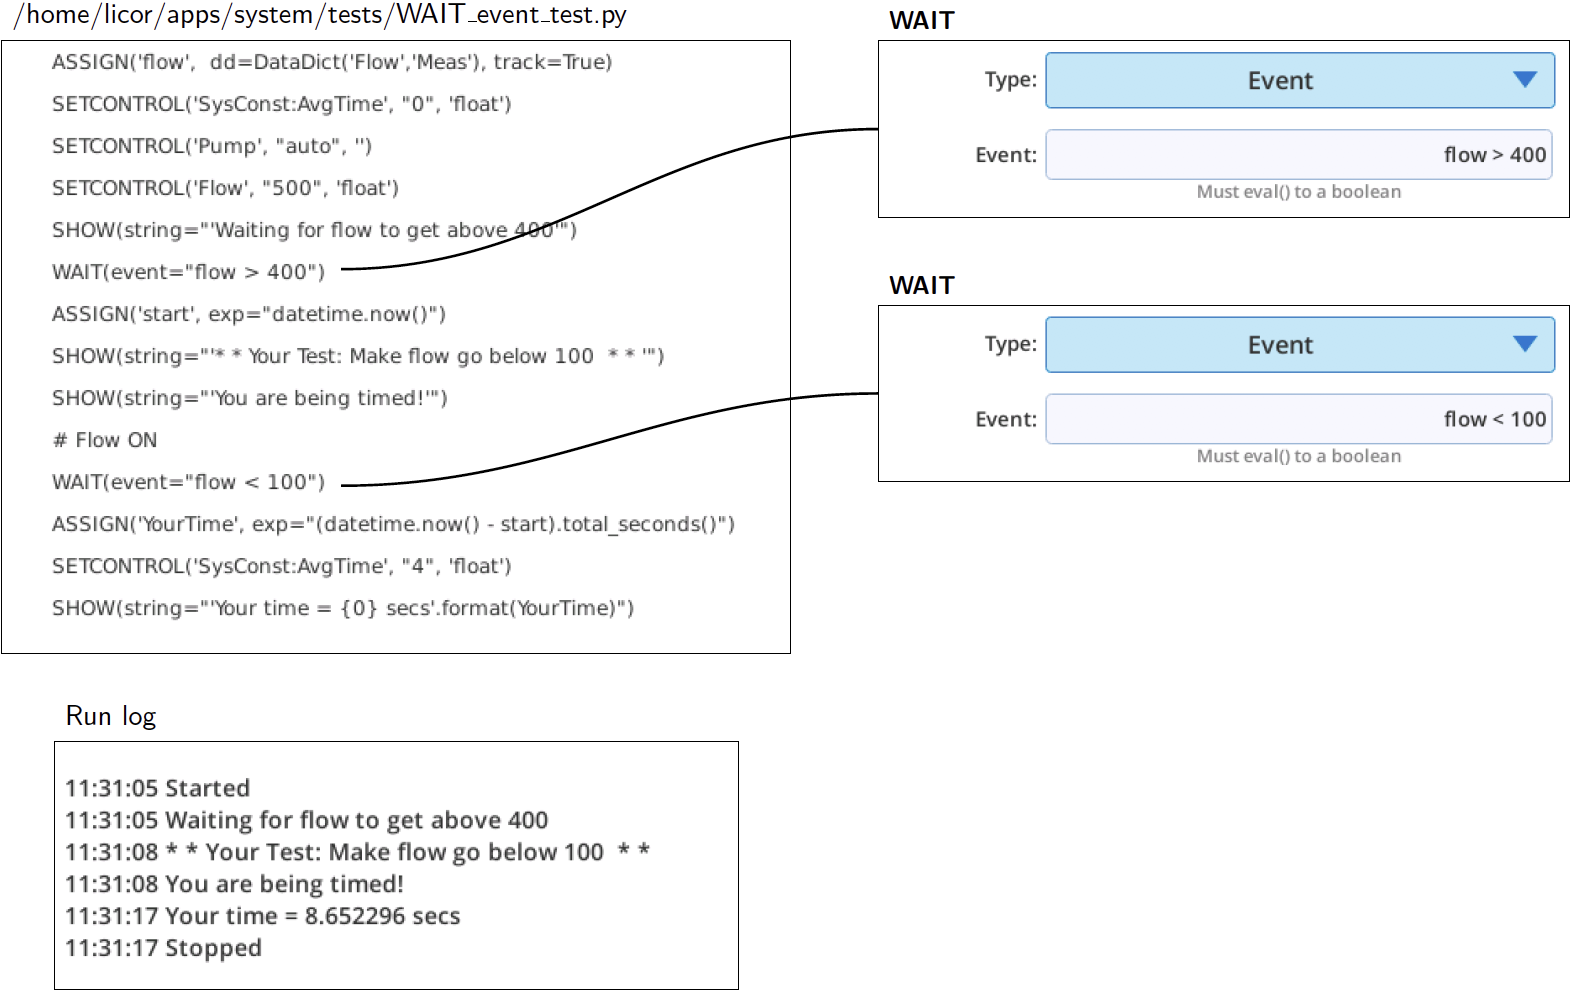
Event
WAIT [Event] waits until the test you have specified becomes True. The example in Figure 12‑127 is as close as you may come to a game on the LI-6800. It simply times how long it takes you to get the flow rate2 below 400.
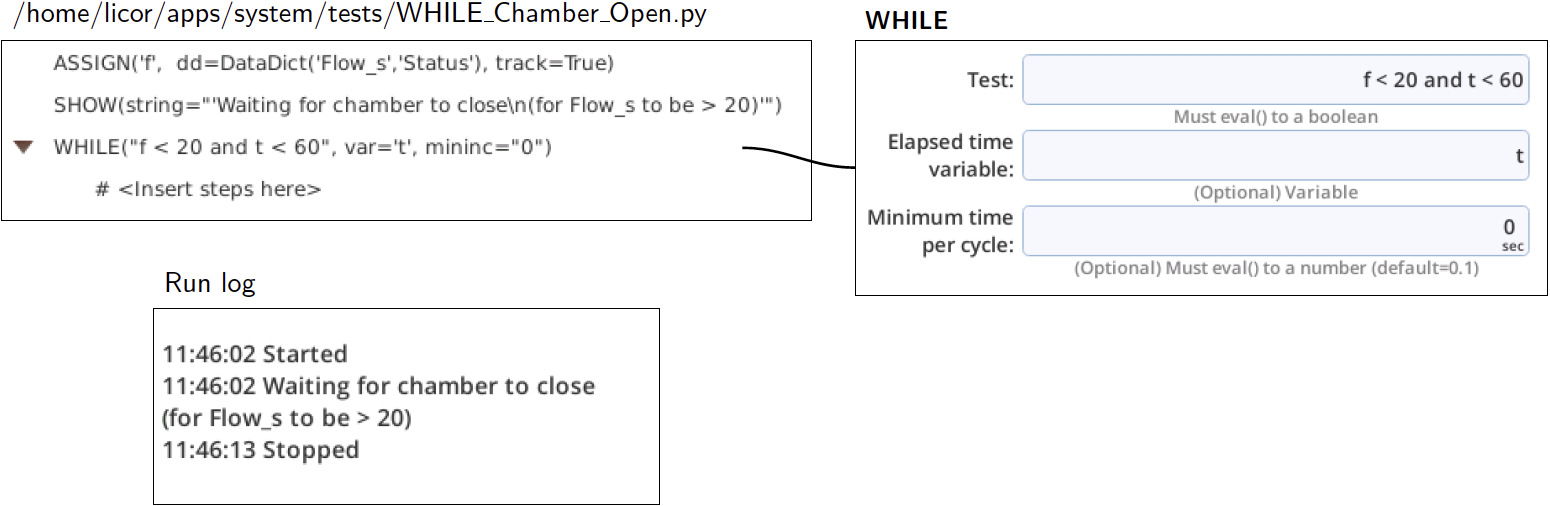
WHILE
WHILE loops while the specified condition is True. The ‘Minimum time per cycle’ specifies the minimum time interval that will separate each cycle through the loop. Default is 0.1 seconds. Setting this to 0 means it will cycle when the next data set become available (nominally every 0.5 sec).
The example in Figure 12‑128 will loop until the sample cell flow rate exceeds 20 µmol/sec, so if you have the chamber closed and the pump running before running this program, it will loop until you either open the chamber, or stop the flow, or 1 minute has expired.