
Background Program screen reference
This section explains the various screens associated with building and running BPs, and related details.
The Open/New screen
Open/New is where you can launch a BP, load one and make changes, or start building one from scratch.

- New BP clears BP steps, and takes you to the Build screen.
- Open BP reads BP steps from the selected file and displays them in the Build screen.
- Start launches the selected file. To view its progress, tap Monitor.
The Build screen
The Build screen is where you can add steps from the list on the left to a BP on the right, arranging them to build up the basic structure of your program. See Table 12‑2 for a summary of the steps; more details on each step is available in Step reference. Pre-configured step collections (of type DEFINE and GROUP) are also available (Table 12‑3).
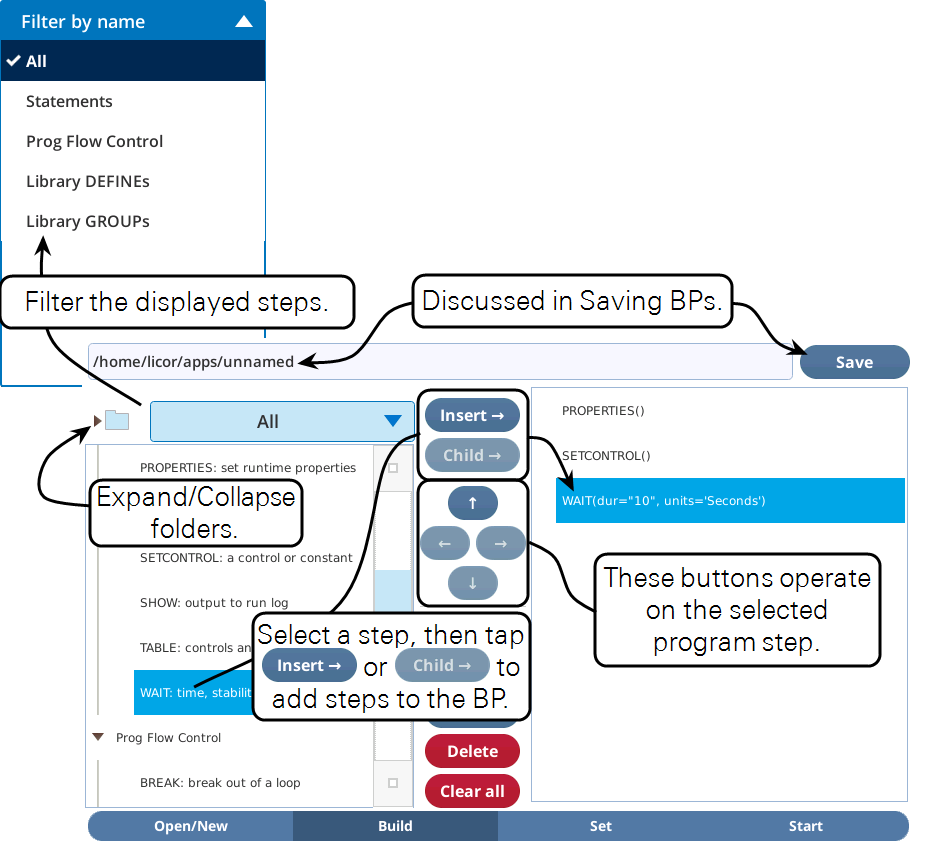
- Insert → copies selected item on left to below highlighted item on right.
- Child → appends selected item on left to list of children of highlighted parent item on right.
- ↓ and ↑ moves selected step (and all contained children, if any) up or down.
- → moves selected step to the bottom of the parent above it.
- ← moves selected step out its parent and puts it below the parent.
- Cut deletes the selected step, and puts it in the clipboard.
- Copy copies the selected step to the clipboard.
- Paste inserts a copy of the clipboard into the program list.
- Delete deletes the selected step from the program list.
- Clear all clears the contents of the program list, changes name to /home/licor/apps/unnamed.
The Set screen
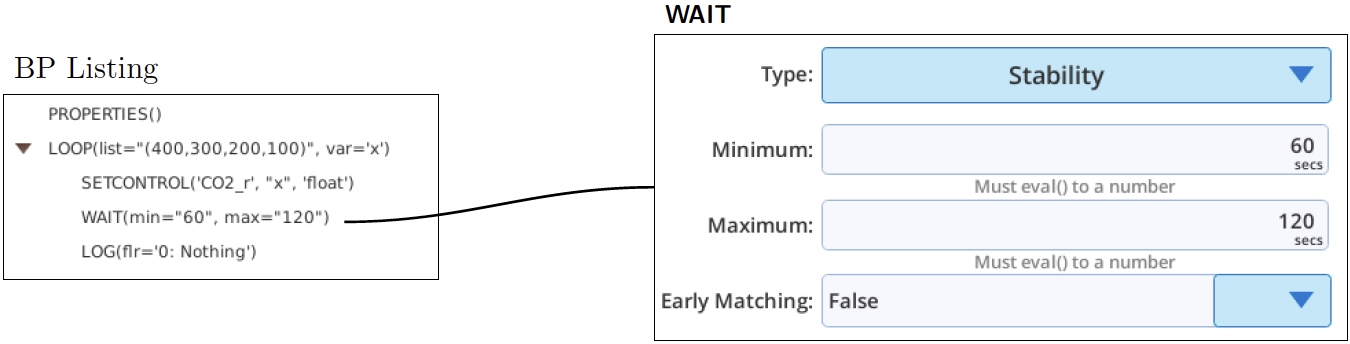
Each program step has attributes that define its behavior. WAIT, for example, can suspend the BP's operation for a fixed time duration, or until stability to be achieved, or until a specific time of day.
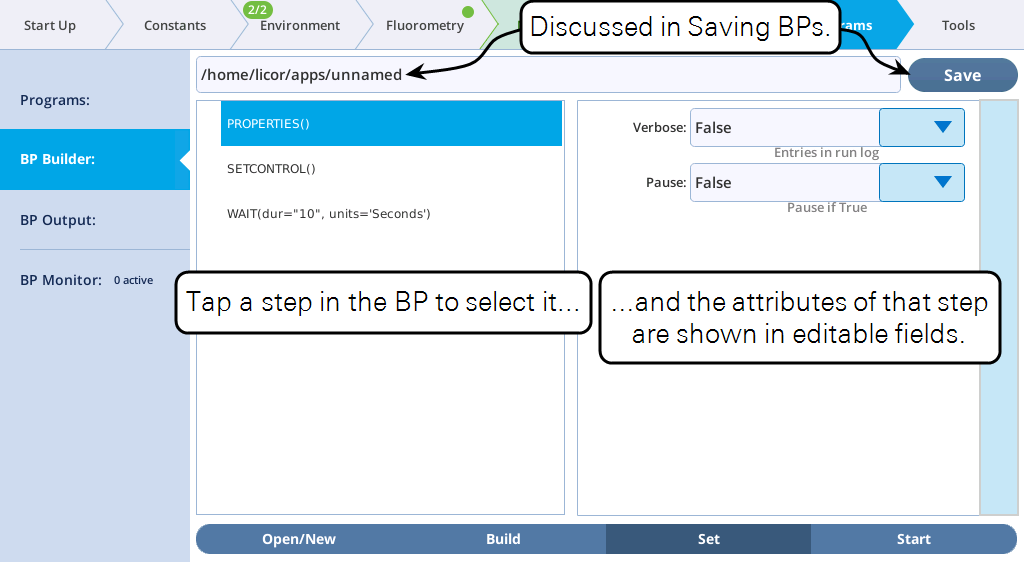
See Set screen interface tools for a discussion of the various interface tools that might appear on the right side of the Set screen.
In this document, we illustrate how to configure BPs in the Set screen as in Figure 12‑62 a listing on the left, and one or more setting screens (the right hand side of the Set screen) on the right.
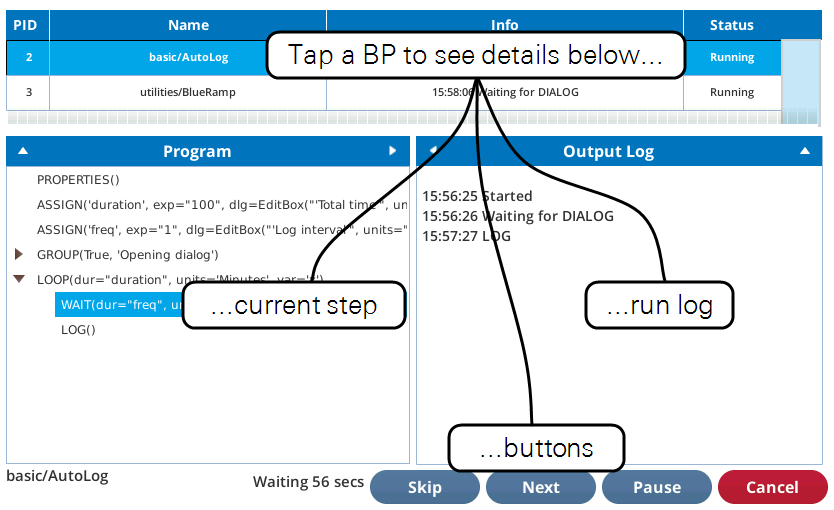
The Start screen
The Start screen provides a place to test run the BP being developed.
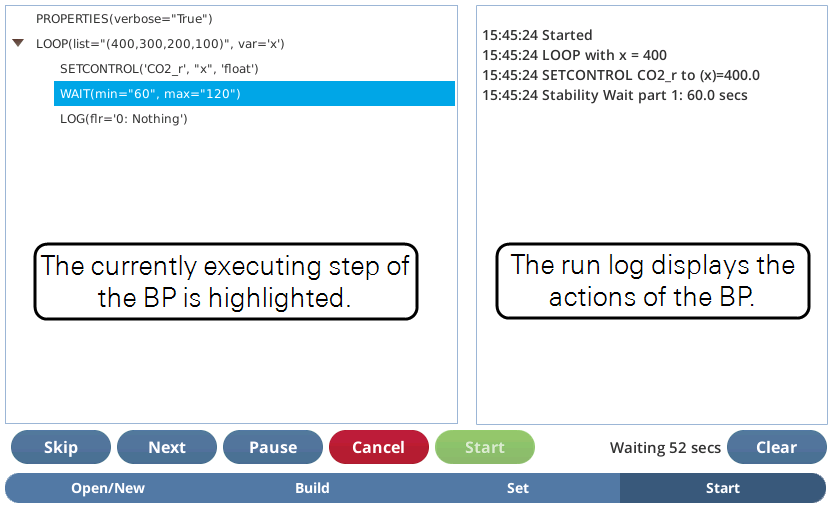
Cancel stops the program, Pause pauses the program (enabling Resume, which will start it running again), Trigger terminates a WAIT.
If you Trigger when a program is paused, the program will remain in a paused state, but go on to the next step. It also will output any messages about that step even if the Verbosity is False (by default, but is set by PROPERTIES). More details are in Debug mode.
Clear clears the run log. Note that if you tap this accidentally, you can still see the entire run log for that program by going to the Monitor screen and - if it still running - selecting the BP there (it will have PID=0).
When a program is running in the Start screen, you can continue editing in the Set and (if available) Build screens. You are also allowed to press Open BP, loading a completely different program into the Build and Set screens. None of these changes will have any effect on the BP running in Start. Once it is finished, however, the program displayed in the Start will update to whatever changes you might have made.
The Monitor screen
The Monitor screen allows you to see all running BPs, and selectively monitor progress, or Cancel, Pause, etc. Debug mode can be used, as well as the Start screen.
Set screen interface tools
The interface tools for setting steps are explained below.
Simple objects
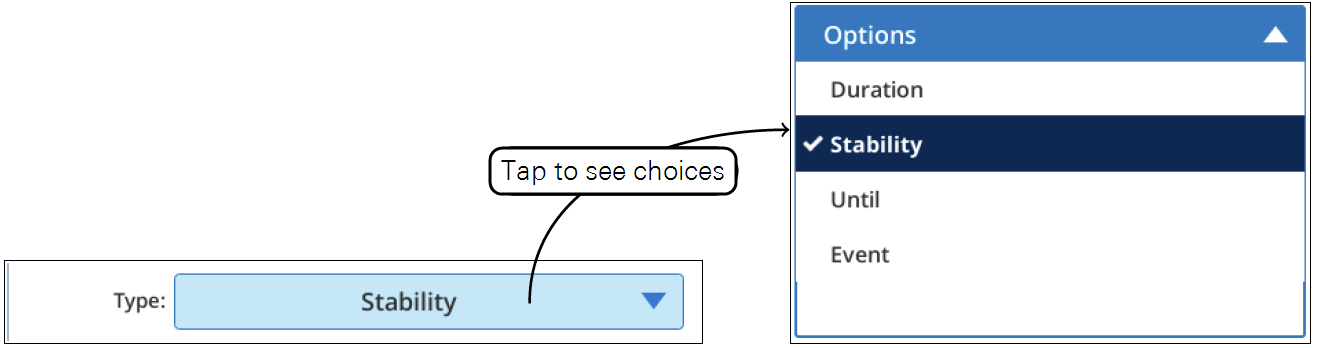
A menu displays a fixed list of choices when you tap it (Figure 12‑65). Note: There may be more items in the list than are shown; you won't know until you try scrolling (touch and drag) down.
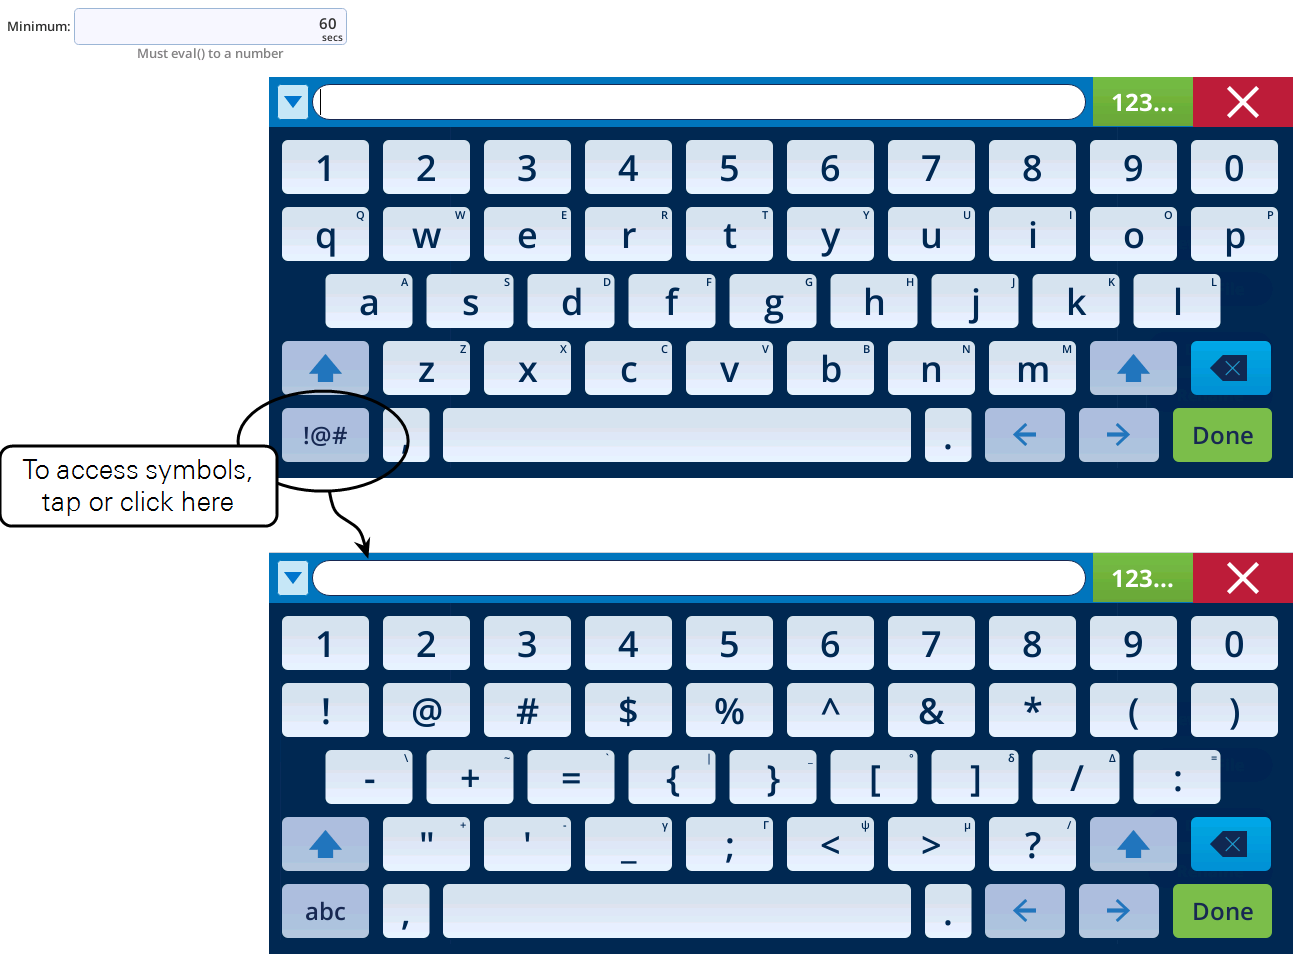
Tapping in an edit box will cause the full keyboard to appear (Figure 12‑66).
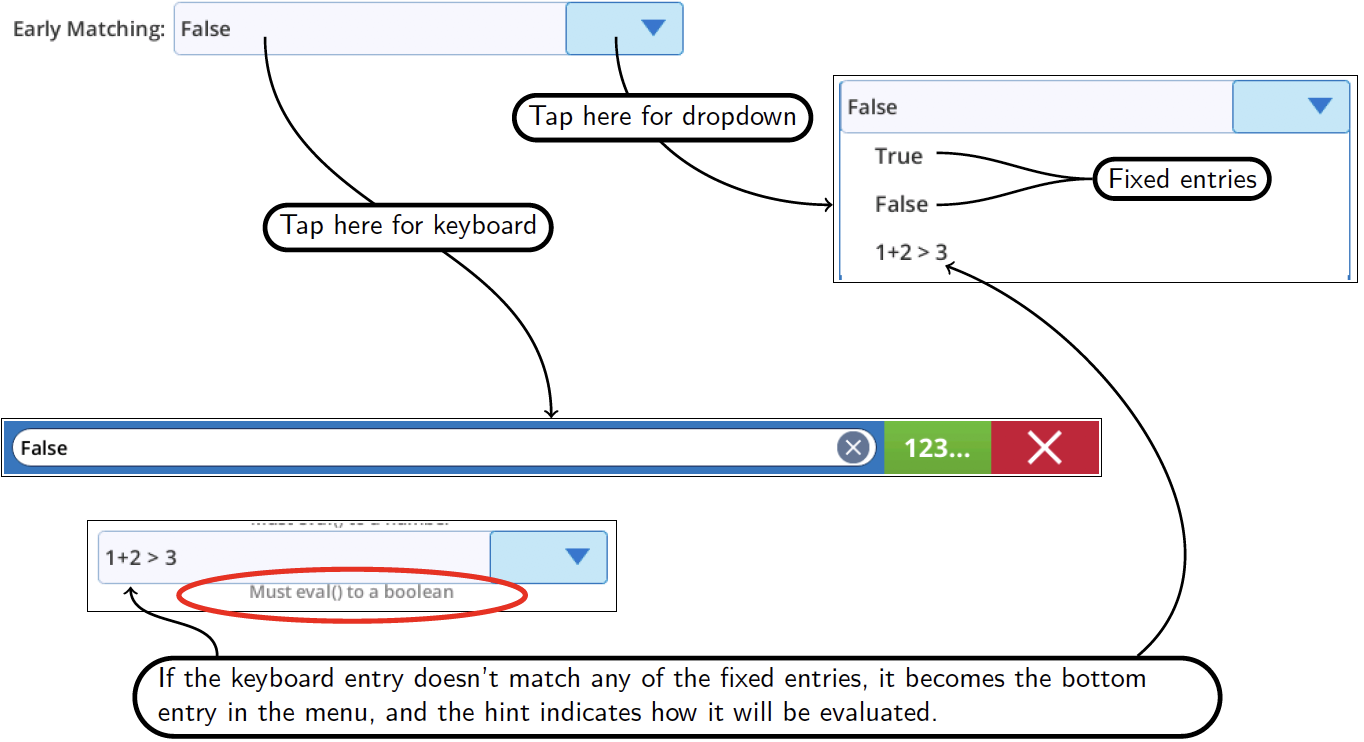
The combo box is a combination of an edit box and a menu.
Buttons are used to access the appropriate support dialog.
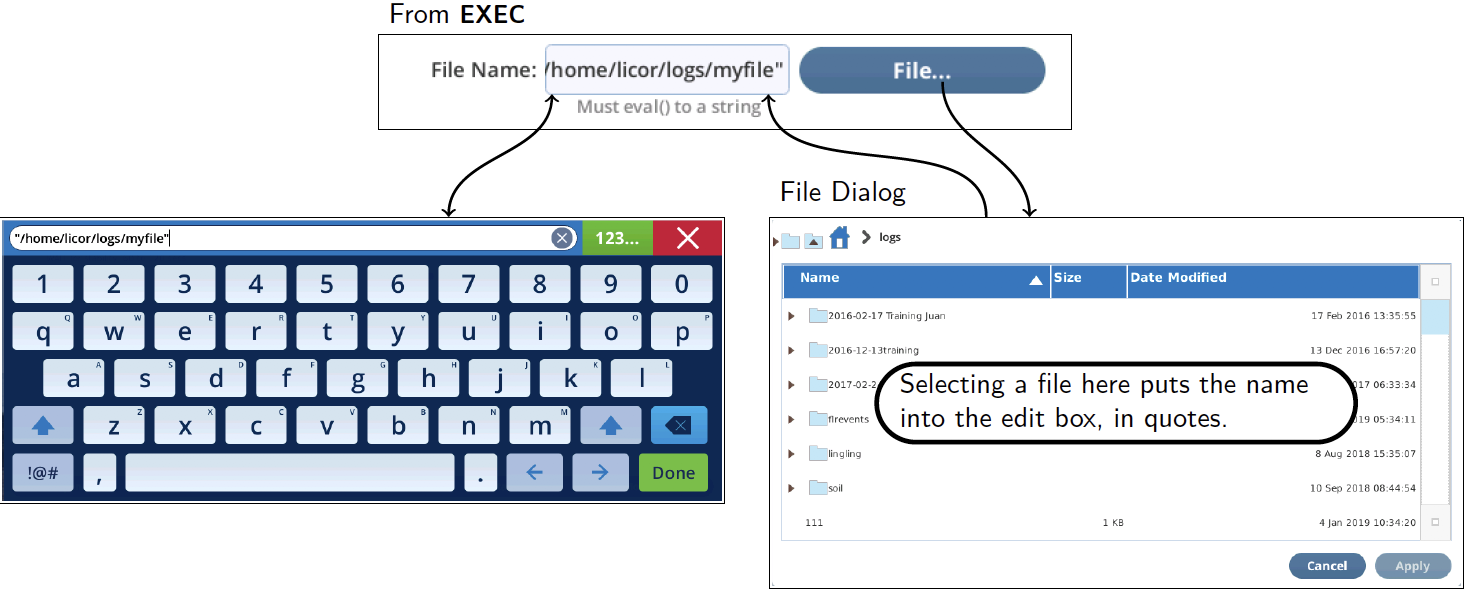
File names are sometimes specified with a combination of button and edit box (Figure 12‑69). Don't forget that strings should be quoted.
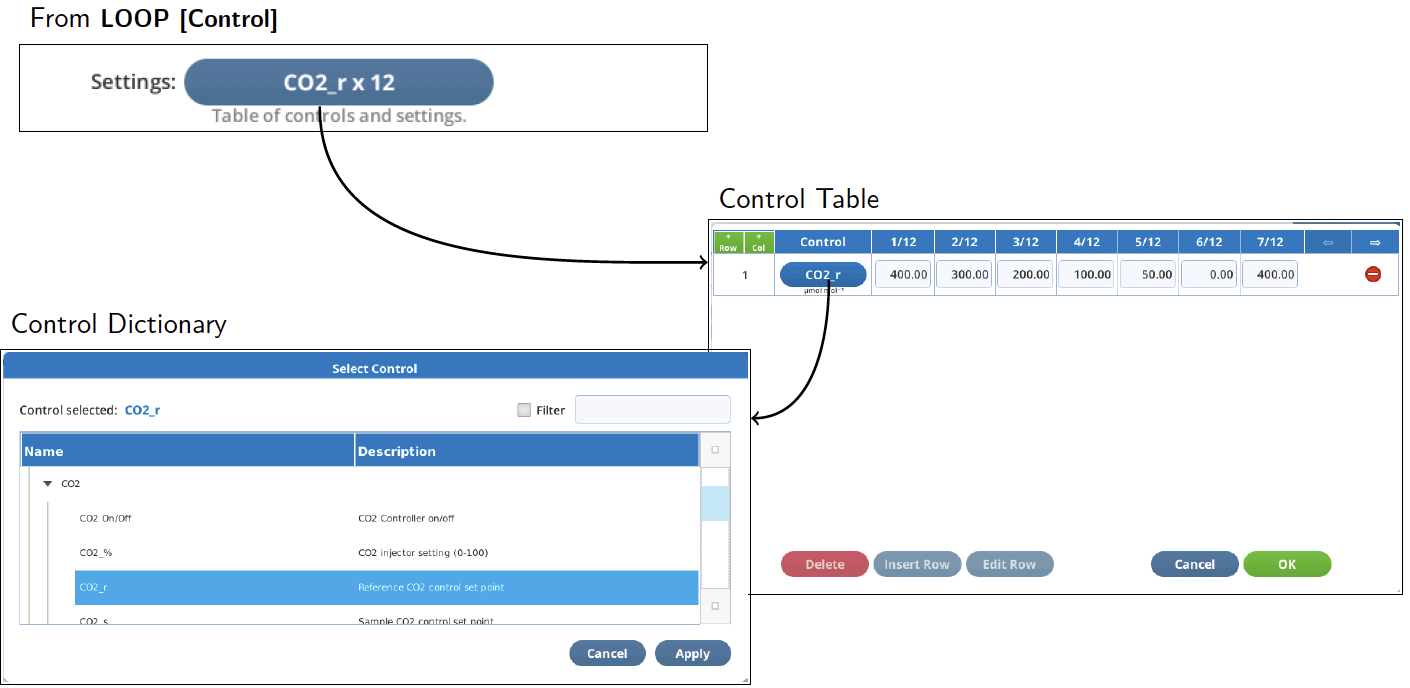
Control table
The Control Table window is used in the LOOP [Control] interface. It is a table whose rows correspond to controls, and whose columns correspond to set points. Thus, in the example below, Light and Fan speed are being set (together) to 5 setpoints each.
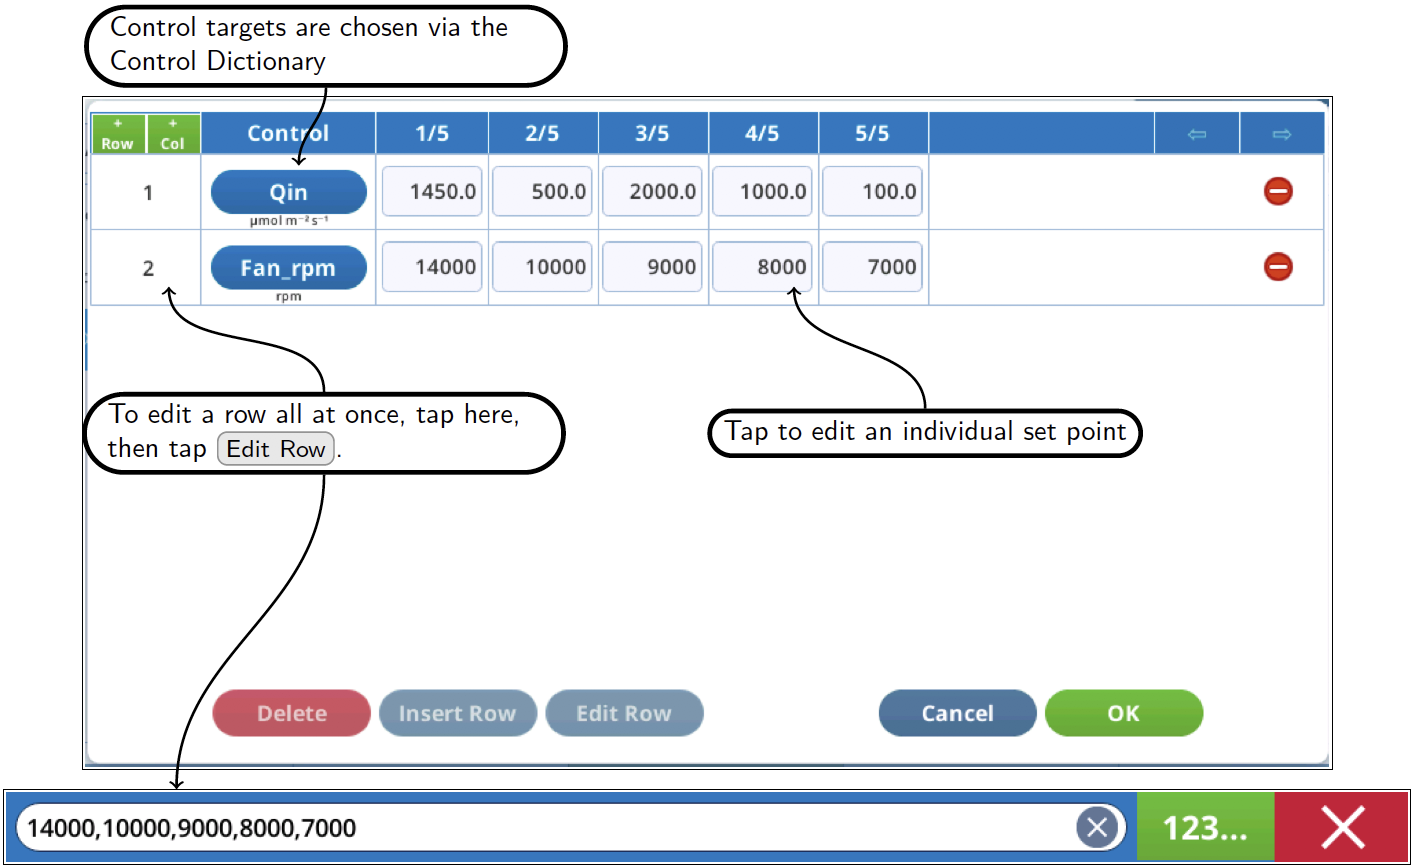
You can have sparse entries in the table (Figure 12‑71), either by entering an empty entry for a cell, or by successive commas when editing a line. The rule is, if there is not a valid entry for a control for that setpoint, no change will be made to that control.

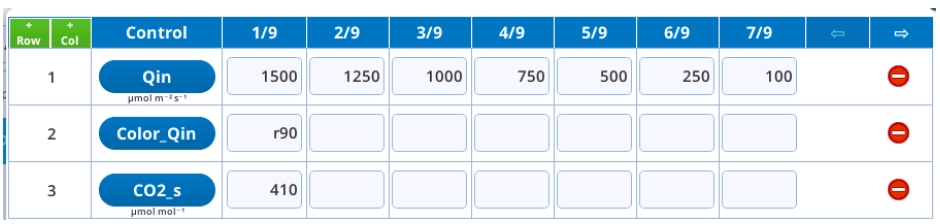
Note that no Control Table entry is passed to Python's eval(), so you cannot use expressions or variable names.
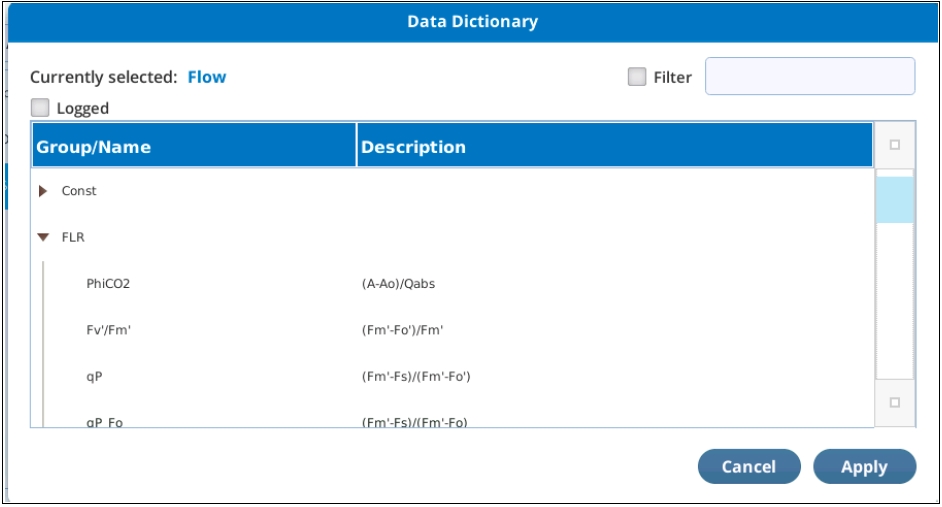
Data dictionary
The Data Dictionary dialog is used in ASSIGN for assigning a local variable. It is a dialog similar to the one used in Data Dictionary in Start Up. Items are arranged by Group.
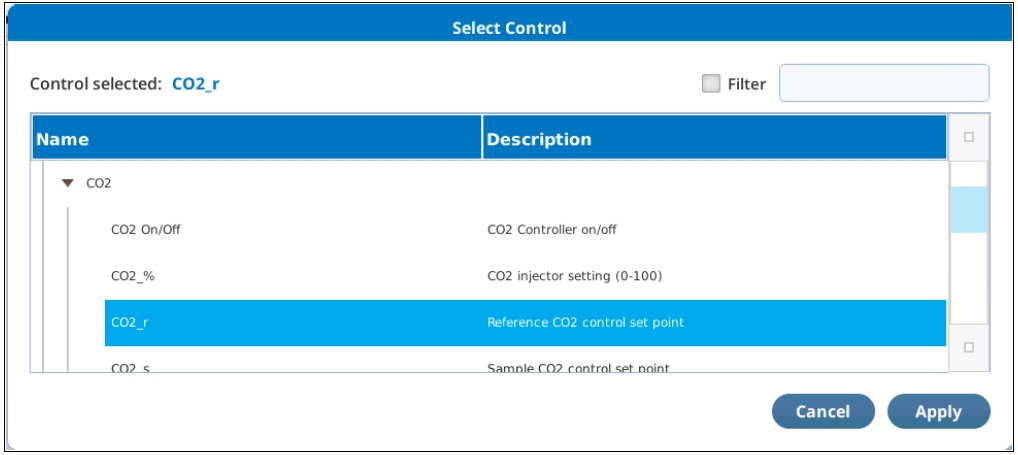
Control dictionary
The Control Dictionary is used for selecting a control or constant that can be set. The SETCONTROL and AUTOENV [Define] steps use it. For contents, see Control dictionary map.
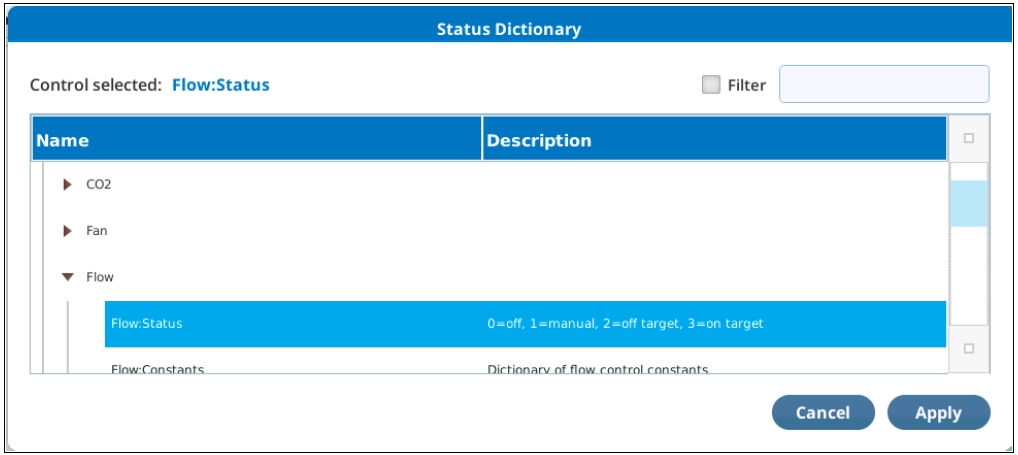
Status dictionary
The Status Dictionary is used for selecting a system value (that is not in the Data Dictionary) to be monitored with the ASSIGN step. For contents, see Status dictionary map.
Debug mode
When a program is in a paused state, Resume gets it running again. When a BP is paused, Trigger will only execute the next step, and the program remains paused. This allows you to slowly walk through your program (Trigger, Trigger, Trigger,...) at your own pace. This is Debug Mode. While in this mode, each step produces output in the run log indicating what will happen next, even if Verbosity (in the PROPERTIES step) is False.
To put a running program into a paused state, tap Pause. You can also pause a program at a certain place by inserting a PROPERTIES step there, with Pause = True.
An example of operating in Debug mode follows, with the simple program shown. Note the first step is PROPERTIES, with Pause set to True.
Tap Start and the BP immediately pauses because of the PROPERTIES statement with Pause=True.

Tap Trigger. The run log indicates it is about to do an ASSIGN. Note that the highlighted line and run log output are indications of what will happen when you tap Trigger.

Tap Trigger. The run log indicates it is about to do a SETCONTROL, setting Qin to f, which is 100.

Tap Trigger. The run log indicates it is about to do WAIT. Tap Trigger again to actually begin the WAIT.

Tap Trigger. The run log indicates it is about to do SETCONTROL. Tap Trigger again to actually do the SETCONTROL.

Directory information
The "home" directory for BPs is /home/licor/apps. You are free to store your BPs here, or in any subdirectories you may care to make. The system does ensure that there are several subdirectories present (listed below), and populated with some files that are write protected: you will not be able to overwrite them, but you can delete them. (If you do accidentally delete one, it is automatically replaced the next time the instrument powers up.)
- /home/licor/apps/basic. Contains a basic set of programs.
- /home/licor/apps/examples. Examples used in this document.
- /home/licor/apps/system. This directory contains a number of programs that support some features of the user interface. It also contains a suite of tests used to verify BP operations.
- /home/licor/apps/tech. Contains useful tech BPs. In certain circumstances, you might be instructed to run one of these as part of technical support or troubleshooting.
- /home/licor/apps/utilities. Potentially useful BPs.
There are some other BP-related directories that are created and maintained by the system, and each contains one or more write-protected files. You are free to add appropriate files to these directories, once you understand how these files are used.
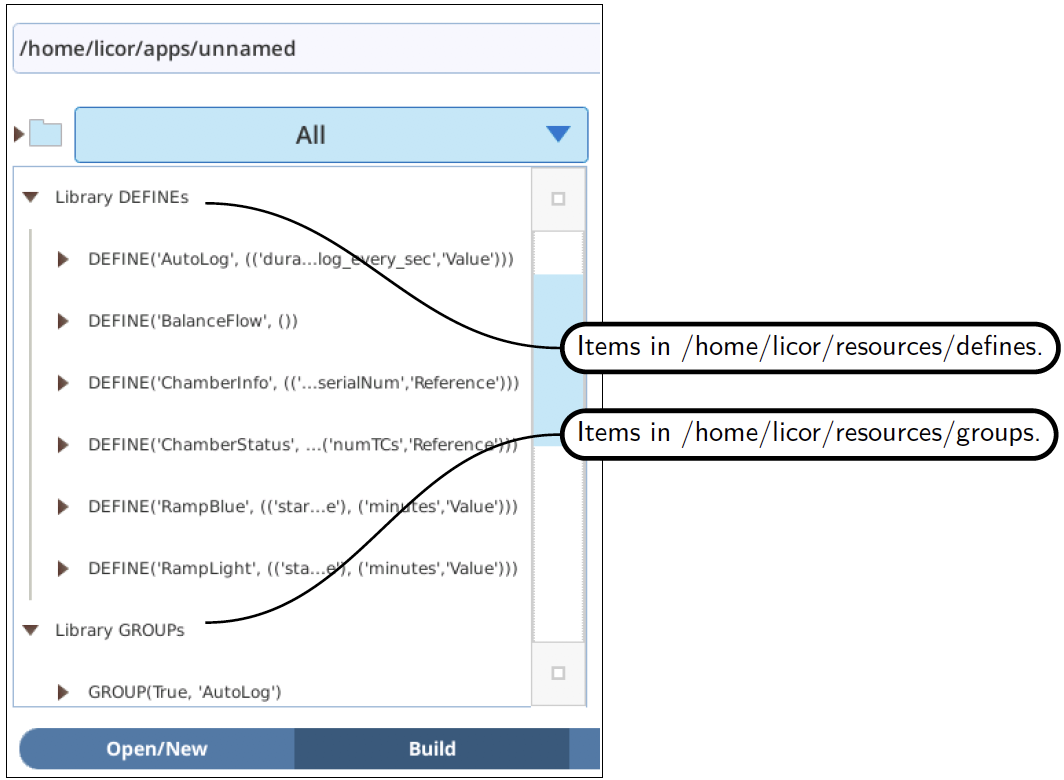
- /home/licor/resources/defines. These are BPs that contain one DEFINE. These files show up in the "Library Subroutines" portion of the source list (Figure 12‑76).
- /home/licor/resources/groups. These are BPs whose first step is a GROUP. Files here show up in the Library Groups portion of the source list (Figure 12‑76).
- /home/licor/resources/lib. Contains Python modules (.py files) that you might want to link to BPs via the EXEC step.
Saving BPs
BPs can be saved from either the Build screen or the Set screen.
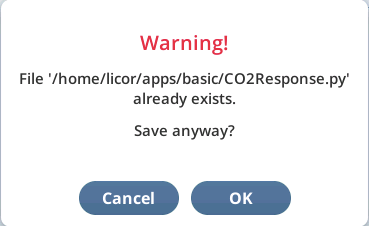
The edit box at the top of either screen shows the name of the last loaded or saved file (/home/licor/apps/unnamed if you tapped Clear All in Build or New in Open/New), so if you tap Save, that file will be overwritten. An overwrite dialog is produced.
Factory supplied BPs (in the directories described in Directory information) are write protected, so it you wish to modify and save them, you will see an error message (Figure 12‑78). Similarly, you will get an error if you try to write to a directory that is not there, or to one for which you do not have permission.

Use the edit box to rename the BP and/or change its location. If you aren't sure of where to store a BP, follow the example in Saving BPs: clear the whole entry, enter a name, and tap Save. If your name does not start out with /home/licor/apps, the system will prepend it automatically. Also, if you don't end with .json, it is appended automatically. The final name is always reported back (unless there is an error).
- Tap in the edit box, clear it, and type in a new name.

- Once the new name is entered, tap Save.

- The edit box now reports the full name actually used. Notice how the system conveniently supplies the base directory and/or the .py suffix if you leave it off.
Note: No quotes needed here: this is not processed at run time, but is live.
Note: You have to actually tap the Save button to save it. Just typing in a name on the keyboard dialog and tapping Done only sets the file name, it doesn't save it.