
The Tools > Calibration tab shows the type and dates of all previous calibrations. In addition to the History, there are four options, described below.
The Tools > Calibrations > IRGA Zeros page is where you set the zero of the gas analyzers. A zero calibration shifts the entire response curve a fixed amount. For example, if the IRGA reads 2 µmol mol‑1 with CO2-free air in the cell, and you do a zero adjustment to make it read 0, then you have changed the response by at least ‑2 µmol mol‑1 at every concentration (there are some subtleties, it might be -4 at high concentrations, for example).
Caution: Never zero without tank gas or fresh chemicals. Old chemicals, even in new packaging, can expire and lose their ability to scrub gases. If you have doubts about the quality of chemicals or gases, do not zero the LI-6800. If zeroing with chemicals, keep the following in mind:
- Know when and from where the chemicals were purchased.
- Know how and where they were stored.
- Just because you changed the chemicals recently does not necessarily mean they are good.
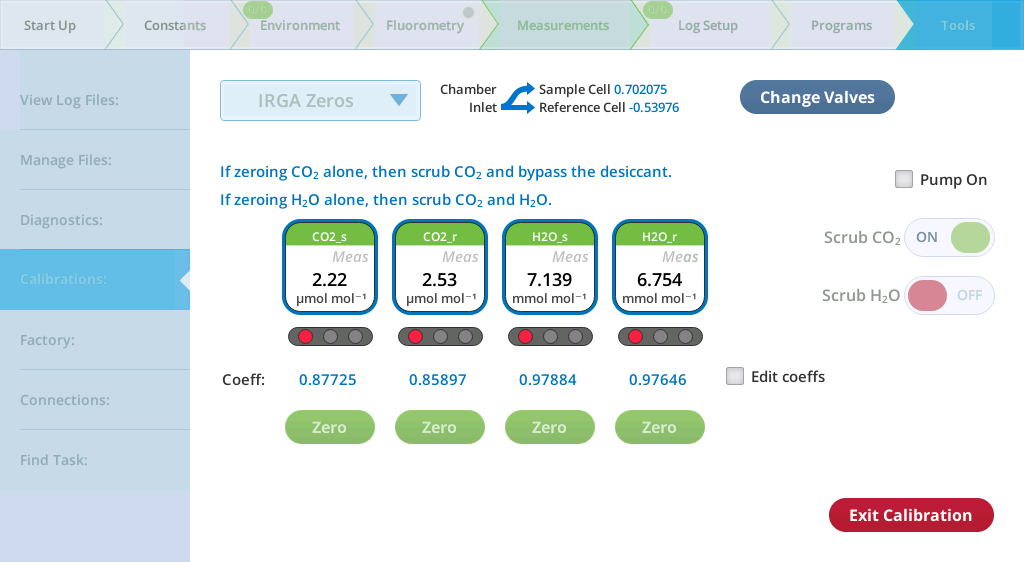
The IRGA Zeros, Spans, and Pressure/Flow calibration screens have status lights associated with each field (Figure 7‑1).
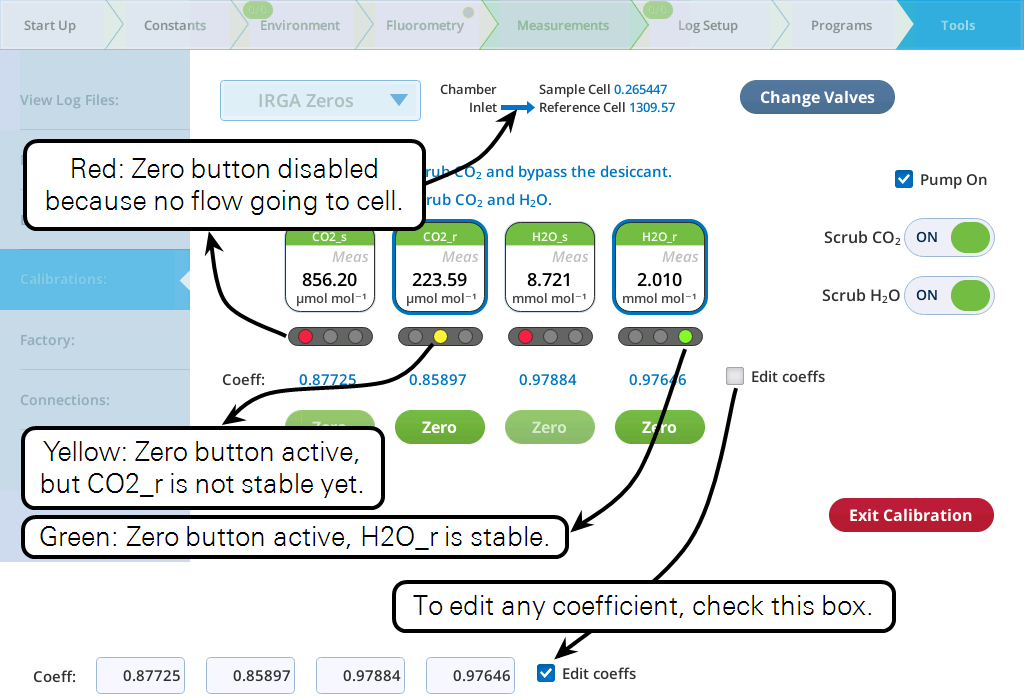
Checking the zeros
You can check the zeros any time during measurements without entering calibration mode. The chamber can be open or closed, with or without a leaf (although if there is a leaf in the chamber it may be starved of CO2).
- Begin with the CO2 zero.
- Zeros are checked under Tools > Calibrations. Tap Begin Calibration.
- Note that the cell getting flow is the cell that gets zeroed. When checking the zero, flow to the leaf chamber is bypassed. Use the Change Valves button to set which cell (Sample or Reference) is getting flow.
- Before checking the zero, check that the soda lime and desiccant are fresh.
- If zeroing CO2 alone, then scrub CO2 and bypass H2O.

- If everything is working properly, you should see CO2 values that are very close to zero.
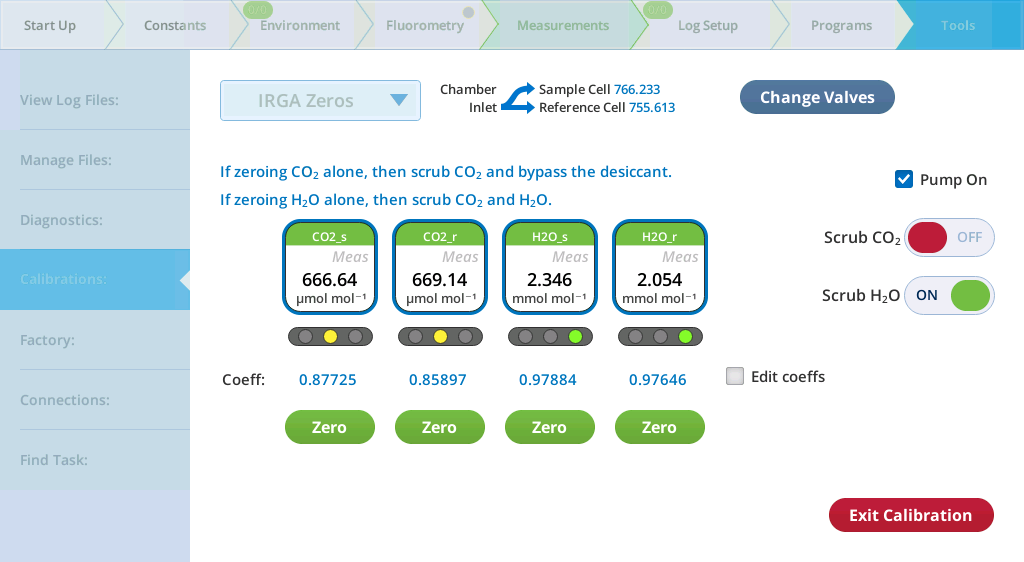
- Check the H2O zero.
- When checking the H2O zero, you'll scrub H2O.
- Watch the H2O reading for the cell that is getting flow.
- It will approach zero more slowly than the CO2 reading. Rather than wait the 10 or 20 minutes to get a really good zero, use your judgment. If, after a minute or so, the reading is down to 0.2 or 0.3 mmol mol-1 and falling slowly, that’s good enough. Clearly, if it’s negative and falling after only 1 minute, it will be going too low, and re-zeroing may be in order.
- Be sure to check the zero for both CO2 and H2O in both the sample and reference IRGAs.
Zeroing with gases
If you have access to a quality calibration gas that has a known concentration of 0 ppm CO2, you can use that to set the CO2 and H2O zeros.
- Connect the head cable between the console and head. Power on the instrument.
- The leaf chamber can be open or closed.
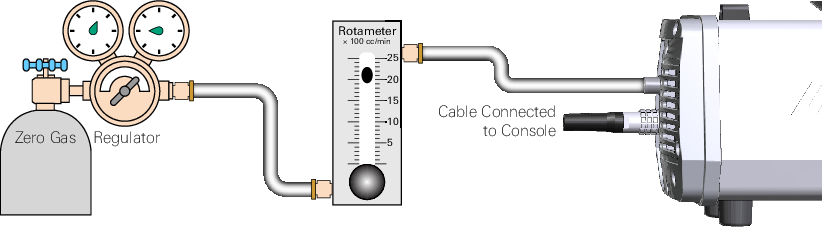
- Plumb the zero gas to the analyzer inlet.
- The zero gas can be CO2-free air or nitrogen. Set flow from the tank to about 2 liters per minute (at least 0.5 liters per minute if you want to conserve gas). Be sure to use a flow regulator. There is a piece of Bev-a-line tubing and a quick-connect fitting in the spares kit.
- Begin with the CO2 zero.
- Zeros are set Under Tools > Calibrations. Tap Begin Calibration.
- The procedure will zero the IRGAs. Note that the cell getting flow is the cell that gets zeroed. During zeroing, flow to the leaf chamber is bypassed.
- Partition the flow so it is through both analyzers.
- Tap Change Valves so flow goes through both Sample and Reference cells.
- Clear the Pump On box, since you are relying on the gas for the flow.
- If everything is working properly, you should see CO2 and H2O values that are very close to zero.
- Check the readings for H2O_r and H2O_s.
- When the readings have stabilized to your satisfaction, tap the Zero H2OR and Zero H2OS buttons. Always do H2O first, since the water vapor affects the CO2 measurement.
- Check the readings for CO2_s and CO2_r.
- When the readings have stabilized to your satisfaction (they should become stable fairly quickly) tap Zero CO2S and Zero CO2R.
- Exit calibration if you are satisfied with the results.
Zeroing with chemicals
Although it is best to set the zero using high-quality calibration gases from a tank, you can zero with the zero kits if calibration gases are not available. Two columns are included—one for soda lime, and one for a desiccant. Follow these good practices to ensure that you achieve a reliable zero.
Caution: Never zero without tank gas or fresh chemicals. Old chemicals, even in new packaging, can expire and lose their ability to scrub gases. If you have doubts about the quality of chemicals or gases, do not zero the LI-6800. If zeroing with chemicals, keep the following in mind:
- Know when and from where the chemicals were purchased.
- Know how and where they were stored.
- Just because you changed the chemicals recently does not necessarily mean they are good.
- Connect the cable between the console and head.
- Leave the hose disconnected. Power on the instrument. The leaf chamber can be open or closed.
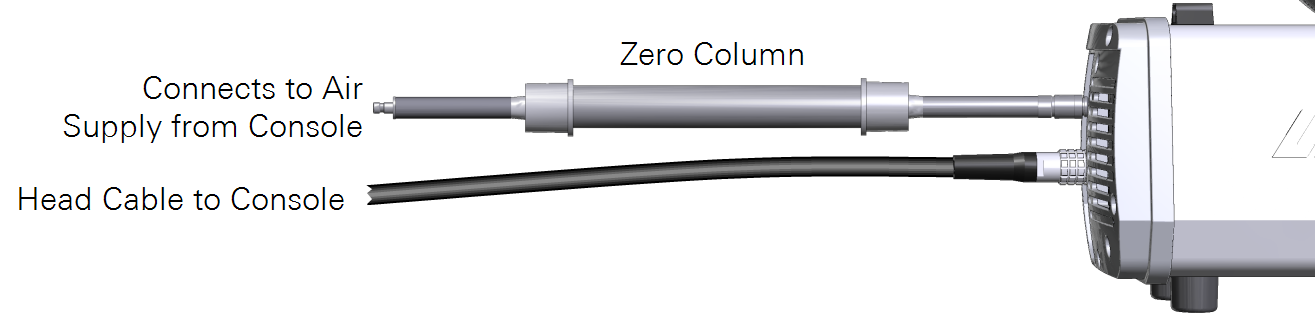
- Fill the zero column (from the spares kit) with either regular or indicating Drierite. Do not attempt to zero H2O with Sorbead® Orange CHAMELEON® or silica gel beads.
- Always do water vapor first, since water vapor affects the CO2 measurement.
- Install the zero column, which is filled with desiccant on the head air inlet.
- The zero column goes in line between the console and head.
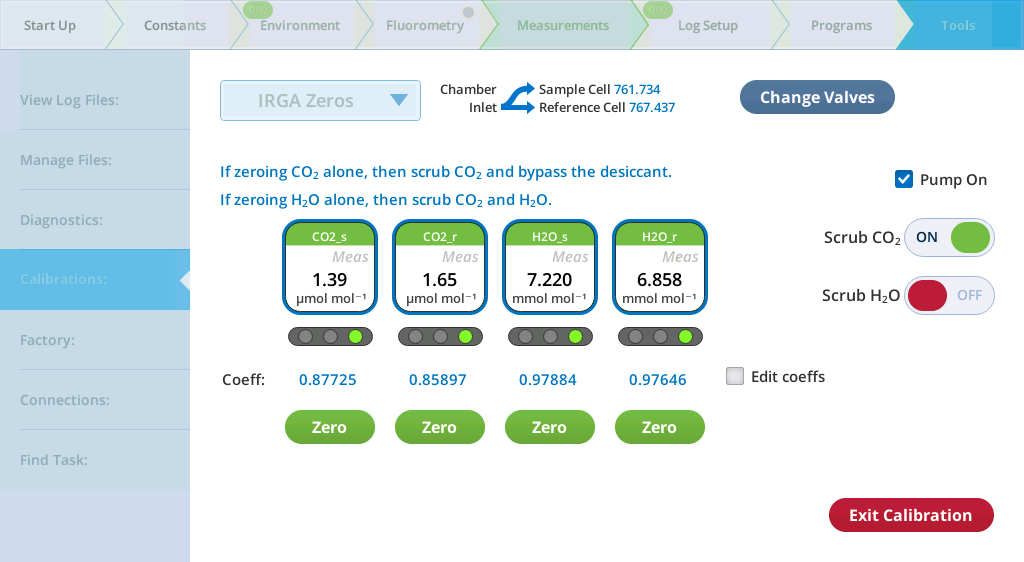
- Begin with the H2O zero.
- Zeros are set Under Tools > Calibrations > IRGA Zeros. Tap Begin Calibration.
- Note that the cell getting flow is the cell that gets zeroed. During zeroing, flow to the leaf chamber is bypassed.
- Partition the flow so it is through both analyzers.
- Tap Change Valves so flow goes through both Sample and Reference cells.
- If everything is working properly, you should see H2O values that are very close to zero.
- Tap the Zero H2OS and Zero H2OR buttons.
- Check the results to see if they are satisfactory. If you're satisfied with the results, move on to the CO2 zero.
- Fill the second zero column with Soda Lime.
- Connect it in line between the console and head, as before, and begin the zero procedure.
- If everything is working properly, you should see CO2 values that are very close to zero.
- Tap the Zero CO2S and Zero CO2R buttons when the values are stable.
- Check the values to confirm that the zero is good.
- Exit Calibration if you are satisfied with the results.
- Stow away the zero tubes for future use. You don't need to empty the chemicals from them. Write the date and the chemicals on the tubes, install caps on the ends, and keep them for the next time you need to zero.
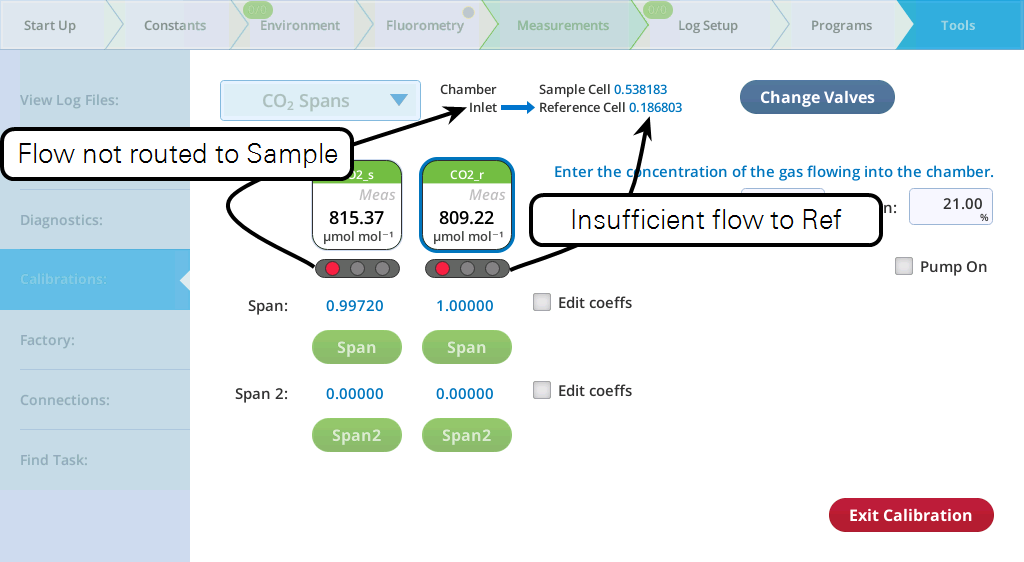
The CO2 and H2O Spans are user calibrations in which you check the reading with a known concentration in the cell. What does the span calibration do? Suppose an IRGA reads 990 µmol mol‑1 when there is 1000 µmol mol‑1 in the cell. If you adjust the span to correct this, you will have increased the response by 10 µmol mol‑1 at 1000, but at 500 µmol mol‑1, the response will be increased by only 5 µmol mol‑1, and at 2000 µmol mol‑1, it will be about 20. (The numbers are not quite right, since the span adjustment is linear with IRGA signal, not concentration.) At 0 concentration (or rather, at zero voltage from the IRGA detector), a span adjustment has no effect at all.
To set the span of the CO2 analyzer, you'll need gas with a known concentration of CO2. Generally, this is provided by a tank of compressed CO2 in air or nitrogen that has been certified, or (even better) that has been measured using a correctly calibrated gas analyzer. The concentration should be at or above where you work most of the time, so 500 µmol mol‑1 is fine.
- Connect the head cable between the console and head. Power on the instrument.
- The leaf chamber can be open, closed empty, or closed on a leaf (although this is not recommended because it will alter the leaf's response).
- Plumb the span gas to the analyzer inlet.
- There is a piece of Bev-a-line tube and a quick-connect fitting in the spares kit for this purpose. The span gas can be CO2 in air or nitrogen. Set flow from the tank to about 2 liters per minute (at least 0.5 liters per minute if you want to conserve gas). Be sure to use a flow regulator.
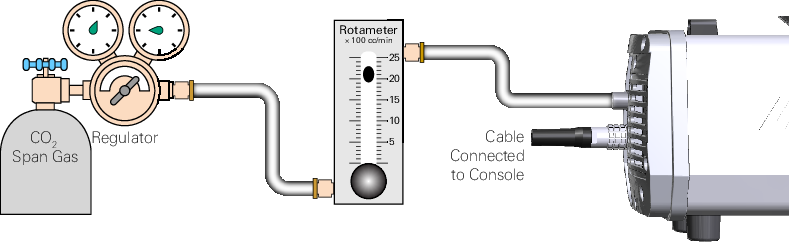
- Go to Tools > Calibrations and select CO2 Spans. Tap Begin Calibration.
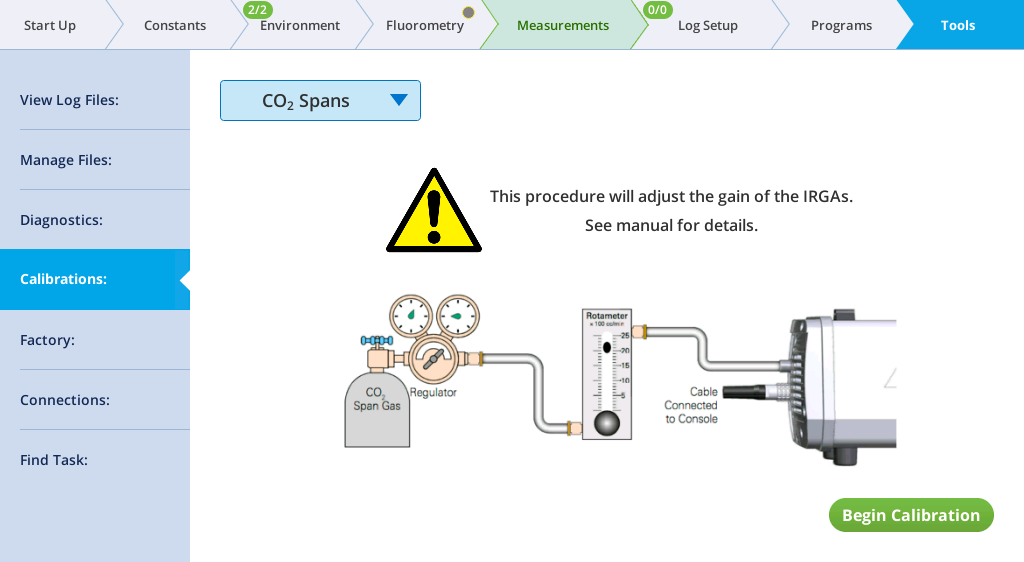
- Partition the flow so it is through both analyzers (tap Change Valves).
- Check the readings for CO2_r and CO2_s.
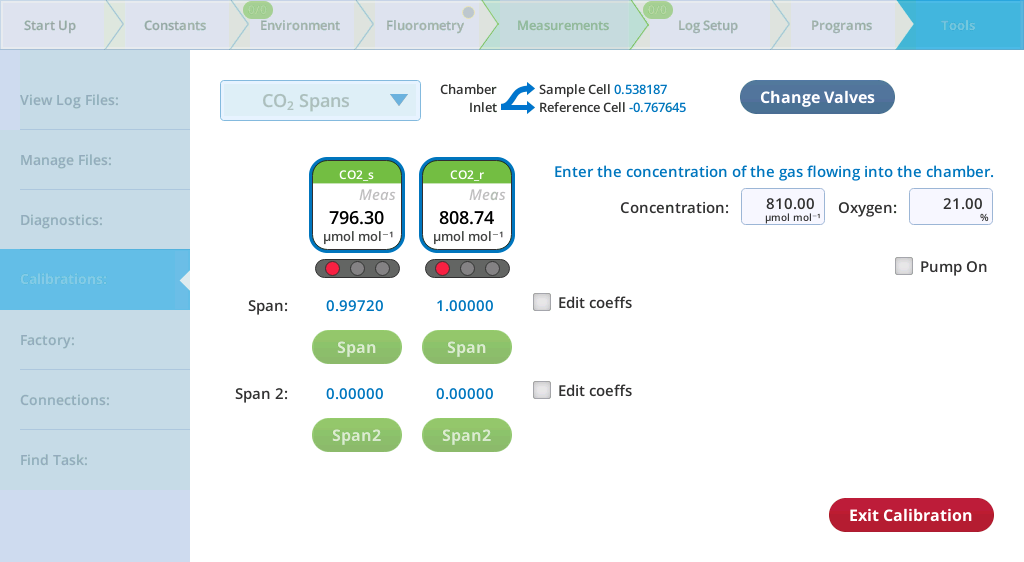
- Enter the Concentration of the span gas (µmol mol‑1).
- Enter the % Oxygen in the span gas (21% if your span gas is CO2 in air, or 0% if using CO2 in nitrogen).
- When you are satisfied that the readings have stabilized, tap Span CO2 S and Span CO2 R.
To set the span of the H2O analyzer, you'll need a gas stream with a known concentration of H2O. The best choice for this is the LI-610 Dew Point Generator.
Caution: If you don't have an LI-610, or some device of similar accuracy, do not adjust the IRGA span values for water.
- Setup the LI-610 for an appropriate dew point.
- Subtract about 5° C from the room temperature and use that for the target dew point temperature. Wait until the condenser’s temperature (as monitored on the LI-610) reaches this target. The reason for this 5° C "buffer" is to avoid condensation in the line between the LI-610's condenser and the IRGA. If condensation happens, you will have large errors.
- Set a flow rate of about 0.5 liters per minute from the LI-610.
- Attach the LI-610 or another suitable dew point generator to the IRGA air inlet.

- Go to Tools > Calibrations and select H2O Spans.
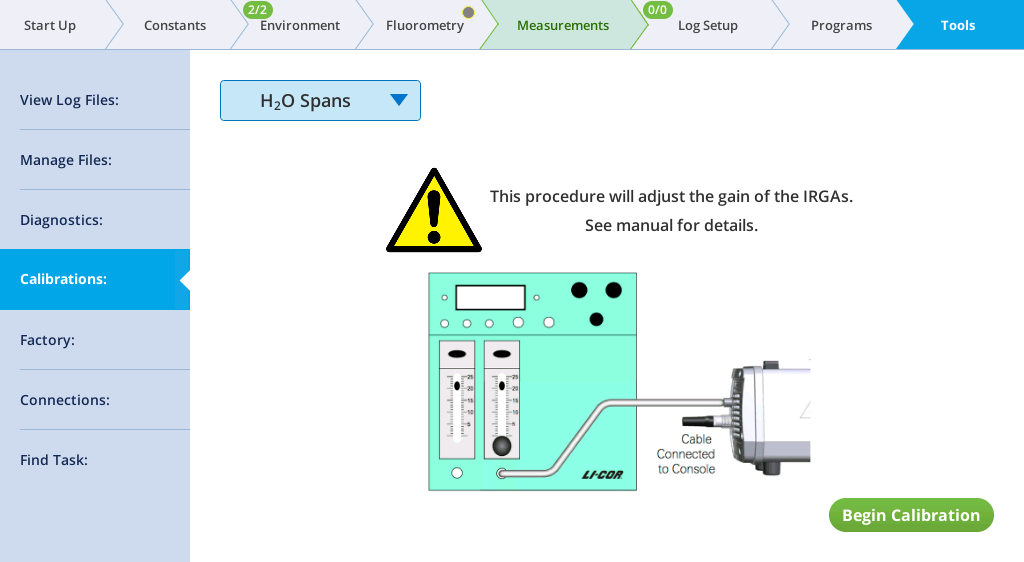
- Tap Begin Calibration.
- Wait for equilibrium. Watch the values for H2O_s and H2O_r. It should take 3 to 5 minutes for equilibration.
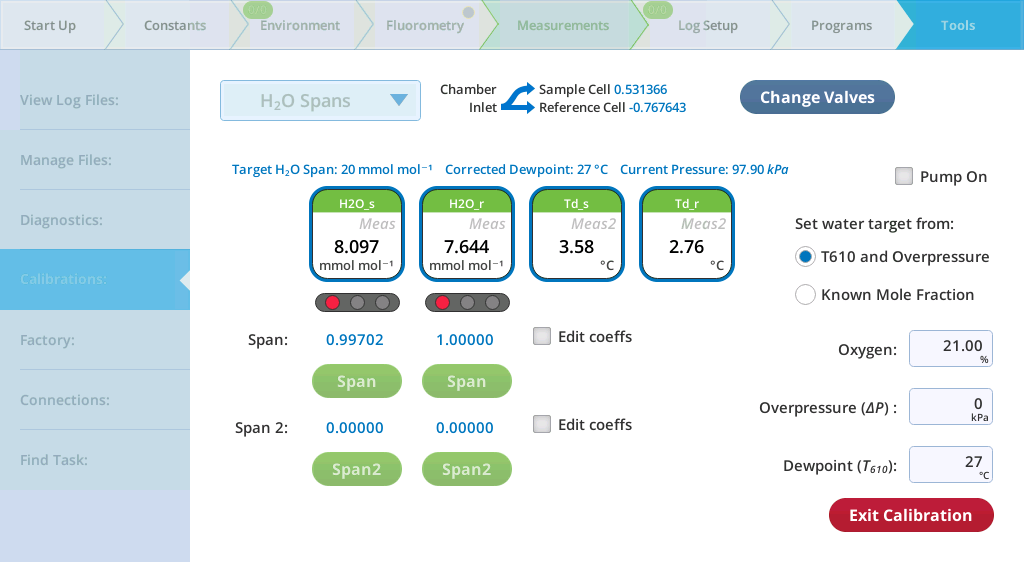
- Set the target from: Select either T610 and overpressure if you're using the LI-610, or Known Mole Fraction if you are using another humidity source.
- Enter the percent oxygen (21% in ambient air).
- Enter the Dewpoint temperature (T610) overpressure (ΔP).
- Tap Span H2O S and Span H2O R to set the spans.
- You can span the analyzers one at a time or both at the same time. Tap the Change Valves button to select a different analyzer or both.
The span factors should be within 0.05 of 1.0 (that is, 0.95 to 1.05). The farther out of this range you go in attempting to make the analyzer read the correct concentration, the more likely it is that something is wrong, such as one of the following:
- Badly zeroed analyzer?
- Make sure you have a good zero before setting the span.
- Concentration not what you think it is? For CO2, has the span gas ever been independently checked?
- Maintain healthy skepticism of even the most reputable vendor of calibration gases; after all, someone could have accidentally put the wrong label on the tank sent to you.
- For H2O, is there water in the condenser? Are you asking for a target that is at or above room temperature?
- You won't get to that dew point, of course, but you will get in trouble in the form of condensation somewhere in the line.
- Leak in the chamber?
- The chamber has to be well sealed for this to work.
- Plumbing mistake?
- Follow the tubing and double check that things are connected correctly.
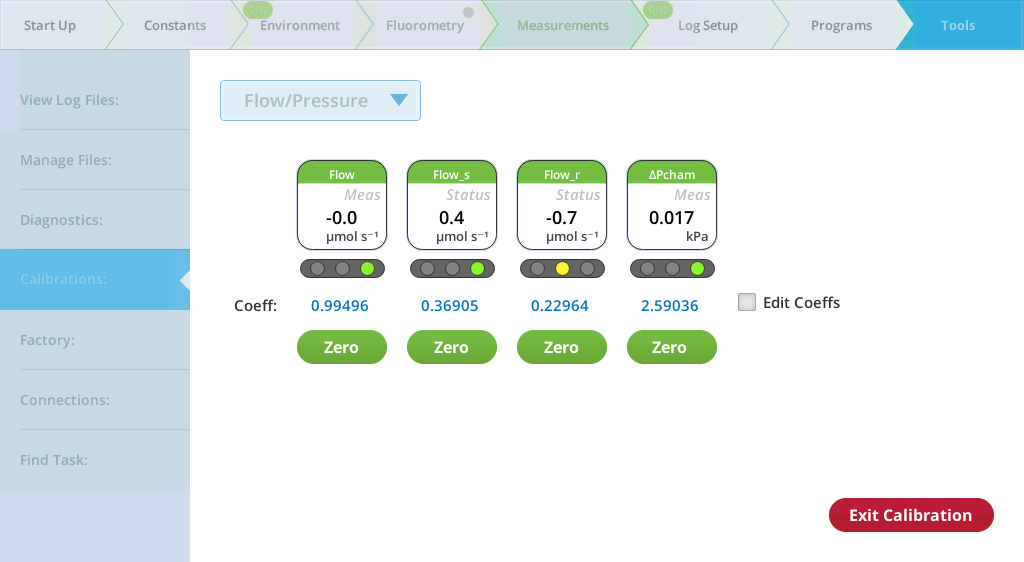
This is where you zero the flow meter and chamber pressure sensor.
To zero the flow meter:
- Under Tools > Calibration, tap Flow Meter Zeroing
- Tap Begin Calibration
- Zero the sensors
- Tap each of the four buttons to zero the corresponding component.