Data that are stored on the LI-6800 can be viewed at any time on the device console.
- View files under Tools > View Log Files.
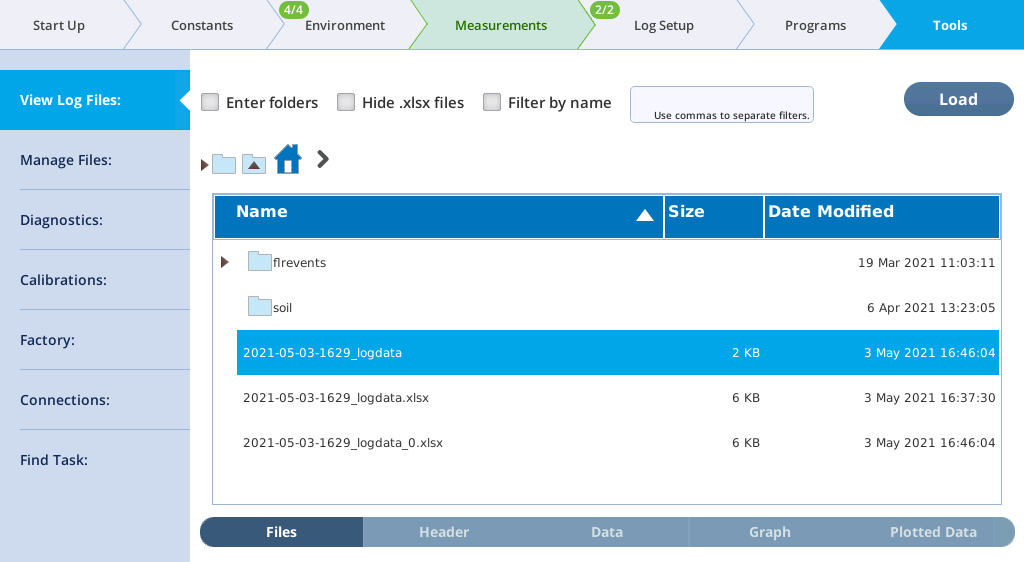
- Select a file, then tap the Load button.
- After the file is opened, you can view:
-
- Files Tap this to view the files.
- Header The header information from the open file.
- Data The actual data values.
- Graph Where you can plot variables from the data file.
- Plotted Data The values of only the graphed data.
- Plot the data.
- Tap the Graph button to get a graphical view. Select the variables to plot on the horizontal axis, left axis, and right axis.
File management
A Trash Folder is now used to contain all deleted files and folders. Moving unwanted items to the trash can be done from any file viewer that has a Delete button, or by a new utility that allows you to target files using name and date filters. The trash can be browsed, and selected content easily recovered, automatically returned to its place of origin. To recover space, items in the trash can be erased, either all at once or selectively.
A new Backup / Recovery utility makes it easy to copy data, settings, and programs to a USB drive. To do a backup, simply insert a drive, select an optional time filter (all files before or after a certain date, or between two dates), and the desired categories: user data, configuration data, and diagnostics. Backups are archived by console serial number and date/time, making it easy to find and browse backed up data. Restoring from a backup is simple and flexible. You can select an entire backup, or narrow it down as far as you like, all the way to a particular folder or file. You also have control over what happens when restoring a file if the original still exists: overwrite it, skip it, or rename it.
For general purpose file copying between a USB drive and the LI-6800, there is a utility screen that lets you browse both file systems system side by side, and pick files and folders to copy, putting them exactly where you want them.
Transferring to USB storage
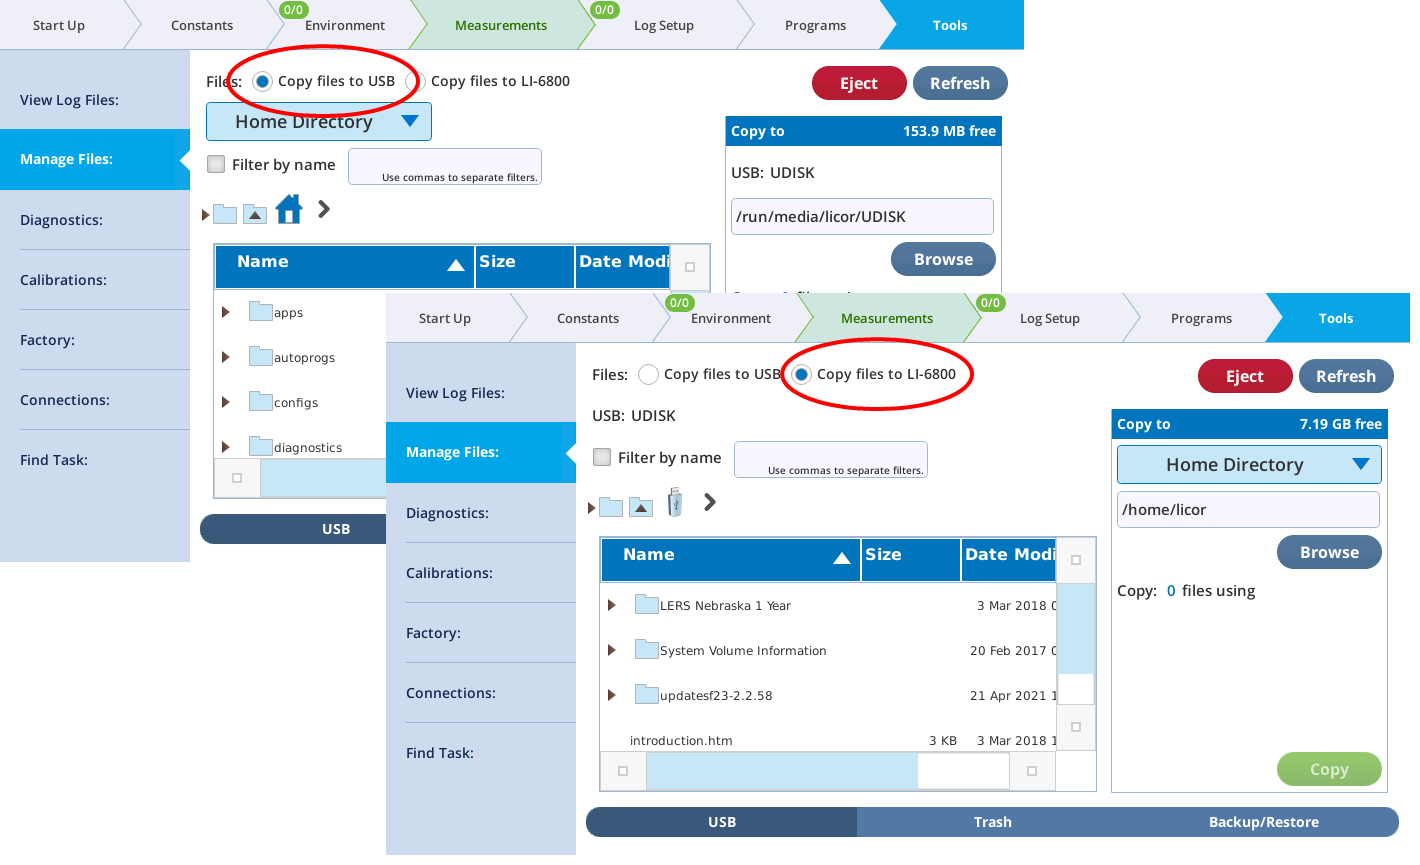
Note: The head and console must be connected via the cable to transfer files to a USB device. The USB device must be formatted as a FAT (File Allocation Table) file system. ExFAT (Extended File Allocation Table) is not supported.
Inserting a USB drive will, after several seconds, automatically bring up the USB file system in either the source or destination views, depending on how the To/From radio buttons are set (Figure 4‑8). Inserting a second USB drive will produce a radio button selection for which USB drive you wish to use (Figure 4‑9).
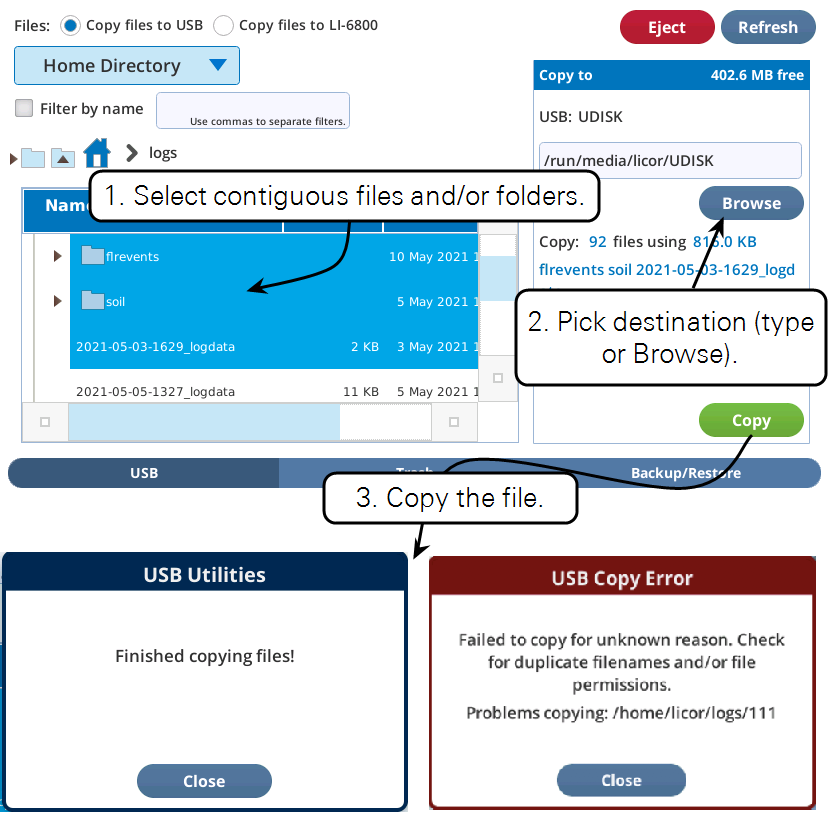
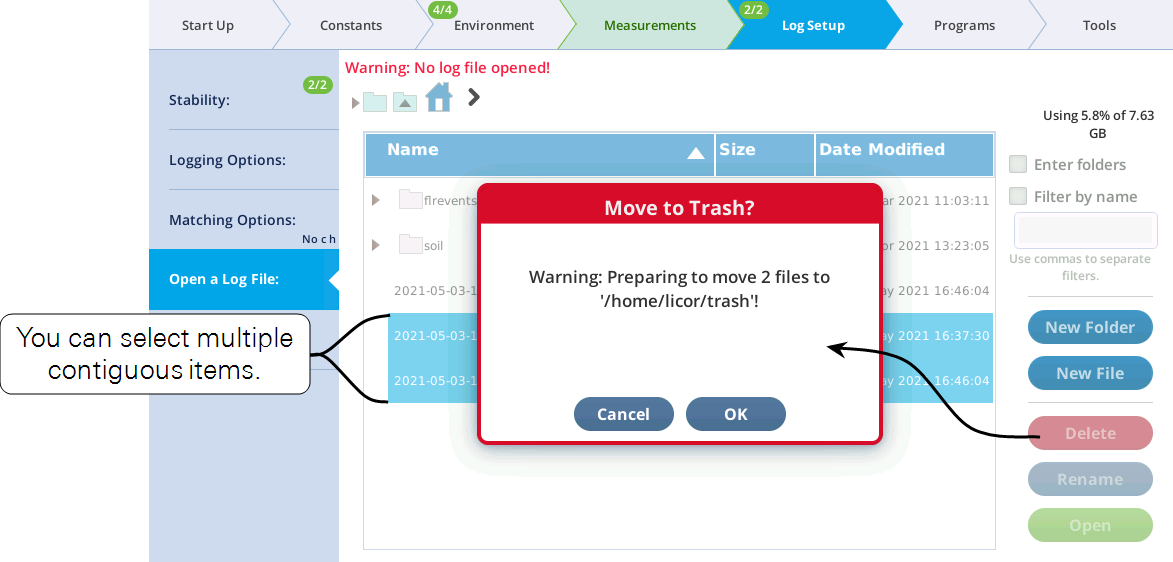
To copy one or more files or folders, select them (tap and drag for multiple, contiguous selection) in the source view, select a folder in the destination view using the Browse button or typing in the edit box, then tap the Copy button. A dialog confirming the copy or reporting a failure is displayed after the copy (Figure 4‑10).
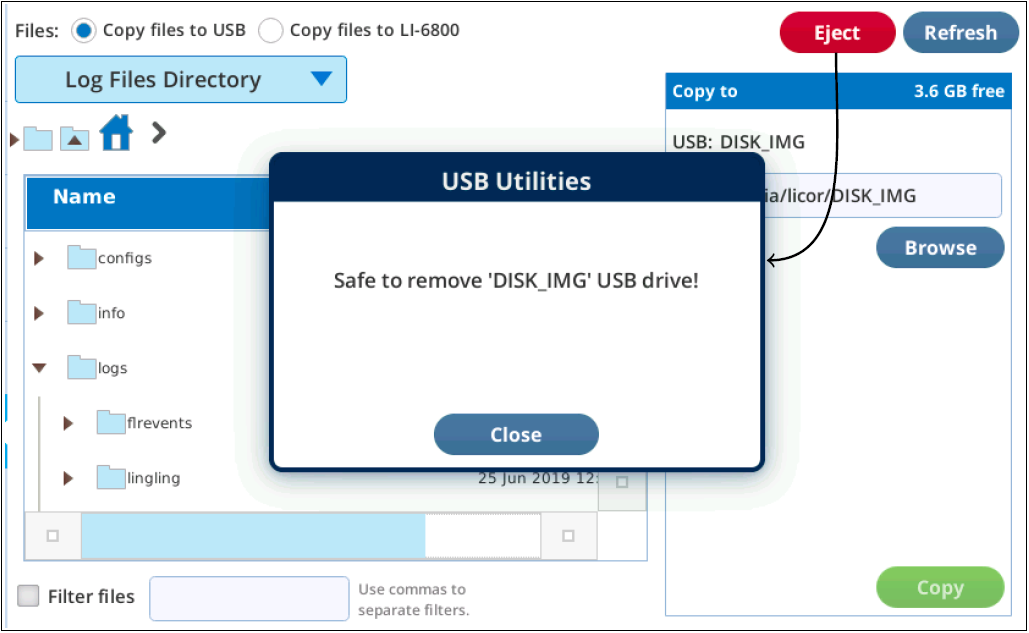
To remove a USB drive safely, tap Eject to verify it is safe to remove (Figure 4‑11). Note you can continue to use the USB drive after tapping Eject if you choose - it remains functional until you physically remove the drive from the console.
Note: If a USB drive has a space character in the volume name (allowed, but never a good idea), the name in the edit box for the destination volume will show nx20 instead of the space. The Copy Files function may fail if the volume name has space characters. If it fails, remove spaces from the volume name and try again.

Trash
When a file or directory is deleted or overwritten, it is moved to a trash folder (/home/licor/trash). When items are added to the trash, folders are created as needed so that the deleted item's location in the trash matches its original location. For example, the file
/home/licor/logs/mydata/lightcurves/mydata.xlsx
would be moved to
/home/licor/trash/logs/mydata/lightcurves/mydata.xlsx
with all of the intermediate folders (trash/logs/mydata/lightcurve) created as needed. Mirroring the directory structure in the trash has two advantages: 1) when browsing the trash, you know where to look to find a file you deleted, and 2) all you have to do to recover an item is to select it; the system knows where to move it based on its location in the trash.
When a file is moved to the trash it will undergo a slight name change if there is a name conflict with something already there. For example, deleting abc.txt when there is already a previously deleted abc.txt in the trash at the same location will result in the moved item being renamed abc.txt_0 (or _1, _2, etc.) to make the name unique.
Moving files to the trash
Any file viewer with a Delete button can move selected files to the trash (Figure 4‑12).
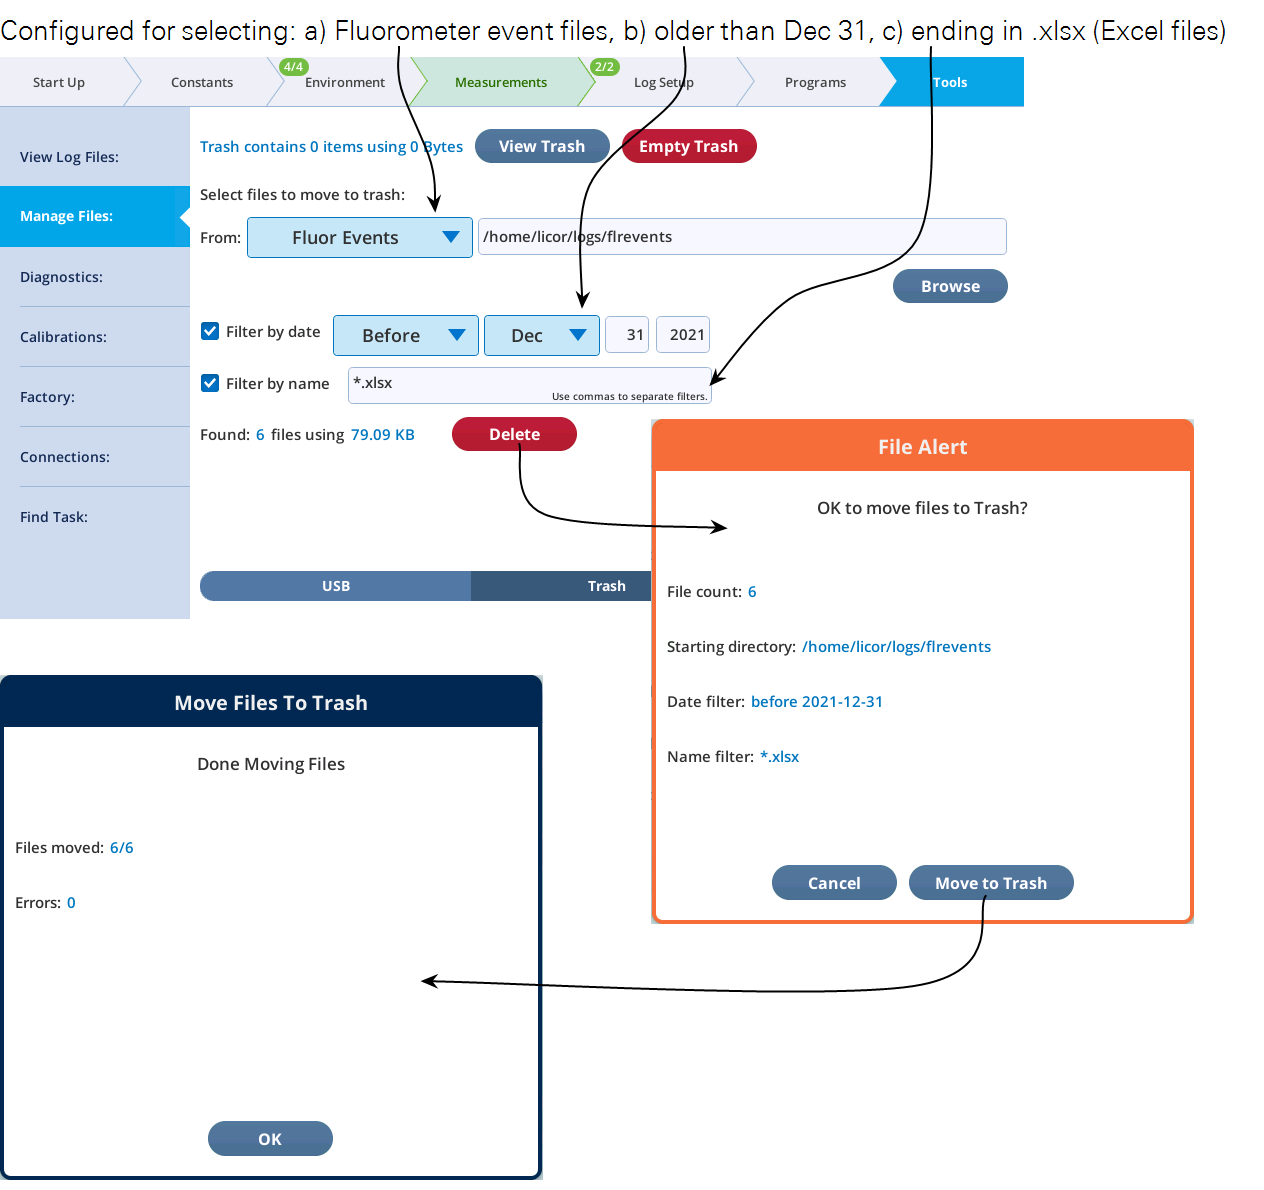
Suppose you want to remove all fluorometer event .xlsx files that are older than some date. These are distributed in daily folders in the /home/licor/logs/flrevents folder, so stepping through removing them by the Delete button method would be very tedious.
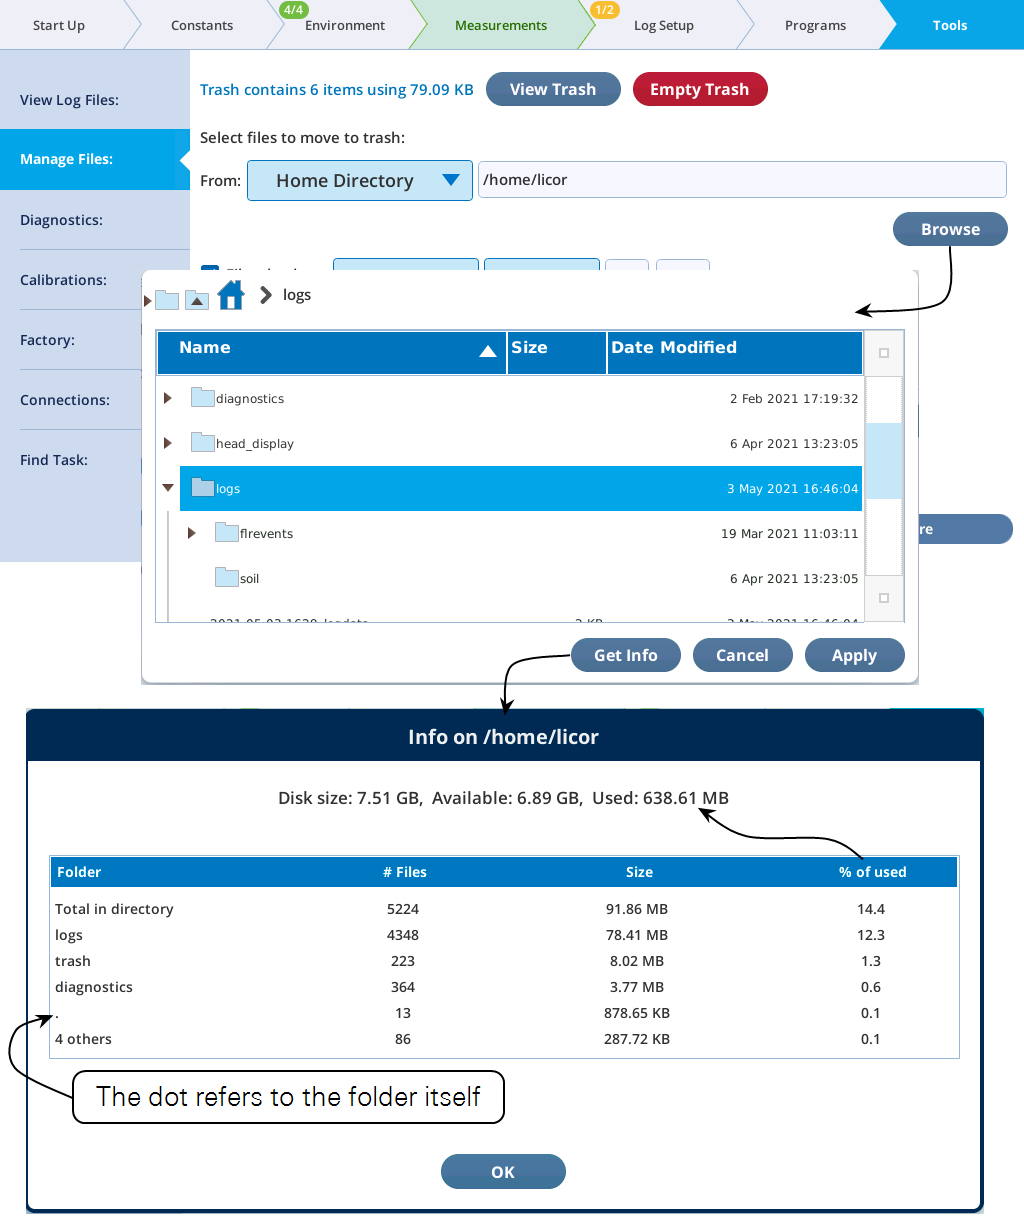
Fortunately, there is a new utility for just this sort of purpose: it is found in the Manage Files screen, accessed by Tools > Manage Files > Trash (see Figure 4‑13).
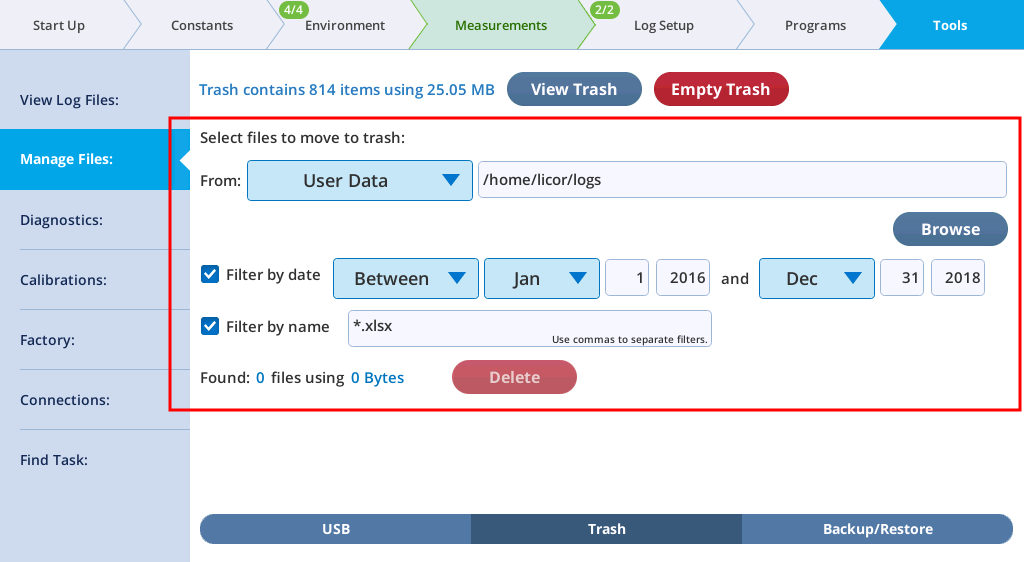
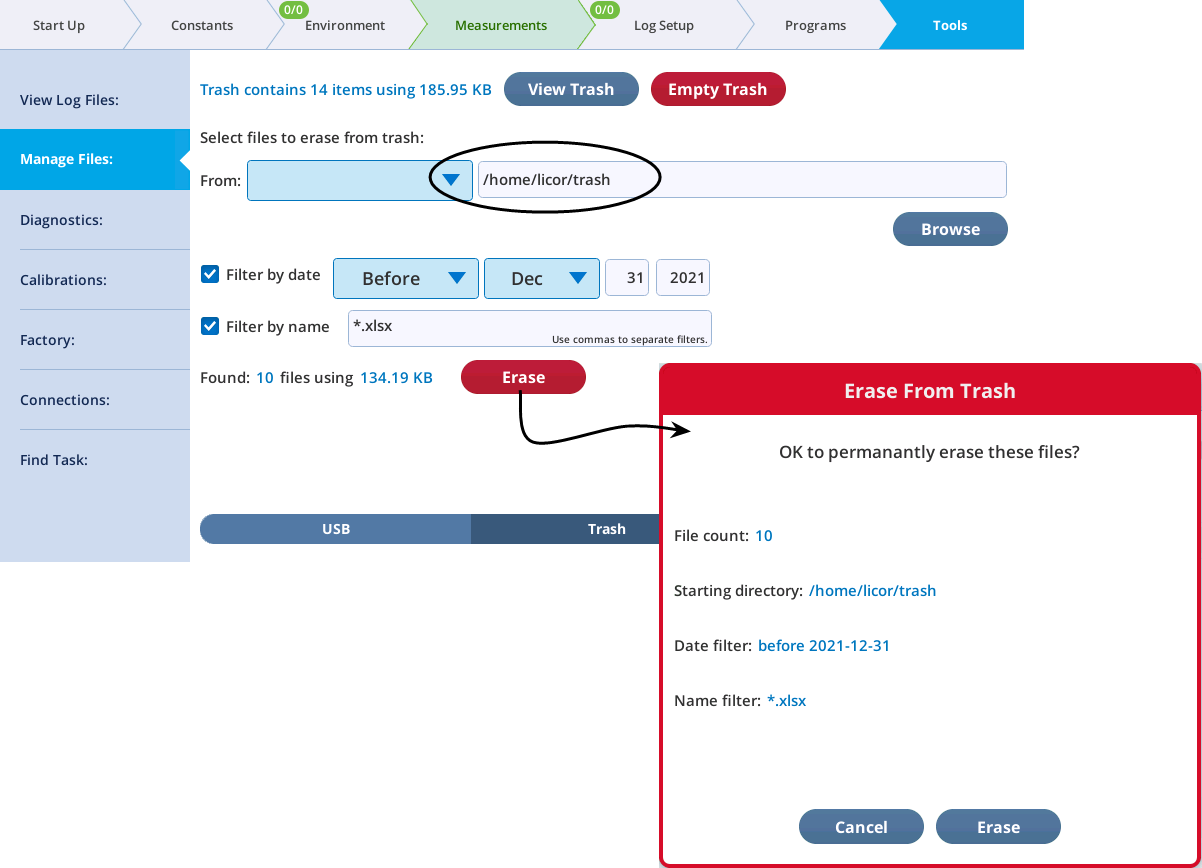
You can target a folder (including all sub-folders), and specify name and date filters. As you edit the target and filters, the system automatically re-scans and indicates the number of files that meet the criteria. The Delete button brings up a dialog that summarizes what will happen, giving you a chance to cancel or proceed.
The source folder can be selected by editing, picking from a list, or browsing.

The time filter can be set to select before, after or between. The before and after are not inclusive (i.e., the date itself is excluded), and the latter is inclusive (the dates are included).

The name filter can use Linux wildcards (* and ?). If no wildcards are used, files that contain the filter string anywhere in their name are included. Name filters are not case sensitive. Multiple filters (joined by "or") are separated by comma.

The following table illustrates how the name filter behaves.
| Filter(s) | File names | |||||
|---|---|---|---|---|---|---|
| abc | xyz.txt | Ab.TXT | stXtx | aBXyxT | abc.xlsx | |
| * | ✓ | ✓ | ✓ | ✓ | ✓ | ✓ |
| *.* | ✓ | ✓ | ✓ | |||
| *.txt | ✓ | ✓ | ||||
| txt | ✓ | ✓ | ✓ | |||
| ab | ✓ | ✓ | ✓ | ✓ | ||
| xy, *.txt | ✓ | ✓ | ✓ | |||
| ????xt | ✓ | ✓ | ||||
| ???.* | ✓ | ✓ | ||||
Recovering trash items
To recover items that have been sent to the trash, tap the View Trash button. This opens a viewer from where you can select items to recover. Multiple selection (contiguous items) is supported. Note that you can choose what to do in the case of a name duplication.
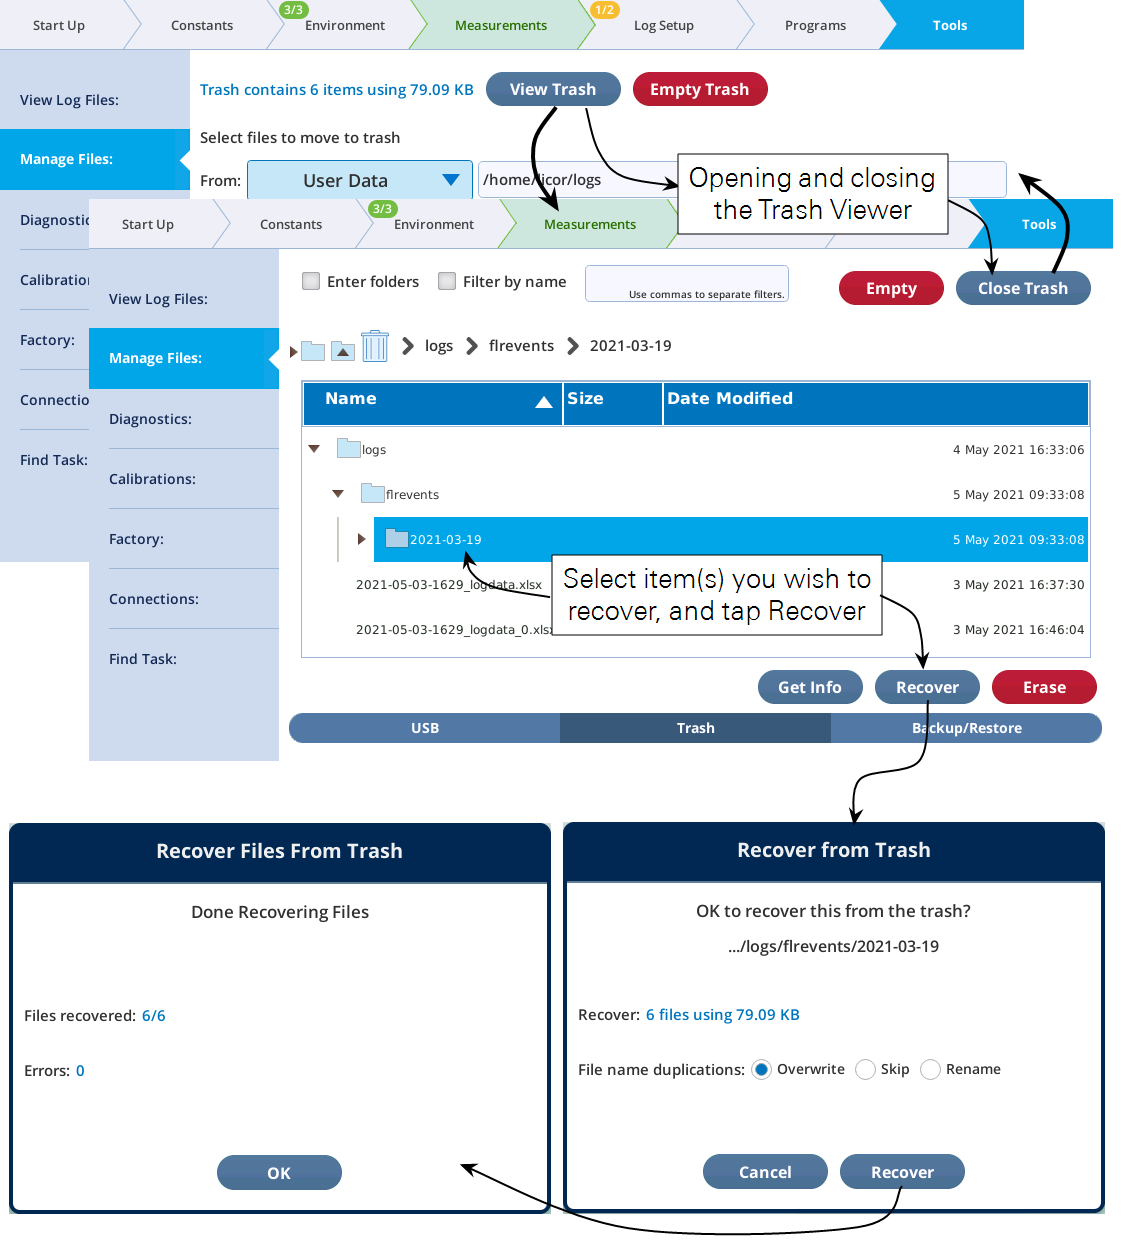
Depending on how you select items to be recovered from the trash, you may see empty folders afterwords (Figure 4‑16).
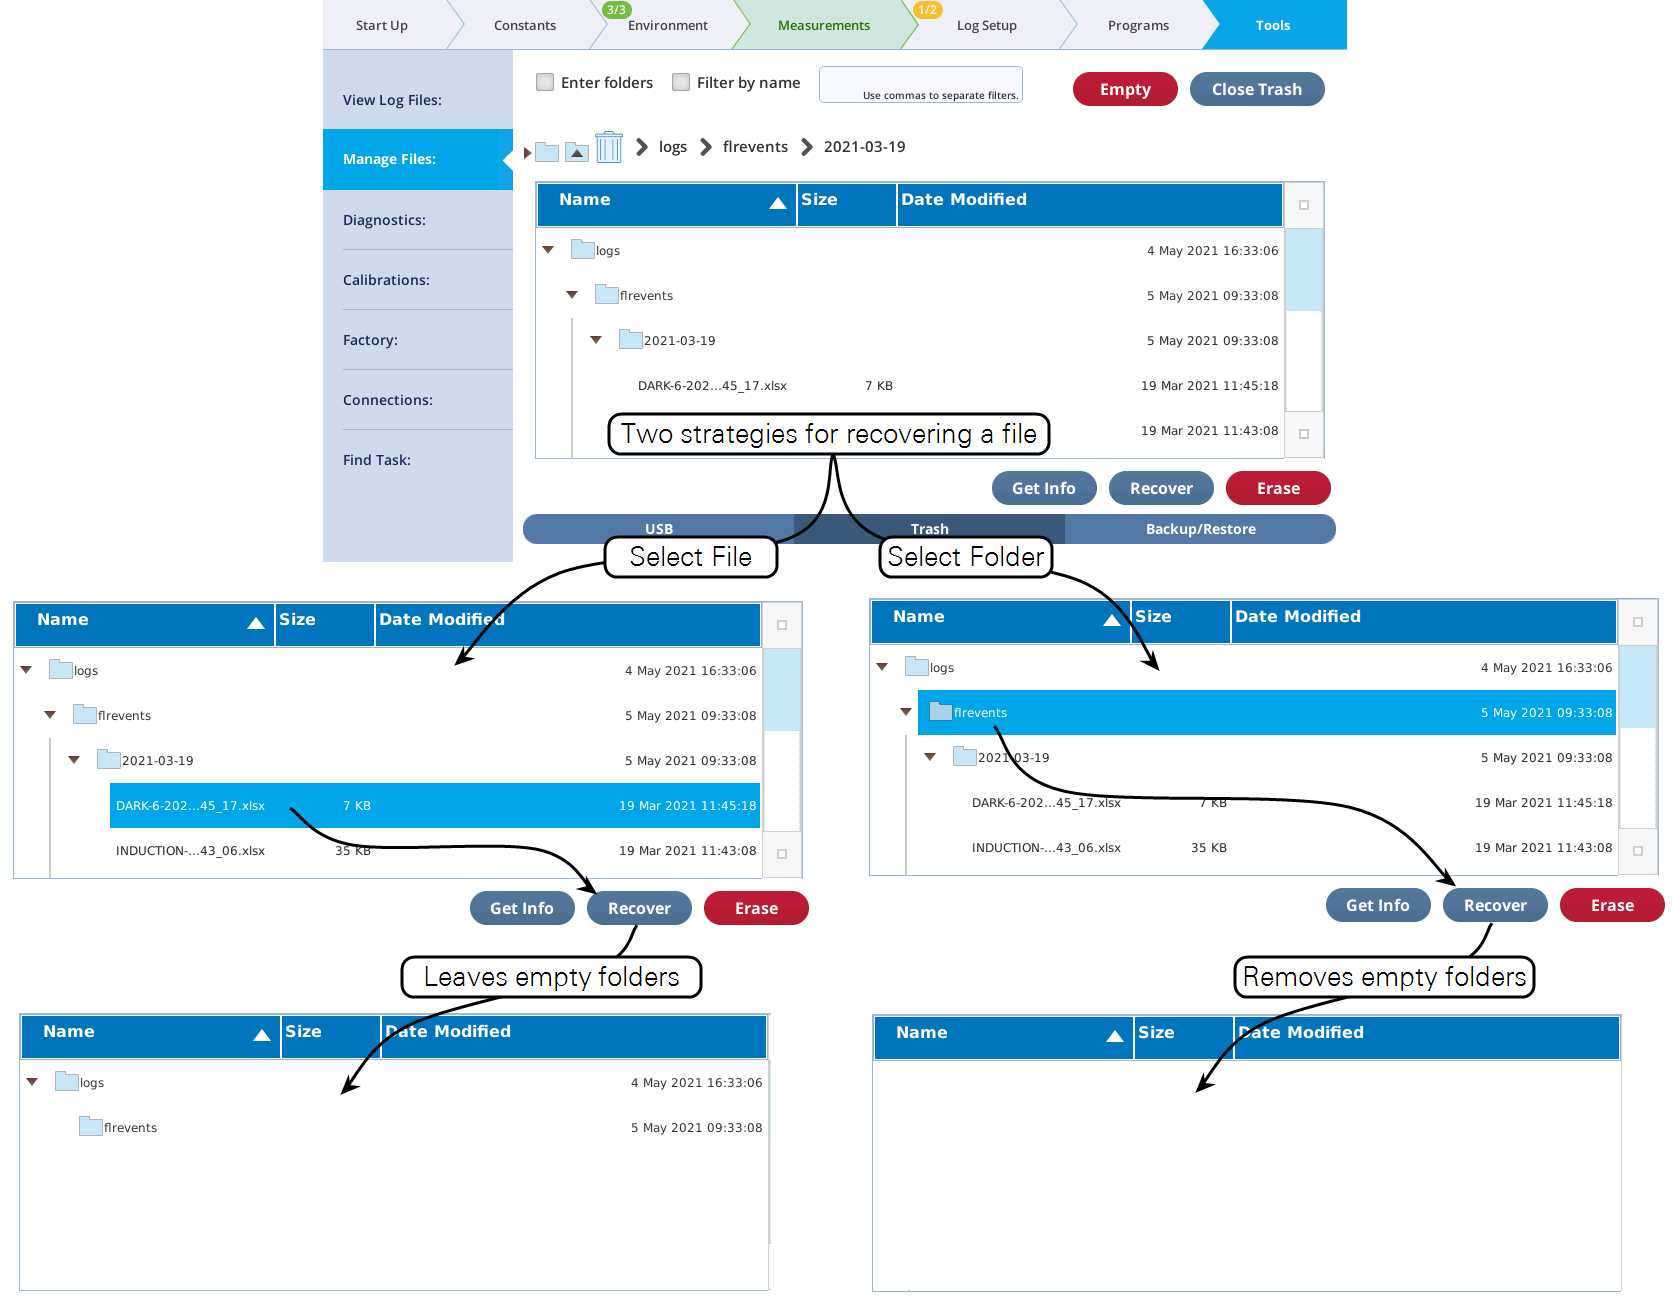
You can remove empty folders by Recover or Erase, although they do not count as files in the ensuing dialogs ("Recover 0 files using 0 bytes"). What actually happens when "recovering" an empty folder is that the system first moves the contents (there are none, it is empty), then erases the folder if it is empty (it is).
Emptying the trash
Moving items to the trash does not free up space on the file system. To do that, items need to be erased from the trash. Once an item is erased it can never be recovered. To erase everything, use the Empty Trash button (Figure 4‑17, top). Partial erasures can also be done (Figure 4‑17, bottom).
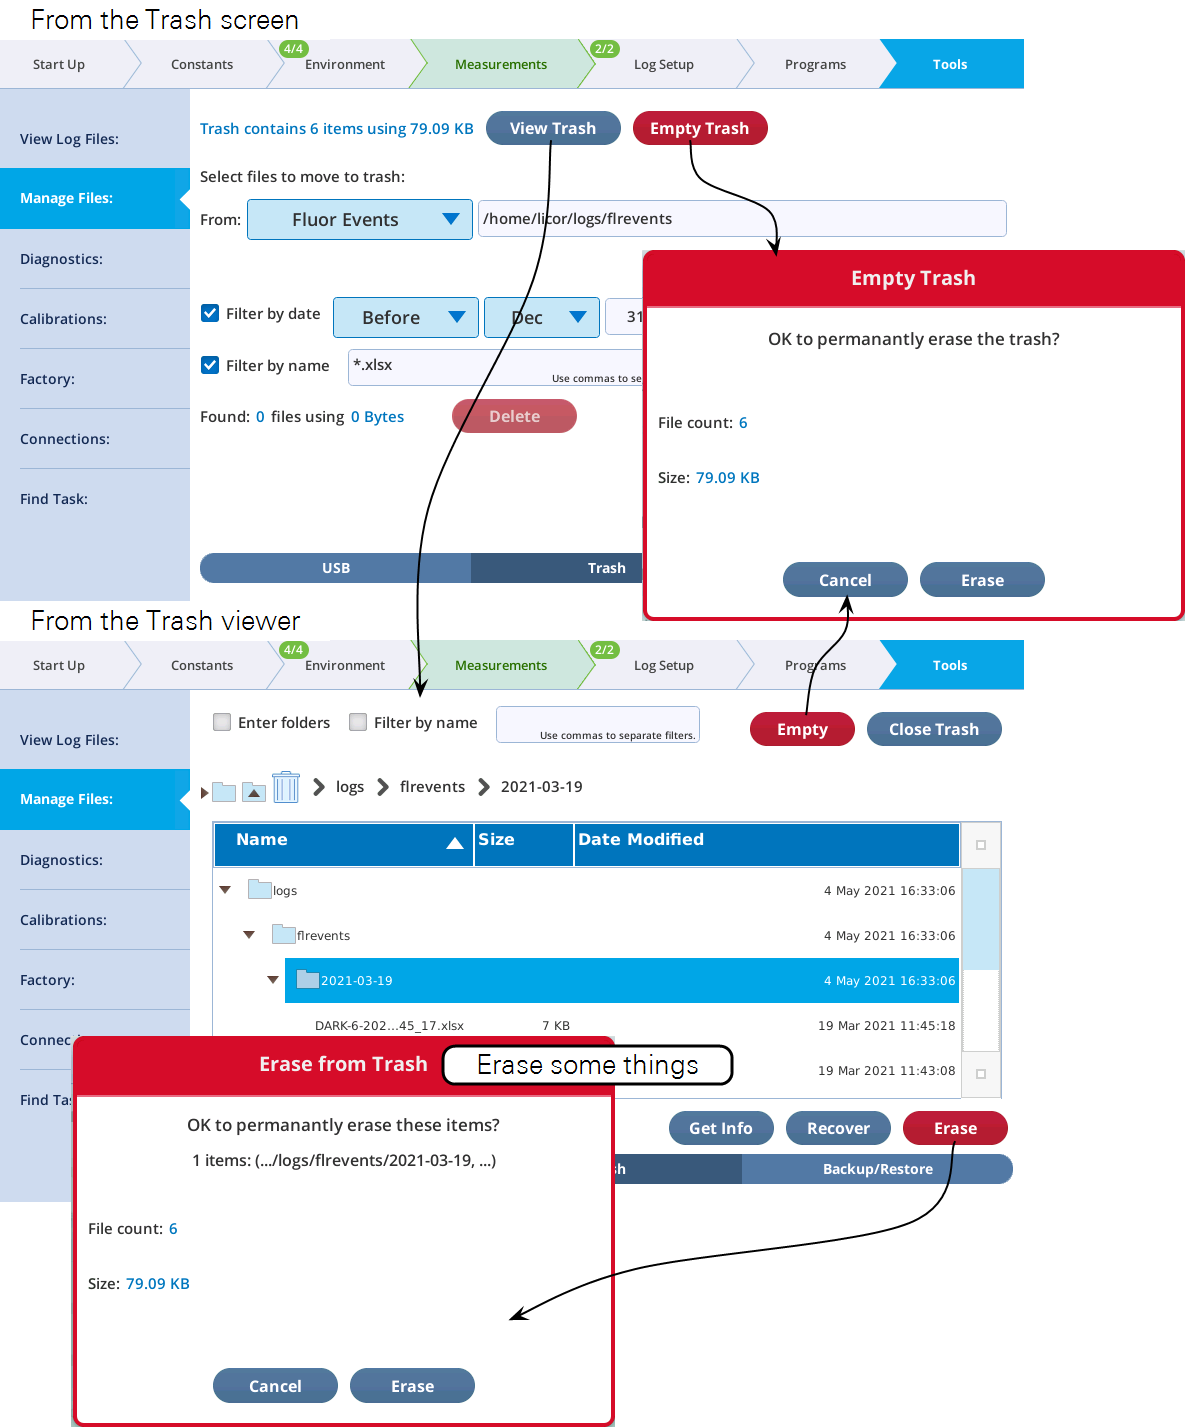
Another method of selectively erasing trash is to point the Move to Trash utility to the trash folder, and set the filters to select the files you want to permanently get rid of.
What's using the space?
You can get information on where file space is being used by the Get Info button available in many of the file browsers. For example, in the Move to Trash utility, set the target to the home folder (/home/licor), tap Browse, and then tap Get Info.
Backup and restore
The Backup/Restore page provides utilities for backing up to USB, and restoring files a USB backup to the console. Since backups created on USB are easy to navigate (folder structure is maintained), backing up is also a quick and easy way to get data files from the console to your computer.
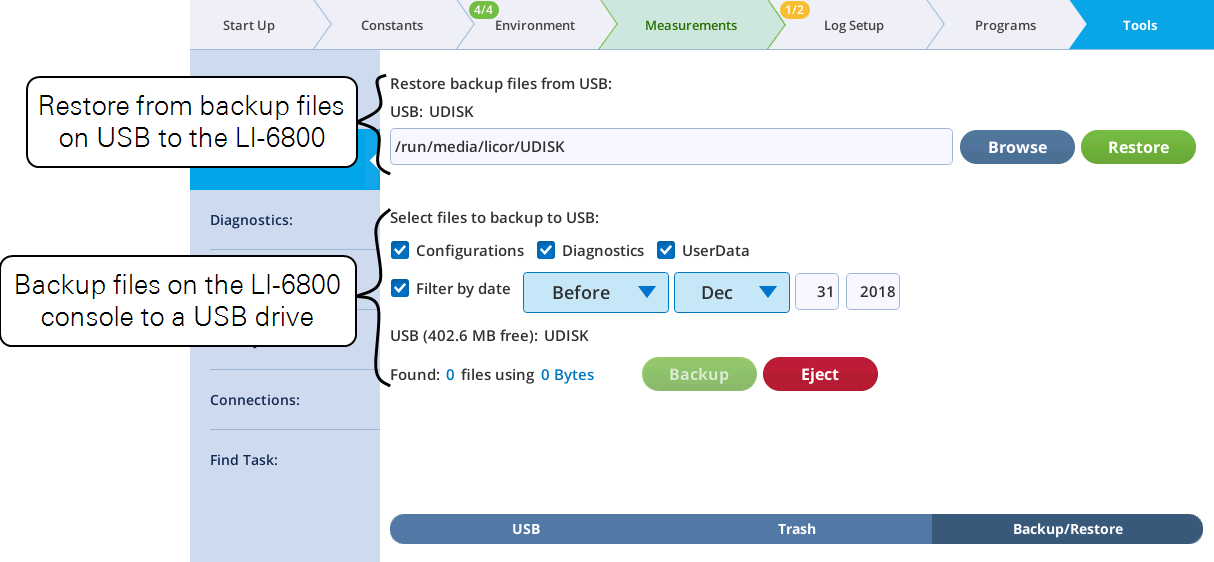
All backup and restore file operations are "copy", never "move". That is, backing up a file does not remove it from the console, and restoring a file from a backup does not remove it from the USB drive.
For purposes of backup, all LI-6800 console files that might need backing up are divided into three categories: Configurations, Diagnostics, and UserData.

Backups never include factory files, so - in the future - restoring from a backup with a different software version should be safe.
Backups
An example backup is illustrated in Figure 4‑21. In this case, all categories are included, but only those files that have changed prior to the specified date.
To do a complete backup, simply a) clear the time filter box, and b) check all three file categories.
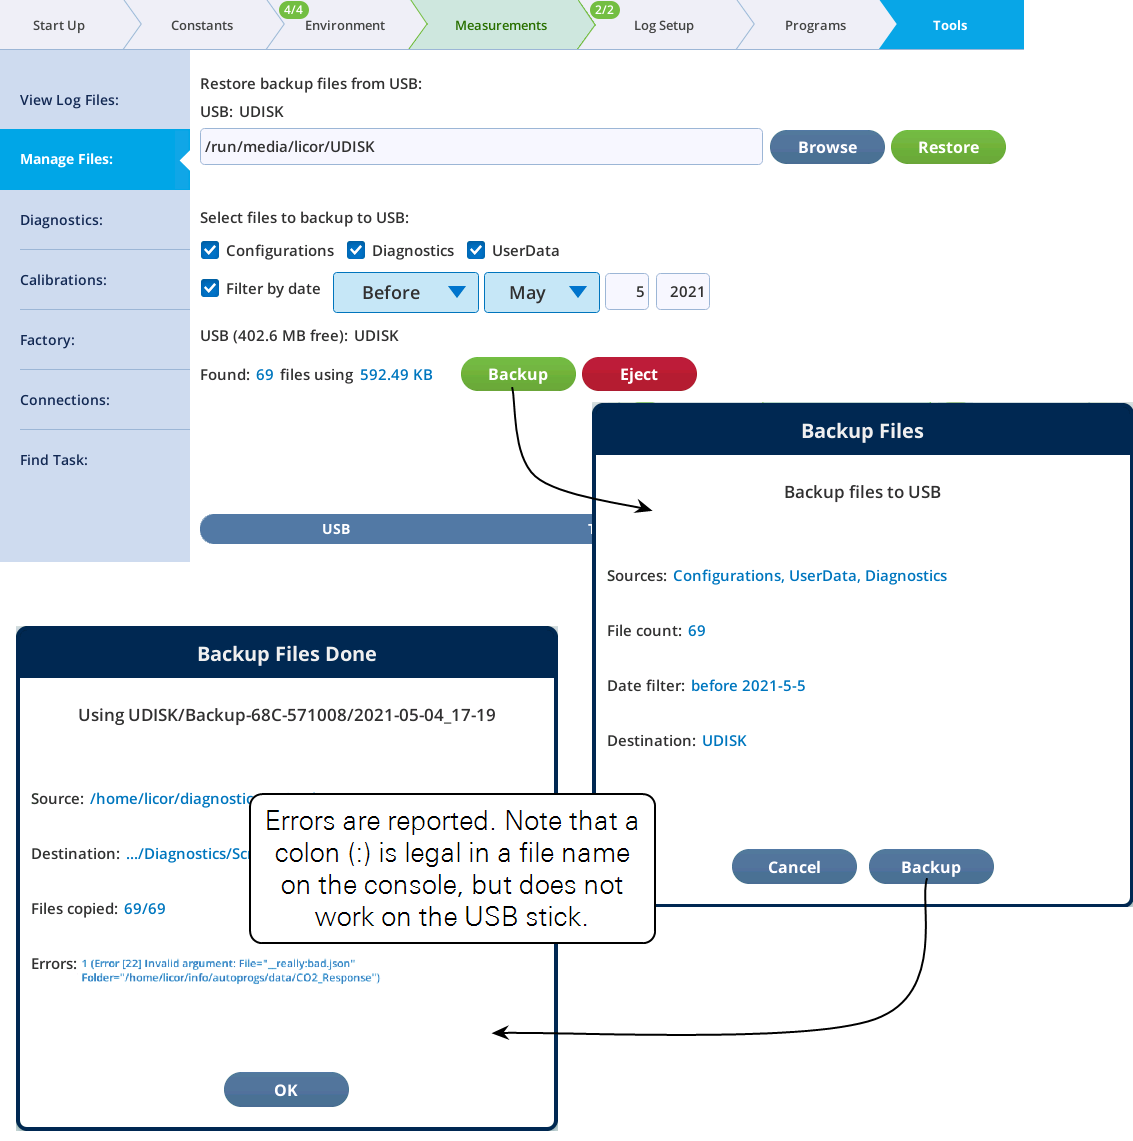
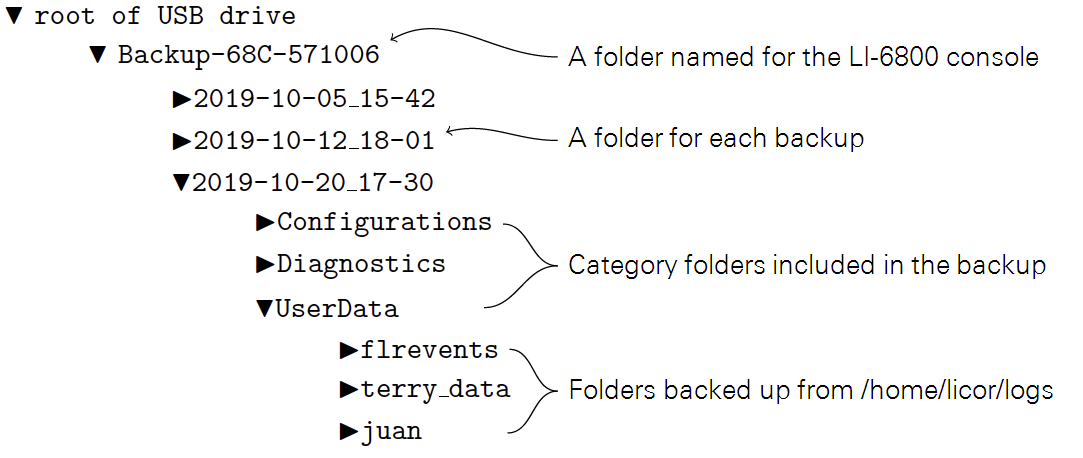
Every backup goes into a folder on the root of the selected USB drive. The folder is named for the console serial number. For example, backing up console 68C-571006 would cause a folder Backup-68C-571006 to be created on the USB drive, into which all backup would be written. Each backup event is stored in a subfolder named for the date and time the backup was started. Inside that folder will be a folder for each selected category.
Thus, after a few backups, the folder structure on the USB drive might look like the example below:
Restoring files from backup
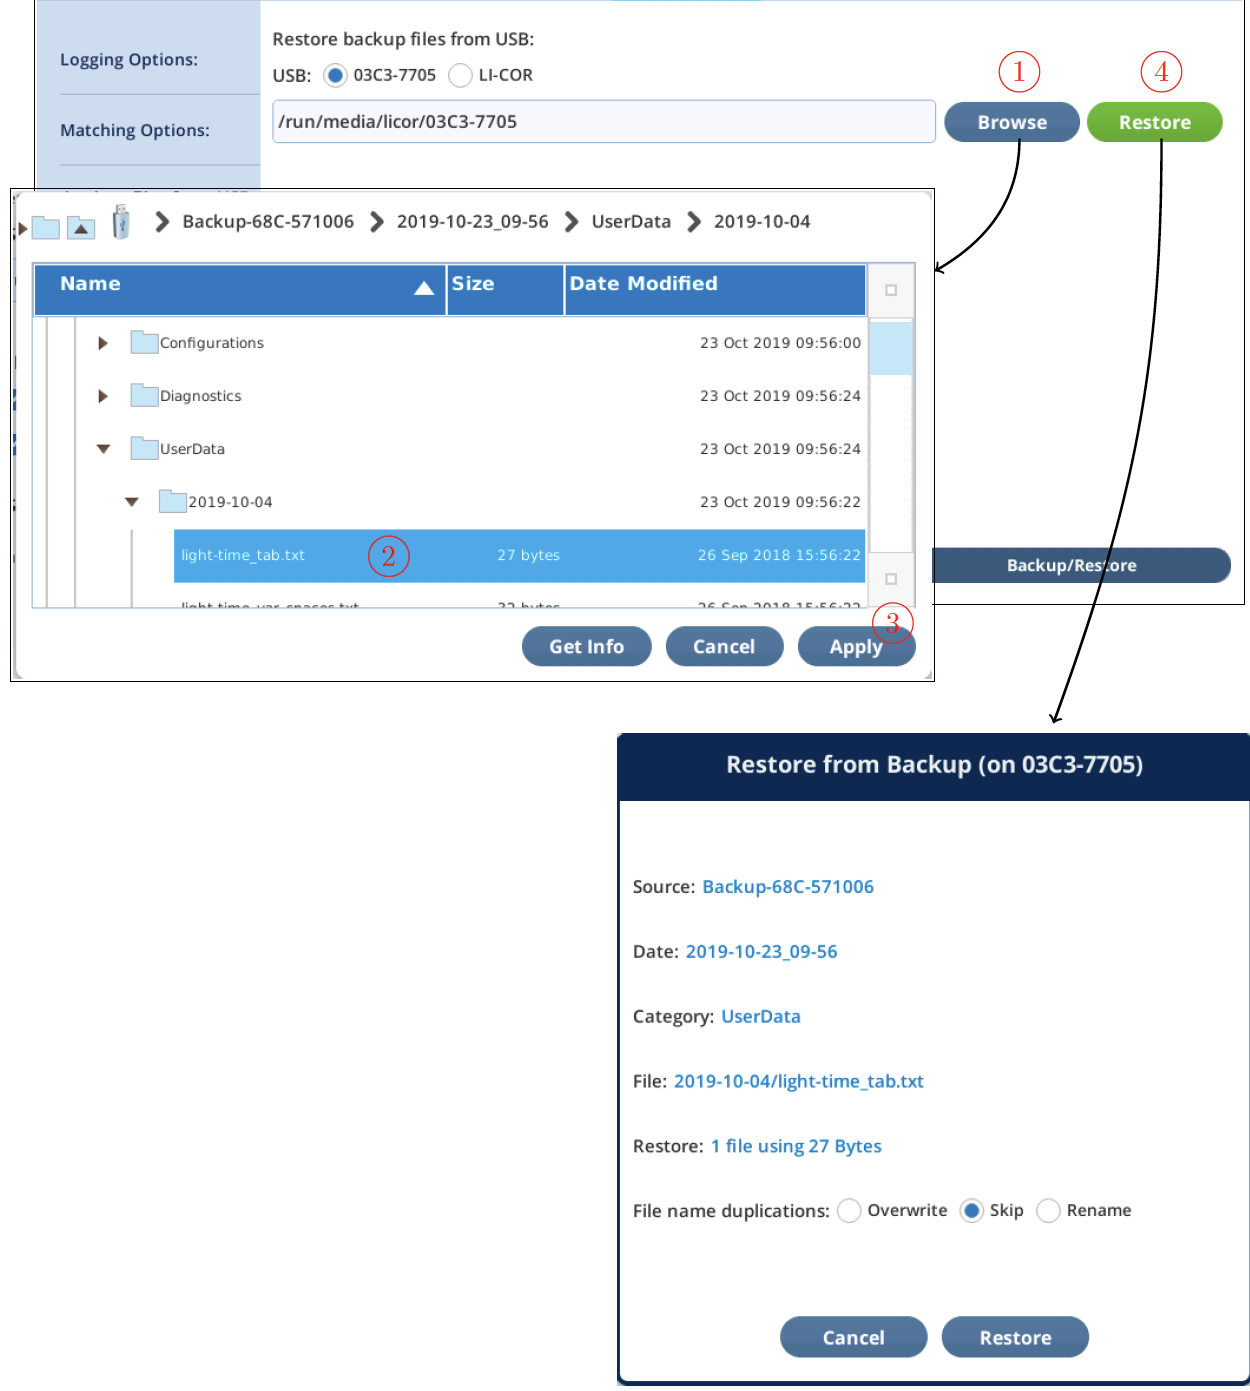
To restore from an entire backup, tap Restore (Figure 4‑22). If no Backup folders are found, then you will be notified.
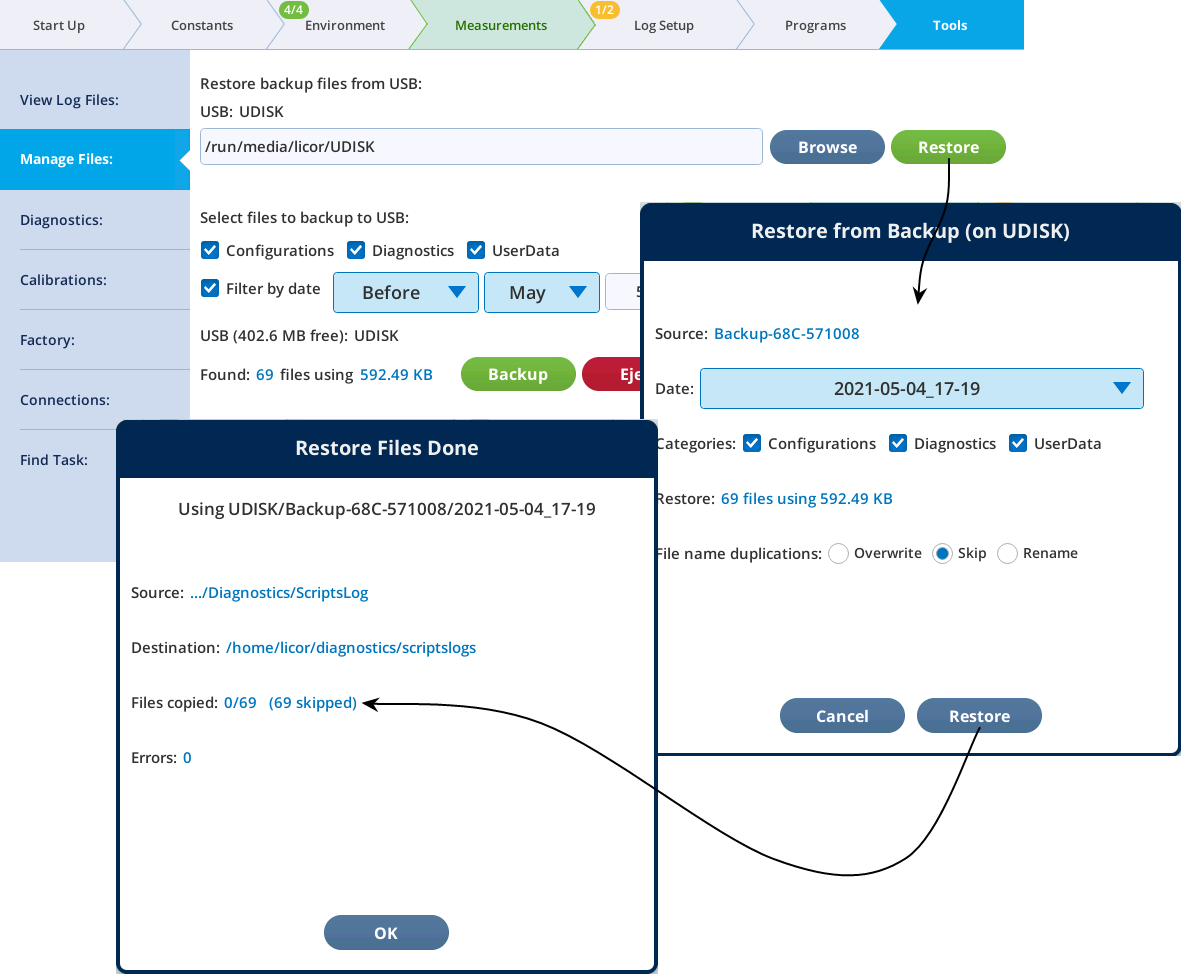
To more narrowly focus the restore from backup, follow these steps (Figure 4‑23):
- Use Browse to open a viewer
- Navigate to the desire folder or file and select it
- Tap Apply
- Tap Restore
Note that if you navigate in step 2 to somewhere that is not within the parentage of a backup folder, your selection will be ignored.