Preparing for measurements
This section provides a tutorial for a soil CO2 flux measurement. Follow these steps while refining the protocol for your soil type, site conditions, and experimental objectives.
Installing soil collars
Although the ideal measurement would not alter the soil in any way, we've found that soil collars present an acceptable and necessary tradeoff between affecting the soil environment and measuring the actual gas flux. Soil collars have several advantages over direct insertion of the chamber into the soil. The disturbance resulting from insertion does not affect measurements that are conducted several hours or days later. And, collars make it possible to make repeated measurements at the exact same location over time.
Tips for using soil collars
- Install soil collars several hours to one day before making a measurement. You can test to see if the flux has stabilized by making a measurement immediately after installing the collar, and then make subsequent measurements over time. Note, however, that the soil surface CO2 flux depends on the time of day, and variation over the diurnal cycle can be quite large.
- In hard or compacted soils, you may need to create a channel around the collar with a knife or trowel before insertion.
- You can lay a piece of wood across the collar and drive the collar with a mallet.
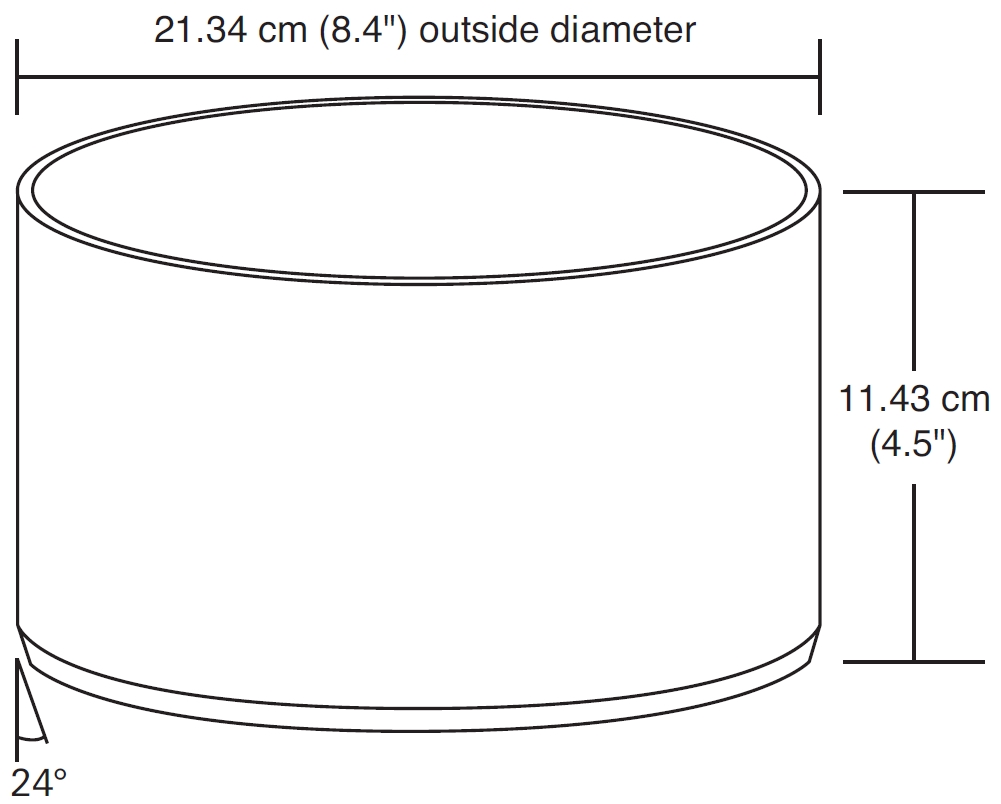
- Make your own collars: the collars have a 20 cm (8 inch) inside diameter. They are constructed from thick-walled 8 inch SDR 35 PVC pipe. Cut a piece of pipe to 11.4 cm long and use a grinder, coarse file, or an extremely large lathe to bevel the bottom edge to an angle of 24°.
Insertion depth
The optimal collar height will depend upon site conditions and the length of time the collars will be used at a given site. At a minimum, the collar should be inserted into the soil to a depth that gives a solid foundation so the collar does not move when placing the chamber on the collar. As insertion depth is increased, lateral diffusion of CO2 in the soil column below the chamber will be reduced. The advantage of this is that lateral diffusion can be a source of error in the measurement (Healy et al., 1996), but the disadvantage is that as insertion depth increases, the possibility of root shearing increases. Collars may become loose over time and should be moved if this occurs.
Collars should extend a minimum of 2 cm above the soil surface. Collars can extend above the soil more than 3 cm, but with greater extension there is increased shading and perturbation of air movement. Over the long term, these perturbations could result in changes of evaporation rate, soil temperature, and soil moisture.
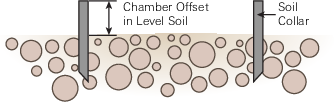
Measuring the chamber offset
The chamber offset is used to determine the volume of air inside the soil collar, which is in turn used to calculate the total system volume. The total system volume is an important part of the flux calculation, so it should be determined as accurately as possible. The chamber offset is measured by the distance between the soil surface and the top of the soil collar.
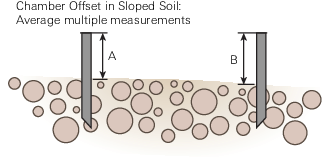
In uneven or sloping soil conditions, measure the chamber offset at multiple points within the collar and then average these measurements to represent the true offset (see Figure 11‑9).
Make sure the soil collar is not disturbed when placing the chamber on it. The chamber edge should be as close to the soil surface as practical (within 1-2 cm) so that air flow within the chamber causes mixing near the soil surface.