Authors: LI-COR, Inc.
Correspondence: envsupport@licor.com
Instruments: LI-6800
Keywords: travel case, wheels
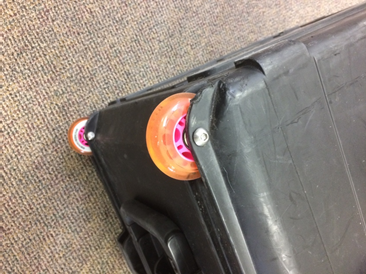
The LI-6800 travel case is a vast improvement over the case offered with the LI-6400/XT. One of the major changes in the case is that it has wheels, making it very easy to transport the instrument. For most users, the stock wheels on the case will perform well and last a long time. However, for users like the Field Application Scientists at LI-COR who put many more miles on the case than a typical user, the stock wheels just don’t hold up well. After going through several sets of wheels on his case, one of our scientists decided there must be a better option. If you find yourself in a similar situation, here is some guidance on how to put more durable wheels on the LI-6800’s travel case.

The LI-6800 travel case uses a fairly standard style of wheel and bearing setup found in a variety of similar cases and consumer luggage. Nearly identical after-market wheels made of the same injection molded plastics, or from polyurethane, are readily available for these kinds of cases, and in many instances, provide a fine replacement option when a wheel fails. These kinds of wheels, however, are not really designed for a lot of impact, yet that is exactly what they experience when dragging the case across old and worn asphalt or gravel. They all appear to use similar style bearings; they come pre-greased in most instances but have non-sealed and non-shielded bearings. When dragging luggage around indoors at an airport for example, this is no issue, but when outside, grit, salt and water get into these style bearings, causing them to fail prematurely.
So what our scientist needed was a wheel with greater impact resistance and a bearing that is sealed to keep out contaminants. Fortunately such a wheel and bearing combination exists, intended for use in inline skates.
Wheel size
The stock case wheels have a nominal outside diameter of 68 mm and fit a nominally 6 mm axle. For inline skate wheels, 68 mm is a standard outer diameter. Bearings are typically sold separate from the wheels, and unfortunately the standard skate bearings are not sized for a 6 mm axle. These come sized either for a 7 mm axle (an 8x22x7 bearing) or an 8 mm axle (an 8x22x8 bearing). The inline skate wheels are slightly narrower than the stock case wheels and when installed will need a small shim on either side (details below).
Choosing wheels and bearings: Inline skate wheels come in a variety of hardness ratings that typically follow the Shore durometer hardness scale type A. Wheels with higher ratings are harder and last longer, whereas wheels with lower ratings are softer and provide better grip. Skate wheels generally have ratings between about 70A and 90A, all of which are probably acceptable for use on the LI-6800 travel case, though a wheel toward the harder end of that range would be preferred.
Upgrading the Case
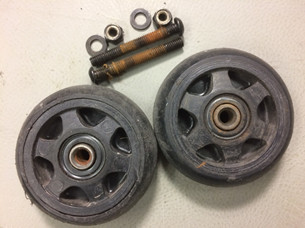
- Remove the old wheels and axles.
- This requires a 4 mm hex key and a 10 mm open ended wrench and should be pretty self-explanatory.
- Figure out how to address the difference in axle diameter.
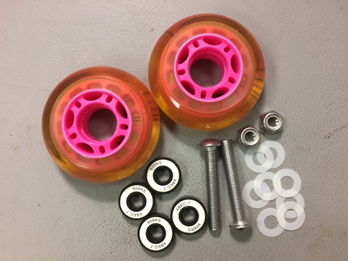
- Since skate wheels use a larger diameter axle than the stock axles on the LI-6800 case, upgrading the case to use these wheels requires either drilling out the stock mounting holes to accept the larger axle or locating a suitable sleeve bushing (6 mm ID x 8 mm OD x 24 mm) to make up the difference in diameter between the stock axle and the bearing’s ID. For our upgrade we chose a larger diameter axle (a stainless steel M8 1.25 x 50 mm hex cap bolt), as a suitable sleeve bushing was not readily available. Like the stock axles, we used a nylon insert lock nut. To compensate for the narrower gauge of the wheel, two or three Mylar nylon washers were needed on either side of the wheel. This prevents the wheel from rubbing on the inside of the wheel well and ensures that wheel tracks nice and straight. Note that depending on the bearing chosen, it will either be an M7 or M8 bolt used for the axle and in the United States at least, M8 hardware is much more readily available than M7. However, the M8 hardware is a tight fit on the case.
- If needed, bore out the case for the larger axle.
- Since we choose to go with a larger diameter axle, we needed to bore the axle holes from 6 mm to 8 mm. On the latch side of the case, the holes were bored more or less straight through to 8 mm. However, due to some asymmetry on the case, on the hinge side the holes had to be slotted out slightly away from the case to allow the 8 mm nut to fit.
- Assemble the wheels.
- If the bearings came separate from the wheels they need to be pressed into the wheel hubs prior to attempting to install the wheels on the case. The bearings should fit tightly in the hubs (as ours did), but can more than likely be pressed in by hand against a hard surface.
- Install the wheels on the case.
- Assembly is more or less the reverse of disassembly from step 1. The axle bolt inserts from the outside with the nut on the inside. If you use a sleeve bushing and the stock axle, the bushing needs to be inserted into the wheel before the wheel goes into the wheel well. With either axle, insert the axle just far enough to catch two or three of the Mylar washers. Then insert the wheel in the wheel well and push the axle through just far enough to reach the other side of the far bearing. At this point carefully slide in two or three more of the Mylar washers (tilting the case so gravity holds them in place helps a lot) and then push the axle through the rest of the way. With the M8 hardware we used there was not enough clearance on the inside of the case to allow the nut to spin; it had to be threaded onto the axle by holding one side of the nut flat against the case and turning the axle with a 5 mm hex key.
- Tighten as needed.
- Tighten the nut to the point where the wheel spins freely but does not chatter from side to side. If enough Mylar washers were used, the nut should only need to be tightened to the point where it is flush against the out-side of the wheel well.
- Roll on.