Getting started
This section provides basic operating instructions for the instrument.
Powering on the instrument
Caution: Remove the protective caps (part number 620-17951) from the air inlet and outlet before powering on the instrument. The instrument will fail to initialize if the caps are in place. Use the caps when storing or shipping the instrument.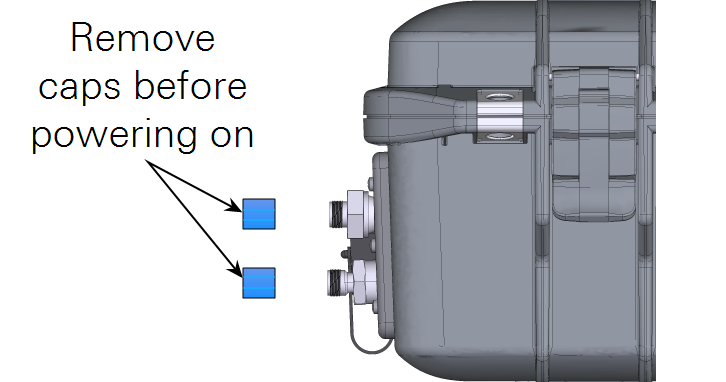
To power on the instrument, either install a battery and push the power button or connect the instrument to an external power supply. The instrument will power on any time power is supplied through the AC power adapter or the auxiliary power cable. See Power options for more details.
If main power is lost, the instrument will run until the batteries are depleted and then it will power off. When the main power is restored, the instrument will power up and the batteries will resume charging. When powered by batteries only, you must press the power button to turn on the instrument.
Upon powering on, the instrument will issue a series of status codes as it completes the start up cycle. The pump will start running when the optical bench approaches 55 °C. If starting from room temperature, it will take about 20 minutes before you can connect and another 10 or 15 minutes before it provides accurate measurements. If the instrument is very cold, it will take longer to warm up.
Instruments shipped prior to January 2021 do not support the automatic power on feature and must be powered on by pressing the power button. Contact LI-COR if you would like to upgrade one of these instruments. The instrument cannot be powered on from afar. You can restart the instrument through the software interface, but if you power it off through the software interface or the power button, you must press the button or reconnect the main power supply to turn it back on. See Powering off the instrument for additional details.
Power options
The instrument can be powered using the universal AC power adapter, rechargeable batteries, or an external power source using the optional auxiliary power cable. We recommend leaving one battery in the instrument when in use to ensure proper shut down if main power is lost unexpectedly.
Universal power adapter
The universal power adapter is compatible with 100 to 240 VAC power sources, both 50 and 60 Hz. It outputs 24 VDC to power the analyzer and charge the batteries that are installed. The instrument will power on when the universal power adapter is connected to a power source.
Rechargeable batteries
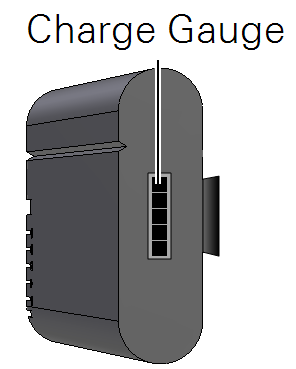
Two batteries can be installed behind the battery cover. Two fully charged batteries will provide about 8 hours of operating. The charge status is given in the web interface, the instrument display, and on the batteries.
When not using the AC power adapter, a single battery is required to power the instrument. The instrument supports hot-swapping, meaning that you can remove a partially depleted battery and replace it with a charged one and measurements will not be disrupted — as long as the instrument is powered by a charged battery or the AC power adapter.
The batteries are not user serviceable. If a battery exceeds a temperature or load threshold, a non-resettable fuse will open, rendering the battery non-functional. If the batteries become excessively discharged in storage, the charger will supply a 3-minute wake-up charge in an attempt to activate the electronics.
Charging batteries in the instrument
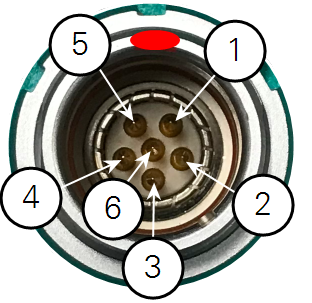
Batteries in the instrument are charged any time the instrument is powered by an external power adapter. When charging batteries, the instrument will consume more power and generate heat that requires the fan to run at full speed. Early models do not support charging by pins 3 and 4; current models do. Pin assignments are given in Table 2‑1.
Charging batteries with an external charger
The optional charger (part number 590-11830; Inspired Energy CH7000A) can charge one battery at a time. To use the charger, plug it into a wall socket and place a battery in the dock. The charger is compatible with 100 to 240 VAC power at 50 to 60 Hz. A blinking LED indicates charging; a solid green LED indicates a full charge.
Note: An optional automobile adapter kit is available to charge the battery from an automobile. Leave the automobile running when charging the battery to prevent excessive discharge of the automobile battery.
Warning: Charge batteries only with a SMBUS compliant level 2 or 3 charger. Do not heat above 80 °C. Do not open battery, dispose of in fire, or short circuit—may ignite, explode, leak, or get hot, causing personal injury. Replace battery with same part number only. Use of another battery may present a risk of fire or explosion. Keep away from children.
External power source
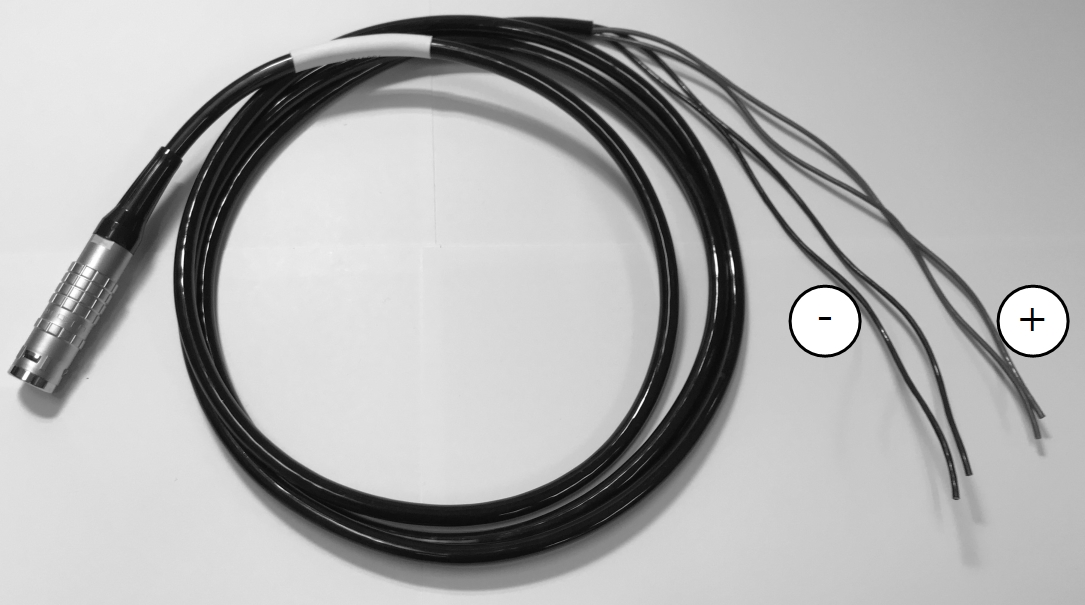
You can power the instrument with any 10.5 to 33 VDC power source, such as a deep-cycle marine battery with >20 amp-hour capacity. The external power source should be connected with the auxiliary power cable (optional; part number 9968-242). Attach both red leads to positive (+) and both black leads to negative (-).
 24 VDC; 6 Amps from the
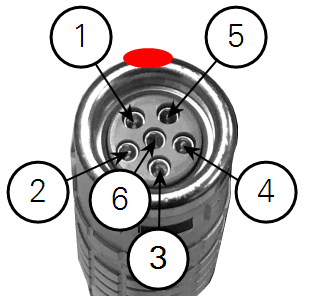
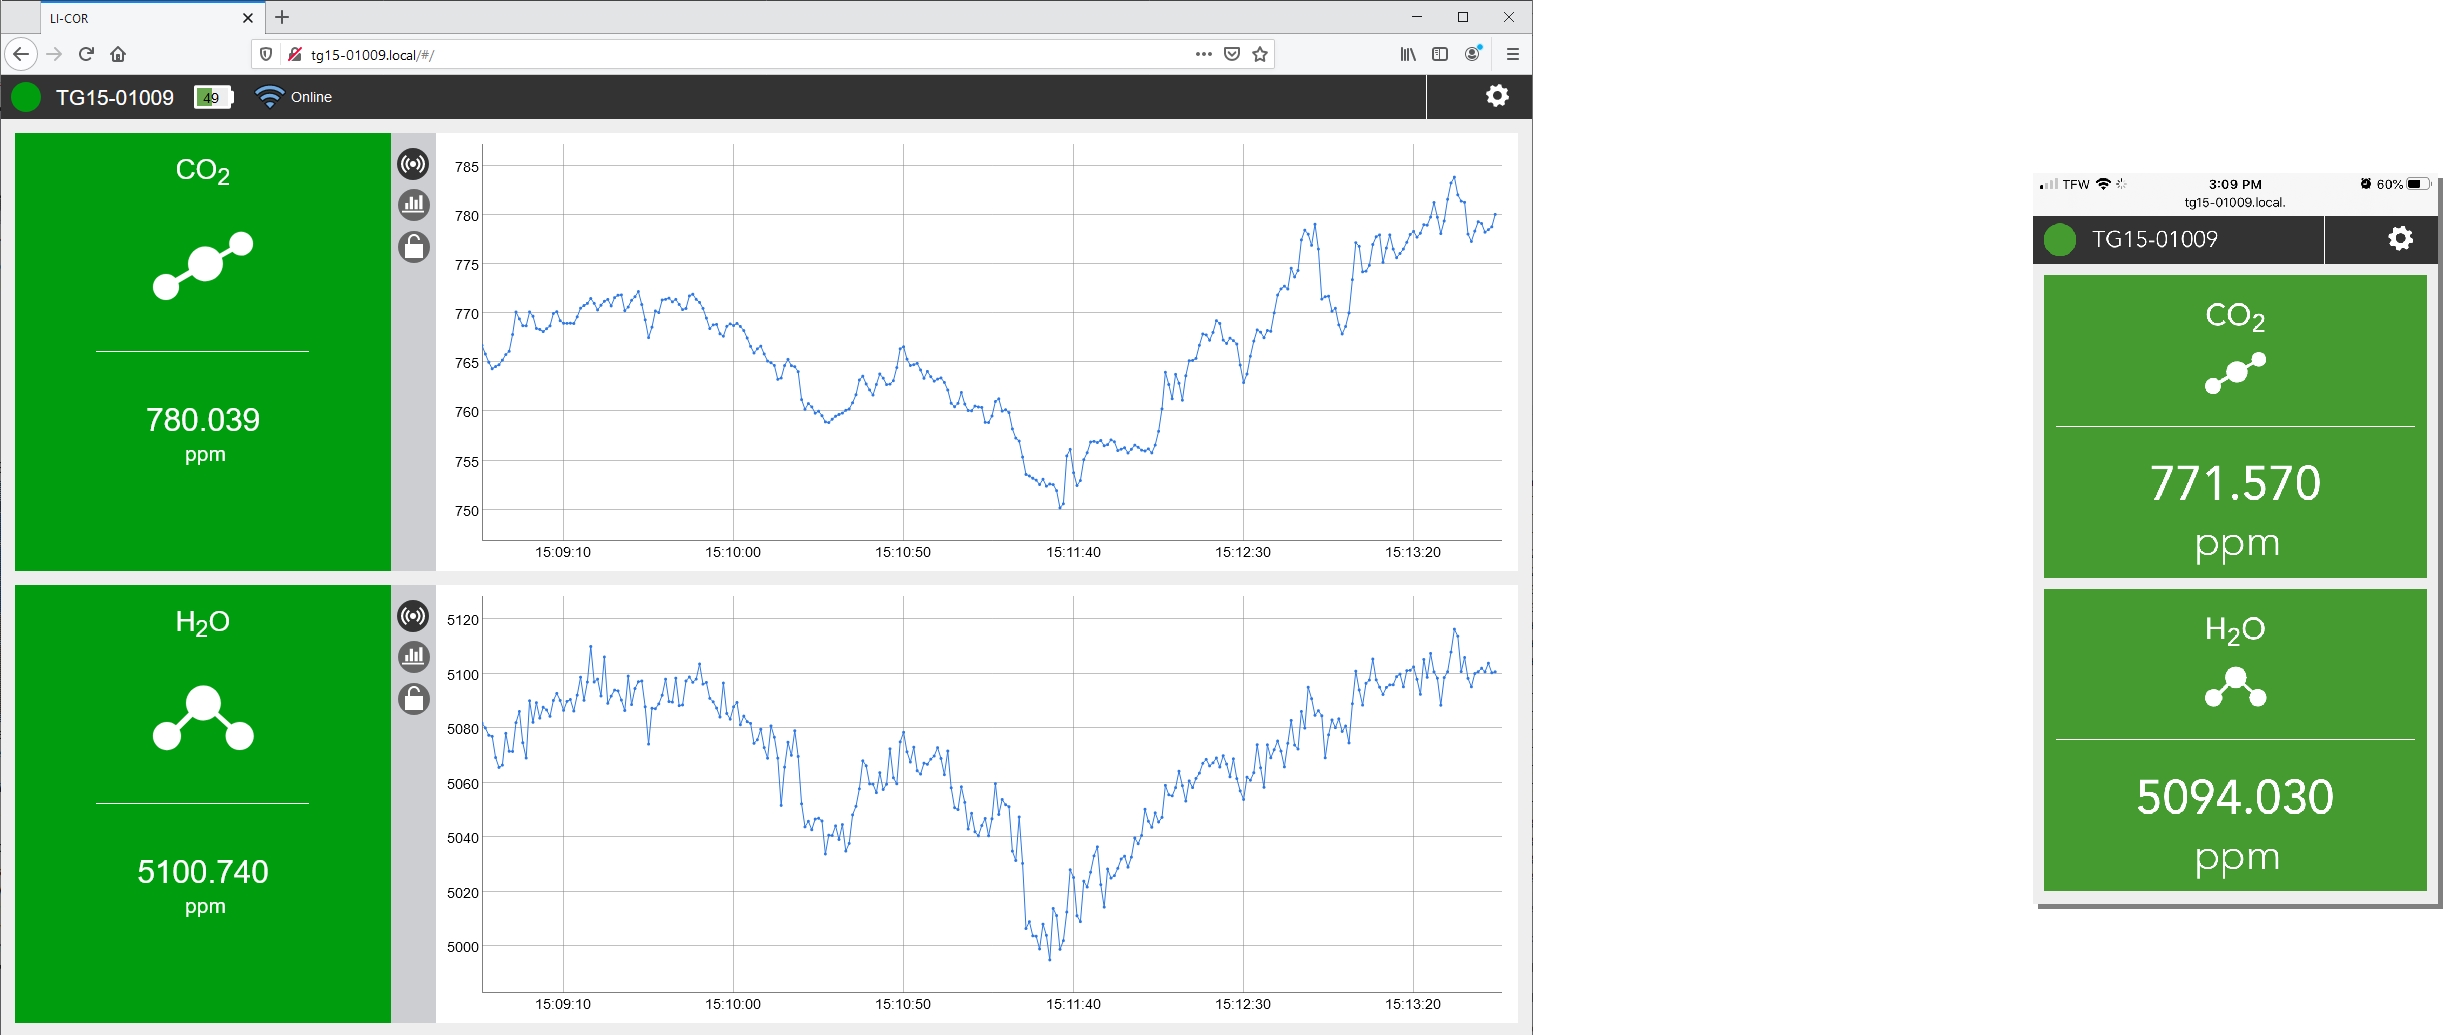
Connecting with the instrument
Connect with the instrument using a web browser on a computer, tablet, or smart phone that is on the same network as the instrument.
Connecting over wireless
Follow these steps to connect to the instrument's wireless network1.
- Connect your PC or mobile device to the instrument wireless network
- When Wi-Fi is enabled, the LI-7815 will make a local wireless network, indicated by the presence of a wireless network symbol (
 ) on the display. Find the network in the list of networks presented on your device. The network name is the hostname (and serial number) of the instrument. The password is licorenv.
- Enter the hostname or IP address in a web browser address bar
- One or more of the following will work:
-
- Hostname: Enter http://tg15-nnnnn.local where tg15-nnnnn is the hostname (and the serial number) of the instrument.
- Dynamic IP address on the display panel if the network cable is connected.
- Fixed IP address of http://192.168.10.1 if the internal Wi-Fi is enabled.
- Press Enter to connect.
- If you are unable to connect, see troubleshooting Connection problems.
Connecting over a wired network
Follow these steps to connect to an instrument that has a wired connection, either directly to your computer or to a local area network.
- Connect a network cable between the instrument and your local network
- Install a network cable between the instrument and a vacant network port on your local network or directly to your computer's network port (the instrument and your computer must be on the same network). The instrument will indicate that it is on a network by displaying the network icon (
 ) and the network-assigned IP address. If your local network also has Wi-Fi, you can connect to the instrument over the wireless network.
- Enter the hostname or IP address in a web browser address bar
- Both the hostname (which is the instrument serial number) and IP address are given on the display. Type one or the other into the address bar:
-
- Hostname: Enter http://tg15-nnnnn.local where tg15-nnnnn is the hostname (and the serial number) of your instrument.
- Dynamic IP address: Enter the IP address on the display panel.
- Press Enter to connect.
-
- If you are unable to connect, see Connection problems for troubleshooting.
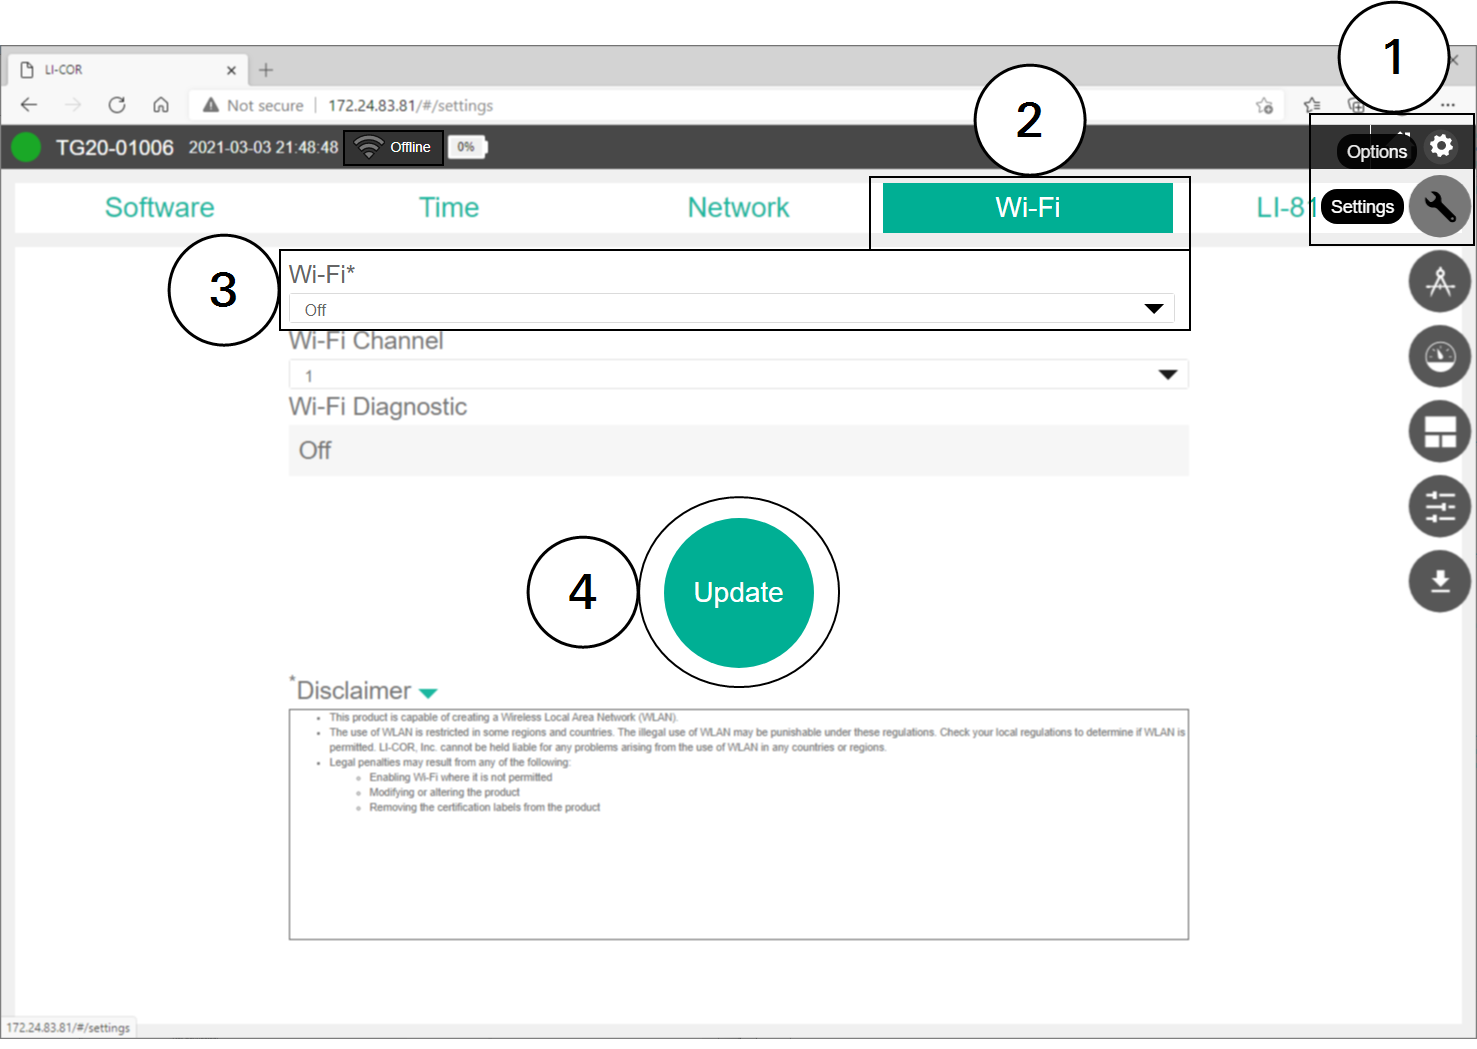
Enabling and Disabling Wi-Fi
To alter the Wi-Fi setting, connect to the instrument using a wired network connection (see Connecting over a wired network).
- Click Options > Settings.
- Click the Wi-Fi tab.
- Set Wi-Fi to Off or On.
- Click Update to apply the setting.
- If you click away from the page without first clicking Update, the setting will not be applied. The Wi-Fi status is displayed in the status bar and the instrument display panel.
Instrument display
The instrument display panel provides useful information at a glance.
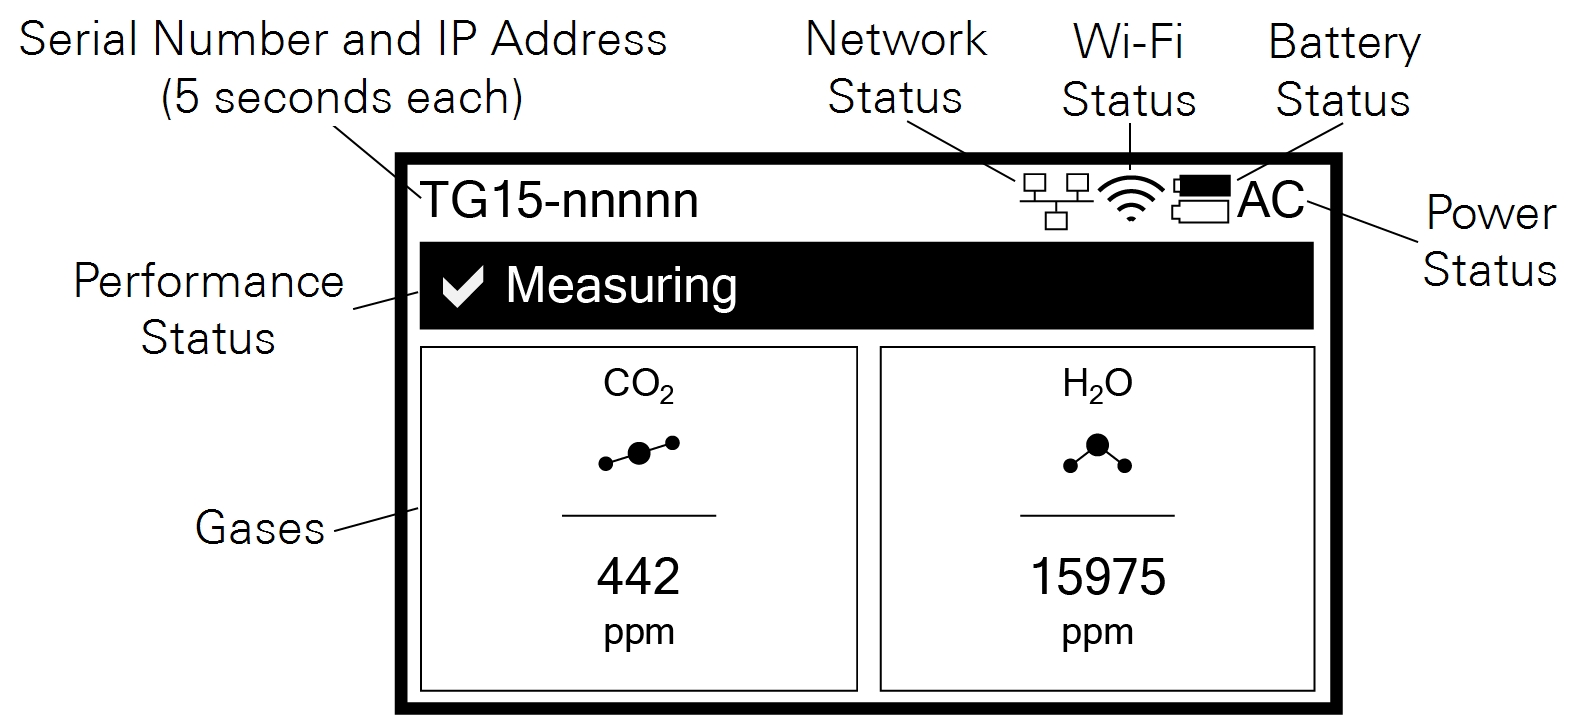
- Serial Number and IP Address: The instrument serial number (hostname) and network-assigned IP address (IPv4) rotate for 5 seconds each. The serial number is also printed on the case label. If the network cable is not plugged in, the display will give the IP address for the Wi-Fi network (if enabled).
- Network Status: When visible (), the instrument is connected to a network. The network cable is installed between the instrument network port and a port on a local area network.
- Wi-Fi Status: When Wi-Fi is enabled (indicated by the symbol), the instrument broadcasts a Wi-Fi network with the same name as the instrument serial number (and hostname).
- Battery Status: Indicates the charge status (
 ). A solid black battery indicates a full charge; an outline indicates a discharged battery. The battery icon is not displayed when no batteries are installed.
 - Power Status: Indicates the power source (AC if power cable connected).
- Performance Status: Indicates performance status of the instrument.
- Gases: The gases measured and their concentrations.
Status codes
Status codes are given on the instrument display panel, software interface, and recorded in the data set, where they are associated with measurements.
 Green
Green
 Yellow
 Red
RedStatus codes are additive: if multiple codes are active, the displayed value is the sum of the codes. For example, a display code of 23 indicates that the instrument is initializing the start-up mode (16), it has an incomplete scan (4), laser temperature adjustment is underway (2), and a start frequency adjustment is underway (1). Non-zero status codes are displayed during warmup and any time the instrument is not in a normal state. Typically, status codes will be resolved by the instrument. Occasionally, you may need to restart the instrument to resolve the code. If a code is not dismissed for several hours or after restarting, contact technical support.
Powering off the instrument
The instrument can be powered off with the power button or through the software interface. To Power Off the instrument with the button, press it three times within 5 seconds. To enter Sleep Mode, press the power button twice within 3 seconds. In sleep mode, the instrument will power off the pump but maintain power to the heaters. Sleep mode is to silence the pumps, if, for example, you want to hear the birds singing while you walk between measurements. To Exit Sleep Mode, press the power button after waiting at least 5 seconds after the previous press.
Caution: While in sleep mode, the instrument will stop drawing in air, which may affect the pressure and flow in your air supply system. Do not enter sleep mode when the air inlet or outlet is subject to positive or negative pressure. Pressures exceeding 110 kPa absolute pressure may damage the instrument.
If a battery becomes depleted during normal operation, the instrument will complete the dry-down cycle before shutting itself down. If the instrument is inadvertently powered off and prevented from completing the dry-down cycle (by removing the batteries and power cable, for example), power it back on and off again so it can complete the dry-down cycle.
Caution: Failure to complete the dry-down while powering off the instrument may result in condensation in the optics, which will damage the instrument.
Storing the instrument
The instrument can be placed in short-term storage (for several weeks) without any special preparations. For longer-term storage (longer than a month), we recommend that you remove the batteries from the case and clean and dry the instrument exterior with a soft damp (not dripping) cloth and mild detergent if needed. The instrument storage temperature is -45 to 50 °C, <85% relative humidity.
Storing lithium-ion batteries
Batteries are manufactured by Inspired Energy®. Comprehensive storage and shipping information is available at www.inspired-energy.com/shipping.
Store the batteries with a 30 to 50% charge. Replenish the charge every 6 months of storage to avoid excessive discharge.
The battery storage conditions should be -20 to 60 °C, <80% relative humidity. However, it is best to store them below 21 °C in a cool, dry, well-ventilated facility free from corrosive gas or vapor. Storage at elevated temperatures (>45 °C) will degrade battery performance and reduce battery life. Storage at low temperatures may affect initial battery performance. Extended storage may require a calibration cycle or a few regular operating cycles to restore full accuracy to the fuel gauge.
If a battery exceeds a temperature or load threshold, a non-resettable fuse will open, rendering the battery non-functional.
If a battery become excessively discharged in storage, you can attempt to restore it by charging. The charger will supply a 3-minute wake-up charge in an attempt to activate the electronics. If this does not work, the battery should be replaced.
Shipping the instrument
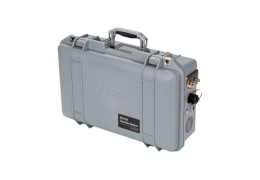
The instrument is delivered with custom-designed foam pad (part number 6578-296) that protects the air inlet and outlet while it is packaged. Keep the foam pad so you can use it to ship the instrument, should the need arise. Cover the air inlet and outlet with the blue caps (part number 620-17951) provided with the instrument or scotch tape to keep dust from the filter. Position the foam pad over the inlet and outlet, wrap the instrument with plastic wrap, place it in a large plastic bag, and then tape it tightly so that the foam will stay in place. Place the wrapped instrument in a box with foam packing peanuts.

Shipping lithium-ion batteries
Many new LI-COR instruments include removable lithium-ion batteries. We recommend that you do not ship these batteries when shipping your instrument to the factory.
Effective April 1, 2016, new shipping requirements were issued regarding the shipment of lithium-ion batteries. There are three separate shipping scenarios described below: 1) Batteries are packaged with the original equipment, 2) Additional batteries (quantity of two or fewer) are packaged without the original equipment, and 3) Additional batteries(quantity of three to ten) are packaged without the original equipment.
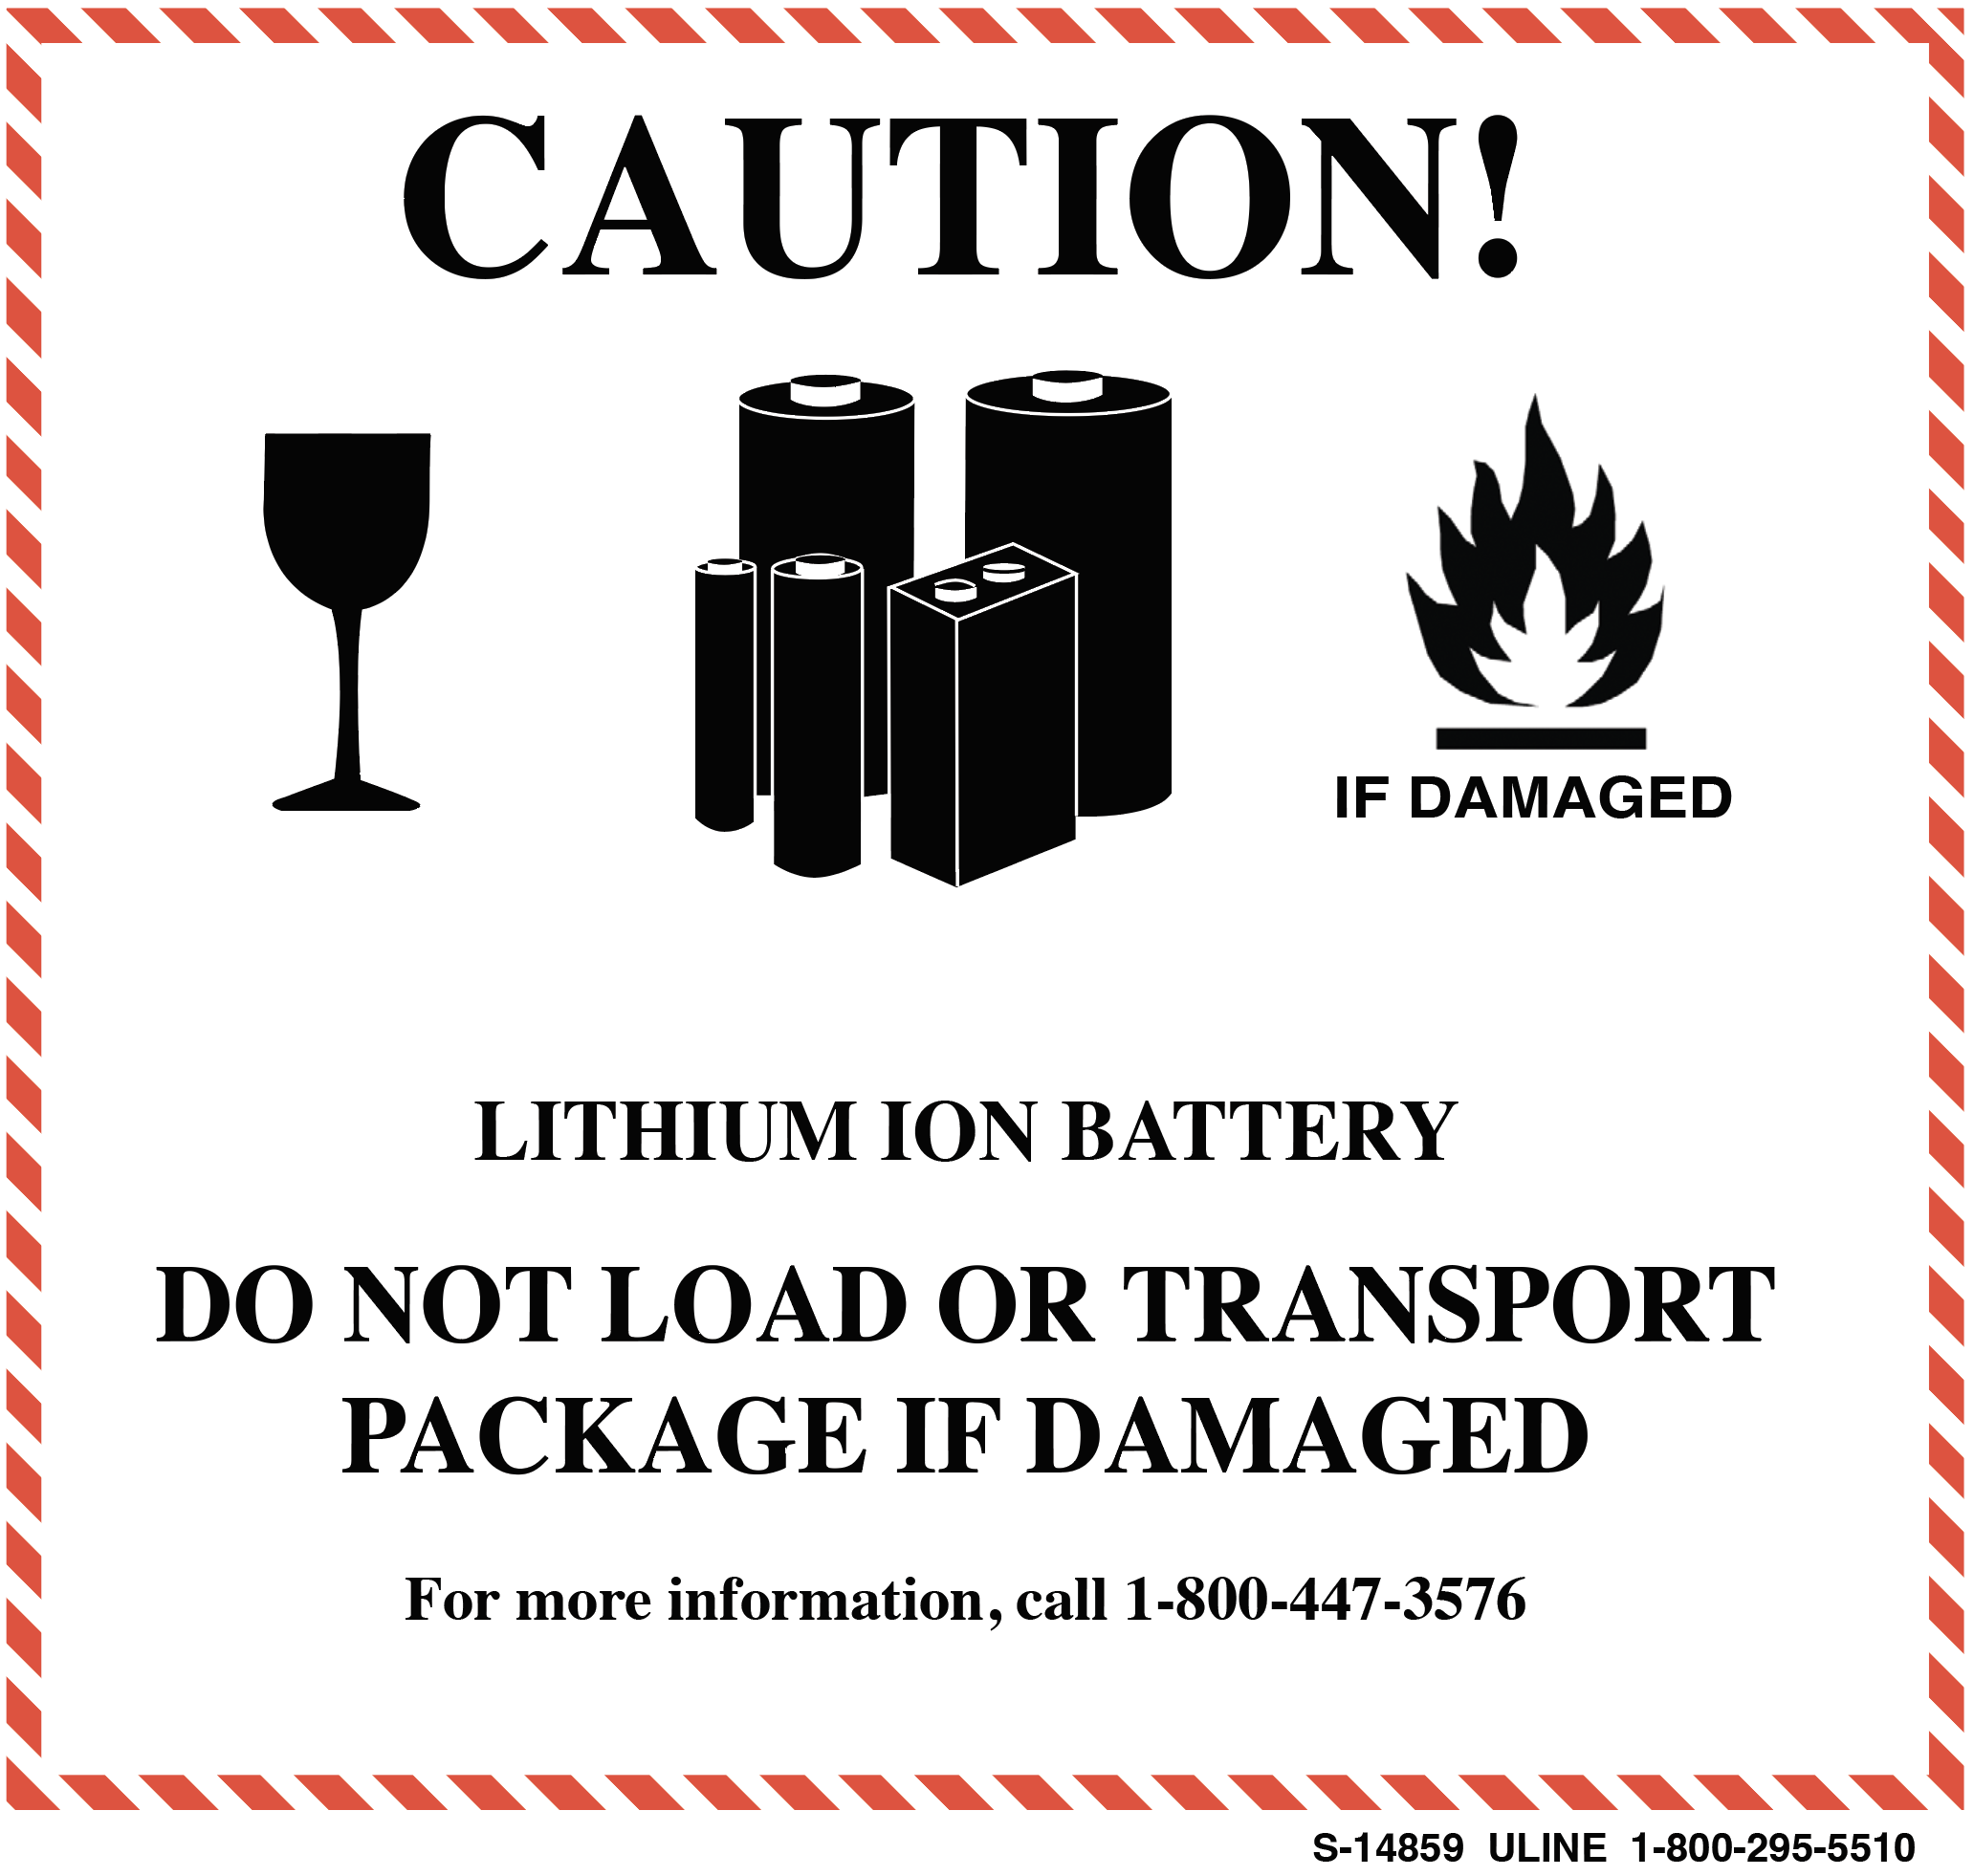
Shipping batteries with equipment
When packed with equipment, lithium-ion batteries (quantity 1-3) are classified as UN3481, packing instruction 966, section II, and require that the package be labeled with the lithium-ion battery handling label (see Figure 2‑3). A full-size copy of this label that can be printed and affixed to the package is available from licor.app.boxenterprise.net/v/Li-Ion-Shipping-Label.
Shipping batteries without equipment (2 or less)
When packed without equipment, lithium-ion batteries (quantity 1-2) are classified as UN3480, packing instruction 965, section II, and require:
- Not declared as Dangerous Goods.
- One or two batteries.
- Shipper’s Declaration: Quantity and type of packing - Packing: 1 Fiberboard Box, Quantity: 0.46 kg weight per battery.
- Label package with lithium-ion battery handling label; a copy is available from licor.app.boxenterprise.net/v/Li-Ion-Shipping-Label.
- Label package as Cargo Aircraft only.
- Airway bill states “Lithium-ion batteries in compliance with Section II of PI 965”.
- Only one package per consignment.
Shipping batteries without equipment (3 to 10)
When packed without equipment, lithium-ion batteries (quantity 3-10) are classified as UN3480, packing instruction 965, section IB, and require:
- Is declared as Dangerous Goods (Proper shipping name: UN3480 Lithium Ion Batteries, Class 9)
- Three to ten batteries
- Shipper’s Declaration: Quantity and type of packing - Packing: 1 Fiberboard Box, Quantity: 0.46 kg weight per battery
- Label package with lithium-ion battery handling label; a copy is available from licor.app.boxenterprise.net/v/Li-Ion-Shipping-Label.
- Label package as Cargo Aircraft only
- Label package with Class 9 hazard label
- Airway bill states “Lithium-ion batteries in compliance with Section IB of PI 965”
Notes
- These packages must be handled with care. A flammability hazard exists if the package(s) is damaged.
- If package is damaged in transport, it must not be loaded until the condition of the contents can be verified. The batteries contained in the package must be inspected for damage and may only be repacked if they are intact and protected against short circuits.