Maintenance
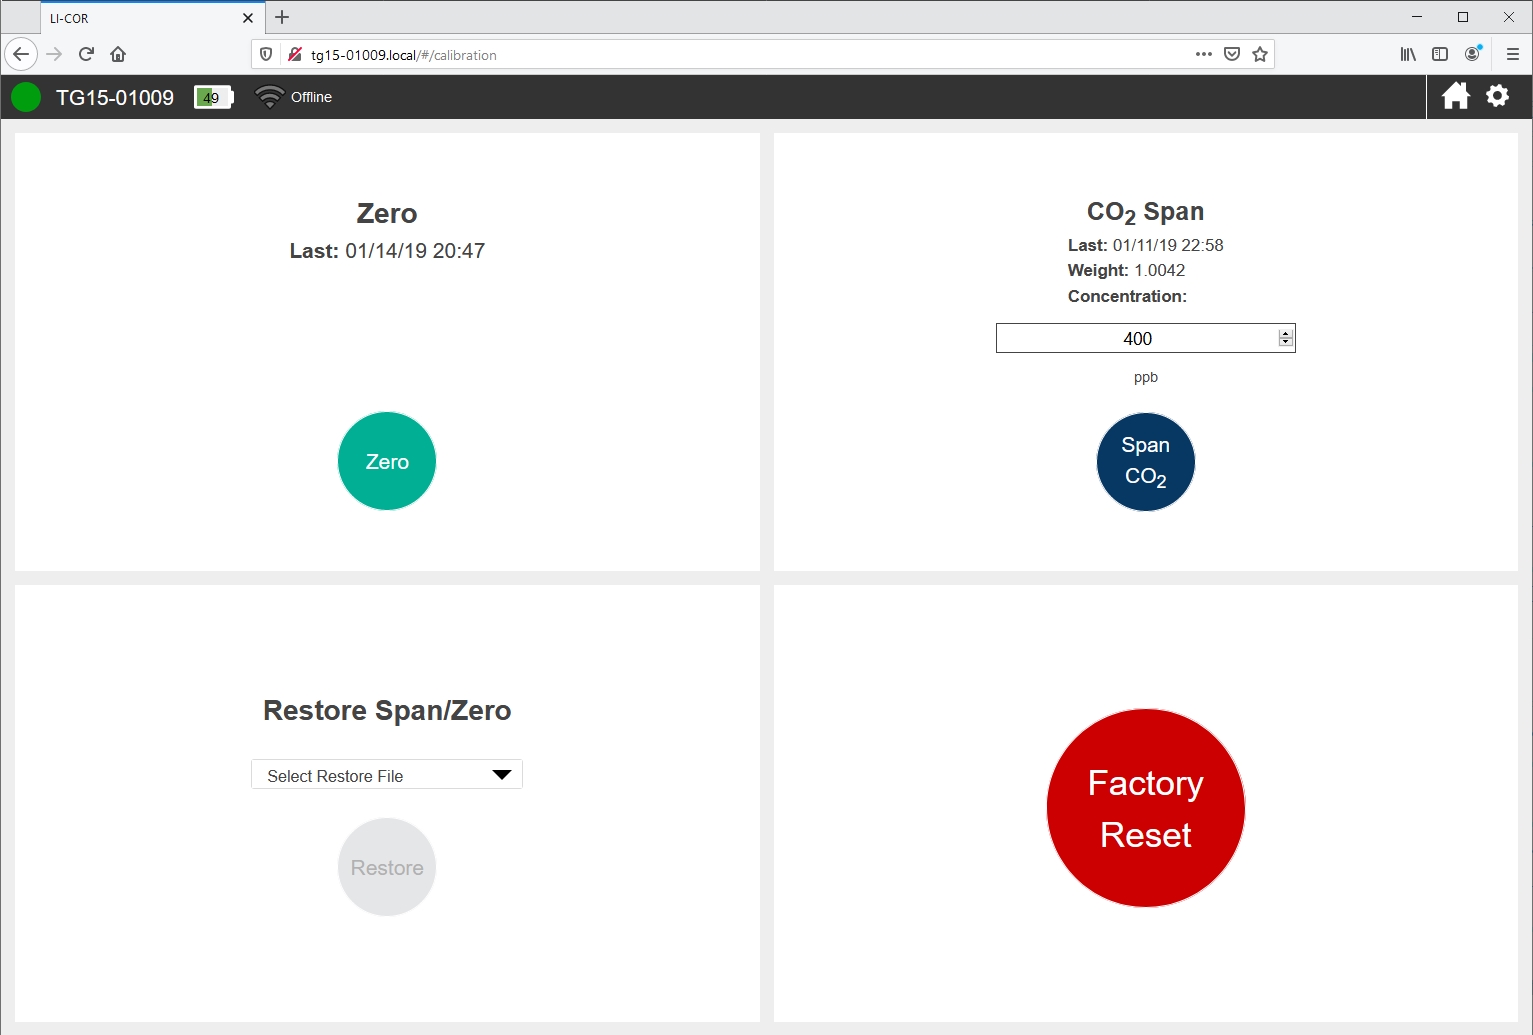
Instrument calibration
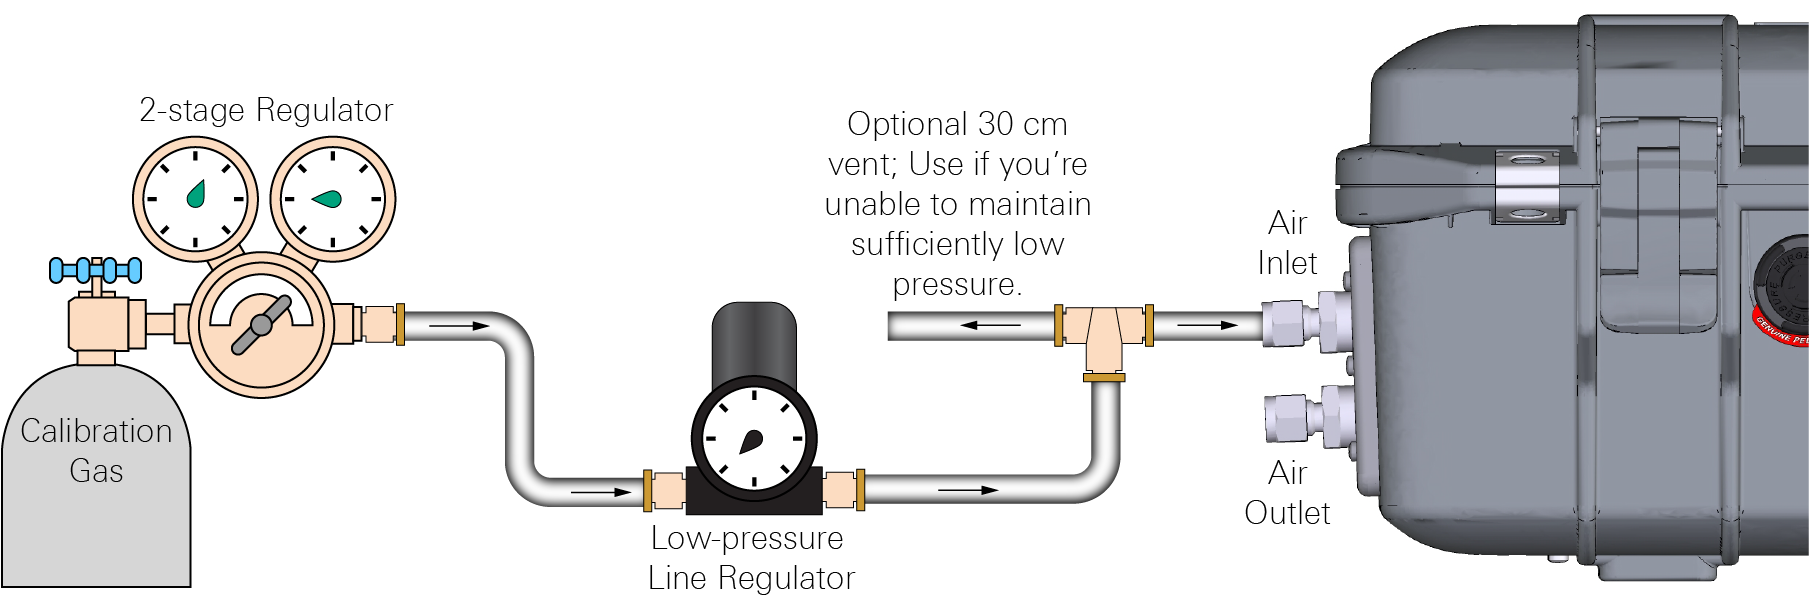
To adjust the instrument calibration, you can set the zero and span. The span is like a slope (the m in y = mx + b). The zero is a spectral baseline. Adjusting the zero changes every measurement (the relationship is non-linear). Adjusting the span changes the slope. Calibration gases should be at a pressure between ambient and 35 kPa (5 PSI) above ambient pressure. We recommend installing a >30 cm vent before the air inlet to vent the excess pressure and prevent diffusion of ambient air into the gas stream.
Setting the CO₂ and H₂O zeroes
Select a quality zero gas that is free of volatile organic compounds (VOCs). The gas should be 0 ppm CO2 in air (a mix of N2 and O2 in their natural abundance). The calibration will only be as good as the gas.
Caution: Do not use nitrogen-balanced gas. Use air-balanced gas for both the zero and span. Do not power on the instrument with a 0 ppm CO2 gas flowing through the analyzer or the analyzer will not initialize properly.
- Power on the instrument and let it warm up.
- Plumb a gas to the air inlet as shown in Figure 6‑1.
- Set the pressure between ambient and 35 kPa (5 PSI) above ambient.
- Observe the measurements on the home screen until they have stabilized.
- The slopes for all gases should be near zero. Since it involves zeroing H2O, wait plenty of time for the H2O concentrations to approach zero (typically, this takes 30 to 45 minutes).
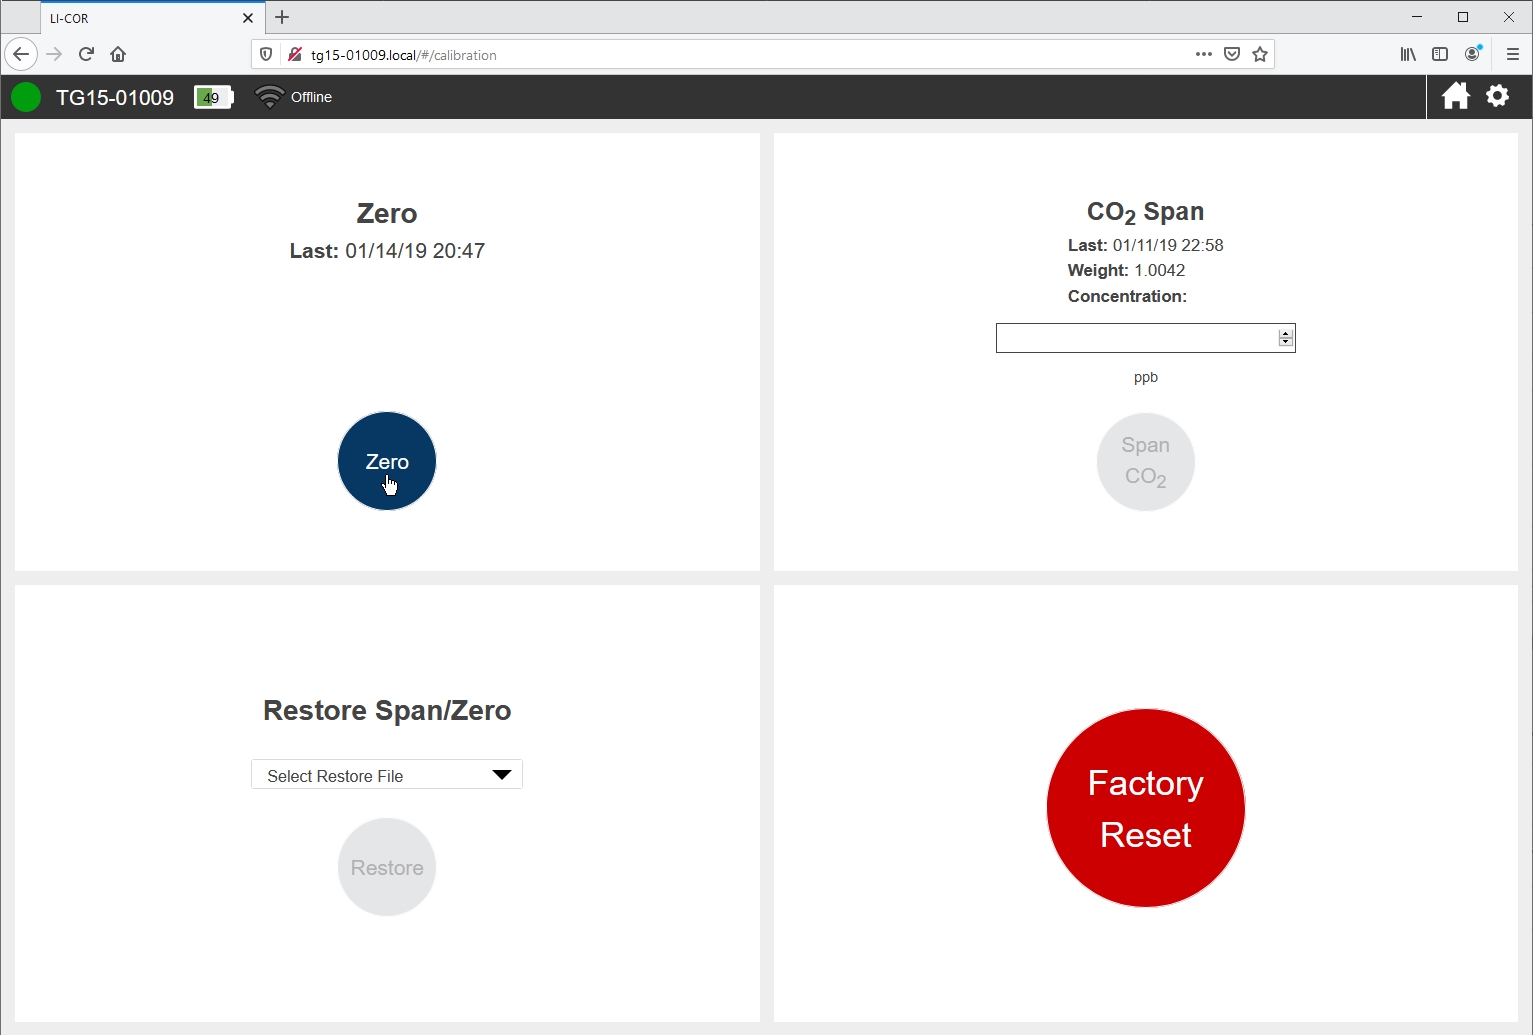
- Zero the analyzer.
- Under Options > Calibration, click Zero. The software will indicate that a zero calibration has started and it will not report concentrations until the zero is set. This usually takes about 5 minutes.
Setting the span
Select a quality span gas with a CO2 concentration near or slightly above the concentrations you expect to measure.
Caution: Do not use nitrogen-balanced gas. Use air-balanced gas for both the zero and span.
- Power on the instrument and let it warm up.
- Plumb a gas to the air inlet as shown in Figure 6‑1.
- Set the pressure between ambient and 35 kPa (5 PSI) above ambient.
- Observe the measurements on the home screen until they have stabilized.
- The slope will be near zero.
- Span the analyzer.
- Under Options > Calibration > CO2 Span, enter the concentration of the gas and click Span CO2.
Recovering from a bad calibration
In the event that an attempt to zero or span fails to work as intended, you can restore a previous zero or span under Restore Span/Zero. Select the file and click Restore.
Factory Reset reloads the factory original zero and span calibration parameters.
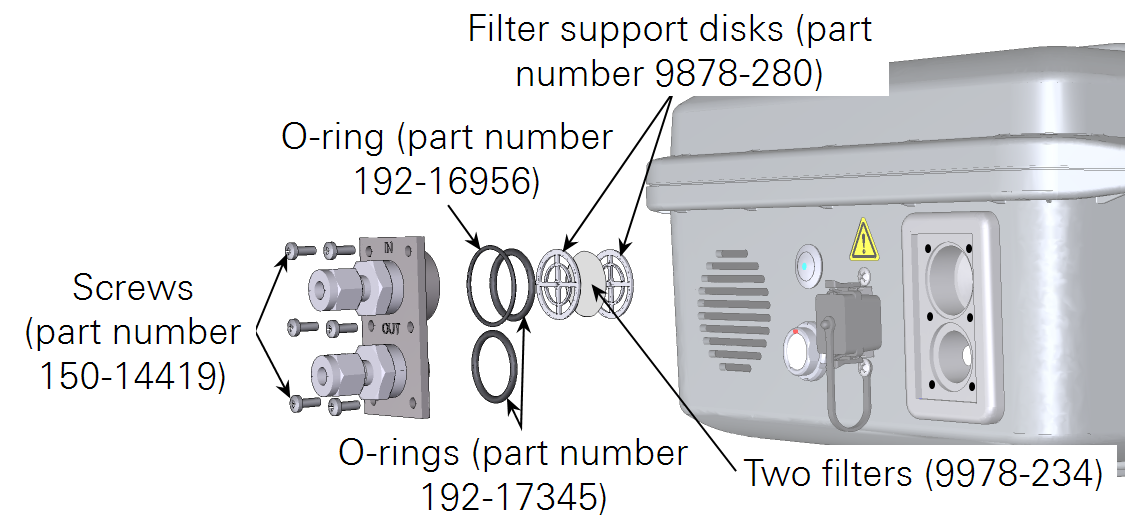
Replacing the air inlet filter
The air intake has filters that may become contaminated periodically. We recommend replacing filters every year, or more often if you are sampling dirty or dusty air. The filters also should help prevent water from being drawn into the gas analyzer.
- Power off the instrument.
- Remove each of the six screws that secure the air intake and outlet.
- They are installed with thread locking compound, which will make them difficult to remove.
- Remove the O-rings, the filter support disks, and the filter.
- Use a toothpick to work them out.
- Inspect the O-rings and replace them if they are damaged or compressed.
- Install the replacement filters and reassemble the system.
- Install two filters (part number 9978-234) between the support disks. The two metal discs support the filter(s) — one on each side. Align the centers of the filters and the metal disks. Assembly is the reverse of disassembly. You do not need to use thread locking compound on the threads. Tighten them snugly.
Replacing the purge dry-down chemical
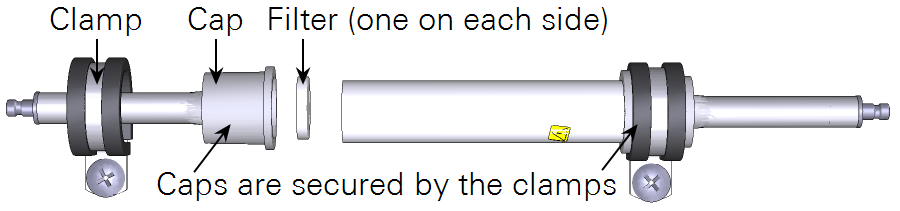
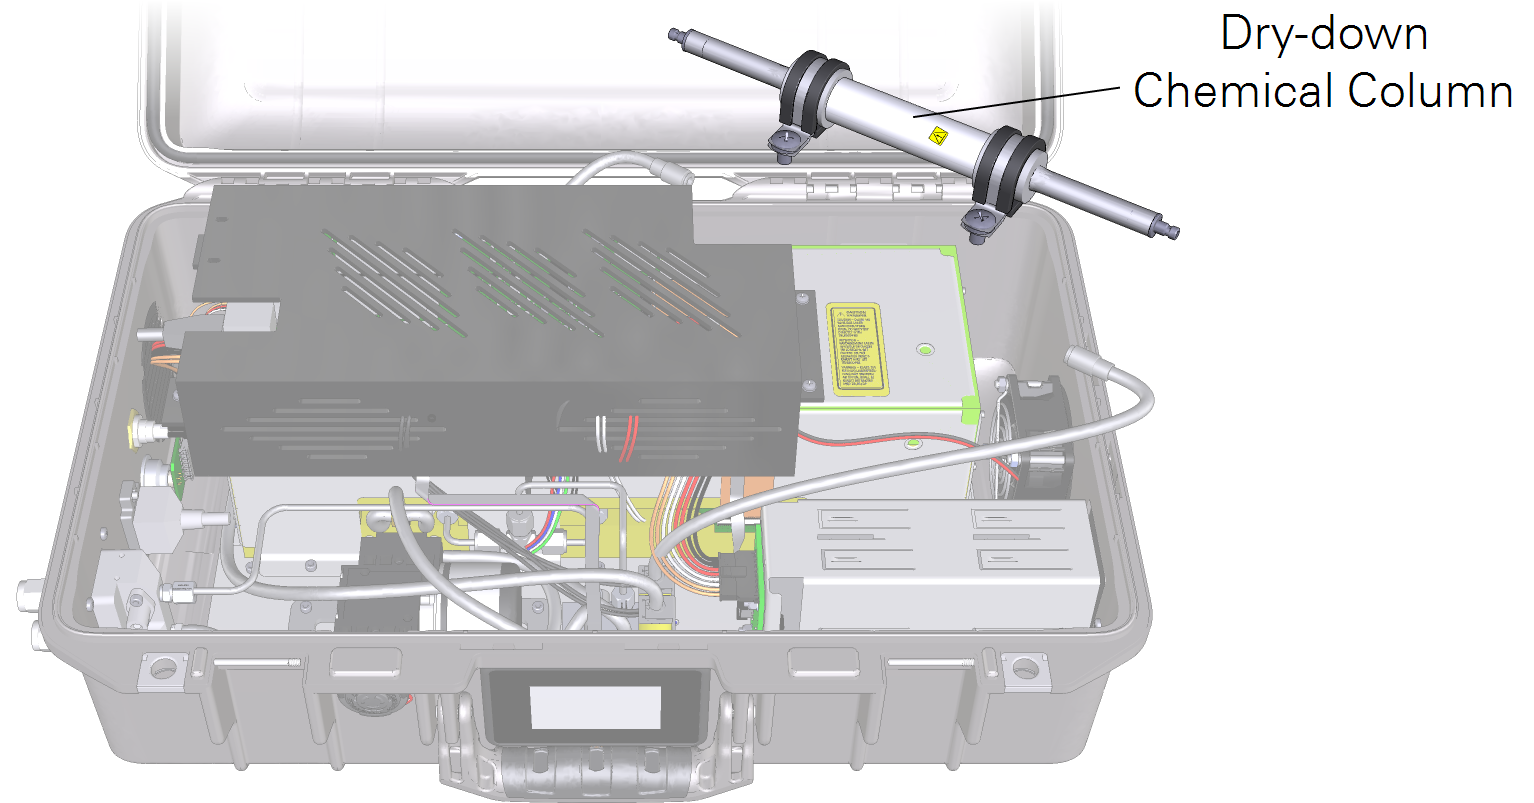
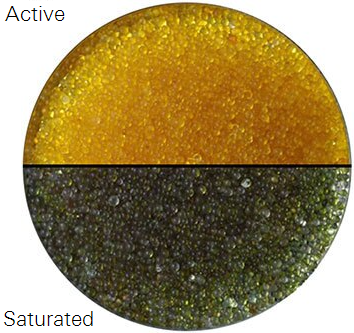
Replacement desiccant (622-17627) is included with the instrument spares. The desiccant, consisting of silica gel beads, is contained in a non-porous tube (see Figure 6‑2). The instrument will pump air through the desiccant tube during power-off to purge the optics of water vapor. You may need to replace or restore the desiccant periodically. The silica gel beads are orange when new and green when saturated (see Figure 6‑3).
Warning: May cause irritation. MAY CAUSE SKIN IRRITATION. MAY CAUSE RESPIRATORY TRACT IRRITATION. MAY CAUSE PAIN, NAUSEA, VOMITING AND DIARRHEA. May result in coughing and/or sore throat. PROLONGED OR REPEATED EXPOSURE TO DUST MAY CAUSE PULMONARY PROBLEMS. INGESTION MAY CAUSE GASTRIC DISTURBANCES.
Desiccant replacement instructions
- Power off the instrument.
- Open the lid and locate the purge chemical column.
- Disconnect the quick-connect fittings from the column inlet and outlet.
- Remove the column.
- It is secured with two screws. Remove them. When the column mounting brackets are removed, the column can come apart easily, and the silica gel beads can fall out. Be careful when handling the column so that it does not come apart.
- HOLDING THE COLUMN AWAY FROM THE CASE, separate one end by grasping one cap and pulling it off of the column.
- Pour out the silica gel beads. The desiccant can be regenerated (see Regenerating the desiccant) or disposed of in municipal waste.
- Locate a new packet of silica gel beads in the accessories kit.
- Fill the column with fresh silica gel beads.
- There may be a little more than is needed. Dispose of the extra silica gel beads or keep them sealed in a glass jar.
- Reassemble the filter and caps; connect the tubes, and tighten the screw clamps securely.
Caution: Tighten the clamp screws securely. The clamps hold the caps onto the tube; the caps hold the silica gel beads in the tube. If the clamps are not tight, the caps will be forced off when the tube is pressurized during shutdown. The tube will open and the silica gel beads will spill in the case. It is a situation easily avoided by tightening the clamp screws securely.
Regenerating the desiccant
Indicating silica gel can be regenerated in a drying oven. This preparation of silica gel is green when it is saturated and orange when it is new or restored.
- Preheat the oven to 120 °C (248 °F).
- Spread a single layer of the granules in a shallow pan.
- Place in the oven for 60 to 120 minutes.
- Less heat for a longer time will not work, nor will more heat for less time.
- After the orange color is restored, place the hot, regenerated material into a glass container and close the lid while it is still hot.
- Do not place hot beads into a plastic container. Store the regenerated desiccant in a sealed glass jar. Avoid storing the beads in a plastic container.
Note: If the Sorbead turns black, you’ve overheated it and it needs to be replaced. Sorbead beads may break over time but the performance is not affected.
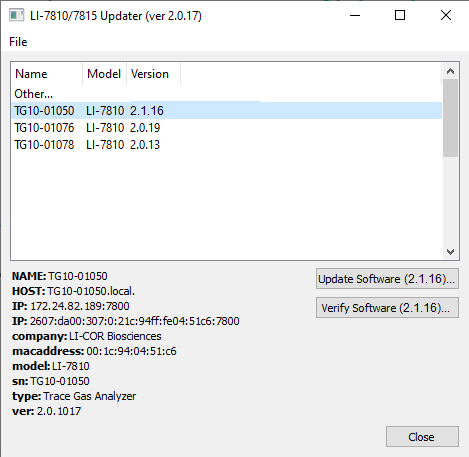
Software updates
Software updates will be released periodically to provide new features and bug fixes. You can check for updates through the interface (click Settings > Software > Check) or on the LI-COR technical support website. Download the updater application and install it on your computer (Windows only). Launch the application. It will display a list of all compatible instruments on your network. The instrument that you want to update must be connected to your network or computer. Select one to update and click Update Software. The update will take several minutes. The instrument will restart when the update is complete.