Troubleshooting
Here we describe common issues and solutions. If things aren't working as you expect, start here.
Connection problems
Here we describe how to resolve issues related to connecting with the instrument.
Request to connect to instrument network rejected by Android OS
When connecting with the instrument Wi-Fi network, some operating systems my detect that the instrument network is not part of the global internet and reject the connection. This is indicated by a warning similar to "The network has no internet access. Stay connected?" Select Yes.
- The exact procedure may vary depending upon the device manufacturer.
- The web browser may continue to try to resolve the hostname to an IP address unsuccessfully. In this case, simply enter the instrument fixed IP address into the address bar. For trace gas analyzers, it is 192.168.10.1.
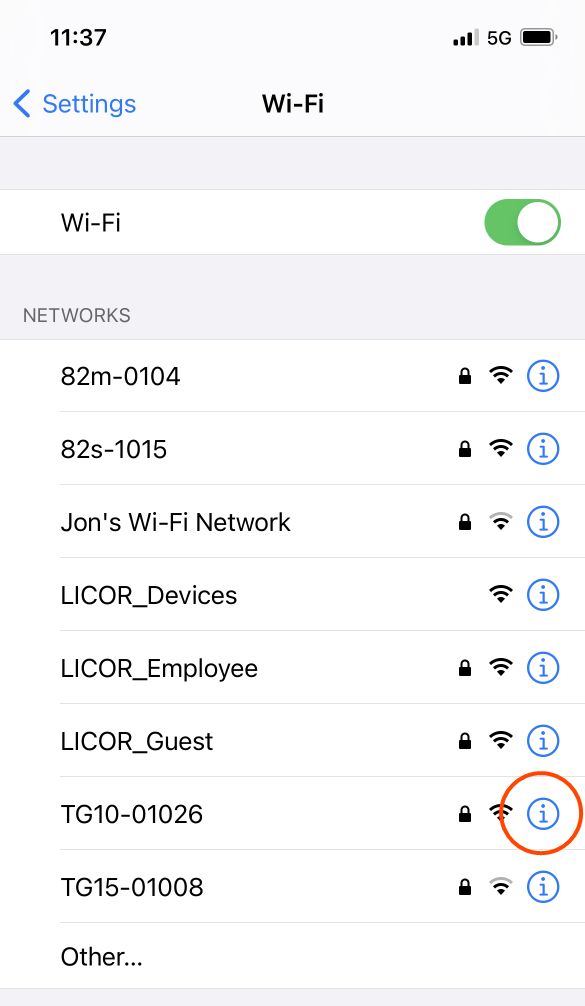
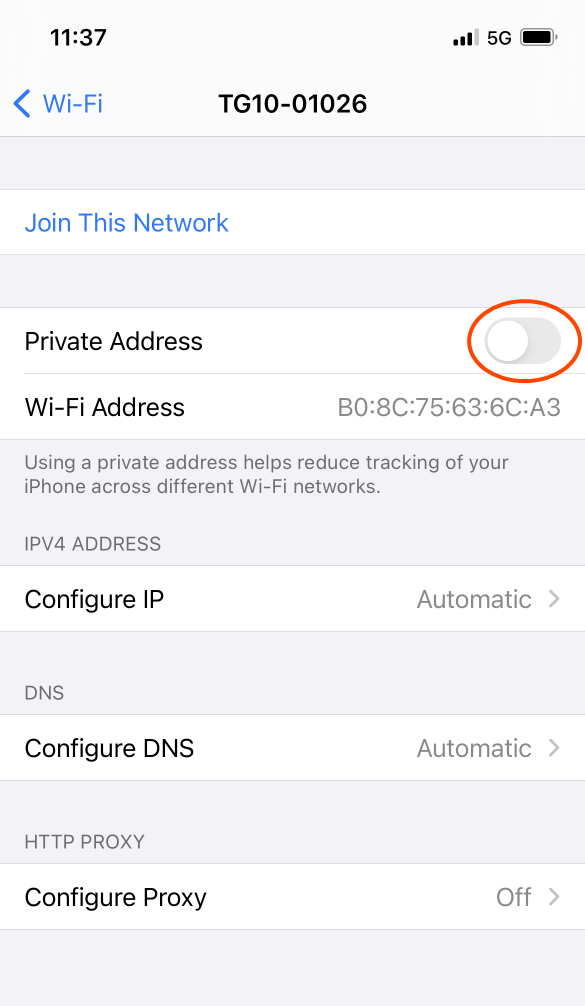
Request to connect to instrument network rejected by iOS
Some iOS configurations may reject the connection and report "Unable to join the network. If your network security is managed by WiFi address, you may need to turn off Private Wi-Fi Address or modify network settings."

To resolve it, tap the information icon next to the device network and disable the Private Network setting.
Other wireless connection problems
Try again a few times. The issue could be related to transient heavy network traffic. Some network channels may be transmitting a lot of data (like videos, for example), causing communication to time out.
Wireless networking turned off? If you are attempting to connect over wireless, be sure it is enabled in the software. The display will show a wireless network symbol ( ) when enabled. If wireless networking needs to be enabled, connect with a wired network connection and enable it.
Computer or mobile device connected to the instrument network? If using wireless, be sure you have connected your PC to the instrument's Wi-Fi network before connecting in the web browser.
Too many devices in a confined space? We have experienced wireless connection issues when several wireless devices are close together. Move your instrument to a different room or another place where there are fewer wireless devices.
Wireless antenna unplugged? The wireless antenna is adhered to the internal plastic electronics shroud. It has a very small connector that plugs into the circuit board. Power off the instrument, remove the cover screws, and lift the cover slightly to see if the antenna is attached to the connector on the circuit board. The connector is near the lower left corner of the processor. If it is unplugged from the circuit board, reattach it and try to connect again.
See Figure B‑3
Unable to connect with the instrument over a wired connection
Network cable disconnected? Check both ends to be sure it is connected to the instrument and to your computer or network.
Instrument on a different network than PC? If you are using an Ethernet cable, be sure the instrument network cable and your PC network cable are connected to the same local network.
Network not detected by the instrument? Check the IP address given on the instrument display. If the display says IP:down, the instrument is not detecting a suitable network (the network cable may be unplugged, network switch or routers may be powered off, the IP address setting in the instrument may be incompatible with the network or computer).
IP address setting incompatible with the network settings? If the instrument IP address or your computer's IP address is set to static, you may need to alter either your computer or instrument network configuration. To restore connectivity, make the computer IP address compatible with the instrument IP address. This procedure may work on Windows 10:
- Press the Windows key (
 ) or the Windows key + R ( + R), type cmd, and press Enter to open the command prompt.
 - Type ipconfig and press Enter.
- Your computer will reply with its network configuration information. You're interested in the IPv4 Address.
- Compare your computer's IP address with the instrument's IP address given on the display.
- If the IP addresses are not compatible (see Table 5‑1), you will not be able to connect until you have changed one or both IP addresses.
To change your computer's IP address (Windows 10):
- Open the Network Connections window.
- Press the Windows key (), type Network Connections, and press Enter.
- Press the Windows key + R ( + R) and type ncpa.cpl and press Enter.
- Press the Windows key (
- In the Network Connections window, double click the icon that represents your network connection, and then click Properties.
- Double click Internet Protocol Version 4 (TCP/IP) to open the IPv4 Window.
- In the window that opens, select Use the following IP address and enter an IP address that is compatible with the instrument IP address. The first three octets will be the same as the instrument IP address, but the final set of octets must be different.
| Device | Compatible IP Addresses |
|---|---|
| LI-78xx | 172.24.1.1 |
| PC | 172.24.1.2 through 172.24.1.255 |
| Device | Compatible IP Addresses |
| LI-78xx | 192.168.1.1 |
| PC | 192.168.1.2 through 192.168.1.255 |
- Connect with the instrument by entering the host name in a web browser address bar.
- Now you can change the instrument IP address settings to whatever you prefer. Connection issues will be resolved if you set both the instrument and your computer to automatic.
Note: You must reconnect after changing the instrument IP address.
Measurement problems
Here we describe issues related to the display of data or measurements.
Readings drift or step change unexpectedly
Constricted inlet or outlet? If one of these becomes constricted, you will observe errant measurements, with corresponding status codes that indicate problematic pressure measurements (see Status codes). Clear the constriction and the instrument should return to normal operation in a few minutes. Restart the instrument if it does not resume normal operation within a few minutes.
Pressure readings are questionable or unstable
Clogged air inlet filter? Check and replace the filter if needed, as described in Replacing the air inlet filter. Otherwise, unstable pressure readings may indicate that the pump is failing. Contact technical support if the issue is not resolved by replacing the filter.
Gas density measurements appear to have oscillations
In older firmware, regular, periodic oscillations in the data may appear in circumstances where there are vibrations that are effectively coupled to the instrument sampling frequency. Typically, these oscillations are small and the measurements are still within the noise specification.
Solution: Update the instrument firmware to v2.1.37 or newer. The latest firmware adjusts the pump speed automatically to prevent this issue.
Interface issues
Some issues related to the display settings are described here.
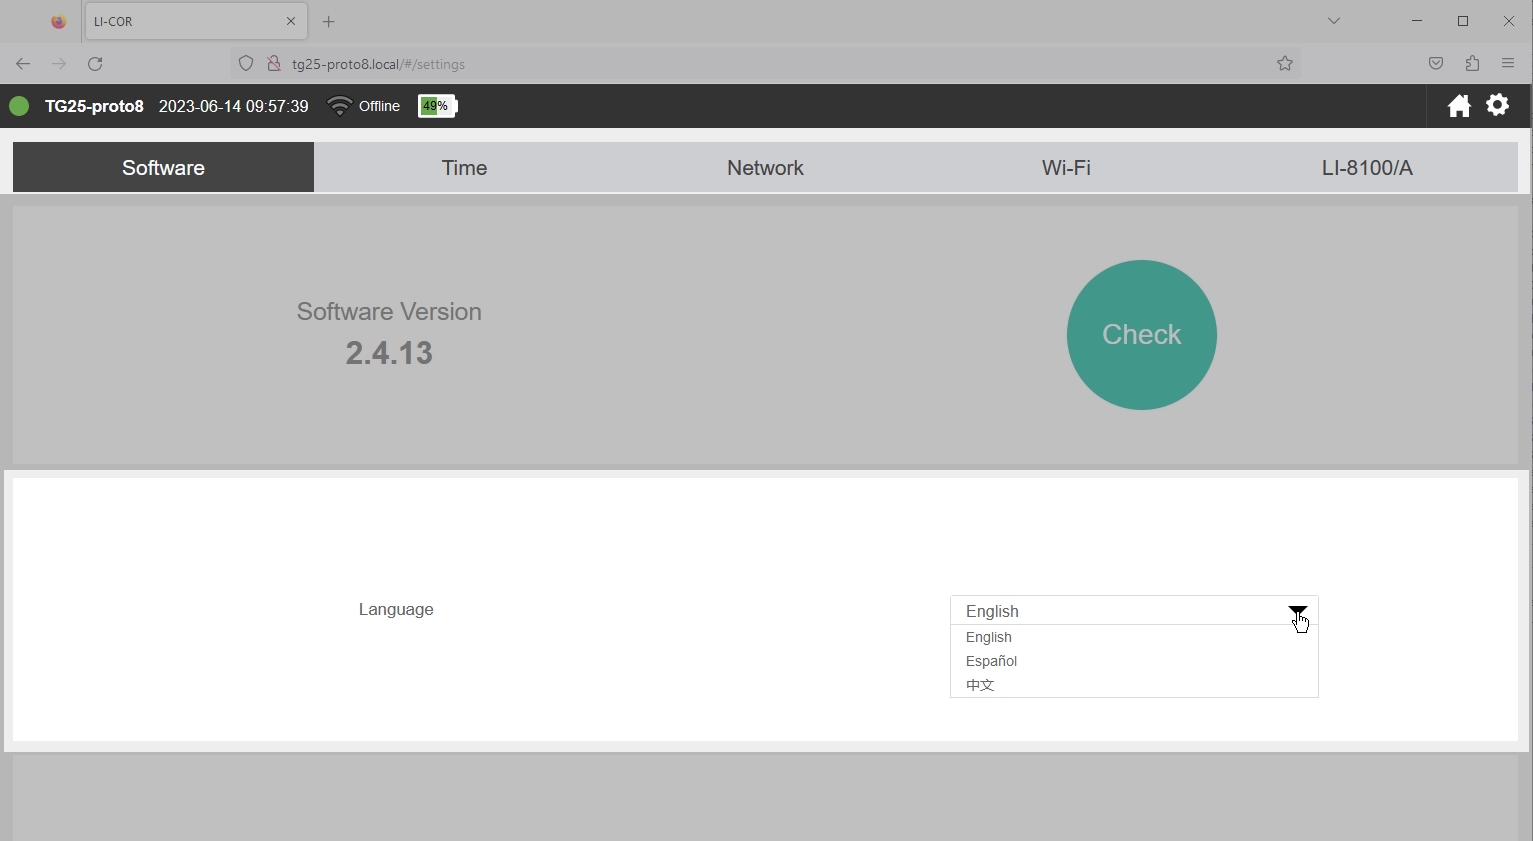
The interface is in a language that I don't understand
The interface can be displayed in English, Spanish, and Simplified Chinese. If you need to change the language setting, click Options > Settings. The language setting is stored in the web browser. Any time you connect with a browser for the first time or clear your browser cache, the language setting will be in the default state (English).
Graphed data overlaps in time or has gaps
If you have been altering the time and time zone settings, the browser may receive overlapping time information. Refresh your web browser to reload the display. The issue should be resolved. Data are always logged with the Unix time.
Status and warning messages
During warmup and any time the instrument detects a problem, it will issue one or more status messages, including a message that says SVC Required. This is normal during warmup. Typically, warmup messages will be resolved within an hour of operation. The status messages will be triggered again if there is an issue with the system.
See Status codes for details on the codes.
Code 128 triggered
Code 128 is triggered if the inlet is obstructed. This can happen if the instrument has drawn water, dust, or debris into the inlet filter, causing a clog. In either case, power off the instrument, clear the obstruction, replace the filters (see Replacing the air inlet filter), and power the instrument back on.
You must restart the instrument to resolve code 128.