The LI-8150 Multiplexer is designed to require little or no routine maintenance. Most of the LI-8150 components are modular, and are designed to be easily replaced should the need arise. The discussion below describes basic maintenance and repair of user-replaceable items; contact LI-COR for information on repair of items not described below.
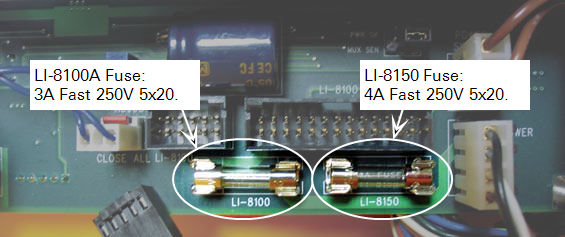
There are two fuses on the LI-8150 main circuit board that protect the LI-8100A and LI-8150. Spare fuses can be found in the LI-8150 spares kit. The fuses are located under the access panel at the front edge of the white lower plate assembly, as shown in Figure 9‑4. The proper fuse sizes are labeled on the circuit board; the leftmost fuse protects the LI-8100A power supply (3A Fast 250V 5x20, part number 439-04215), and the rightmost fuse protects the LI-8150 power supply (4A Fast 250V 5x20, part number 439-08516). If the LI-8150 and/or LI-8100A fail to power up, check to see if either of these fuses has blown. Loosen the thumbnuts on the access panel and lift off to access the fuses. You may need to unplug the two connectors above the fuses to access the fuses.
The urethane tubing used for air connections within the LI-8150 is 1/8” ID x 11” OD; a 3’ length of this tubing can be found in the spare parts kit under part number 222- 00303. If any of the internal tubing should become clogged or otherwise damaged, simply remove it by pressing in on the orange quick-connect fittings, cut a new piece of the same length, and replace.
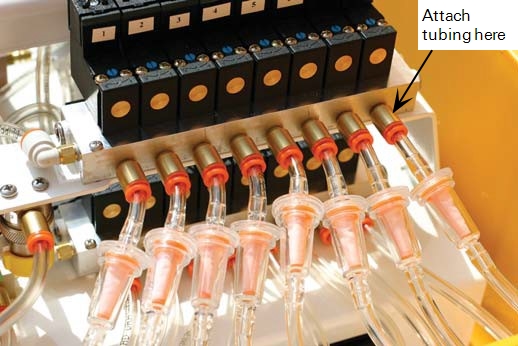
The air filters are located on the air lines connected to each of the eight (or sixteen) air input ports. The filters are translucent to more easily see dust and dirt buildup. Check the filters periodically (yearly or more often, depending on operating environment). Replace the filters when they become dirty, or if low, or no, flow rates are present on the associated chamber. A filter kit (8 each) can be found in the spares kit under part number 8150-909; additional kits can be ordered from LI-COR.
Remove dirty or damaged filters by pressing on the quick-connect fittings and pulling the tubing straight out; discard the tubing and old filter. Note the orientation of the new filter; the arrow pointing toward the wider end of the filter should point toward the solenoids. Attach the tubing near the solenoid first. The tubing on the other end of the filter is longer than is required; route the tubing toward the connector on the multiplexer case, leaving a bit of slack, and cut to length.
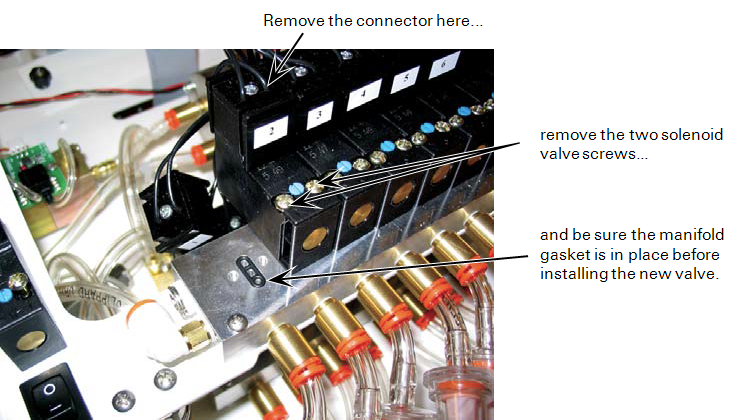
Under normal operation the solenoid valves should not need to be replaced. If however, a solenoid fails to open, it can be easily replaced. Note that each solenoid has a manual override that can be used to test the mechanical opening of each solenoid (they are normally closed). If it appears that a solenoid is not opening (no flow), turn the blue screw on the top of the solenoid valve with a small flathead screwdriver a quarter turn in either direction to manually open the solenoid. If the solenoid does not open manually, it should be replaced. Solenoid valves are available from LI-COR under part number 300-08249 (1 each). Follow these steps to replace a solenoid:
- Power the LI-8150 off and open the lid.
- Remove the single screw on the wired valve connector, pinch the top of the connector, and remove.
- Remove the two screws on the top of the solenoid valve, remove the solenoid, and discard.
- Make sure the manifold gasket is in place, and install the new solenoid valve.