
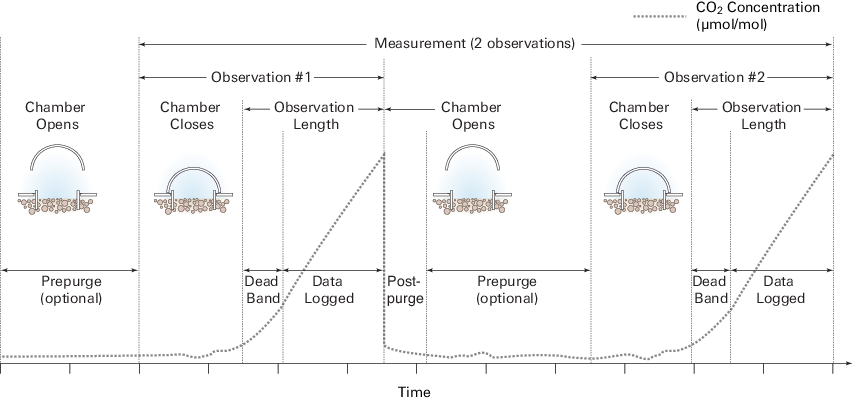
The measurement cycle begins with an optional pre-purge period with the chamber open, after which the chamber closes. Upon closing, the dead band starts and the instrument begins logging data. When the observation is finished the post-purge begins. Then the cycle repeats as configured.
Terminology
This section addresses terminology of the measurement and software. The computer software and mobile apps use the same terminology where possible but slight differences may occur from time to time.
Chamber
Under the configuration menu, select the chamber connected to the port. Select Custom to enter information about a user-constructed chamber, or select a chamber from the list.
Chamber offset
The chamber offset is used to compute volume of the system. See Measuring the chamber offset for details.
Dead band
The dead band is the time period that starts when the chamber closes completely, and continues until steady mixing is established and the measurement begins. The dead band requirement changes depending upon the chamber geometry, system flow rate, collar, and site characteristics. A dead band between 10 and 30 seconds generally provides adequate mixing, but the actual time can (and should) be optimized in post processing in SoilFluxPro.
Destination
Data collected by the LI-8100A is stored to the instrument's internal memory or to an optional CompactFlash card. You can log to one or the other, but not both at the same time. Data stored to the internal memory can be transferred to a CompactFlash card or to the PC at any time, but not when a file is open.
Extension tube volume
The volume of the tube between the chamber multiplexer. You will not enter a tube volume when using a single chamber because the volume is included with chamber volume.
- For a long-term single-chamber measurements, connect the chamber to the analyzer control unit with the 2-meter tube (part number 8100-704). If, for some reason, you use the 15-meter tube (part number 8150-705) in this configuration, you need to use a long dead band and pre-purge, and recompute the data in SoilFluxPro after updating the system volume to include the long tube.
- For long-term multiplexed measurements, use the 15-meter tube and enter 237 cm3 for the volume.
- For a custom tube, compute the volume and enter it. To compute volume of Bev-a-line IV, use the internal diameter of 1/8" (0.3175 cm) and the total length—including the AIR IN and AIR OUT tubes. The examples below are for the 15‑meter tube.
1‑1

1‑2

For simplicity you can multiply the total tube length (meters) by 7.91. Be sure the length includes the AIR IN and AIR OUT tubes.
1‑3

General purpose input
The general purpose input is for any device that outputs a 0 to 5 V signal.
Measurement file
In the interface, enter a file name and optional comments. The comments appear in the header information. Files can be created in the standard data file format, where the entire data set is placed in a single file, as defined by the measurement configuration. Large files can be split into smaller files, in increments of 1 day or 1 week. Files split by the day are appended with a date, beginning at 12:00 a.m. each day; files split by the week are appended with a date, beginning at a period 7 days after the first measurement is taken.
Click the Append data to an existing file button to add new measurement data at the end of the currently defined file.
Measurement start
Enter a start time. You can start the measurement immediately or choose to begin the measurement at a specified date and time.
Observation count
For survey measurements, you can make repeated observations under the same set of parameters by setting the observation count to reflect the number of times to repeat the observation.
Observation length
The observation length is the time period from the instant the chamber is closed until just before it begins to open again, and includes the specified Dead Band period. At moderate to low CO2 fluxes an observation length of 90 to 120 seconds is usually adequate.
Note that the LI-8100A starts logging data when the chamber is actuated and starts to close. Raw, or Type 1 records are recorded throughout the entire observation period. The elapsed time (labeled ETime in the data output) does not increment, however, until the chamber is closed. While the chamber is closing, ETime will register a count up to 0 from seconds until 0 (in older versions of software it simply registered -1).
Optional data fields
Variables that can be logged at your discretion. They include: Hour, Day of Year, Relative Humidity, Case Temperature, Input Voltage, H2O Absorption, CO2 Absorption, Raw IRGA Outputs, V1, V2, V3, V4, Thermocouple 1, Thermocouple 2, Thermocouple 3, Thermocouple 4, and GPS variables.
Post-purge
The post-purge is the amount of time during which air continues to flow through the chamber as it begins to open, after the measurement is complete. This is important in certain cases where environmental factors may influence the amount of CO2 or moisture that is present in the gas sampling lines. For example, in hot, moist conditions, you may want to increase the post-purge to ensure that the gas sampling lines are purged of moisture that may condense in the lines, before the next measurement using that chamber is started. In most cases, a post-purge of about 45 seconds is adequate.
NOTE: The post-purge function accommodates the use of the LI-8150 Multiplexer, where it is important to purge the gas sampling lines before making the next measurement with that chamber. Because the post-purge starts after the measurement is complete, it has slightly different implications for use in single-chamber mode. As shown in Figure 1‑1, after the first measurement is complete, the Post-purge starts, followed by the pre-purge; thus, the post-purge and pre-purge become additive. In most single-chamber applications, the combination of the two delays is unnecessary. Before the first measurement starts, the chamber will not close until the pre-purge has finished; again, in most cases this delay is unnecessary, particularly when moving the chamber from collar to collar. For these reasons, you may want to use the post-purge instead of the pre-purge; in other words, set the pre-purge to zero, and set the post-purge to 20-30 seconds, or more, depending on the conditions.
Pre-purge
In multiplexed configurations while chambers are open, or between measurements in survey configurations, CO2 may accumulate in the open chamber. The pre-purge turns on the flow pump when the chamber is open. This mixes air in the chamber in order to bring conditions in the chamber closer to ambient.
When an observation is complete, the chamber will automatically rise off of the soil collar. If the observation count is set to 2 or more, the pre-purge sets the time during which the chamber is open. Under very still conditions it may take 2 minutes or more for the chamber air to return to ambient conditions. Under windy conditions the chamber CO2 concentration may return to ambient levels in as little as 20 or 30 seconds. Note, too, that the pre-purge begins as soon as the chamber starts to open. Therefore, it is possible to set a delay time that is too short for the chamber to fully open before it begins closing again. Chambers typically take about 15 seconds to close.
Presets
Once you have defined a measurement protocol it can be stored and reused from the preset menu.
Repeat Sequence
Repeat measurement allows you to repeat the defined protocol at a regular interval. This function is particularly useful when making long term, unattended measurements.
For example, you could specify a 90 second observation length, 45 second dead band, observation delay of 2 minutes, and observation count of 3. This protocol could then be repeated every hour for 240 hours (10 days). The resulting data set would include 240 measurements, with each measurement consisting of three 90-second observations on the chosen port. The maximum number of repeats is 12000.
Soil area
The surface area of soil in the chamber.
- For the 10 cm soil collar it is 80.1 cm2.
- For the 20 cm soil collar it is 317.8 cm2.
- For home-made soil collars, compute surface area and enter it.
Soil moisture probe
For a soil moisture probe, such as the Decagon EC-5 or Delta-T ThetaProbe soil moisture probes.
Stop observation if RH reaches…
This setting will protect equipment from condensation under high humidity conditions. Enable the setting and enter a relative humidity (RH) value of 80 to 90% if humidity is a concern at the measurement site. The observation will abort if the measured relative humidity in the chamber exceeds this value at any time during the observation. If the observation is aborted, a message is logged in the log file, and the measurement will continue at the next observation.
NOTE: If this is set to 0% RH, you probably will not collect any data because each measurement will abort any time the RH value is greater than 0% (and RH will always be greater than 0%). Therefore, we recommend disabling this setting unless you are working in a very humid environment.
Temp. source
Under the configuration menu, this setting specifies the temperature source for flux calculations.
Total system volume
The computed volume of the system.
Treatment label
The treatment label is embedded as a separate column in the resulting data records. It is in the measurement header, viewable as a column in the summary view of SoilFluxPro software.
Turn off flow pump(s) between measurements
You can elect to turn off the flow pump between repeated measurements to conserve battery life and extend the life of the pump by enabling the check box.