Installing soil collars
To install a soil collar, lay a piece of wood across the collar and hit the wood using a hammer or mallet to drive the collar into the soil. Aim to hit the wood near the collar and move the wood to high spots as needed. In hard or compacted soils, you may need to create a channel around the collar with a knife or trowel before installing the collar. Check the collar to ensure it is level.
Note: After installing a soil collar it may take up to 24 hours for the soil gas flux to return to normal, undisturbed levels.
Insertion depth
Optimal collar height will depend upon site conditions and the length of time the collars will be used at a given site. At a minimum, the collar should be inserted into the soil to a depth that gives a solid foundation so the collar does not move when placing the chamber on the collar.
As insertion depth is increased, lateral diffusion of trace gases in the soil column below the chamber will be reduced. The advantage of this is that lateral diffusion can be a source of error in the measurement, but the disadvantage is that as insertion depth increases, the possibility of root shearing increases. Collars may become loose over time and should be moved if this occurs.
Collars should extend 3 cm or more above the soil surface. With greater extension there is increased shading and perturbation of air movement. Over the long term, these perturbations could result in changes of evaporation rate, soil temperature, and soil moisture.
Making your own soil collars
You can make your own collars if you can acquire suitable pipe. Large soil collars from LI-COR are constructed from thick-walled, 8-inch SDR 35 PVC pipe. This material is widely available in the United States. In other countries, you may need to special order the PVC pipe or find a similar alternative.
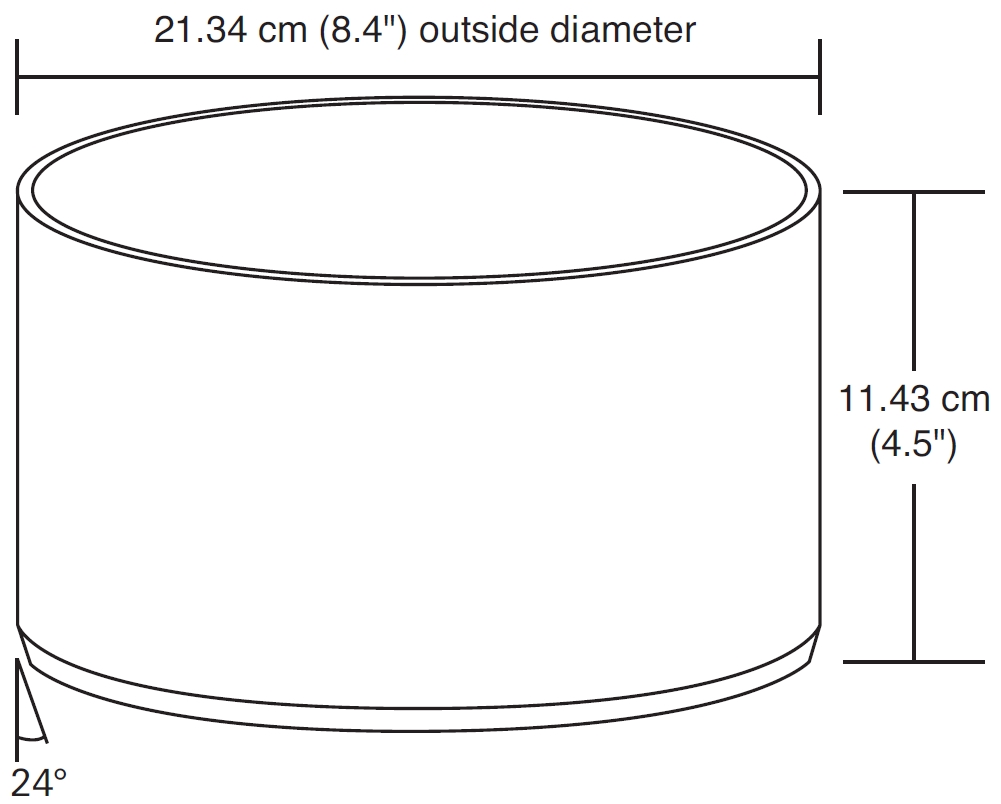
To construct a collar, cut a length of pipe to approximately 11.43 cm. Then, use a grinder or coarse file to bevel the bottom edge to a 24° angle. The bevel is optional but does allow for easier insertion of the collar into the soil.
- Inside Diameter: 20.1 cm ± 0.03 cm
- Outside Diameter: 21.34 cm
- Height: 11.43 cm