Using the SDI-12 console
The SDI-12 console is used to set the address and configure connected SDI-12 sensors, such as the Stevens HydraProbe. Here, we give example commands for a Stevens HydraProbe, but you can connect and configure nearly any SDI-12 sensor.
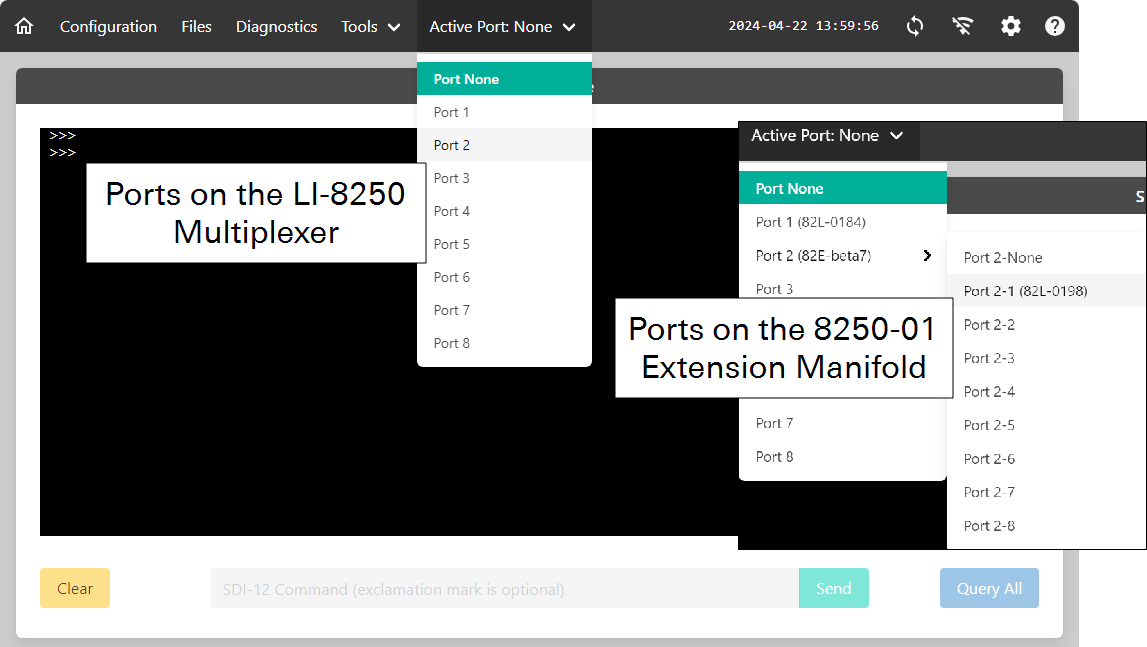
To configure a sensor with the SDI-12 console, you must be connected to the LI-8250 Multiplexer user interface, the sensor must be connected to a port on a long-term chamber, and that chamber must be connected to a port on the multiplexer or an extension manifold. You can connect multiple sensors to a port on a LI-COR long-term chamber using the sensor T-split fitting (part number 310-18516).
Note: For best results, connect and configure the sensors on each chamber one at a time. Often, but not always, the default address of a sensor is 0. If multiple sensors on the same chamber have the same address, communication with either sensor will not be possible. Related to this, the console does allow you to change the address of one sensor to the address of another. If more than one sensor is assigned the same address, you will need to disconnect all but one of the sensors and change the addresses.
Configuring sensors
-
Open the SDI-12 Console.
In the LI-8250 interface, click Tools > SDI-12 Console.

-
Select an Active Port - the one that hosts the chamber and thus, the SDI-12 sensor.
The port will be on the multiplexer (e.g., Port 1) or an extension manifold (e.g., Port 1-1 (82E-xxxx).
-
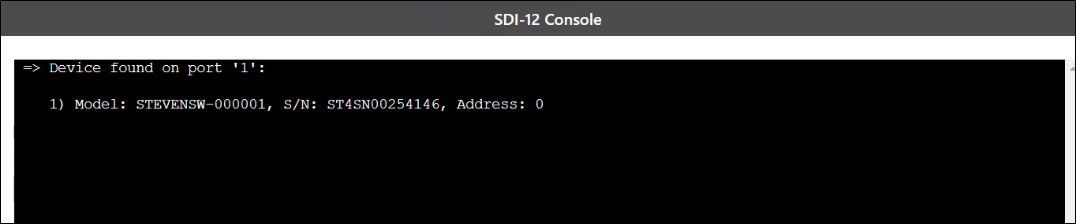
Query sensors on the port.
With the first sensor to configure connected and the active port set, click Query All. A query will search the active port for any connected devices. Devices that are found will report back the model number, serial number, and address.
-
Setting the address.
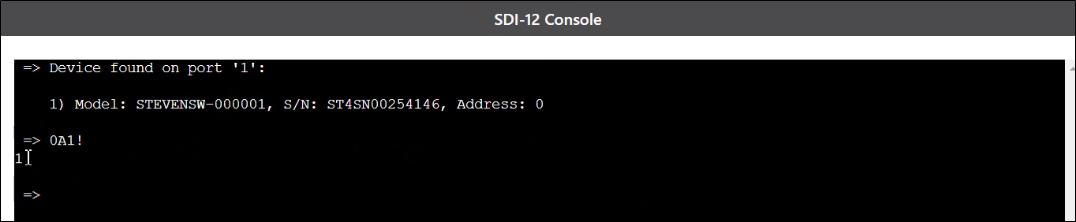
Each SDI-12 sensor on a chamber must have a unique address (a number between 0 and 9). If there is more than one sensor with the same address on a chamber, communication with both sensors will be stopped. If you are using more than one SDI-12 sensor per chamber, we recommend that you avoid using the address of 0 to reduce address conflicts during setup.
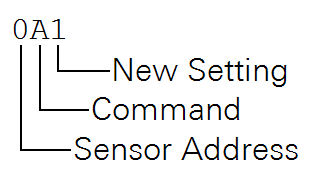
To change an address from 0 to 1, enter the command 0A1, then click Send or press Enter. This command tells the sensor with the address 0 to set the address (A) to 1. You should receive a response of 1 as confirmation from the sensor that the address was changed.
-
Setting the soil type.
HydraProbes with serial numbers 268000 and higher feature a generic calibration that is suitable for a range of soil types. Earlier models require you to enter the soil type in order to compute accurate measurements.
With older HydraProbes, you should change the soil type to reflect the type of soil representative of your site. This changes the calibration coefficient the probe uses to convert signal to soil moisture, temperature, or electrical conductivity values. The different soil types and their corresponding commands can be found in Table 2‑3 and Table 2‑4.
To change the soil type for sensor 1 to silt, enter the command 1XS2, then Send. This command tells the sensor with the address 1 to set the soil type (XS) to silt (2). Choose the soil type that best represents the soil at your site.
Note: We recommend that you keep the Stevens HydraProbe in its default configuration except the address and soil type.
Anatomy of a command
The first character in a command is the sensor address. Whenever you would like to communicate with a sensor, your command will begin with the address of that sensor. In the example in this section, we change the address from 0 to 1, but the address could be any number from 0 to 9. While the full SDI-12 protocol does allow for a wider range of addresses, the LI-8250 Multiplexer uses a partial implementation and can only accept numeric addresses.
Note: Typically, device specific SDI-12 commands are followed by an exclamation mark (!). In the SDI-12 Console, you do not need to add the exclamation mark as it is added automatically.
| Command | Definition |
|---|---|
|
The command 0A1 changes the address for sensor 0 to 1. |

|
The command 1XW_SOIL_G changes a setting on the sensor. In a Stevens HydraProbe, 1XW_SOIL_G changes the soil type for sensor 1 to general (see Table 2‑3). |
|
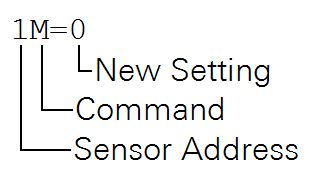
(Version 3 and older) The command 1XM=0 changes the measurement for sensor 1 to the first default set. |