The LI-830 and LI-850 can communicate with a computer or a system controller through a serial connection (either the RS-232 or USB output). The following discussion describes how to implement the communication protocol. To help facilitate this discussion, this document will rely exclusively on a terminal program to communicate with the gas analyzer. To use this document, download and install a terminal program on your computer. We give examples using TeraTerm for Windows and Serial for Mac, but nearly any terminal program will work.
About XML communications
The configuration grammar used to communicate with the analyzer is based upon the eXtensible Markup Language (XML). XML relies on the use of tags to "Markup", or give structural rules to a set of data.
A tag is a descriptive identifier enclosed between a less than (<) and a greater than (>) symbol, used in part to describe a piece of data. For example, <name> is a tag that describes a person's name. Each tag must have a corresponding end tag, denoted by '/'. Extending the example above, the end tag of <name> is </name>.
Elements are the basic unit of XML content. An element consists of a start tag and an end tag, and everything in between. For example, consider the following element:
<name>George</name>.
In this example, <NAME> (start tag) and </NAME> (end tag) comprise the markup, and "george" comprises the data. Because XML is extensible, tags can be defined specifically for the data they are meant to describe.
Elements can also contain other elements other than data.
<name>
    <first>George</first>
    <last>Smith</last>
</name>
In this example, the outermost element <NAME> encompasses two other elements that contain data. All elements combined make up the XML document.
The LI-830 and LI-850 communications are not case sensitive. So, your commands can be upper case, lower case, or a combination of upper and lower case if you are so inclined. The instruments do not interpret upper case commands as yelling, in the way that people often do.
Types of data
An element includes a start tag, end tag, and the data inside the tags. The data can take any of the forms described in Table 1‑1.
Connecting over a terminal program
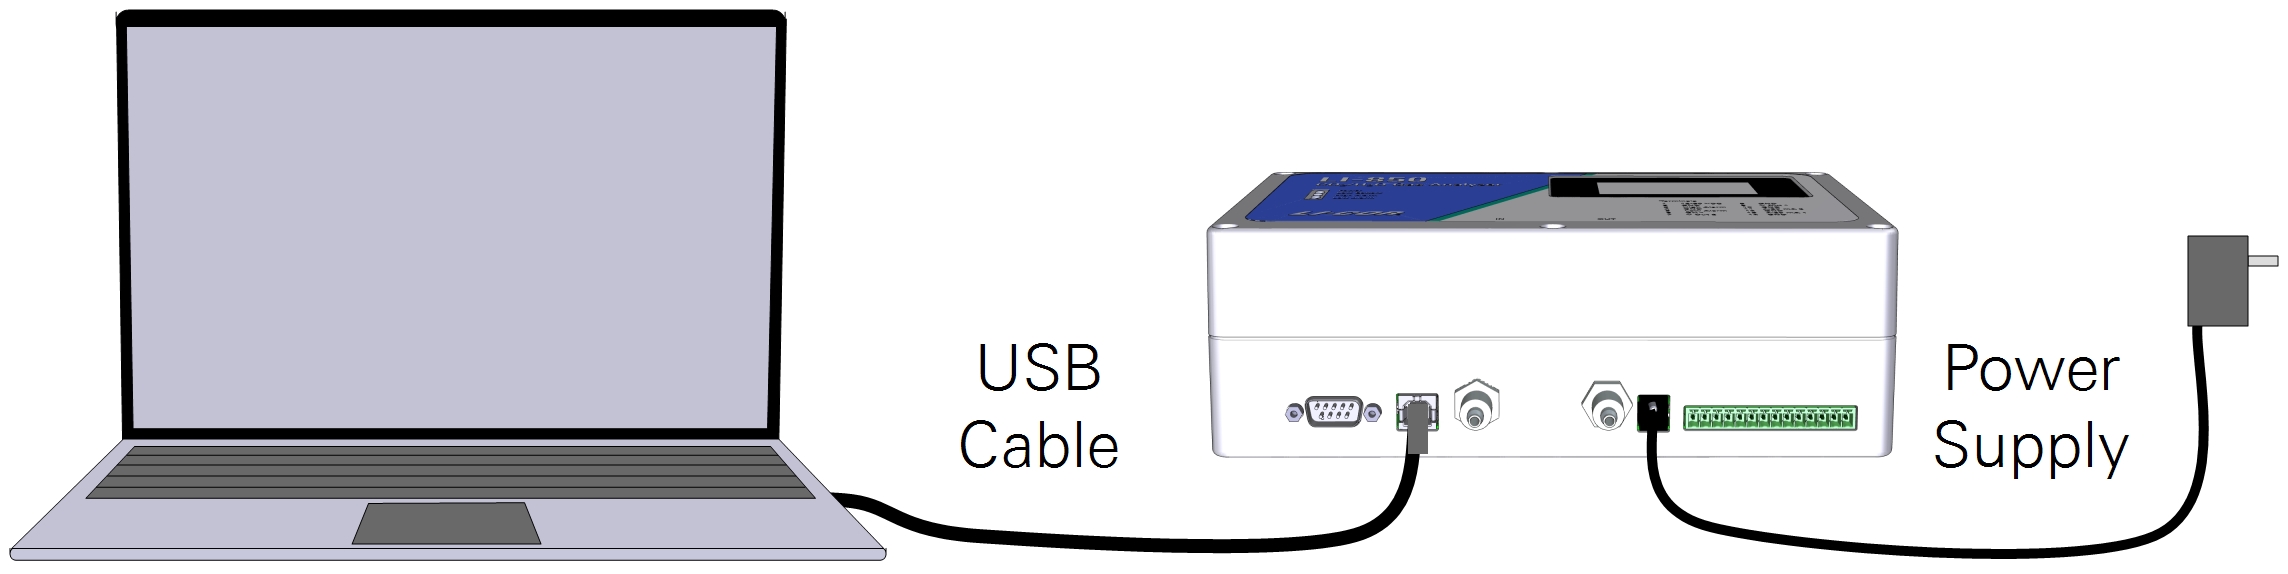
To connect with the analyzer, power it on and connect the USB cable between the analyzer and your computer. Or, connect to the board as described in Circuit board connector.
- Launch the terminal program.
- In this example, we use TeraTerm for Windows and Serial for Mac. In either case, you can select from the devices that are connected to the computer.
- Connect with the instrument.
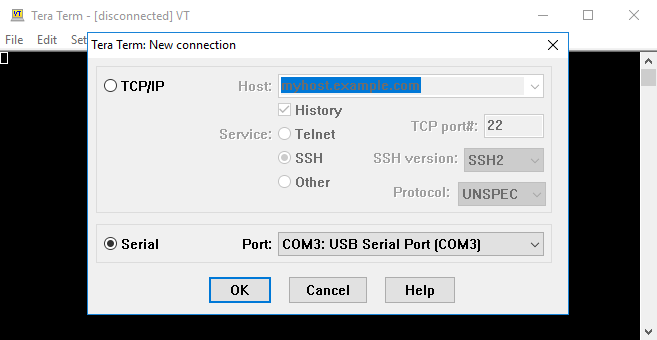
In TeraTerm on Windows:
Launch the TeraTerm app. Select Serial, select the port called COM#: USB Serial Port (COM#), then click OK.
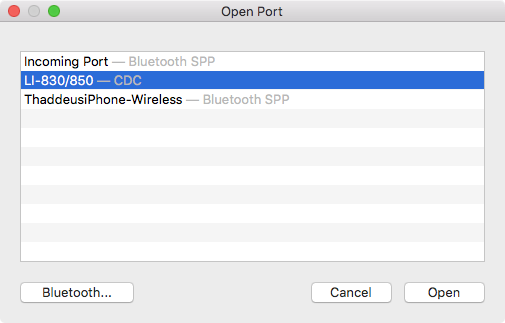
In Serial on Mac:
Launch the Serial app. It will open a window that lists all of the devices. Select LI-830/LI-850 and click Open.
You may or may not see data stream into the terminal program immediately, depending on the current instrument configuration.
The default configuration for serial communication is given in Details on the serial connection.
Sending a command
It can be a bit tricky to send commands if you're unfamiliar with terminal programs. Here are some tips that might help you get started:
Note: The root tag for the LI-850 is <LI850> and the root tag for the LI-830 is <LI830>. We use <LI850> throughout most of this document.
In TeraTerm on Windows:
Select the text below:
<li850>?</li850> or <li830>?</li830>
and copy it to the clipboard (Ctrl + C).
In TeraTerm, click Edit > Paste <CR> to open a clipboard window, where you can edit the command.
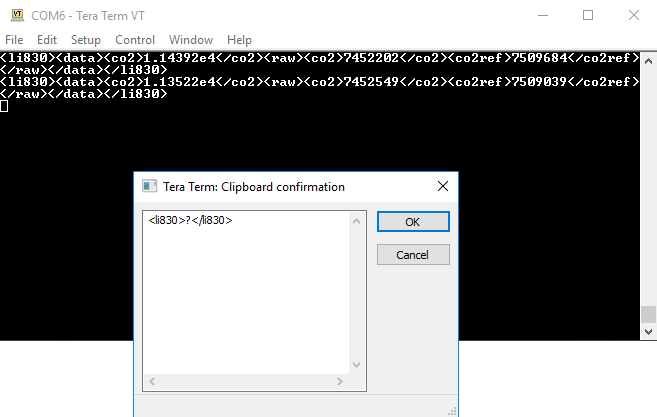
Click OK to submit the command.
In Serial on Mac:
Click Terminal > Send String.
Type (or copy and paste) the command into the interface.
<li850>?</li850> or <li830>?</li830>
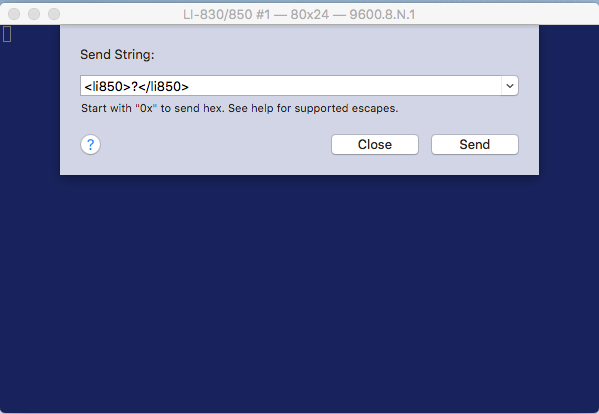
Click Send to submit the command.
The instrument will reply by returning the entire configuration as XML.
Note: A simple way to write the commands is to copy the text from this document or type the command into a text editor and copy the text to your clipboard (select the text and press Ctrl+C). Then right-click in the terminal window and paste the command (or press Ctrl+V).
Reading data from the instrument
This section describes how to view measurements from the instrument in a terminal program.
Configuring the output rate
Copy the following command and paste it into the TeraTerm window:
<LI850>
    <CFG>
        <OUTRATE>1</OUTRATE>
    </CFG>
</LI850>
This will configure the instrument to send one measurement per second. The instrument will respond with a confirmation message (<li850><ack>true</ack></li850>) and by sending data once per second. You still may not see data however, depending on the instrument settings.
Enabling and disabling an output variable
To include the CO2 reading among the data sent from the instrument, copy the following command and paste it into the TeraTerm window:
<LI850>
    <RS232>
        <CO2>TRUE</CO2>
    </RS232>
</LI850>
This will configure the instrument to send the CO2 measurement. After sending the command you will see the confirmation message and other variables in addition to CO2, depending upon the instrument settings. The confirmation message is <li850><ack>true</ack></li850>.
To exclude the CO2 reading from the data, send this command:
<LI850>
    <RS232>
        <CO2>FALSE</CO2>
    </RS232>
</LI850>CO2 will no longer be returned. You will still see all the measurements that are configured as TRUE but not specified here.
Turning off all output variables except CO2
Send this command to stop the instrument from sending all the measurements except CO2 and to send CO2 once per second:
<LI850>
    <CFG>
        <OUTRATE>1</OUTRATE>
    </CFG>
    <RS232>
        <CO2>TRUE</CO2>
        <FLOWRATE>FALSE</FLOWRATE>
        <H2O>FALSE</H2O>
        <CELLTEMP>FALSE</CELLTEMP>
        <CELLPRES>FALSE</CELLPRES>
        <IVOLT>FALSE</IVOLT>
        <CO2ABS>FALSE</CO2ABS>
        <H2OABS>FALSE</H2OABS>
        <H2ODEWPOINT>FALSE</H2ODEWPOINT>
        <RAW>false</RAW>
        <ECHO>FALSE</ECHO>
        <STRIP>FALSE</STRIP>
    </RS232>
</LI850>
It may be evident by now that the TRUE command means do send; whereas the FALSE command means do not send. Also, here we included the command to configure the output rate to once per second.
Removing XML tags
So far we've been viewing data inside the XML tags. If you simply want to see the data without the enclosing XML tags, send this command:
<LI850>
    <RS232>
        <STRIP>TRUE</STRIP>
    </RS232>
</LI850>
The instrument will respond with the confirmation message:
<li850><ack>true</ack></li850>
and by streaming space-delimited text rather than XML text. Send this command to return the data with XML tags:
<LI850>
    <RS232>
        <STRIP>FALSE</STRIP>
    </RS232>
</LI850>
The instrument will respond with the confirmation message and by streaming data as XML text.
Reading the full dataset
Sending this command:
<LI850>
    <DATA>?</DATA>
</LI850>
instructs the analyzer to send the most recent set of data values according to the current configuration. You will only see data values that are set as true (see Enabling and disabling an output variable). In other words, you may see no data, some data, or all of the data.
Reading instrument settings
Previously we described how to configure the data that is sent over the serial port (RS-232 or USB). Here we describe how to read the current settings in the instrument. You may want to set the output rate (<outrate>) to 0 for these exercises.
The analyzer can be polled for individual sets of data by sending an XML document with a ? in place of the set of elements requested. The element sets that can be requested include the data set, the current configuration, and the entire state of the instrument.
All settings
To receive the entire state of the instrument as an XML document (except the <TECH> information), send this command:
<li850>?</li850>The instrument will reply with the full configuration followed by the confirmation message.
Configuration settings
To receive all of the configuration information, send this command:
<LI850>
    <CFG>?</CFG>
</LI850>
The instrument will return the current configuration, including heater status, filter settings, DACs, and alarms, followed by the confirmation message. See Configuration tags for the full description.
Zero and span settings
To receive the user-settable zero and span calibration settings, send:
<LI850>
    <CAL>?</CAL>
</LI850>
The instrument will return the current zero and span calibration information, including the dates of calibrations and the zero and span coefficients. See Calibration tags for the full description.
Polynomial settings
To receive the coefficients for the calibration polynomial function, send:
<LI850>
    <POLY>?</POLY>
</LI850>
The instrument will return the factory-determined polynomial coefficients that are unique to your instrument. See Polynomial tags for the full description.
Pump settings
To receive the pump settings, send:
<LI850>
    <PUMP>?</PUMP>
</LI850>
If the LI-COR pump is installed, the instrument will return all of the pump settings and the confirmation message. See Pump tags for the full description.
Optical source hours of operation
To receive the hours of operation for the optical source, send:
<LI850>
    <SOURCE>?</SOURCE>
</LI850>
The instrument will return the number of hours on the source, followed by confirmation.
Serial number
To request the serial number of your instrument, send the following:
<LI850>
    <SERIALNUM>?</SERIALNUM>
</LI850>
The instrument will return the serial number of the instrument, followed by confirmation.
Software version
To request the software version, send:
<LI850>
    <ver>?</ver>
</LI850>
The instrument will return the software version number.
Applying instrument settings
Here we describe how to apply some settings. Earlier we described how to set the output rate. The output rate is a configuration:
<LI850>
    <CFG>
        <OUTRATE>1</OUTRATE>
    </CFG>
</LI850>
You can also configure the other settings. For example, sending this command:
<LI850>
    <CFG>
        <HEATER>false</HEATER>
    </CFG>
</LI850>
will turn the optical bench heater off and return a confirmation message. You normally don't want the heater off, so send this command to reenable it:
<LI850>
    <CFG>
        <HEATER>true</HEATER>
    </CFG>
</LI850>
Controlling the pump
For instruments that are equipped with a LI-COR-installed pump, the pump controls are in their own tag: <pump>. To enable the pump, send:
<LI850>
    <PUMP>
        <ENABLED>true</ENABLED>
    </PUMP>
</LI850>
The instrument will respond with a confirmation message.
To disable the pump, send:
<LI850>
    <PUMP>
        <ENABLED>false</ENABLED>
    </PUMP>
</LI850>
The instrument will respond with a confirmation message.
Calibrating the instrument
The analyzer CO2 and H2O (LI-850 only) zeros and spans can be performed using XML grammar. Just like when you calibrate with the software, be sure that a suitable calibration gas is flowing through the optical cell before changing a zero or span. See the instruction manual for details. To request the calibration information (optional), enter the following command:
<LI850>
    <CAL>?</CAL>
</LI850>
The instrument will respond with the current calibration information and a confirmation message: <li850><ack>true</ack></li850>. If the calibration cannot be performed, an error is returned: <LI850><ERROR>Text</ERROR></LI850>.
-
- With suitable CO2-free air flowing through the analyzer cell:
-
- Send the command to initiate the zero. The date and concentration must be sent together.
<LI850>
    <CAL>
        <DATE>YYYY-MM-DD</DATE>
        <CO2ZERO>TRUE</CO2ZERO>
    </CAL>
</LI850>-
- Wait for the acknowledgment.
- When the zero is set the instrument will return confirmation. If the operation fails the instrument will return an error message.
-
- Using a CO2 span gas with a known concentration of CO2 in air:
-
- Send the command to initiate the span.
<LI850>
    <CAL>
        <DATE>YYYY-MM-DD</DATE>
        <CO2SPAN>Gas Concentration</CO2SPAN>
    </CAL>
</LI850>-
- Wait for the acknowledgment.
- When the primary span is set the instrument will return confirmation. If the operation fails the instrument will return an error message.
-
- Using a CO2 span gas with a known concentration of CO2 in air (different from the concentration used to set the primary span):
-
- Send the XML command to initiate the second span.
<LI850>
    <CAL>
        <DATE>YYYY-MM-DD</DATE>
        <CO2SPAN2>Gas Concentration</CO2SPAN2>
    </CAL>
</LI850>-
- Wait for the acknowledgment.
- When the secondary span is set the instrument will return confirmation. If the operation fails the instrument will return an error message.
You can verify that all the calibrations were set by querying the instrument:
<LI850>
    <CAL>?</CAL>
</LI850>
The instrument will return the calibration settings and dates.
Configuring the alarms
The alarms can be set for either CO2 or H2O (in the LI-850). In either case, each alarm features a level and a deadband. The low alarm (<LOW>) is triggered when the reading drops below the setting. It is deactivated when the reading rises above the deadband setting (<LDEAD>). The high alarm (<HIGH>) is triggered when the reading exceeds the setting. It is deactivated when the reading drops below the deadband setting (<HDEAD>).
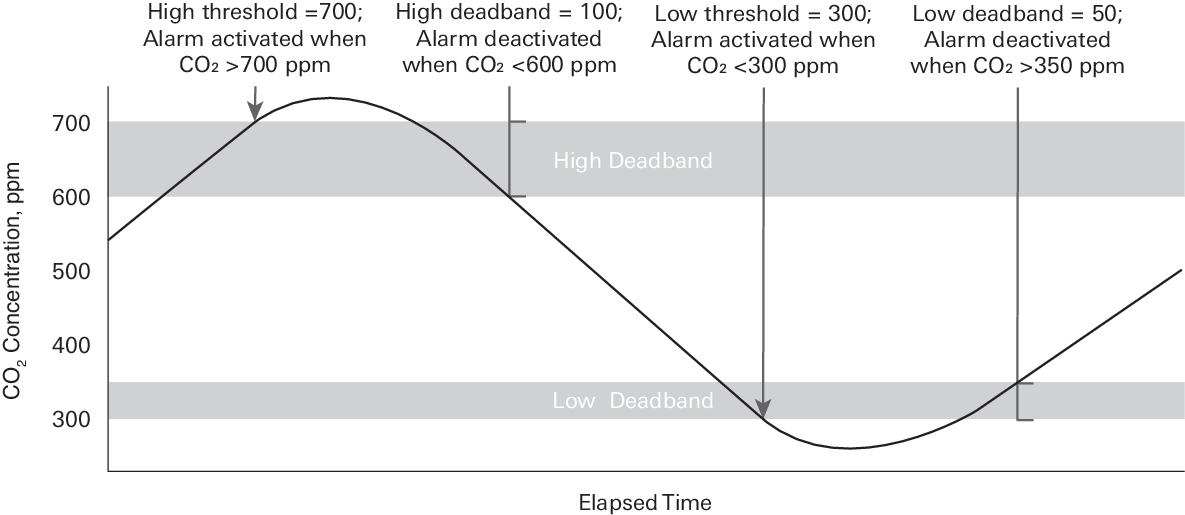
Sending this command will configure the alarm on for CO2 readings in the manner shown in Figure 1‑1.
<LI850>
    <CFG>
        <ALARMS>
            <ENABLED>TRUE</ENABLED>
            <SOURCE>co2</SOURCE>
            <LOW>300</LOW>
            <LDEAD>400</LDEAD>
            <HIGH>700</HIGH>
            <HDEAD>600</HDEAD>
        </ALARMS>
    </CFG>
</LI850>
Configuring the analog outputs
The LI-830 and LI-850 can send two analog signals over analog output channels (either voltage or current). Analog signals are linear, single-ended outputs.
The voltage channels (pins 7 and 9) can be configured for ranges of 0 to 2.5 V or 0 to 5.0 V. The current channels (pins 11 and 13) are fixed to a range of 4 to 20 mA.
<d1>configures V Out 1 (pin 9) and 4-20 mA 1 (pin 13) on the terminal strip<d2>configures V Out 2 (pin 7) and 4-20 mA 2 (pin 11) on the terminal strip
The data that can be sent as analog signals are:
| XML variable | Data sent |
|---|---|
| co2 | CO2 concentration (ppm) |
| h2o | H2O concentration (mmol mol-1; LI-850 only) |
| h2odewpoint | H2O dewpoint temperature (°C; LI-850 only) |
| cellpress | Pressure in the optical cell (kPa) |
| celltemp | Temperature in the optical cell (°C) |
| none | None |
Sending the following command will configure the analog voltage output for a range of 0 to 5 V, and configure V Out 1 (pin 9) to output 0 V when the instrument measures 200 ppm CO2 and 5.0 V when the instrument measures 1000 ppm. This command will also configure the current output for 4-20 mA 2 (pin 11) will output 4 mA when the instrument measures 200 ppm and 20 mA when it measures 1000 ppm.
<li850>
    <cfg>
        <dacs>
            <range>5.0</range>
            <d1>co2</d1>
            <d1_0>200</d1_0>
            <d1_f>1000</d1_f>
        </dacs>
    </cfg>
</li850>