Creating a wireless light sensor with Particle Argon platform
Printable PDF: Creating a wireless light sensor with Particle Argon platform
(Sensors_TechTip_Wireless-Light-Sensor-Network_19274.pdf)
Download this content as a pdf that can be saved to your computer or printed.
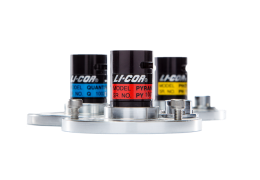
LI-COR manufactures the LI-190R light sensors which measures light in the 400-700 nm wavelength. Light in this wavelength range is commonly defined as the Photosynthetically Active Radiation (PAR) as this is the wavelength range of light which is utilized by plants for photosynthesis. This is an important measurement which can help in understanding the light availability and utilization in plants. This measurement can be critical in intensive cropping systems such as greenhouses where artificial lighting systems are used. The data from these sensors can be used to monitor and control the lightning systems and understand the light distribution in a greenhouse environment.
This sensor produces a micro amp-level current output (5 μA to 10 μA per 1000 μmol s-1 m-2), which requires a data logger with a high resolution to capture the small changes in light levels. In most greenhouses, multiple light sensors must be deployed across a bigger area, which requires pulling cables across longer distances or having to deploy multiple logging systems, and could make the data collection procedure cumbersome and expensive. In this tech tip, a cost-effective solution is proposed based on the Particle platform. Particle is a company that manufactures cost-effective microcontroller boards and provides a cloud-based platform for monitoring and controlling the microcontroller.
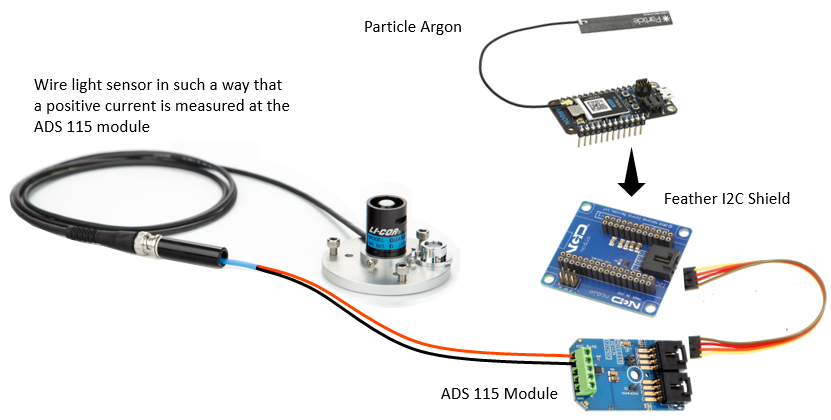
The microcontroller used in this tech tip is the Argon Wi-Fi Development Board, which has built-in Bluetooth and wireless networking. The data collected from the microcontroller board is then posted directly to a Google sheet using the webhook feature provided by the Particle ecosystem. Since the Particle board analog inputs have limited resolution (10 bit, an A/D converter ADS1115 is used to get the PAR data with enough resolution. The ADS 1115 is a 16-bit analog-to-digital converter with a programmable gain amplifier. This converter with the highest amplification setting can measure in the range of ±0.256 V, resulting in an LSB (least significant bit or the smallest value the ADC can covert) of 7.812 µV. Most light sensors have an output in the range of 5-10 micro amps per 1000 µmol m-2 s-1, which translates to an output range of 3 to 6 µV per 1 µmol m-2 s-1 of PAR when using the 604-ohm millivolt adapter. So depending upon the calibration coefficients of the sensor, the smallest value of PAR you can resolve with the ADS 1115 and the Particle board or any similar microcontroller is in the range from 2.06 to 1.30 µmol m-2 s-1. This is enough for most measurements unless you are trying to quantify low level lights such as moonlight.
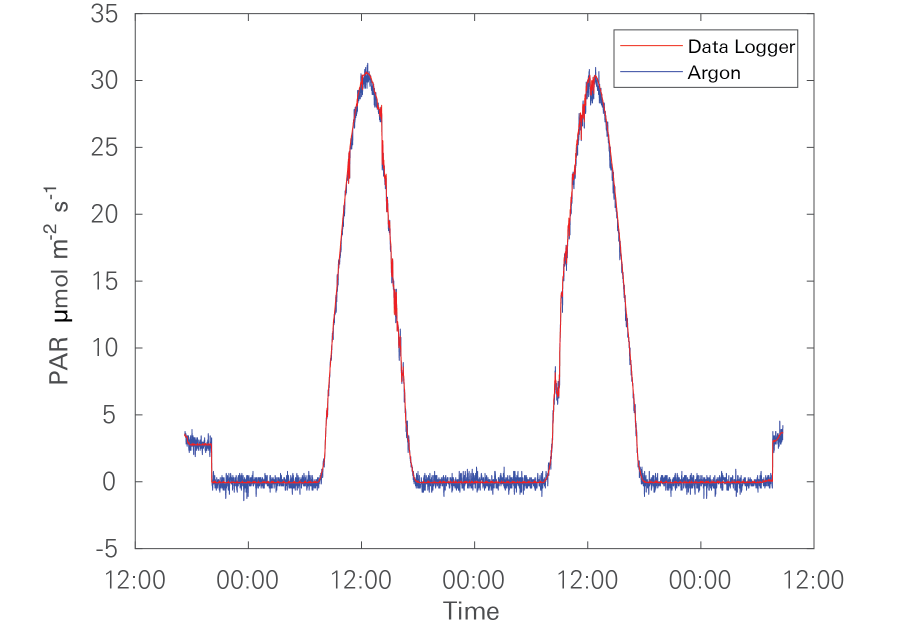
Figure 1 shows a comparison of light from two sensors measured with the ADS 1115 and the microcontroller in parallel with a 24-bit data logger under indoor conditions. The sensor was sampled at 5 second intervals (One-minute averages shown).
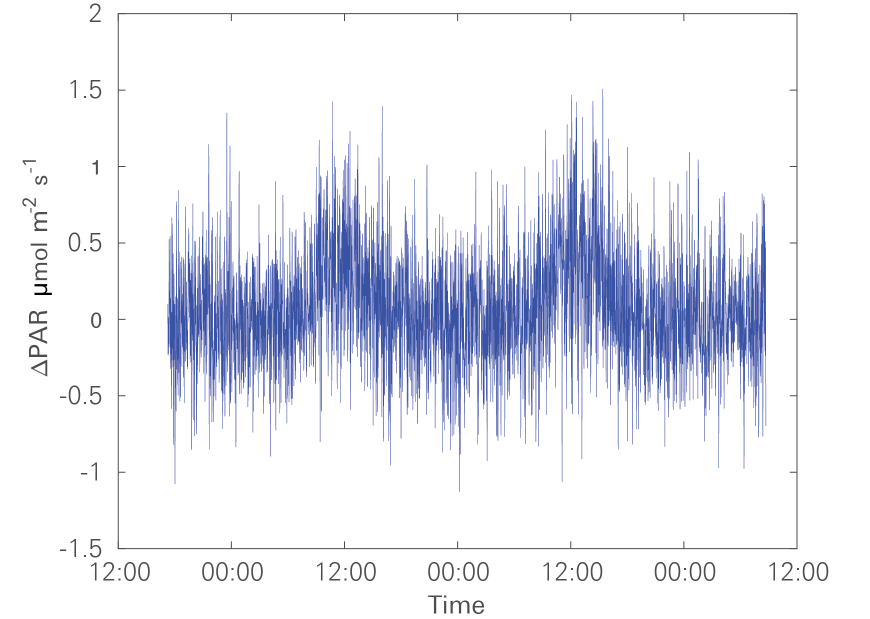
The differences between the expected value collect by the data logger and the values collected by the data logger is also plotted (Figure 2). The values from the microcontrollers are a little bit noisier than what is measured by the logger. The differences observed are within the 2 µmol m-2 s-1.
Materials
The components were selected for ease of use and to enable easy connectivity without any soldering. Hence, shields which enable easy connectivity and connectorized modules were used. Links are also provided for the vendors from which these components were procured.
- Particle Argon: store.particle.io/products/argon
- ADS 1115 16 bit ADC: store.ncd.io/product/ads1115-16-bit-4-channel-precision-analog-to-digital-converter-i2c-mini-module/
- Feather I2C shield for Particle and Feather modules: store.ncd.io/product/feather-i2c-shield-for-particle-and-feather-modules/
The light sensor connected with the millivolt adapter is plugged into the A/D converter in such a way that a positive voltage is measured at the A/D converter.
The Particle Argon has built in circuitry for connecting a 3.7 V lithium ion battery with a JST-PH 2-position 2-mm connector. Since most of the power consumption is required to keep the Wi-Fi on, reducing the data collection interval and switching on the Wi-Fi connectivity only to post the data can improve battery life. A 2Ah 3.7 V lithium battery can run a Particle Argon with the Wi-Fi on all the time and sampling every 5 seconds and pushing data to the cloud for 1.5 to 2 days. It is possible to power these devices with power banks, but since they consume very low power, the power banks need to support low power charging mode.
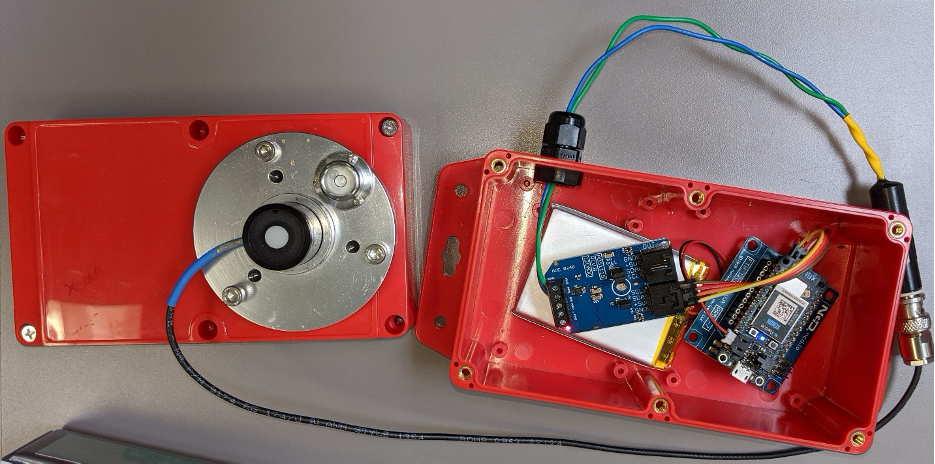
The entire setup can be incorporated into a weatherproof box and it can be deployed outdoors or in a greenhouse environment. The BNC connector is not water proof, so ensure that it is adequately protected from moisture in outdoor deployment.
Coding
In this tech tip the hardware must be first configured to talk with the Particle cloud. For this you will have to create an account with Particle and add the devices to your account.
More information on configuring an Argon board can be found here: docs.particle.io/quickstart/argon/
Particle microcontroller programming
The code for interacting with the Particle microcontrollers and collecting the data and publishing it has to be either programmed via the Particle Workbench (docs.particle.io/tutorials/developer-tools/workbench/) or via the cloud Particle interface provided by Particle (docs.particle.io/tutorials/developer-tools/build/).
To configure and read the ADS-1115 analog-to-digital converter, specific libraries are needed. The libraries used in this tech tip were obtained from the public GitHub repository github.com/jrowberg/i2cdevlib. The specific files are the ADS1115.cpp, ADS1115.h from github.com/jrowberg/i2cdevlib/tree/master/Arduino/ADS1115, along with I2Cdev.cpp and I2Cdev.h from github.com/jrowberg/i2cdevlib/tree/master/Arduino/I2Cdev.
These libraries are meant for use with the Arduino boards. To make them compatible with the Particle boards, you will have to add the line #include “application.h” in both the ADS1115.cpp and I2Cdev.cpp files.
Alternatively, all the files used in this project are available as a zipped folder from licor.app.boxenterprise.net/s/00dnh31xu0wrkvtteizw5yu30vlxftji.
If you are using the Particle work bench, you will have to download these files and add them to the project by putting the files in the project folder. If you are working with the Particle Web IDE, then you will have to add these additional libraries manually, by using the plus button on the upper right-hand corner of the screen in the Web IDE. The code is heavily commented, but a few details of the code are provided below.
- Single shot sampling us used in the code to reduce the power consumption as this enables the device to wake up do the measurement and then go back to sleep (Power consumption in sleep mode is 0.5 µA).
- Differential measurement is made on the sensor to reduce noise.
- To reduce the noise the samples are taken at the lowest sampling rate of 8SPS.
- The code samples the sensor every 5 seconds and the sampling loop runs 12 times with a delay of 5 seconds to end up with 1-minute averages of the data. This loop can be adjusted to get the required averages.
// This #include statement was automatically added by the Particle IDE.
#include "I2Cdev.h"
// This #include statement was automatically added by the Particle IDE.
#include "ADS1115.h"
// This #include statement was automatically added by the Particle IDE.
#include "I2Cdev.h"
// This #include statement was automatically added by the Particle IDE.
#include "ADS1115.h"
ADS1115 adc0(ADS1115_DEFAULT_ADDRESS);
char payload[128];
char msg[64];
double pavg = 0.0000;
String tstmp;
float battv = 0.00;
void init_ads1115() {
Serial.println("Testing device connections...");
Serial.println(adc0.testConnection() ? "ADS1115 connection successful" : "ADS1115 connection failed");
adc0.initialize(); // initialize ADS1115 16 bit A/D chip
adc0.setMode(ADS1115_MODE_SINGLESHOT); //single shot sampling
adc0.setRate(ADS1115_RATE_8); // sample at 8 sps
}
void setup() {
Wire.begin();
Serial.begin(9600); // initialize serial communication
init_ads1115(); // initialize the A/D convertor
Time.zone(-6.0);
// Particle.keepAlive(20); // this is to keep the wifi connection alive
waitUntil(Particle.connected); //Wait for connection to particle cloud
Particle.variable("par", pavg);
pinMode(BATT, INPUT);
}
void loop() {
double data = 0.0000;
for (int i=0; i<12; i++) {
adc0.setMultiplexer(ADS1115_MUX_P1_NG);
adc0.setGain(ADS1115_PGA_0P256);
adc0.getConversionP0N1();
data += adc0.getMilliVolts(false)*240.33; //getting serial data and applying multiplier
delay(5000);
}
pavg = data/12;
tstmp = Time.format(Time.now(), "%Y-%m-%d %H:%M:%S");
Serial.print(tstmp); Serial.print("\t");
Serial.print("PAR :" ); Serial.print(pavg);
Serial.println();
float battv = analogRead(BATT) * 0.0011224;
snprintf(payload, sizeof(payload),"{\"tstmp\":\"" +tstmp +"\",\"par\":%4.2f\,\"battv1\":%4.2f}",pavg,battv);
Serial.print (payload);
Serial.println();
if (Particle.connected() == true) {
Serial.println("Online Now Publishing");
Particle.publish("par",payload,PRIVATE);
}
else{
Serial.println("Particle offline-trying to reconnect and publish");
Particle.connect();
Particle.publish("par",payload,PRIVATE);
}
}Web hook integration with Google sheets
The Particle ecosystem allows for webhooks, which are a simple flexible way to send data from the Particle device to other apps and services which can be accessed online. For more information, see docs.particle.io/tutorials/device-cloud/webhooks/
The webhook is triggered by a Particle event and in this case the Particle variable par which when published triggers the webhook.
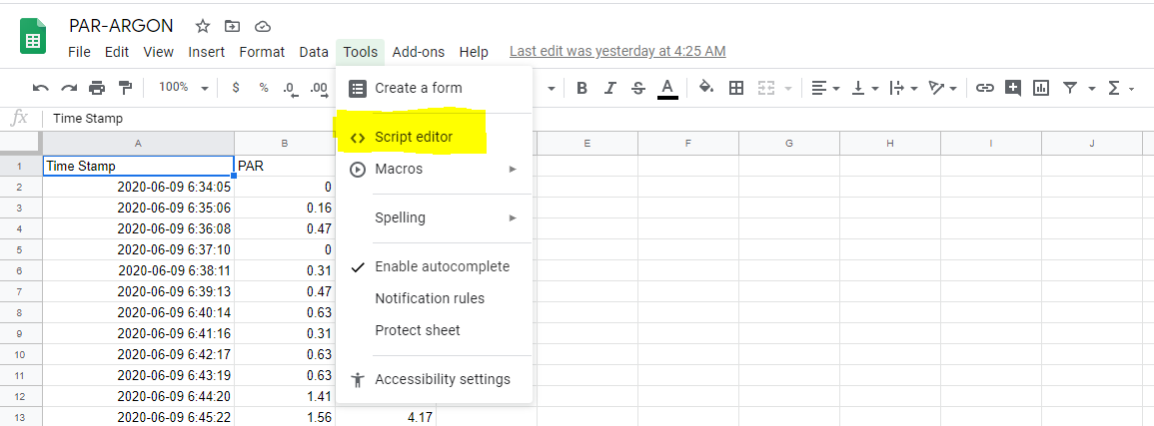
To set this up, first set up a Google sheet where the data will be posted. The sheet can be saved and header lines added to it for the various columns of data which are going to be posted. Once the sheet is set up, go to Tools and open the script editor.
In the script editor, you will have to enter some code to parse the data which is coming in from the Particle Argon we set up previously. The code used in this tech tip can copied below.
function doPost(e) {
//Delete Undefined
var sheet = SpreadsheetApp.getActiveSheet();
var r = sheet.getRange('A:A');
var v = r.getValues();
for(var i=v.length-1;i>=0;i--)
if(v[0,i]=='undefined'){
sheet.deleteRow(i+1);
}
//Return if null
if( e === undefined ) {
SpreadsheetApp.flush();
return HtmlService.createHtmlOutput("need data");
}
else
{
//Parse the JSON data
var event = JSON.parse(e.postData.contents);
var data = JSON.parse(event.data);
//Get the last row without data
var lastRow = Math.max(sheet.getLastRow(),1);
sheet.insertRowAfter(lastRow);
//Insert the data into the sheet
if (event !== undefined) {
sheet.getRange(lastRow + 1, 1).setValue(data.tstmp);
sheet.getRange(lastRow + 1, 2).setValue(data.par);
sheet.getRange(lastRow + 1, 3).setValue(data.battv1);
}
SpreadsheetApp.flush();
return HtmlService.createHtmlOutput("Data Posted");The Argon is going to publish the data as a .json string which must be parsed out so that the PAR value and the battery voltage of the system can be put into appropriate columns. There is also some code to remove rows that may have undefined values.
You can copy and paste the code and save it. Once the code is saved, you will need to publish it using the Publish button in the menu.
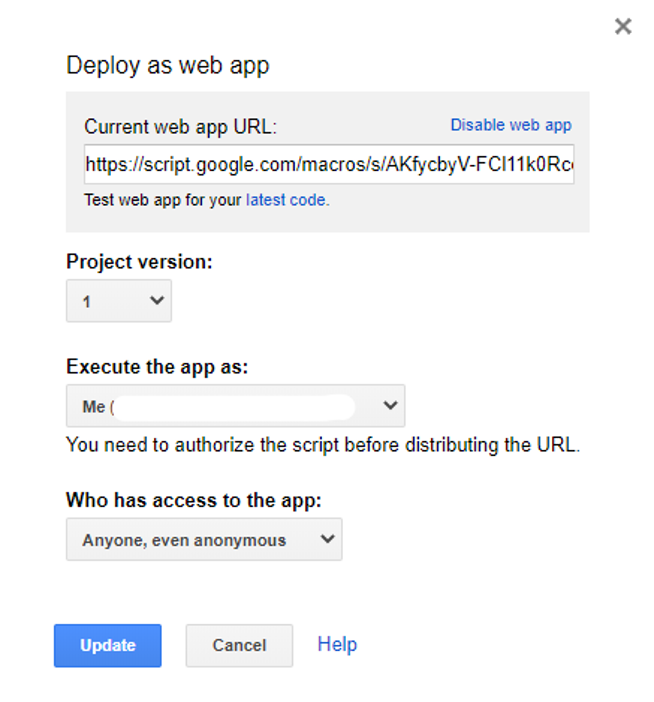
Make sure you give permission is given for Anyone, even anonymous to access the app, so that the Particle console can insert data into the Google sheet. The web app URL is needed for setting up the webhook in the Particle integration section.
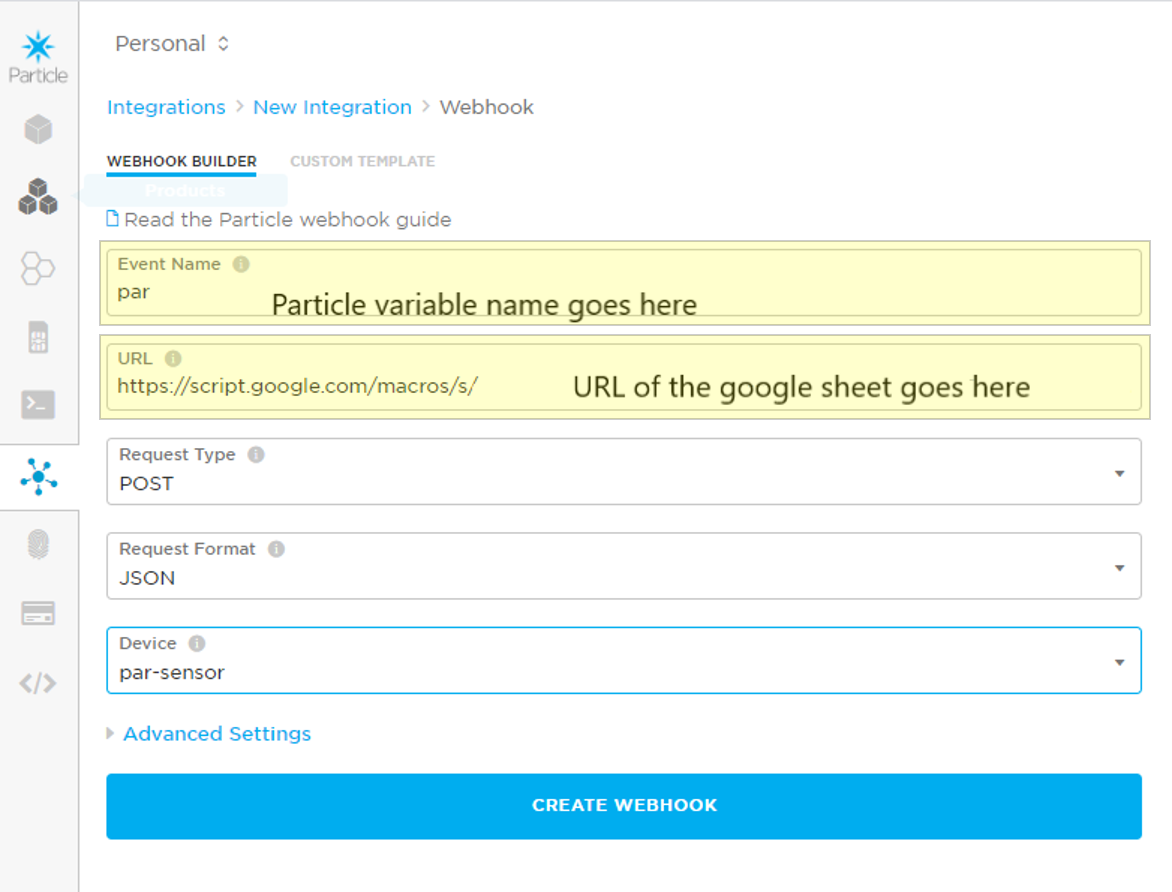
In the Particle console, click on the integration icon, click new integration and select the webhook option. You can use the webhook builder and fill up the information as shown above.
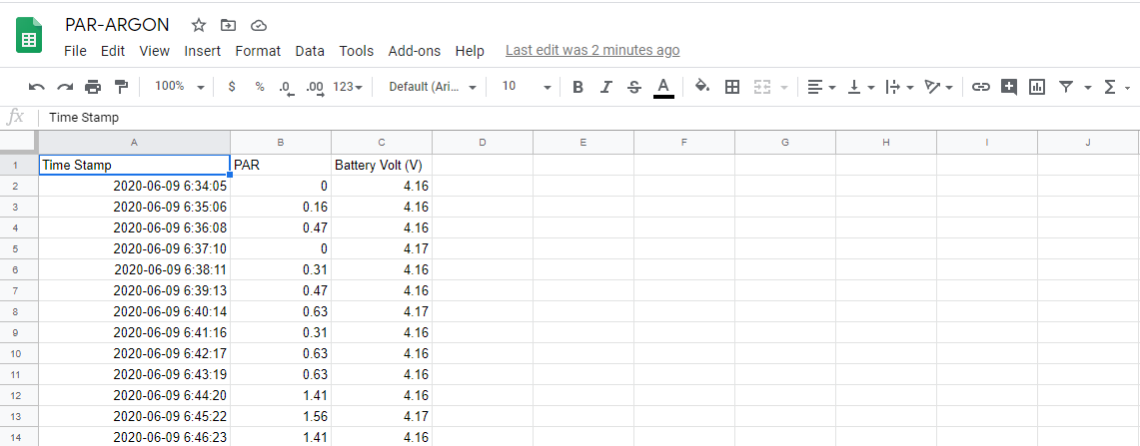
Here is a screen shot of the Google sheet where the data from the PAR sensor is populated.
It is possible to use other cloud based IOT platforms for integrating data from the Particle Argon using protocols such as MQTT. Some libraries are available from public platforms such as this one (github.com/hirotakaster/MQTT) that pushes .json-formatted messages to cloud IoT/MQTT servers.
Cloud IoT platforms like Ubidots (ubidots.com) also offer their MQTT library for pushing data from the Particle ecosystem to their platform (ubidots.com/docs/devices/particleMQTT.html).