Tips for wireless sensors
If you are using wireless sensors with your station, you can monitor their battery levels and network connectivity to make sure data is being transmitted across the network to the station as expected.
Checking sensor battery power
There are two ways to check the remaining battery power:
-
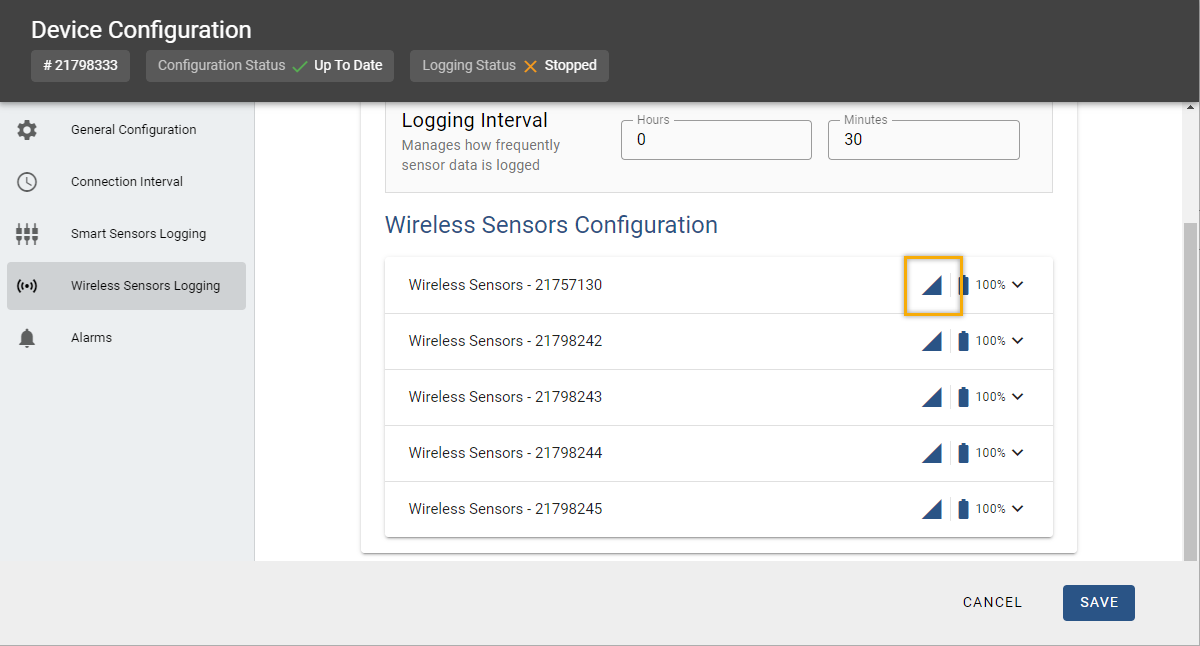
Click Devices, locate the tile for the station the sensor is connected to, then click the wrench icon on that tile. Click the Wireless Sensors Logging tab. Locate the sensor under Wireless Sensors Configuration and check percentage value next to the battery for the wireless sensor.

-
Click Devices, then Map View, and click a sensor to see the percentage of battery power remaining.
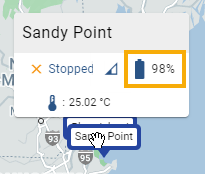
Sensors with rechargeable batteries require regular sunlight to remain charged. If the remaining battery percentage for a sensor is regularly lower than expected, you may need to readjust it so that the built-in solar panel receives optimal sunlight. You may also need to adjust the sensor's position periodically as the path of the sunlight changes throughout the year or if tree and leaf growth alters the amount of sunlight reaching the solar panel. Older rechargeable batteries eventually lose their charge and must be replaced.
If the sensor has non-rechargeable batteries, monitor the remaining power and replace the batteries when it gets low (under 10 percent).
Note: Enable a Low Battery System Alarm to alert you when there is a low battery condition on one of your sensors.
Monitoring network connectivity
There are two ways to check network connectivity:
-
Click Devices, locate the tile for the station the sensor is connected to, then click the wrench icon on that tile. Click the Wireless Sensors Logging tab. Locate the sensor under Wireless Sensors Configuration and check the wireless icon for the wireless sensor.
-
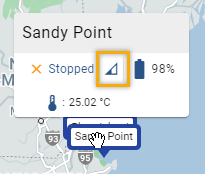
Click Devices, then Map View, and click a sensor to see the signal strength.
Follow these guidelines when network health is poor:
-
Make sure there is full line-of-sight between sensors because obstructions prevent reliable network communication. If the sensor is blocked by a small obstruction (e.g., a pole, the station, shrubbery), move the sensor to a location where there is a clear path to the nearest sensor. If there is a change in elevation between sensors or a large obstruction is in the way (e.g., a building or tree), either reposition the sensor until there is full line of sight to the next sensor or add a repeater between them.
-
If you move the sensor to a new position, check the signal strength on the sensor LCD in the new location. If there are only one or two bars on the signal strength indicator, look for a location where the signal strength is stronger.
-
Ensure the sensor is mounted vertically a minimum of 1.8 m (6 ft) above the ground or vegetation to help maximize distance and signal strength. Consider using plastic poles such as PVC to mount the sensor, as certain types of metal could decrease signal strength.
-
There should not be more than five sensors in any direction at their maximum transmission range from the station. Data logged by a wireless sensor must travel or “hop” across the wireless network from one sensor to the next until it ultimately reaches the manager at the station. To make sure that data can successfully travel across the network, the sensor should not be more than five hops away from the station.
-
For optimal network health, consider placing several sensors within range of each other to provide multiple paths for transmission of data if one sensor is temporarily unavailable.
What happens when a sensor goes offline?
If a sensor is temporarily offline, it saves any logged data until it is back online. In addition, if a sensor is offline for 30 minutes, the station automatically connects to LI-COR Cloud and trips a system alarm to report the sensor as missing. A sensor can go offline if there is not enough battery power, it loses its wireless signal, or another error occurs. If a sensor is offline longer than expected, check it and make any adjustments as described in the previous two sections. Once the sensor is back online, it enters a period of data recovery, during which all the data that were logged while the sensor was offline is uploaded to LI-COR Cloud. When a sensor is in data recovery mode, sensor data for that sensor is temporarily unavailable for data delivery, data feeds, and dashboards. New data are also uploaded to LI-COR Cloud at the same time so there may be readings reported from the last connection on the device overview page even though all older data are still being processed.
Any sensor alarms that should have tripped while the sensor was offline are added to the alarms log for the station, but no notifications are sent because the alarm condition may no longer be in effect. Any alarms that trip for newly logged data result in notifications, but do not appear in dashboards until data recovery is complete.
In addition, an event is recorded in the station connections log every time a sensor enters and exits data recovery mode. To check the log:
-
Under Devices, click the tile for the station, and click Logs.
-
Use the menu at the top of the page to filter the log.