
Connecting with remote instruments
If the RV50X configuration and data plan both support two-way communication, you can change the settings of each instrument in the system.
Connecting to the LI-7500A/RS/DS or LI-7200/RS
To connect to an LI-7500A/RS/DS or LI-7200/RS that is behind the gateway:
- On a computer that has internet access, launch the gas analyzer PC software (win-GHG).
-

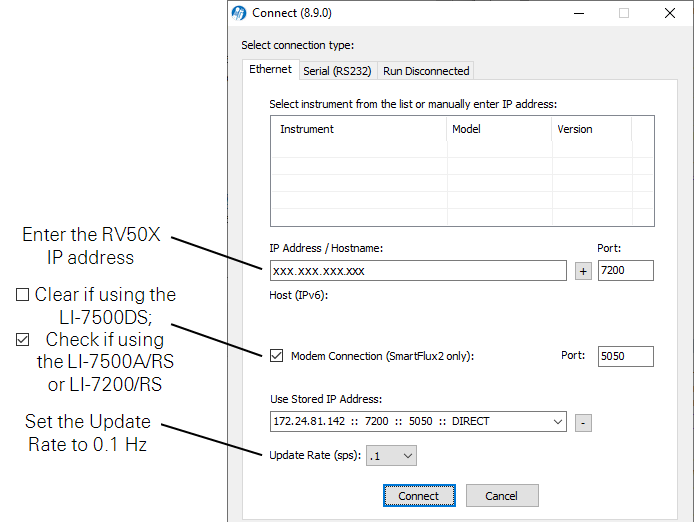
- Enter the gateway IP address of the RV50X gateway.
- The port is 7200 for the LI-7500A/RS/DS or LI-7200/RS analyzers.
-
- If the RV50X has a Static IP address, simply type it in (see The RV50X IP address).
- If the RV50X has a Dynamic IP address, retrieve the IP address from the DDNS service provider and enter it.
- Set the update rate to 0.1 Hz to reduce the amount of data transferred and click Connect.
- After connecting to the instrument you can check the performance and modify the configuration as you normally would, or manage logged data as described in Eddy covariance file management and data transfer.
Eddy covariance file management and data transfer
The Download utility allows you download and delete files that are stored on the SmartFlux System USB drive. You can access the files remotely, so long as you can connect to your instrument over a network that supports two-way communication. Click the Download button to launch the tool. Enter the IP Address for RV50X (see The RV50X IP address), port 7222, Password (default password is licor), and click Verify Connection.
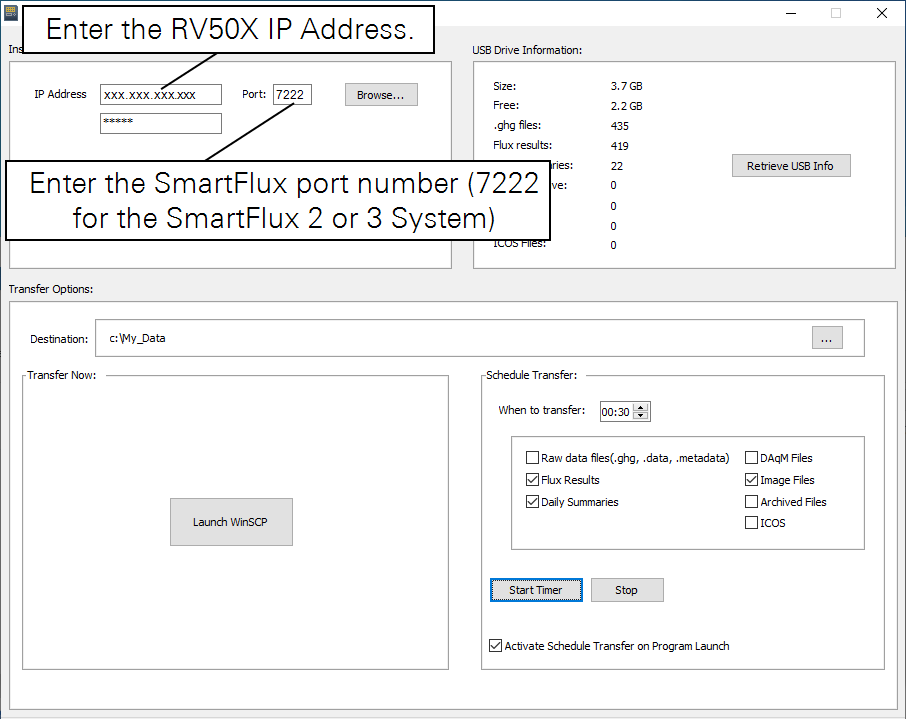
The application should automatically connect to the instrument, but if it doesn't, click Browse to view a list of instruments on the network. Select the instrument, click OK, enter the password (licor) and click Verify Connection. You may need to set the port if you are connecting with a cellular or satellite gateway. If your instrument is not listed, type the IP address into the IP Address field. Set the Port to the same number that you have opened in the RV50X software.
USB Drive Information displays the size of the USB drive, available memory, number of each type of file.
Transfer Options are used to configure settings and other features:
- Transfer Now will allow you to use WinSCP to transfer files. WinSCP is a free file transfer application that can be installed as part of the win-GHG application. Click Launch WinSCP to open the application.
- Destination: This is where the transferred files will be saved. Ideally, this will be a directory on your computer. If you are transferring files to a server or cloud-based service such as a Dropbox, this is configured in the SmartFlux section of the application.
- Schedule Transfer: This section allow you to configure automatic file downloads to a computer.
- When to transfer: You can Transfer files daily at a scheduled time.
- You can close the application to your system tray (close it, but choose No) so it continues running in the background. Also be sure your computer does not go to sleep before the scheduled transfer. You may need to re-start the automatic download service if your computer is shut down and re-started.
- Files to transfer: Select any or all file types to transfer data files (you must select a file type before files are displayed). When you check a box, a corresponding tab is added to the box on the right. Here you can choose to download specific files or all of them.
- After configuring the transfer and selecting files, click Start Timer and allow the application to run in the background so it can download files as scheduled.
Tips for the Scheduled Download utility:
- If the utility is already running, open it from your system tray rather than starting another instance of it.
- Set the download to begin at 00:15 (12:15 am) if you are using the SmartFlux System. That way all the logged files for the previous day will be processed before the download begins.
- Close the application to your system tray to keep it running in the background. Be sure the computer that runs the application is on and not in power saver mode.

Connecting to the LI-7700
This section describes how to connect with the LI-7700 from a computer with Internet access. You will find this useful if you want to review the performance of the instrument or alter the configuration.
- On a computer that has Internet access, launch the LI-7700 configuration software.
- Click the Connect button and select Ethernet.
- In the Select Instrument: field, enter the IP address of the RV50X.
-
- If the RV50X has a Static IP address, simply type it in (see The RV50X IP address).
- If the RV50X has a Dynamic IP address, retrieve the IP address from the DDNS service provider and type it in.

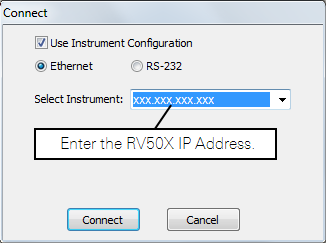
- Click Connect.
After connecting to the instrument you can check the performance and modify the configuration as you normally would.
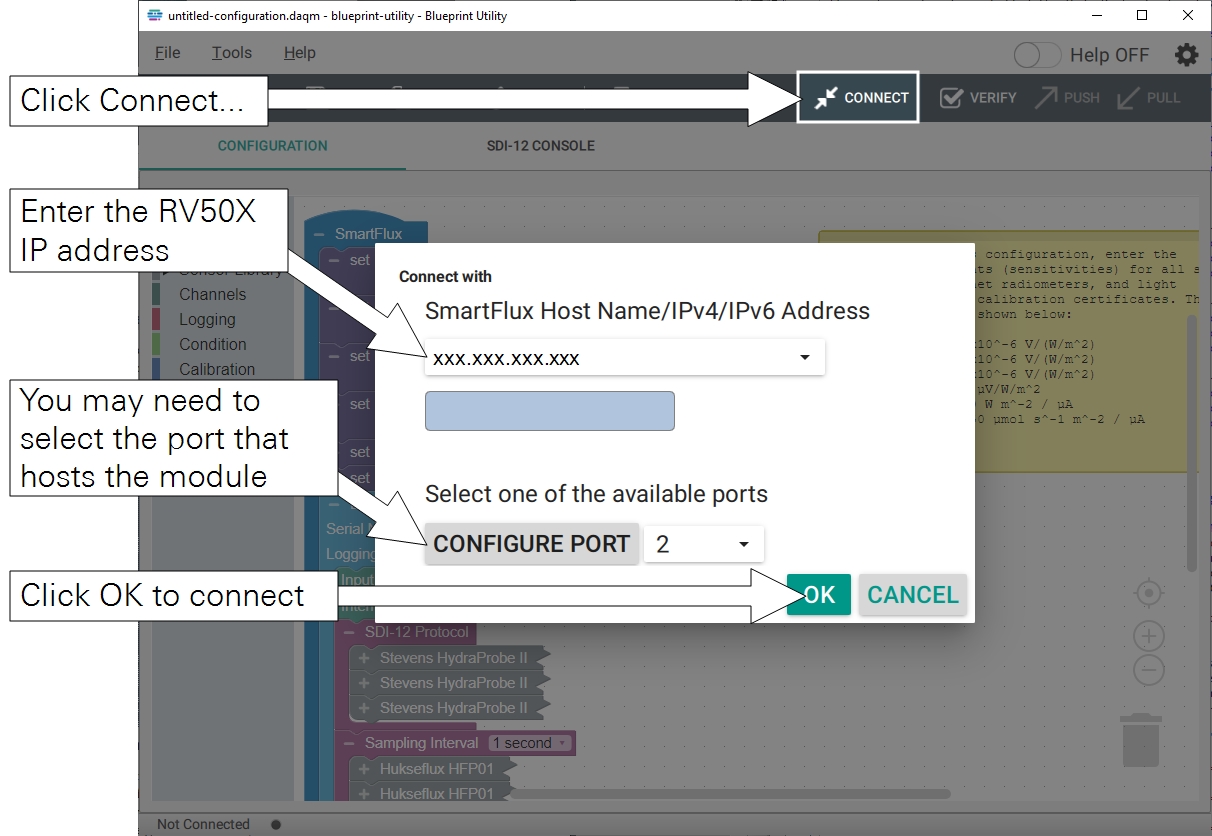
Connecting to a LI-COR Biomet Data Acquisition System
To connect with the LI-COR data acquisition system with the Blueprint Utility:
- On an internet-connected computer, launch the Blueprint Utility.
- Enter the IP address for the RV50X that hosts the Data Acquisition System.
- Click OK to connect.
Connecting to the LI-8250
To connect with the LI-8250 that is behind the cellular gateway:
- Open a web browser.
- Type the RV50X IP address into the address bar, followed by a colon and the Private Start Port.
- It will take a format similar to this: xxx.xxx.xxx.xxx:8200
- Press Enter to connect.
Connecting to an LI-78xx Trace Gas Analyzer
To connect with the LI-78xx that is behind the cellular gateway:
- Open a web browser.
- Type the RV50X IP address into the address bar, followed by a colon and the Private Start Port.
-
- For the LI-7810, enter xxx.xxx.xxx.xxx:7810
- For the LI-7815, enter xxx.xxx.xxx.xxx:7815
- For the LI-7820, enter xxx.xxx.xxx.xxx:7820
- For the LI-7825, enter xxx.xxx.xxx.xxx:7825
- Press Enter to connect.
Connecting to the PhenoCam
To connect directly to the PhenoCam:
- Open a web browser.
- Type the RV50X IP address into the address bar, followed by a colon and the Private Start Port.
- It will take a format similar to this: xxx.xxx.xxx.xxx:7980
- Press Enter to connect.
Connecting to the biomet system (Sutron logger)
This section describes how to connect with the Biomet System (Sutron logger) from a computer with Internet access. You will find this useful if you want to retrieve data, review the performance of the system, or alter the configuration. You will need to open port 23 on the RV50X, as described in Configuring IP addresses and ports ).
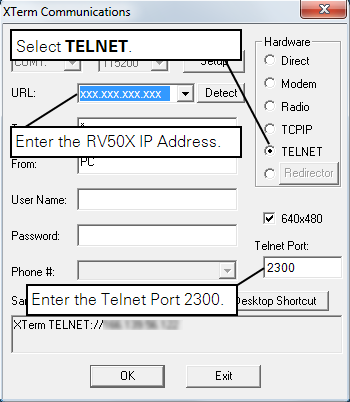
- On a computer that has Internet access, launch the Sutron XTerm configuration software.
- Select TELNET from the Hardware field, then enter the RV50X IP address as the URL. Click OK.
-
- If the RV50X has a Static IP address, simply type it in (seeThe RV50X IP address).
- If the RV50X has a Dynamic IP address, retrieve the IP address from the DDNS service provider and type it in.
- Change the Telnet Port to 2300.
Note on Internet Security: The Telnet port (23) used by the 9210B datalogger is unsecured. Information transferred over this port is unencrypted and can be intercepted. If you leave this port open, your system may be vulnerable to hackers. Therefore, we recommend that you only open port 23 if and when you need direct access to the 9210B datalogger, and that you close the port after you have finished. To close the port, click the  button.
After connecting to the instrument you can check the performance and modify the configuration as you normally would.
Connecting to the LI-8100A system
If the RV50X is configured to support two-way communication you can change the settings of the LI-8100A remotely.
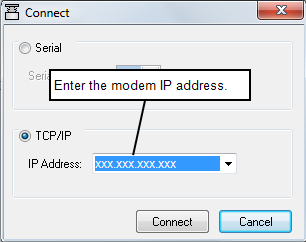
- On a computer that has Internet access, launch the LI-8100A configuration software and click the Connect button.
-

- Select TCP/IP, enter the RV50X IP Address, and click Connect.
-
- If the RV50X has a Static IP address, simply type it in (see The RV50X IP address).
- If the RV50X has a Dynamic IP address, retrieve the IP address from a DDNS service provider and enter it.
After connecting to the instrument you can check the performance and modify the configuration as you normally would.
LI-8100A data management and file transfer
The LI-8100A software has a built-in file manager that you can use to copy files to your computer.
- Connect with the LI-8100A.
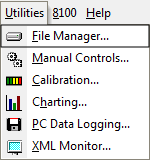
- Launch the File Manager (Utilities > File Manager).
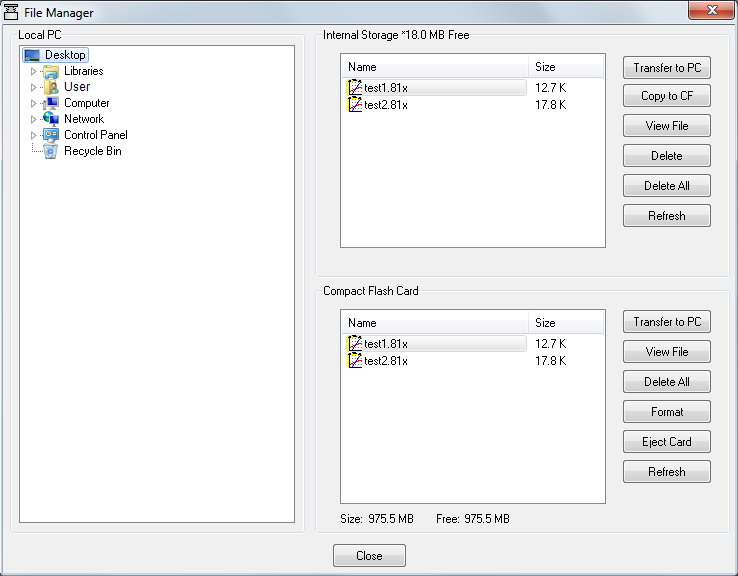
- The Local PC panel on the left displays the file directories on your computer. The Internal Storage panel on the upper right displays the LI-8100A data files currently stored on the LI-8100A internal flash memory and the free memory available. The Compact Flash Card panel on the lower right shows the files stored and memory available on the compact flash card (if it is installed).
- Move files from the LI-8100A.
- Select the file you want to transfer and select Transfer to PC or Copy to CF. When Transfer to PC is selected, the file(s) will be transferred to the selected destination in the Local PC panel.
- or
- Drag and drop the file(s) you want to transfer.
Some useful keyboard shortcuts: Most of the common keyboard shortcuts can be used when selecting and/or moving files in the LI-8100A directory list. For example, press CTRL + A to select all files, Shift + click to select a range of files, or CTRL + click to select multiple files individually. You can also ‘drag and drop’ selected files to a PC destination or to the Compact Flash card.
Copying files from internal storage…
Click the Transfer to PC button to move the highlighted file(s). When you are finished moving files, you can delete selected files or all files by clicking Delete or Delete All, respectively. Click Refresh to update the file list. Click Copy to CF to move the selected files to the compact flash card. Click View File to open the entire file in a new text window. You can also drag and drop files to/from the internal storage.
Files generated by the LI-8100A are denoted with a .81x file extension, and contain all of the raw data records and summaries.
Copying files from the compact flash card…
Click on Format to format the compact flash card. Note that all files on the card will be deleted. Click the Transfer to PC button to move the highlighted file(s). When you are finished moving files, you can delete all files by clicking Delete All. Click View File to open the entire file in a new text window. Click Eject Card to unmount the compact flash card and safely remove from the instrument. Click Refresh to update the file list.