
Configuring the RV50X
Note: Sometimes networked cellular devices take a few minutes to finish booting and to establish communications. If the devices seem unresponsive, wait a few minutes and try again.
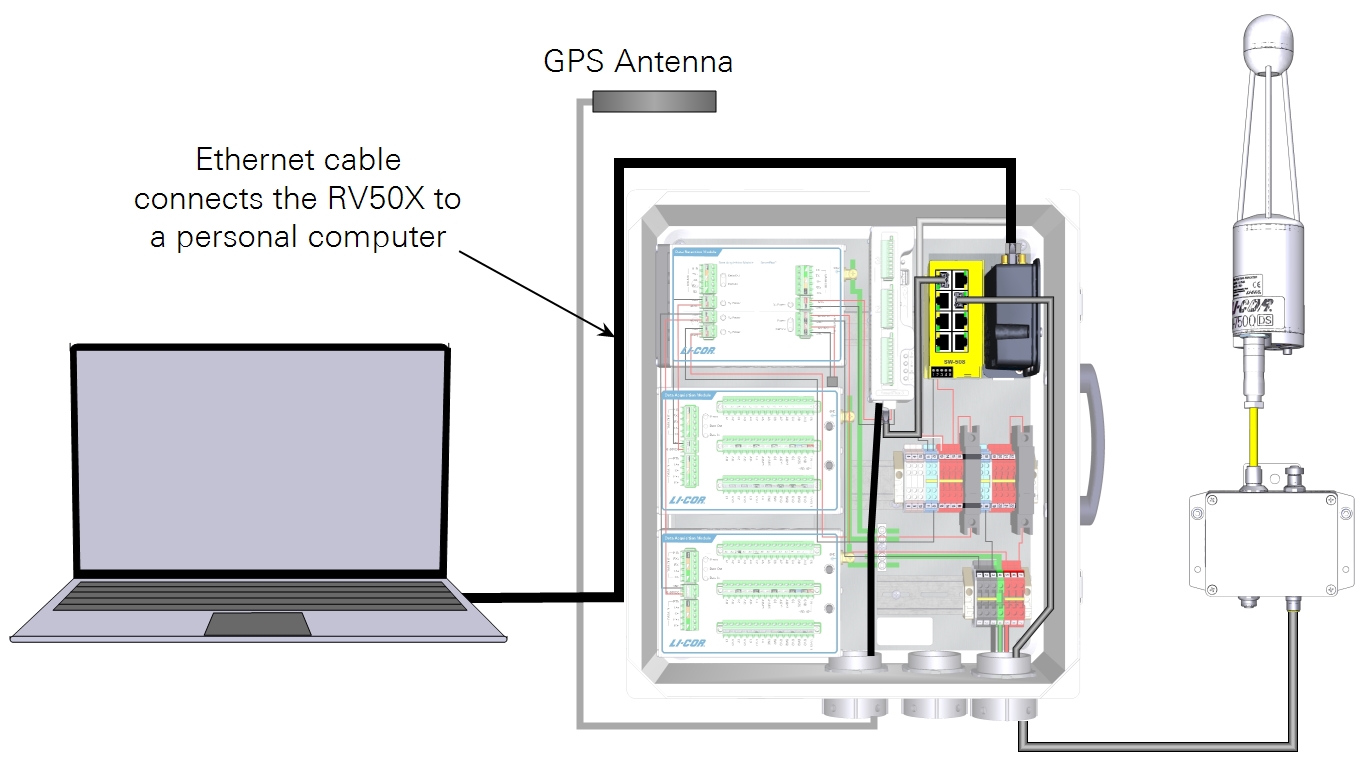
Connect the RV50X Ethernet cable to a computer
Connect the RV50X to a computer with an Ethernet cable and power it on. Do not connect it to the network switch yet. At this point, it doesn't matter if other components are powered on.
Logging in to ACEmanager™
If you have trouble connecting to ACEmanager™, refresh the window (press F5) or try a different web browser. Firefox, Google Chrome, and Microsoft Edge all seem to work well. Use a PC that is directly connected to the RV50X network port or to an unmanaged network switch.
- Open an internet browser and enter http://192.168.13.31:9191 in the address bar.
- Note: If you cannot connect using http and port 9191, use https and port 9443 (type https://192.168.13.31:9443 in the address bar). The browser may warn you about the page being not secure, but you can bypass this warning and proceed to access the modem.
- This will connect to the RV50X with the ACEmanager™ interface.
- Enter the default user name and password. The user name is user.
Devices that support unique passwords have the default password printed on the label. For other devices, the default password is 12345.
Caution: Check the Sierra Wireless website for updated product information. Update the embedded software any time updates are available.
Changing the RV50X password
The RV50X has a default user name of user. Devices that support unique passwords have the default password printed on the label. For other devices, the default password is 12345. You should change the password to make your system less vulnerable to hackers. To change the password:
- Click Admin > Change Password.

- Enter the old password and new password.
- Click Change Password and then restart the RV50X.
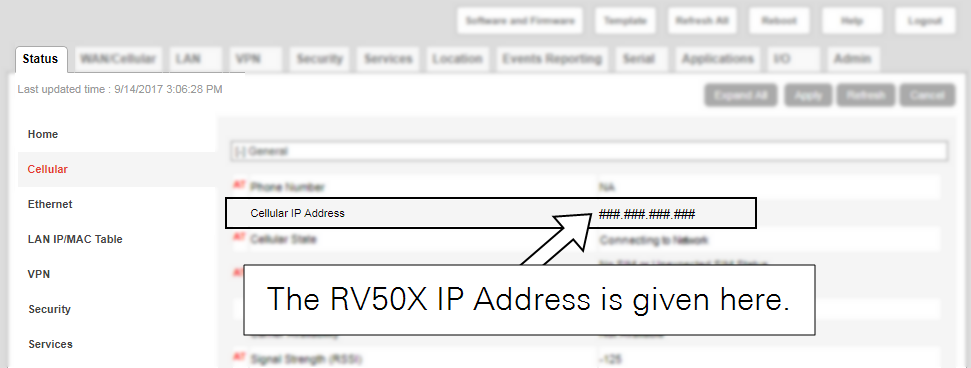
The RV50X IP address
You must know the RV50X IP address in order to connect with the system and any connected device. The RV50X will have either a public static IP address (recommended) or a public dynamic IP address.
When your computer is connected to the RV50X and you are logged in, you can view the RV50X IP address under Status > Cellular > Cellular IP Address (see Figure 3‑1).
Loading the LI-COR configuration template
Two configuration files are available that apply some settings on the RV50X. One file is for systems that include the LI-7500A/RS or LI-7200/RS with the SmartFlux 2 System. The other is for systems that include the LI-7500DS with the SmartFlux 3 System. Both files support the LI-7700, LI-8100A, LI-8250, LI-78xx Trace Gas Analyzers, the LI-COR Data Acquisition System, and several models of data loggers.
Caution: Do not alter settings other than those described here unless in consultation with an Internet Service Provider or LI-COR technical support.
Note: The Override APN feature can be used in cases where the APN provided by the service provider must be changed due to the connection type. For example the T-Mobile default APN setting is fast.t-mobile.com, but with a fixed public IP address you will enter b2b.static instead, as shown in Figure 3‑2.

-
Download the file to your computer.
- For the LI-7500DS and SmartFlux 3 System, use
sf3-rv50x-config.xml, available from https://licor.boxenterprise.net/s/k4bz349qeji8a0zn2k5q5hyebl8npph2. - For the LI-7500A/RS or LI-7200/RS and SmartFlux 2 System, use
sf2-rv50x-config.xml, available from https://licor.boxenterprise.net/s/m95jtn31mq6173qyipzss1dfb73mt67q.
- For the LI-7500DS and SmartFlux 3 System, use
-
Connect and log in as described above, then click Template and choose the template file.
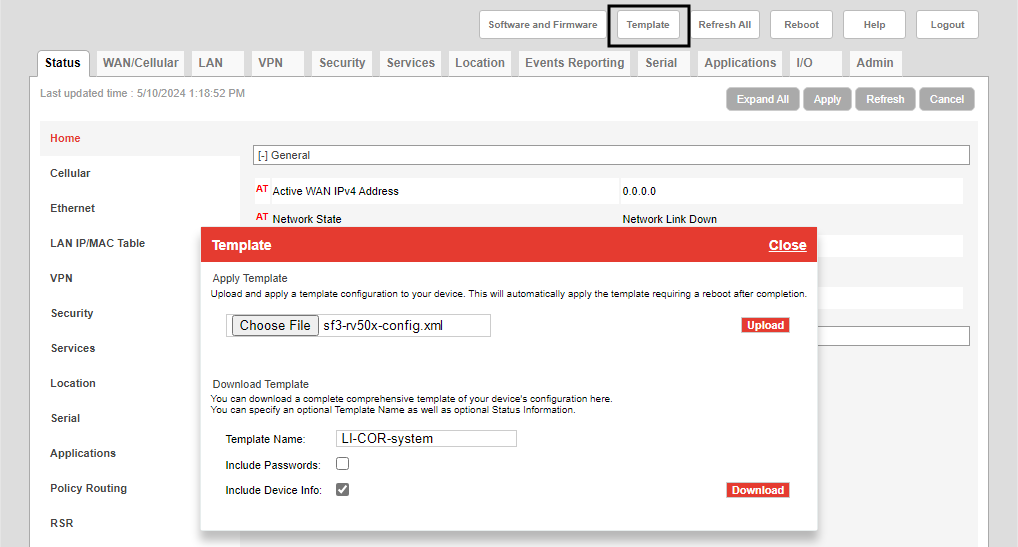
You can enter a template name, if desired.
-
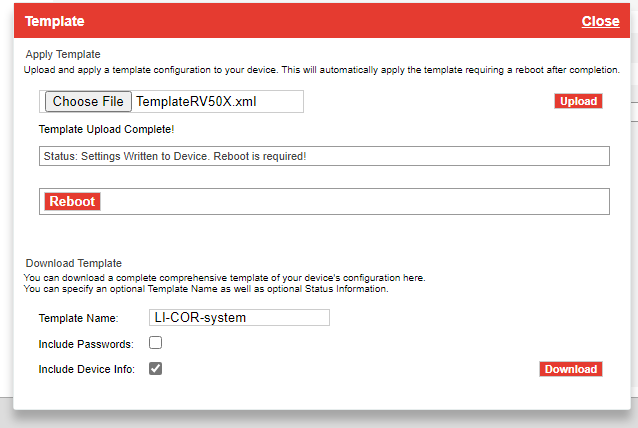
Click upload, and then reboot the RV50X when prompted.
-
After the RV50X restarts, reconnect and verify the configuration.
A variety of settings are applied by the template.
No additional steps are required since you have loaded the configuration file. Proceed to Configuring instrument IP addresses.
Creating your own configuration template
Follow these steps to compete a manual configuration. A manual configuration will apply the settings described in Loading the LI-COR configuration template.
Caution: Do not alter settings other than those described here unless in consultation with an Internet Service Provider or LI-COR technical support.
Configuring the access point name
Your service provider will provide you with an Access Point Name (APN) when you sign up for cellular service. If not, you may need to contact the provider and request the APN associated with your wireless account. The APN will either be configured automatically or it must be entered manually. To check and configure the APN:
-
Log into ACEmanager (see Logging in to ACEmanager™).
-
Check the IP address.
Under Status > Cellular, the IP Address field will show the IP address (see Figure 3‑1). If it is 0.0.0.0 or anything other than your assigned IP address, follow these steps to set the APN.
-
Click the WAN/Cellular tab.
If you installed the card in slot 1 (see Installing the SIM card), select SIM Slot 1. The APN assigned by the service provider may already be shown beside APN In Use. If it is not, enter your assigned APN beside User Entered APN.
The Override APN feature can be used in cases where the APN provided by the service provider must be changed due to the connection type. For example the T-Mobile default APN setting is fast.t-mobile.com, but with a fixed public IP address you will enter b2b.static instead, as shown in Figure 3‑2.
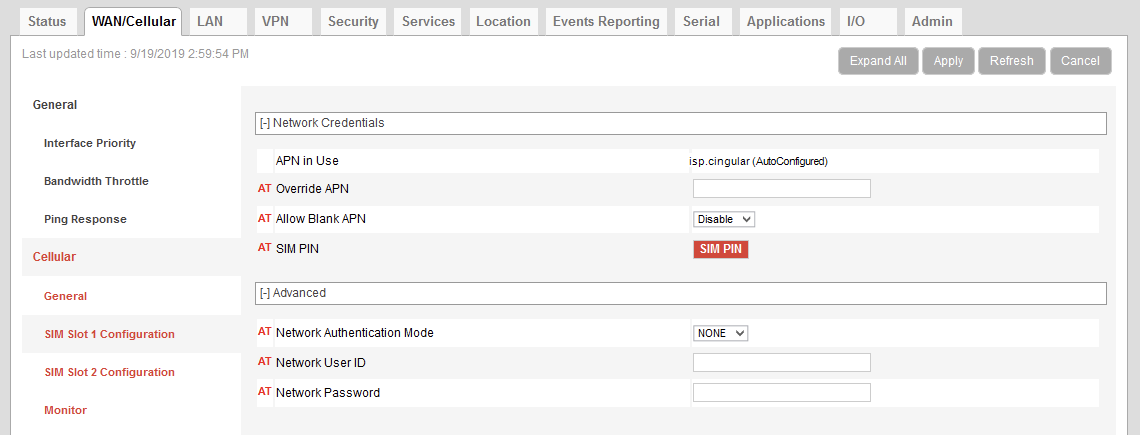
If the service provider also requires network authentication, on the same page, under Advanced, enter information for Network Authentication Mode, Network user ID, and Network Password.
-
Click Apply.
When prompted, Restart the device and log in again.
-
Repeat step 2 above and check the IP Address.
Look for your assigned IP address. It will be a numeric string of four octets (groups of three-digit numbers >0 and <255 like 192.168.13.100). It will take several minutes for the RV50X to collect all the needed information and establish a connection with the network—patience is a virtue in all things, and especially when configuring the RV50X.
-
Verify the connection.
If your IP address, APN, and phone number are displayed, the connection is configured properly.
Reserving an IP address range
It is useful to have an IP address range reserved so do not have to alter your computer's network settings when connecting. In doing so, you will be able to connect a computer that is configured for a dynamic IP address (assumed to be the common default setting) to the RV50X. It will be assigned an IP address by the RV50X when connecting.
The IP address range should not encompass the IP addresses assigned to instruments.

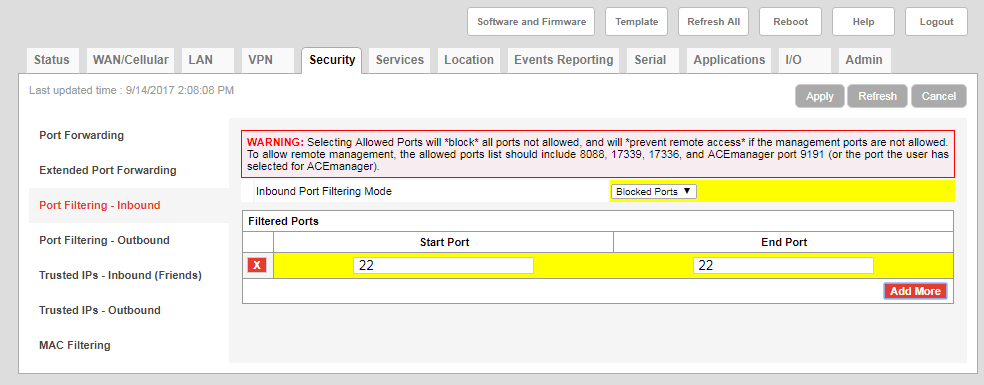
Configuring port filtering
Inbound Port Filtering can protect the instruments at the site from nefarious hacking attempts over the network. For this reason we recommend blocking port 22, as described below.
- In ACEmanager, click Security > Port Filtering - Inbound.
- For Inbound Port Filtering Mode, choose Blocked Ports.
- Click Add More and set Start Port to 22 and End Port to 22.
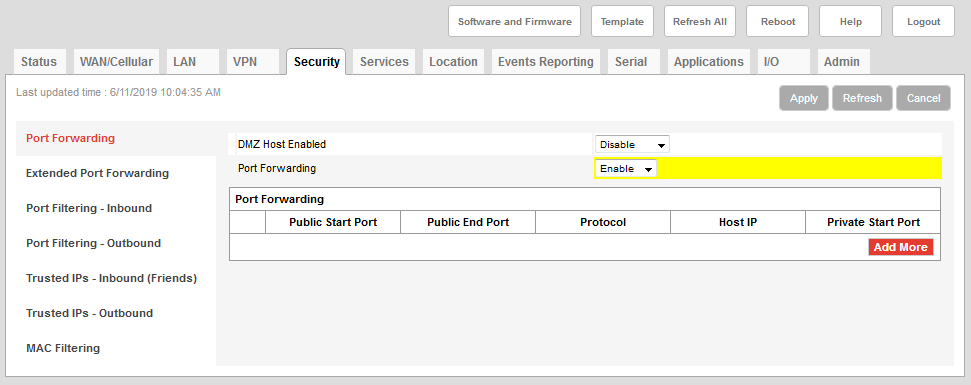
Enabling port forwarding
Port forwarding allows remote computers and devices to connect to a specific device within a Local Area Network. Port forwarding must be enabled in the RV50X software to allow you to communicate with the devices that are connected to it (such as an LI-7500DS or other instrument).
- In ACEmanager, click Security > Port Forwarding.
- Set Port Forwarding to Enable.
- Click Apply or wait until you've finished configuring port forwarding for instruments.
- You do not need to click apply and reboot immediately; you have additional changes to make. But port forwarding does not take effect until the device is rebooted. Wait to restart until you've finished the remaining configuration.
Enabling Hairpin NAT
Cellular modems with ALEOS v4.16.0 or newer include the Hairpin NAT option. When the Hairpin NAT is enabled, it allows you to check the validity of the network setup (port forwarding, for example) while connected to the local network of the gateway but using the public IP address. For example, if you are setting up the LI-COR system and you want to confirm that the LI-COR system can be reached via the public IP address of the gateway, you can do so without leaving the site or leaving the gateway network. Simply enter the public IP of the gateway in the LI-COR software. If the settings are correct, it will resolve the connection to the correct device. If Hairpin NAT is disabled, such requests are rejected by the gateway firewall.

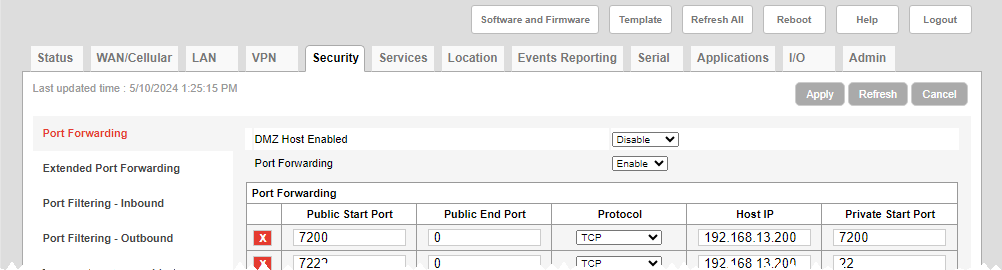
Configuring IP addresses and ports
This procedure opens ports to enable instruments to communicate with each other. Earlier we reserved a range of IP addresses for automatic uses by the RV50X (192.168.13.100 to 192.168.13.150; see Reserving an IP address range). For instruments, use IP addresses that are outside the reserved range (examples below start at 192.168.13.200).
Important: The Telnet port (23) used by the 9210B datalogger is unsecured. Information transferred over this port is unencrypted and can be intercepted. If you leave this port open, your system may be vulnerable to hackers. Therefore, we recommend that you only open port 23 if and when you need direct access to the 9210B datalogger, and that you close the port after you have finished. To close the port, click the  button to remove it from the list. Then apply the settings and restart the RV50X.
For the LI-7500DS and SmartFlux 3 System
In ACEmanager™, under Security > Port Forwarding, click Add More and enter the relevant information from Table 3‑1.
For the LI-7500A/RS or LI-7200/RS and SmartFlux 2 System
In ACEmanager™, under Security > Port Forwarding, click Add More and enter the relevant information from Table 3‑2.
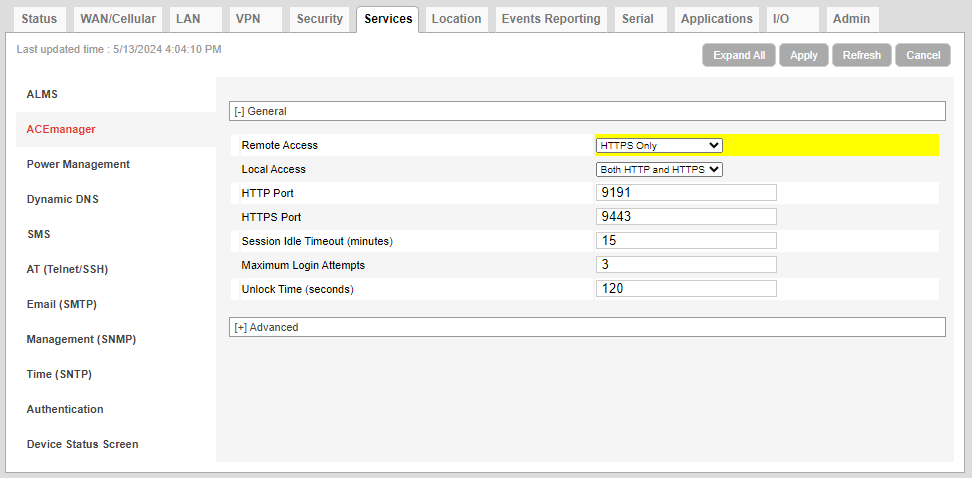
Enabling remote access to the RV50X
If you need to access the RV50X software remotely (for example, to open another port), the RV50X must be configured to allow over-the-air access. In ACEmanager™, under Services > ACEmanager, set Remote Access to HTTPS Only.
Saving the configuration template
If you've gone through the steps to create your own configuration, you can save it for safekeeping, future reference, or to deploy to other RV50X gateways. To save it, click Template, and then choose Download.
Finishing up
After changing port forwarding settings, power off the RV50X and disconnect the network cable from your computer. Next, you'll configure instruments in the network (see Configuring instrument IP addresses).