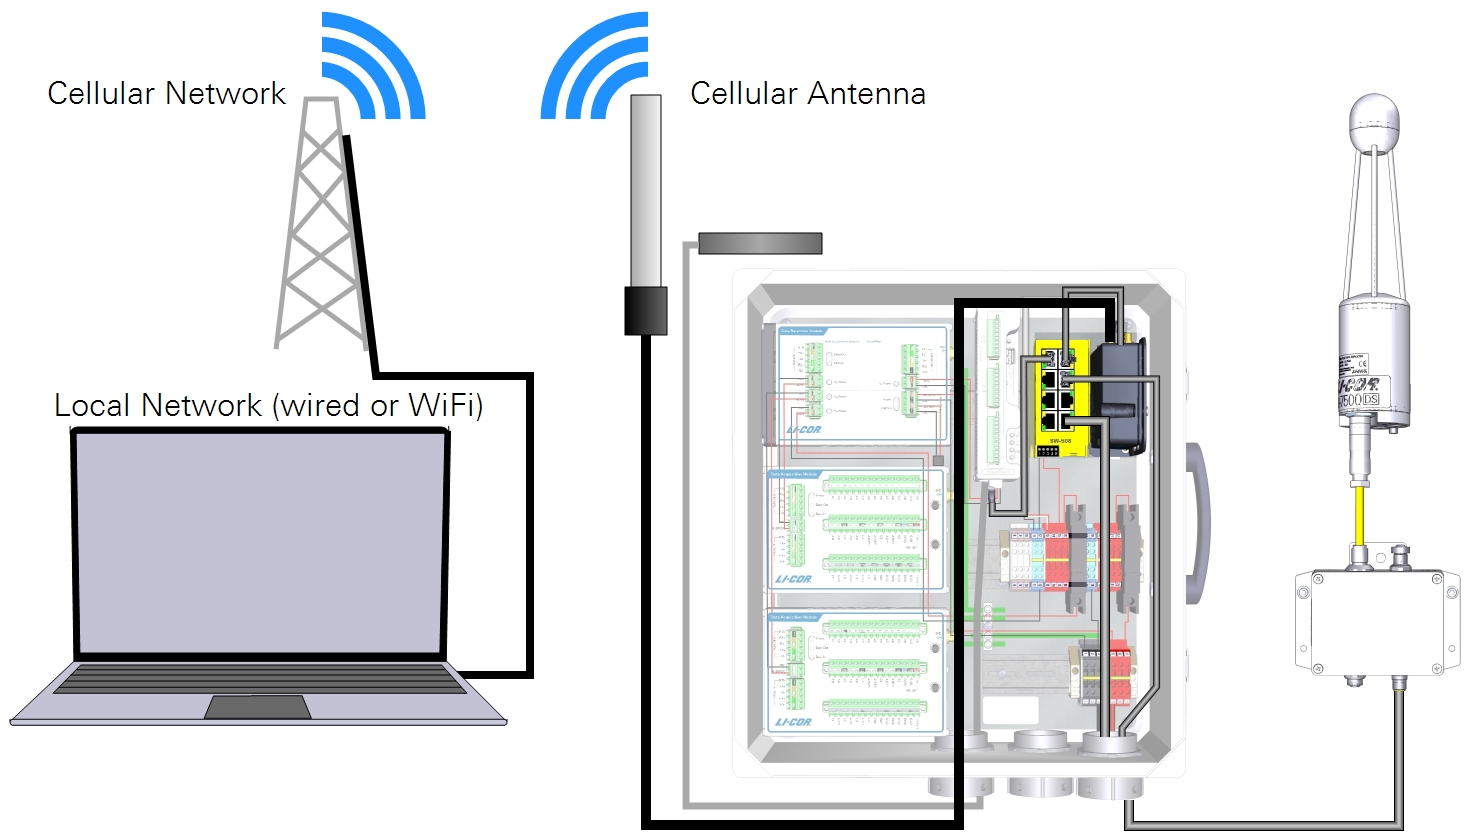
Configuring instrument IP addresses
The objective of this section is to configure the network settings of the instruments. You'll need to do this for each instrument to enable communication through the network connection. If you are using a biomet system with a Sutron Datalogger, also see Setting the Sutron Datalogger IP address.
Power on the system
Note: Disconnect the RV50X Ethernet cable for this section.
Double check the power wiring and data cable connections. Flip both breakers to the ON position and wait a few minutes for everything to start up.

Configuring the instrument network
Go through the following pages to configure IP addresses for each component. Skip any sections that don't apply. Table 3‑1 and Table 3‑2 give IP addresses and ports to configure for instruments.
Setting the LI-7500A/RS/DS or LI-7200/RS IP address
The LI-7500A/RS/DS or LI-7200/RS, in combination with the SmartFlux 2 or 3 System is the hub of the eddy covariance system.
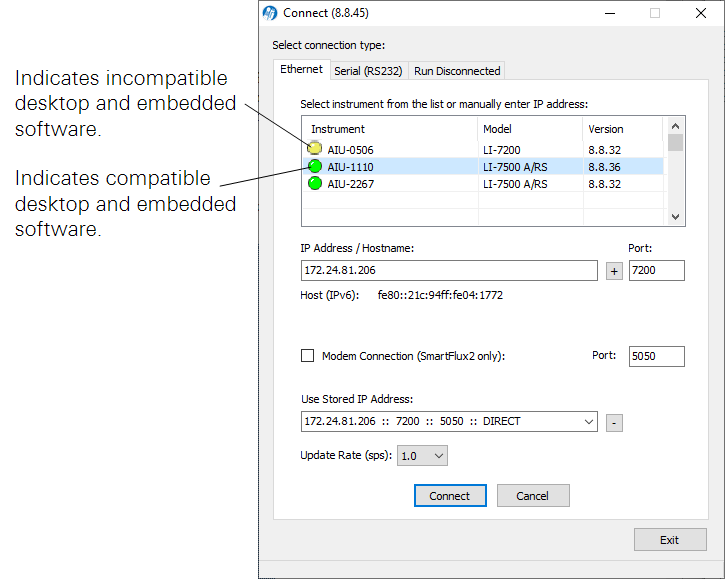
- Launch the gas analyzer software.
- Select the gas analyzer and Connect to it.
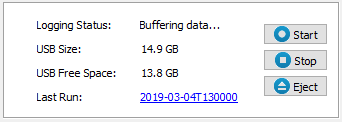
- Stop data logging.
- Click the Stop button on the software dashboard.
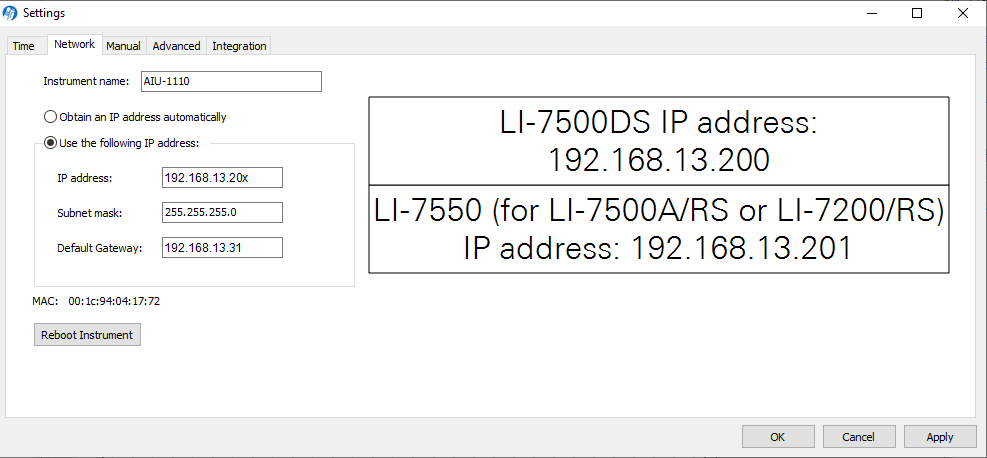
- Configure the LI-7500A/RS, LI-7500A/RS or LI-7200/RS for a static IP address: Click Settings > Network and enter the IP Address, Subnet Mask, and Default Gateway.
-
LI-7500DS with the SmartFlux 3 System:
- IP Address: 192.168.13.200
- Subnet Mask: Typically 255.255.255.0
- Default Gateway: Set this to the local IP address of the RV50X (192.168.13.31).
-
LI-7550 with the LI-7500A/RS or LI-7200/RS and the SmartFlux 2 System:
- IP Address: 192.168.13.201
- Subnet Mask: Typically 255.255.255.0
- Default Gateway: Set this to the local IP address of the RV50X (192.168.13.31).
- Reboot the instrument after changing the network settings.


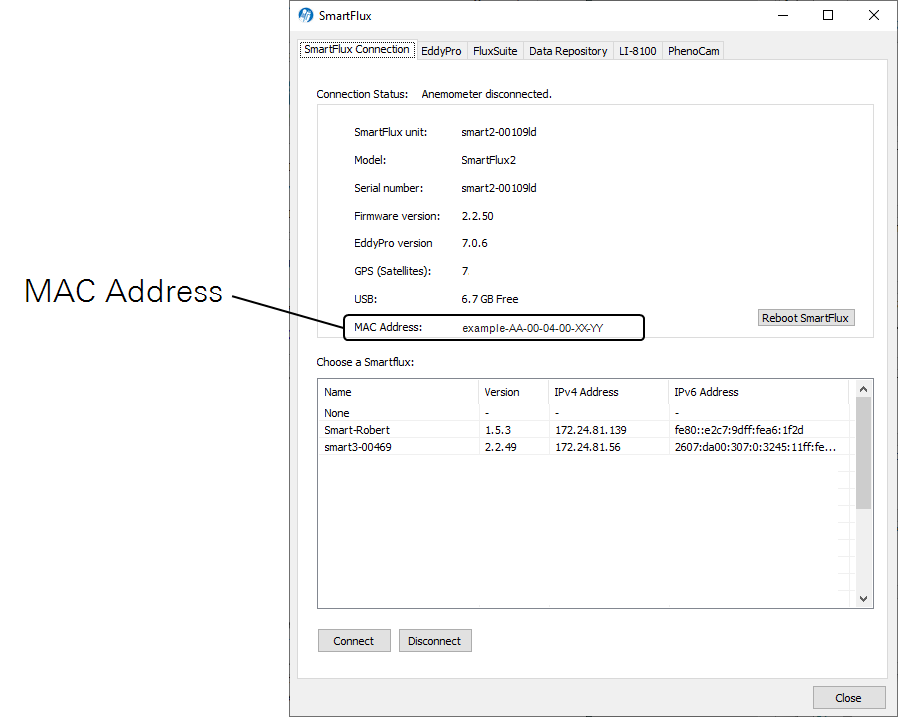
Identifying the SmartFlux 2 System MAC address
This step is required only if you want to use the SmartFlux 2 System as an NTP server or to enable two-way communication with the Biomet Data Acquisition System that is connected to a SmartFlux 2 System (to upload a new configuration file to a DAqM or DRM, for example). To find the SmartFlux 2 System MAC address, click the SmartFlux button and select the SmartFlux Connection tab. Copy the MAC address or keep the window open so you can find it later when you'll enter it into the RV50X software (Setting the SmartFlux 2 System IP address via the RV50X).

Setting the SmartFlux 2 System IP address via the RV50X
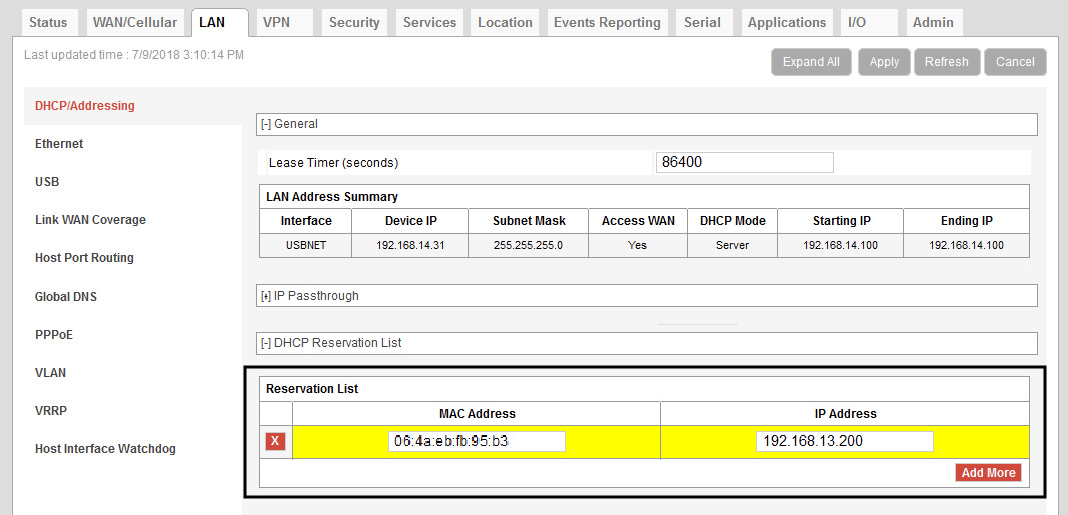
To enable two-way communication with the Biomet Data Acquisition System (to update the configuration remotely, for example) or to use the SmartFlux 2 System as an NTP server, the RV50X must be configured to set the SmartFlux 2 System IP address (see About the SmartFlux 2 and 3 IP addresses for more details). This is accomplished by entering the MAC address of the device you want to reserve an IP address for (the SmartFlux 2 System in this case) and the desired IP address for the device. To apply the setting:
- Click the LAN > DHCP Addressing tab and expand the DHCP Reservation List.
- Click Add More and enter the following:
-
- MAC Address: Enter the SmartFlux 2 System MAC address. See Identifying the SmartFlux 2 System MAC address.
- IP Address: Enter the IP address you want to reserve for the SmartFlux 2 System. Use 192.168.13.200 if following suggestions in this manual.
- Click Apply.
- Reboot the modem or wait and restart later.
- You can configure the remaining settings before restarting the RV50X. The SmartFlux System will switch addresses automatically, but it may take up to 24 hours for the setting to be applied. Restart it to apply the setting immediately.
Multiple analyzers behind one gateway
The interface can store up to 20 connections. This is useful if you are unable to read the instrument IP address while attempting to connect or if you have more than one LI-7500A/RS or LI-7200/RS connected to the modem (differentiated by the port number). In this case, assign unique ports to the gas analyzers.
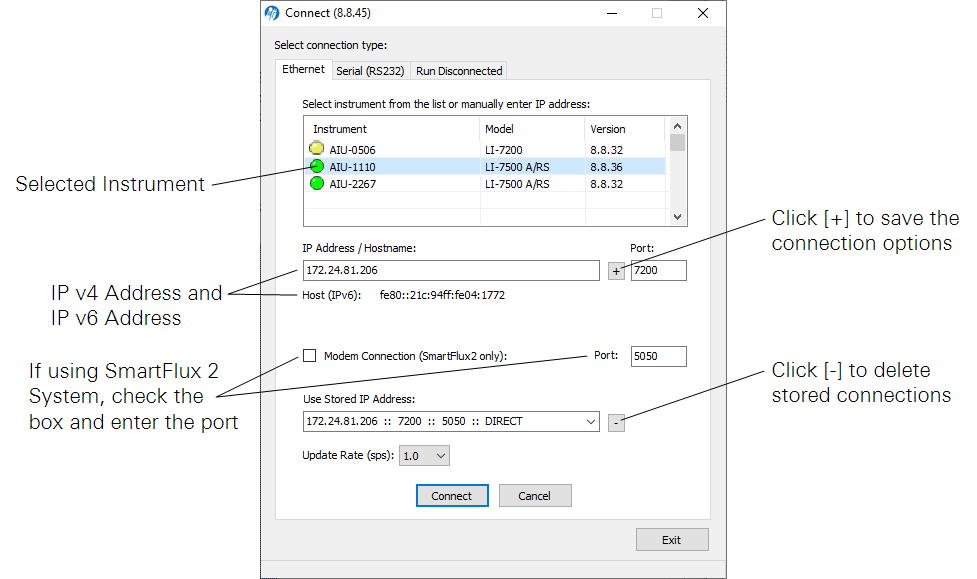
- For the SmartFlux 2 System, check the Modem Connection box and enter the port (typically 5050) before storing the connection. The interface will store the connection information, enabling you to reconnect when the IP address is not retrievable.
- For the SmartFlux 3 System, leave the box clear.
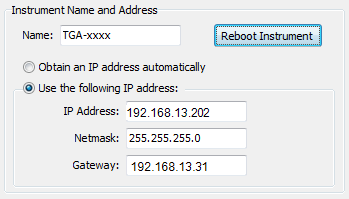
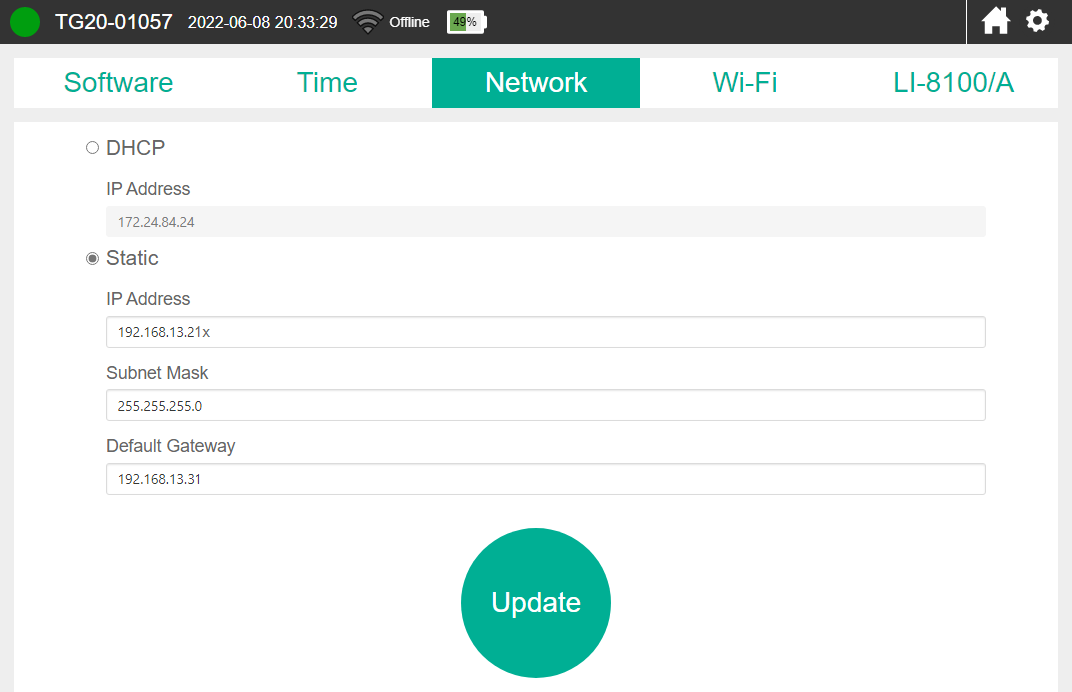
Setting the LI-7700 IP address
If your system includes an LI-7700, start by configuring its IP address. If you do not have an LI-7700, skip to the next section.
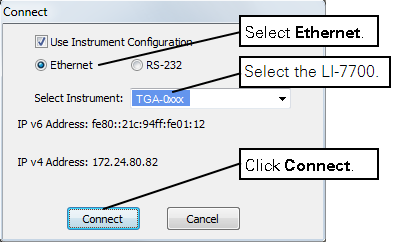
- Launch the LI-7700 software and connect to the instrument.
- Click Manual Controls (
 ).
). - Set the IP address, subnet mask and gateway:
-
- IP Address: 192.168.13.202
- Subnet Mask: Typically 255.255.255.0
- Gateway: Set this to the IP address used to connect with the RV50X: (192.168.13.31)
- Set PTP to automatic.
- Reboot the LI-7700 after changing the network settings.
Setting the PhenoCam IP address
If your system includes a PhenoCam, set its IP address next.
- Be sure the camera is powered on and the Ethernet cable is connected to the switch.
- Launch the StarDot Tools application.
- Download it from http://www.stardot.com/downloads and install it on your Windows computer. Launch the app and it will present all of the PhenoCams that are on your network. Identify the one you want to configure and record its ID and IP address.
- Enter the IP Address into a web browser address bar.
- Upon connecting, the browser will display a recent image from the camera as well as some menu links.
- Click Config in the lower left of the page and log in when prompted.
-
- User Name: admin
- Password: admin
- Do not change the user name or password; doing so will disable communication with the SmartFlux System.
- Click the Network tab and configure the settings:
-
- Under IP Assignment, select Manual.
- Set the IP address, subnet mask and gateway:
-
- IP Address: 192.168.13.203
- Subnet Mask: Typically it should be 255.255.255.0
- Gateway: Set this to the IP address used to connect with the RV50X: (192.168.13.31)
- Reboot the PhenoCam after changing the network settings.
Setting the LI-8250 IP address
To set the LI-8250 IP address in either a stand-alone operation, in combination with an eddy covariance system, or in combination with trace gas analyzers or the LI-870, follow these steps:
- Connect to the LI-8250 Multiplexer using a web browser.
- Click Device Settings (
 ) and select the Ethernet tab.
 - Select Static and enter the IP address, subnet mask, and gateway.
-
- IP Address: 192.168.13.209
- Subnet Mask: Typically 255.255.255.0
- Default Gateway: Set this to the local IP address used to connect to your cellular modem (e.g., 192.168.13.31)
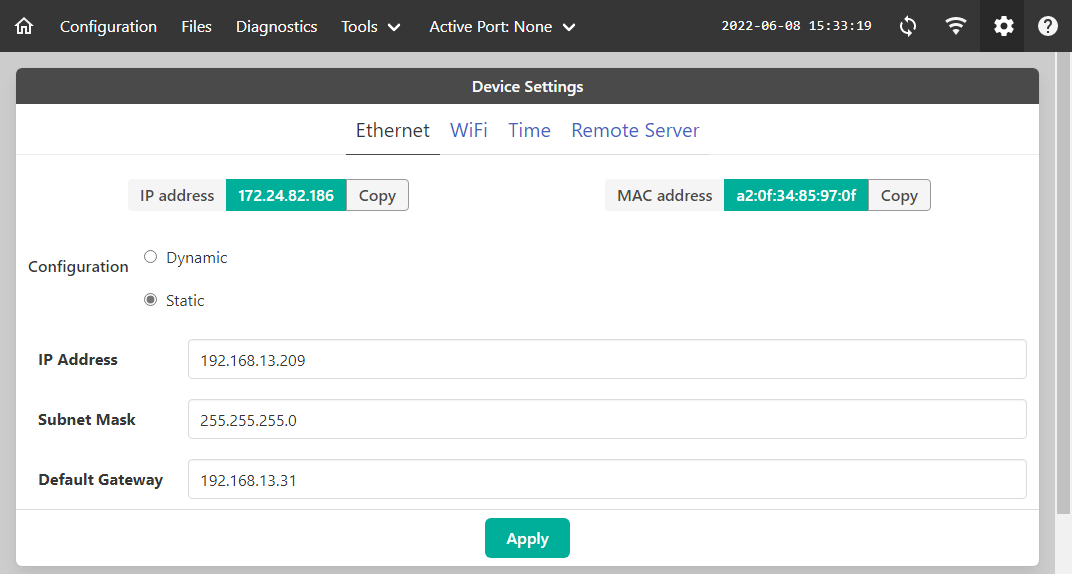
- Click Apply and then click Reboot at the bottom of the page to restart the multiplexer
- After restarting, return to the settings page to verify the new address.
Setting LI-78xx Trace Gas Analyzer IP addresses
To set the IP address of a Trace Gas Analyzer (LI-7810, LI-7815, or LI-7820):
- Connect to the analyzer using a web browser
- Click Options > Settings > Network to see the IP address.
- Select Static and enter the IP address, subnet mask, and gateway.
-
- LI-7810 IP Address: 192.168.13.210
- LI-7815 IP Address: 192.168.13.211
- LI-7820 IP Address: 192.168.13.212
- LI-7825 IP Address: 192.168.13.213
- Subnet Mask: Typically 255.255.255.0
- Default Gateway: Set this to the local IP address used to connect to your cellular modem (e.g., 192.168.13.31)
- Click Update to apply the settings.
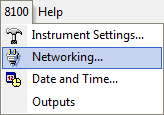
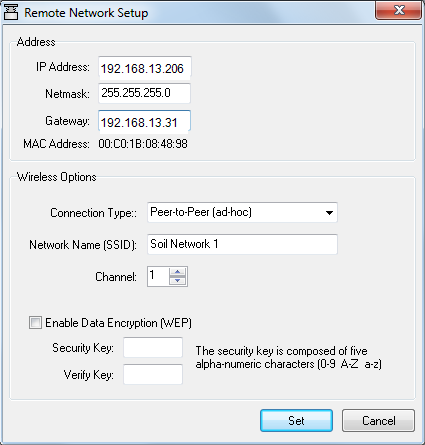
Setting the LI-8100A IP address
If your system includes an LI-8100A, set its IP address next.
- Connect a PC to the LI-8100A using the RS-232 cable and connect with the instrument.
-

- Click 8100 > Networking... and enter an IP Address, Netmask, and Gateway.
-
- IP Address: 192.168.13.206
- Subnet Mask: Typically it should be 255.255.255.0
- Gateway: Set this to the IP address used to connect with the RV50X: (192.168.13.31)
- Restart the LI-8100A after changing the network configuration.
- If you are using a stand-alone RV50X, connect the LI-8100A network cable to the RV50X and keep the RS-232 cable in place for the remaining configuration. If you are using the LI-8100A in an eddy covariance station, connect the LI-8100A to the network switch.
Finishing up
After you've configured each instrument in the network, power everything off, connect the network cable between the RV50X and the network switch, and then power everything on. If your devices are online via the RV50X and your computer is online via a local network, you can connect with devices as described in Connecting with remote instruments.