Additional considerations
This section describes several operations that may simplify your use of the RV50X.
Selecting a data plan
The typical raw data volume when logging compressed .ghg eddy covariance files is about 1 MB per half hour, or about 1.5 GB of raw data in 30 days. See Table A‑1 for more details.
| Sensors in System | Files to Transfer | GB per Month1 |
|---|---|---|
| Any configuration given below | Status Reports | <1 |
| EC system with sonic anemometer and CO2/H2O gas analyzer. | Raw Data | <2 |
| EC system with sonic anemometer, LI-7700, and CO2/H2O gas analyzer. | Raw Data | <2.5 |
| EC system sonic anemometer, biomet station, and CO2/H2O gas analyzer. | Raw Data | <3 |
| EC system with sonic anemometer, biomet system, LI-7700, and CO2/H2O gas analyzer. | Raw Data | <3.5 |
| LI-8100A Soil CO2 Flux System | Raw Data | <2 |
| LI-8250 with eight chambers, LI-870, and LI-7810 | Results | <0.3 |
About sensor networks
A basic knowledge of network principles will help you exploit the power of networked sensors—and help ensure successful deployment of your system. In this section we describe some basic concepts of networking that may help you understand how the system works, how to configure communication in the system, and how to solve communication problems.
LI-COR eddy covariance systems and soil gas flux systems communicate using standard Internet communication protocols. In an eddy covariance system that has multiple instruments, the devices will create a Local Area Network (LAN). The local area network allows the devices to communicate with each other like computers on the Internet.
Each instrument in the flux system (including the LI-7500x, LI-7200x, SmartFlux 2 or 3 System, LI-7700, Biomet system, and LI-8100A) can be added to the LAN. In order to communicate with other devices in the network, each instrument must be given a unique Internet Protocol (IP) address within the LAN. When configured for cellular communication, the cellular communication system will get a unique IP address, which isolates the instruments from the global Internet in a LAN, while allowing access to the instruments from computers on the Internet.
The IP Address is a number that uniquely identifies each device on the network. The address is composed of a set of four numbers called "octets", where each octet ranges in value from 0 to 255. When entering an IP address, the octets are separated with a period. For example, 192.168.13.201 is a valid IP address. Some IP address ranges have been set aside for private use, and are typically used by organizations for internal networks. For a peer-to-peer network (such as the network you will create with your instruments), we suggest choosing an IP address from the private range—192.168.13.151 to 192.168.13.255. In this range, the first 3 octets, which represent the network address, are fixed at 192.168.13. The last octet, which represents the host address, must be different for each node on the network. For simplicity, you can number your first device 192.168.13.201, your second device 192.168.13.202, and so on.
For example, if you have an eddy covariance flux system with an LI‑7200x or LI‑7500x, LI-7700, Biomet Station, LI-8100A, and a PC, you could assign IP addresses given in Table 3‑1 or Table 3‑2. In addition to the IP address, you may need to set the netmask and gateway.
The netmask is a set of 4 octets used to separate an IP address into two parts; the network address and the host address. If you are using LI-COR's recommended IP address range, the netmask should be set to 255.255.255.0 for all instruments.
The Gateway is a node that routes traffic to another network. For cellular communication systems, the gateway should be set to the local IP address (e.g., 192.168.x.x) that has been assigned to the router.
Note: LI-COR sensors always use static IP addresses when in wireless communication systems. Therefore, when connecting to an existing network make sure you choose IP addresses that are unique and in the range of addresses supported by that network.
Adding a DDNS
To use a dynamic IP address, first set up a Dynamic DNS (DDNS) with a service provider from the list of supported providers. You may need to create an account with a DDNS provider. Several service providers are supported by the RV50X.
- Power on the RV50X, connect a network cable between the RV50X and computer, and log in.
- Under Services > Dynamic DNS, select a service from the list.
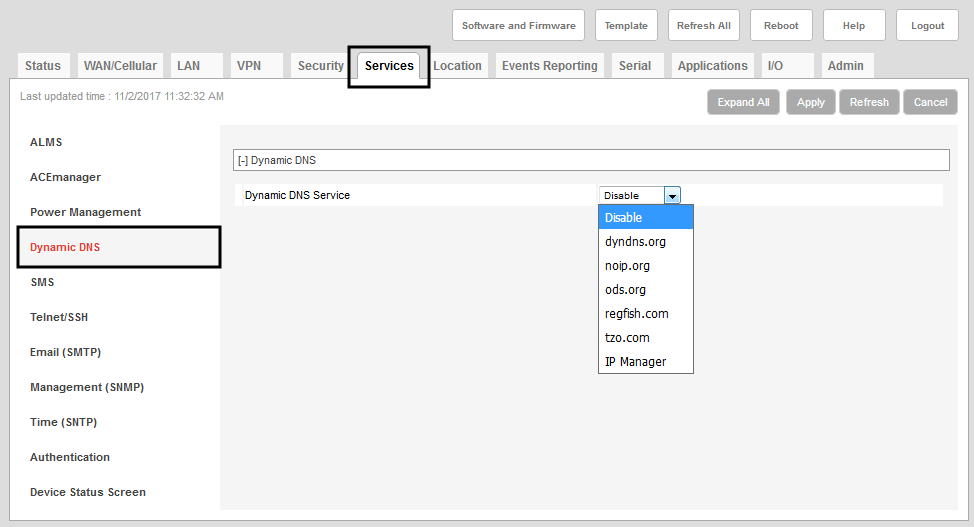
- Configure the other settings—select Only on Change, enter the full domain name, and provide your log on information and any additional required information.
- Verify the connection by acquiring the IP address from the online service and connecting with the RV50X.
About the SmartFlux 2 and 3 IP addresses
For the SmartFlux 3 System, the IP address is set in the gas analyzer software. In contrast, the same action with the SmartFlux 2 System sets the IP address of the LI-7550. Therefore, the SmartFlux 3 address must be set in a different way. When the SmartFlux 2 System has its IP address set in this way, not only does it function as an NTP server for the system, it also enables two-way communication with the Biomet Data Acquisition System (to load configuration files) and the ability to copy PhenoCam images and raw biomet data files from the USB drive using the Download utility or an SFTP client.
NTP communication with the SmartFlux System is established via Internet communication protocols, and therefore, the SmartFlux 2 System IP address must be set to use the feature.
For the NTP server
Starting with embedded firmware software version 2.2.49, the SmartFlux 2 and 3 Systems have an NTP (Network Time Protocol) server, which is synchronized to the timing of the data recorder. With the NTP server, the SmartFlux 2 or 3 System clock is used to synchronizes clocks, rather than an NTP server on the Internet.
For file transfer functions
Setting the SmartFlux 2 System IP address via the RV50X software also enables the transfer of both image files and raw Biomet Data Acquisition System files using the Download utility or an SFTP client. It also enables two-way communication with the Biomet Data Acquisition System.
Note: This is only necessary when configuring the system. You may need to do this when configuring the RV50X for the first time, when connecting to the RV50X to change the configuration, or when your computer is connected directly to an instrument via an Ethernet cable.
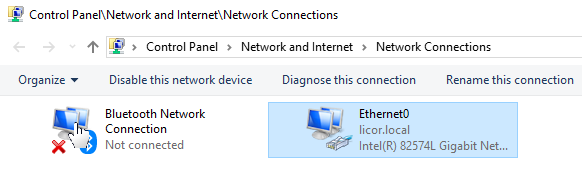
When connecting to a remote monitoring system you may need to configure your computer's network settings. The steps below describe how to do this with a Windows® 10 PC. The steps may differ for other computers and operating systems. Consult with your IT department and operating system documents for more information.
-
Open the network settings on your computer.
Press the Windows key (
 ), type Network Connections into the search bar and press Enter to view network connections.
 - Double-click the internet connection to bring up the Local Area Connection Status, then click Properties.
- Select Internet Protocol Version 4 (TCP/IPv4), then click Properties.
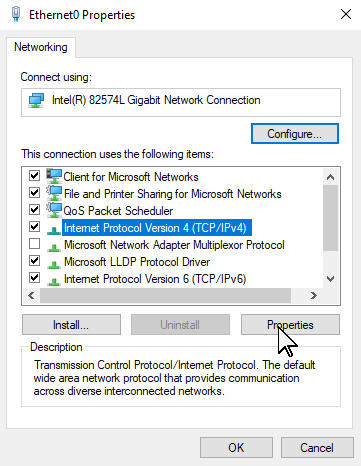
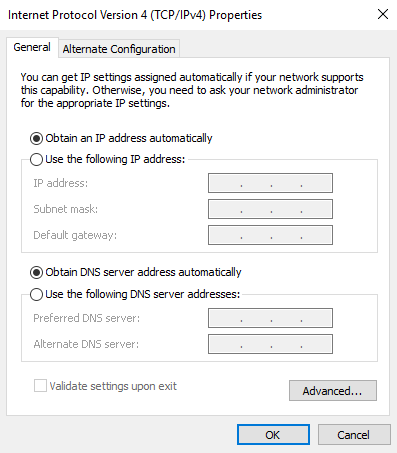
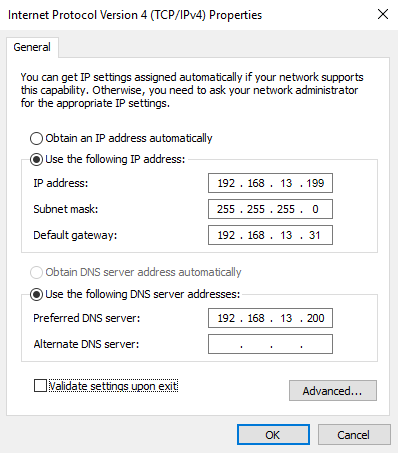
- If you need a dynamic IP address, select Obtain an IP address automatically and Obtain DNS server address automatically. If you need a static IP address, select Use the following IP address and enter the IP address and Subnet mask.
| Dynamic IP Address | Static IP Address (Recommended) |
|---|---|
|
|
Setting the Sutron Datalogger IP address
- Connect the datalogger to your PC.
- Option 1: Ethernet. Connect the Sutron Datalogger to your PC Ethernet terminal either directly or through an Ethernet switch. In XTerm, select TCPIP, then click Detect. Select the Sutron from the list click, and click OK to connect. You may need to type in the IP address if the software cannot detect the datalogger (169.254.100.100 by default). Click OK to connect.
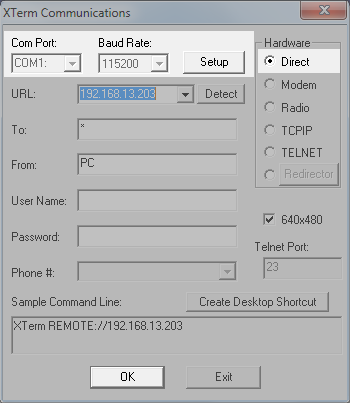
- Option 2: RS-232 serial. If you are unable to connect with the TCPIP option, connect using RS-232. Install an RS-232 cable between the Sutron logger and your computer. You may need to use a USB-to-serial adapter. In XTerm, select Direct, set the Baud Rate to 115200, and select the COM port that your computer is using for serial communication. Click OK to connect. See the Sutron manual for additional details.

- Click Setup Access.

- Click the Setup tab, select LAN Settings, and click Edit....

- Click Settings..., then click No to dismiss the wizard.

- In the Network Properties window, enter the IP address, Subnet mask, and Default Gateway.
-
- IP Address: 192.168.13.204
- Subnet Mask: Typically it should be 255.255.255.0
- Default Gateway: The IP address to connect with the RV50X (192.168.13.31)
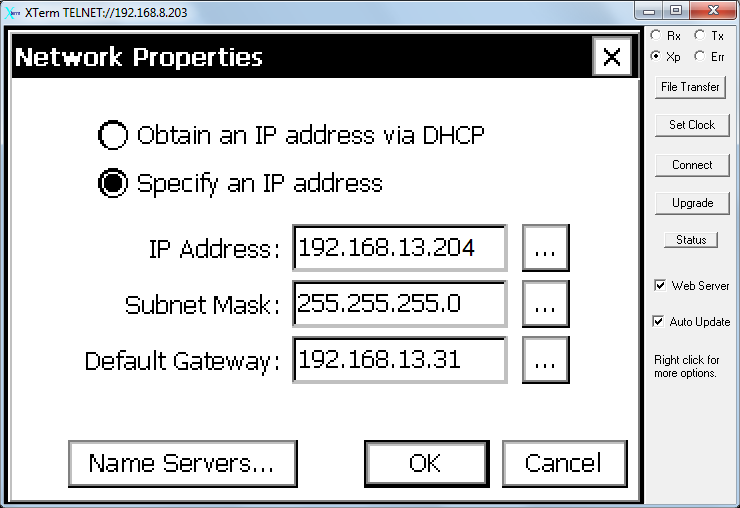
- Click OK.
- Restart the datalogger after changing the network settings.
- Integrate biomet data with .ghg files.
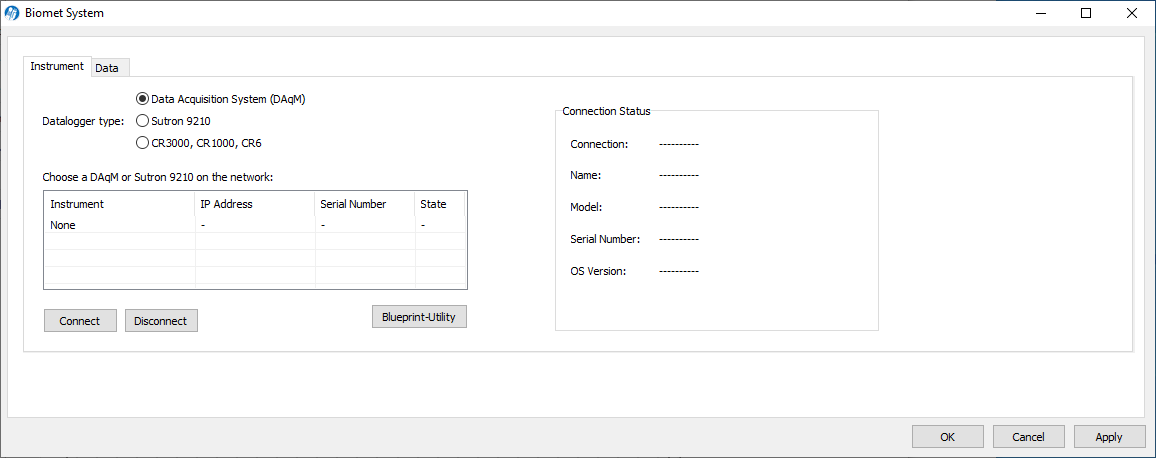
- Launch the gas analyzer software and connect to the instrument. Click Biomet and then click Instrument. Select the Biomet System and click Connect and OK.
-

Here you will configure the network settings of the Sutron datalogger and establish the data connection to the LI-7500A/RS/DS or LI-7200/RS. The steps in this section describe how to log biomet data in .ghg files for processing in EddyPro software or with the SmartFlux System. This section assumes that you have completed all the required steps in Configuring the RV50X and that you have verified that the RV50X can connect with the Internet.
See Connecting to the biomet system (Sutron logger) to learn how to connect remotely.