Using the LI-3000C Windows software
- Display of individual area, leaf length, average width, and maximum width.
- Readings can be stored in a data file. Elements of the data file include: individual area, maximum width, average width, length, and a running subtotal for area. The user can also enter optional remarks for each logged area value. The resulting data file can be opened by most common text editor or spreadsheet programs.
- Supports serial and USB connections.
Installing the interface software
The 3000-500 software in on the CD that ships with the LI-3000C. It also can be downloaded from licor.com/support. The software will run on most versions of the Windows operating system. Both serial and USB connections are supported by the software. You will need to install USB drivers if you are connecting via USB.
Connecting the LI-3000C to a computer
Two connection methods are available: RS-232 Serial or USB. Both are described below.
USB connection
To connect with USB, you'll install the drivers and connect with the instrument. Although the connection is with a USB cable, your computer will treat it as a COM port, as described below.
- Acquire the driver software from licor.app.boxenterprise.net/s/1yfmqsrgmaikvzhzrzh9q3ferzmptpha and install the application called li3x00_driver_install on your computer.
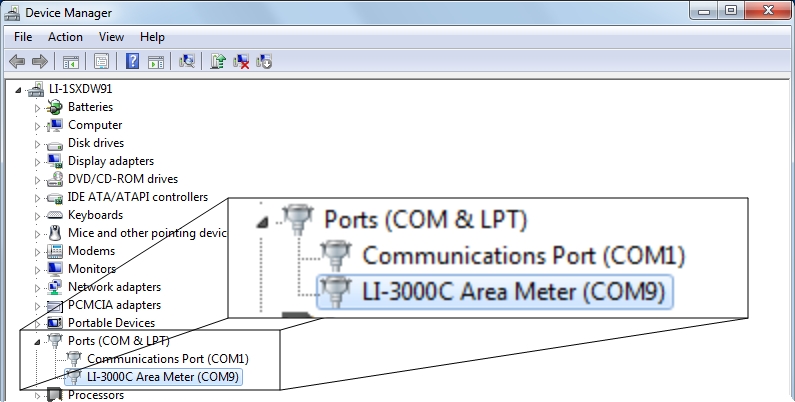
- Open the Device Manager.
- Press the Windows key (
 ), type Device Manager, and press Enter.
 - In the Device Manager, expand the entry called Ports (COM and LPT).
- Power on the LI-3000C and install the USB cable between the instrument and the computer.
- Your computer should assign a communications port number to the LI-3000C
- In the Device Manager, make note of the COM port number beside LI-3000C Area Meter.
- Connect to the area meter
- In the LI-3000C Portable Area Meter Windows software, click the connect button.
- Select Serial and enter the COM port number identified previously.
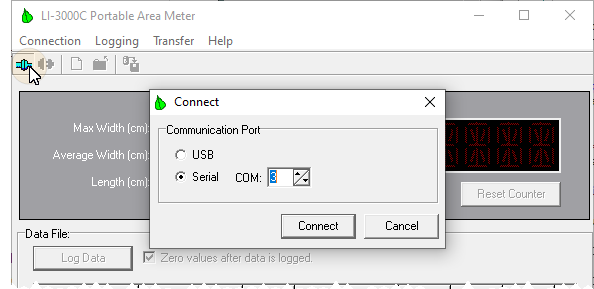
- Click Connect.
Serial connection
The RS-232 serial cable included has 9-pin connectors on both ends; either end plugs into the serial connector on the back panel of the LI-3000C. Use this cable to connect to your computer's 9-pin serial port or a serial-to-USB adapter.
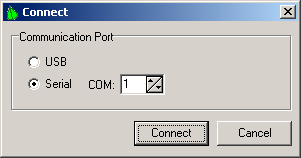
Turn on the LI-3000C. Click on the LI-3000C program icon to start the program. The LI-3000C main window appears. Select Connect from the Connection menu, or click on the connect icon in the toolbar beneath the Connection menu. A connection dialog box will appear (Figure 4‑1). Check Serial, select the proper communication port number, and click Connect. Commonly, the PC's serial port is assigned to COM 1.
If the instrument is connected properly (and the instrument is in Realtime Capture mode), data will appear in the counter window when a leaf is passed through the scanning head.
Software basics
The main window of the software features a real-time display of area. The software also calculates maximum width, average width, and total length of samples passed through the area meter scanning head. These values are shown in the window to the left of the area counter.
The PC area counter can be reset by the user by pressing the Reset Counter button - this also resets calculated values for width and length. Pressing the button on the LI-3000C scanning head or on the LI-3050C also resets the PC software counter.
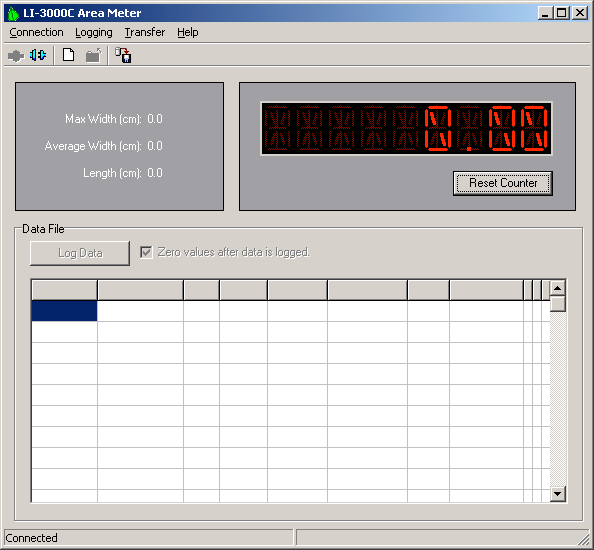
The main window also contains the menu bar, a toolbar with shortcuts for commonly used tasks, and a grid where the log file can be viewed as it is being created.
To disconnect the PC software from the LI-3000C, choose Disconnect from the Connection menu. As an alternative, the Disconnect icon in the toolbar can be used.
A toolbar with shortcuts to commonly used tasks is located beneath the menu bar.
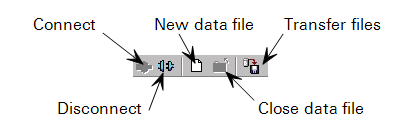
The toolbar shortcuts are as follows:
- Connect – opens the Connect dialog, where you can choose to connect to the LI-3000C via serial or USB connection.
- Disconnect – terminates communication with the LI-3000C.
- Create new data file – allows you to configure logging options and create a new data file into which data are logged.
- Close data file – stops writing to the data file.
- Transfer files – causes the application software to “wait” for data files to be transferred from the LI-3000C console.
Logging to a new data file
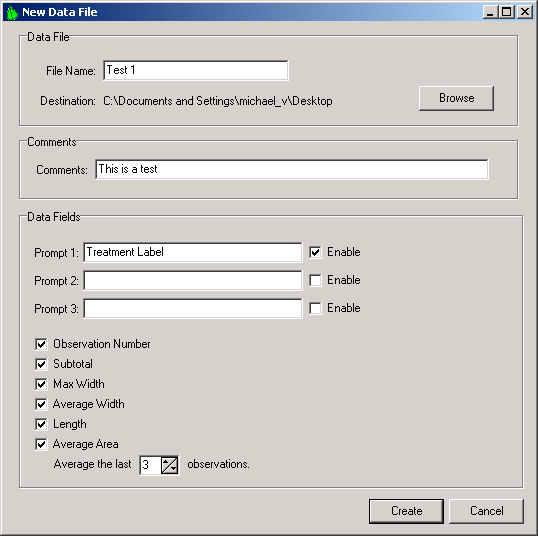
The logging feature writes data to a text file that can be opened by a text editor, or by a spreadsheet program such as Microsoft Excel. To create a data file, select Create new data file... from the Logging menu, or click on the New Data File icon in the toolbar beneath the File menu.
A dialog box appears that prompts for a file name and path. Comments to be placed in the file header are optional. The user may choose to be prompted for up to three remarks each time an area value is logged to the file. Columns for observation number, subtotal (of area), maximum width, average width, length, and average area may also be enabled. When your preferred options have been selected, click on the Create button to open the data file.
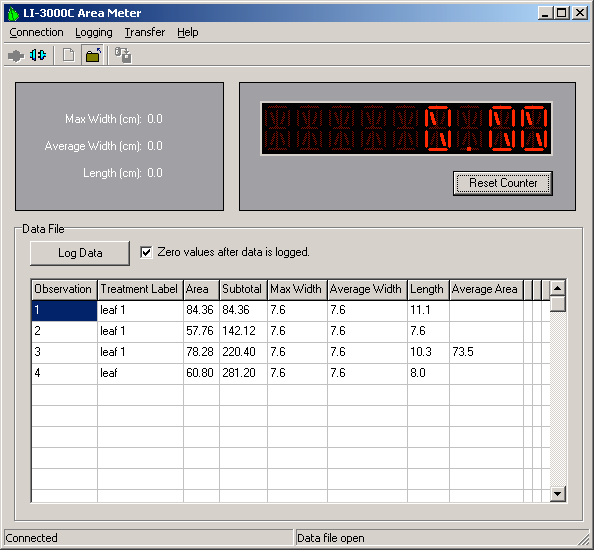
The main window of the LI-3000C program contains a grid where a log file can be viewed as it is being created. Pressing the Log Data button will prompt the user for remarks (if enabled) and append a new row of data to the log file.
Enable the ‘Zero values after data is logged’ check box to reset all values to zero after the data are logged.
Maximum width, average width, and length are calculated for the area of objects passed through the meter since the last time values were zeroed. You can choose to zero the area counter and calculated values for width and length each time the Log Data button is pressed by checking the ‘Zero values after Record’ check box. Or, values can be manually zeroed by pressing the Reset Counter button under the software area counter.
The Subtotal column represents an accumulated value of all area values logged to the data file. The Average Area column shows the average for the last "n" area observations, selectable by the user in the New Data File dialog box.
To close the log file, select Close data file from the Logging menu, or click on the Close Data File icon in the toolbar beneath the File menu. The file is saved to the directory specified in the New Data File dialog box.
Transferring stored data files from the LI-3000C to a computer
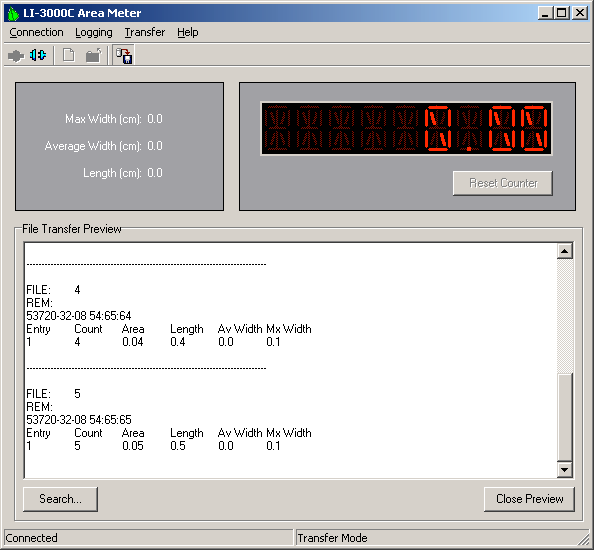
Data files collected and stored on the LI-3000C console can be transferred to the PC application software for viewing and/or storage. When this function is enabled, the PC application software will “wait” until files are sent from the LI-3000C, using the Print Files routine.
Select Transfer Files from the Transfer menu, or click on the shortcut in the toolbar. The File Transfer dialog appears:
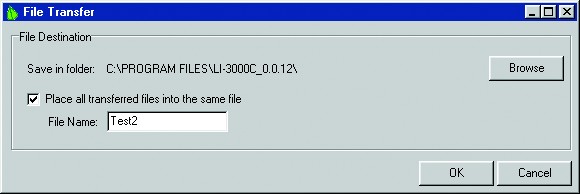
The destination path where the files will be transferred is shown; click on the Browse button to change the path.
Enable the “Place all transferred files into the same file” check box to create a single data file containing all records sent from the LI-3000C. When this check box is enabled, you can enter the file name. Note that when placing all records into a single data file the data are formatted differently; the time stamp and remarks are replicated for each data entry.
Click OK. The application software will display “Waiting”, and the grid in the main window will change to show a preview of the file transfer. Use the Print Files routine in the LI-3000C to send the desired files; when finished, a message will appear stating the file transfer is complete. The files have now been transferred to the path specified above. The transferred data files can also be searched by clicking the Search button and entering the search text. Click Close Preview to return to realtime capture mode.
The file transfer routine can be cancelled by choosing Cancel Transfer from the Transfer menu while the application software is waiting for files to be sent from the LI-3000C; note, however, that once files have started to be sent, the routine cannot be stopped until all files are transferred.
Importing a data file to a spreadsheet
The data file can be imported into a spreadsheet such as Microsoft Excel using the Text Import Wizard. Excel will open a wizard dialog box when the LI-3000C data file is opened with the Excel program. The wizard prompts you for information about the text file being opened. Be sure to indicate that the file is Tab Delimited.