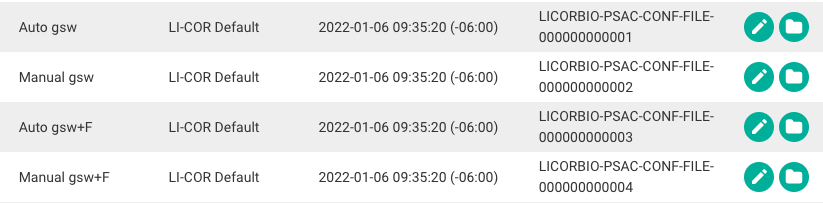
Configurations
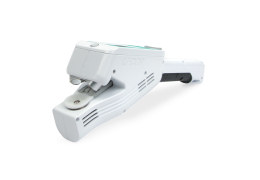
The LI-600 Porometer/Fluorometer comes with default configurations preloaded: auto and manual modes for the porometer-only, and auto and manual modes for the porometer/fluorometer. Configurations are uploaded to the instrument from the computer software (see Configuration Management).
Configuration settings
Configurations include settings for auto or manual mode, porometer and fluorometer options, measurement settings, data labels, remarks, and the instrument display layout.
General
General settings specify the name and author of the configuration, and the fluorometer and GPS/leaf angle options. If the fluorometer option is unchecked, the settings for the fluorometer will be hidden.
Data Labels
Data Labels are user-specified labels that can be applied to each measurement, for example genotype, plot number, or replicate. A label can be formatted as a number, list, or barcode. A configuration can have up to three labels, and at least one label must be a barcode to enable the barcode scanner on the instrument.
Automode Setup
Automode Setup enables or disables Auto Mode measurements on the instrument (see Taking a measurement in Auto Mode) and Taking a measurement in Manual Mode). Auto Mode automatically monitors stability criteria.
When Auto Mode is enabled, the LI-600 determines when to log a data point. It computes stability criteria and compares it to the settings. Once two consecutive data points are below the set threshold, the measurement is considered stable, and the LI-600 logs the data point. This is based on monitoring changes over time (in seconds) to both the computed stomatal conductance (gsw) and/or the de-modulated fluorescence signal (F).
When Auto Mode is not enabled, the instrument is in Manual Mode, and a measurement is logged by pressing the Enter button when the userobserves that stability criteria are met.
Remarks
Remarks are optional comments that can be added to each measurement. You can create up to three remarks; one of those remarks can be applied to each measurement. Remarks are selected on the instrument when a user chooses to mark a record after taking a measurement. See Taking a measurement.
Measurement Settings
Measurement Settings control the following aspects of measurements taken with the LI-600. If the fluorometer option is not available, the fluorometer measurement settings are not be included in the configuration.
Flow is the flow rate generated by the pump to the leaf aperture: Low (75), Medium (115), or High (150).
Match Frequency indicates how often a match of the RH sensors is triggered, specified in minutes. The default is 10 minutes.
Flash indicates whether the measurements are light or dark adapted, type of flash, flash intensity, and flash length in milliseconds.
Fluorescence Constants are Leaf Absorptance (abs) and Fraction Abs PSII (PS2/1).
Modulation (modrate) is the modulation rate of the LEDs used to take the fluorescence measurement. The input Actinic Modulation Rate in Hz is shown with the automatically calculated Integrated Modulation Intensity.
Display Layout
Display Layout determines the layout of the instrument display. The options include a 2- or 8-panel layout that displays selected variables after a measurement is taken.
Creating custom configurations
Custom configurations can be created in the LI-600 computer software with or without an LI-600 connected.
Go to Configuration Management from the drop-down menu in the upper left. At Local Configurations, use the green plus icon to Create New Configuration. You can also open a default configuration and save it as a new one.
General
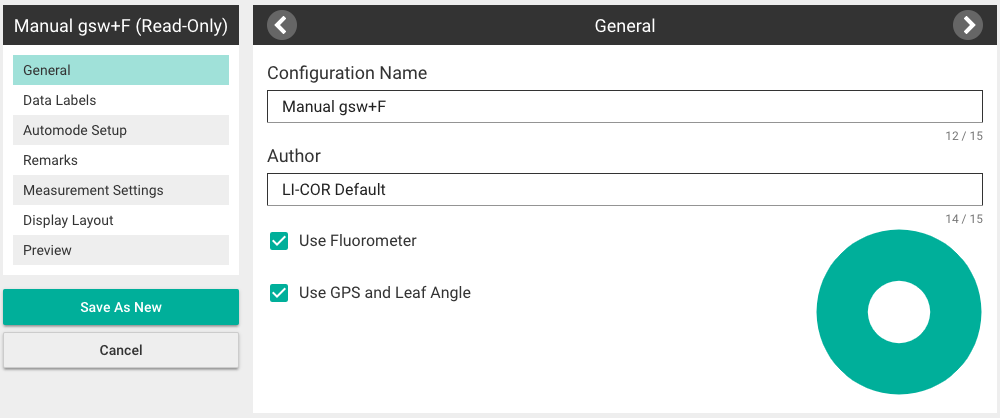
In General, add a Configuration Name and an Author. For the LI-600 with a fluorometer, check Use Fluorometer; fluorometer options are hidden if unchecked. For the LI-600 with leaf angle and GPS capability, check Use GPS and Leaf Angle.
Data Labels
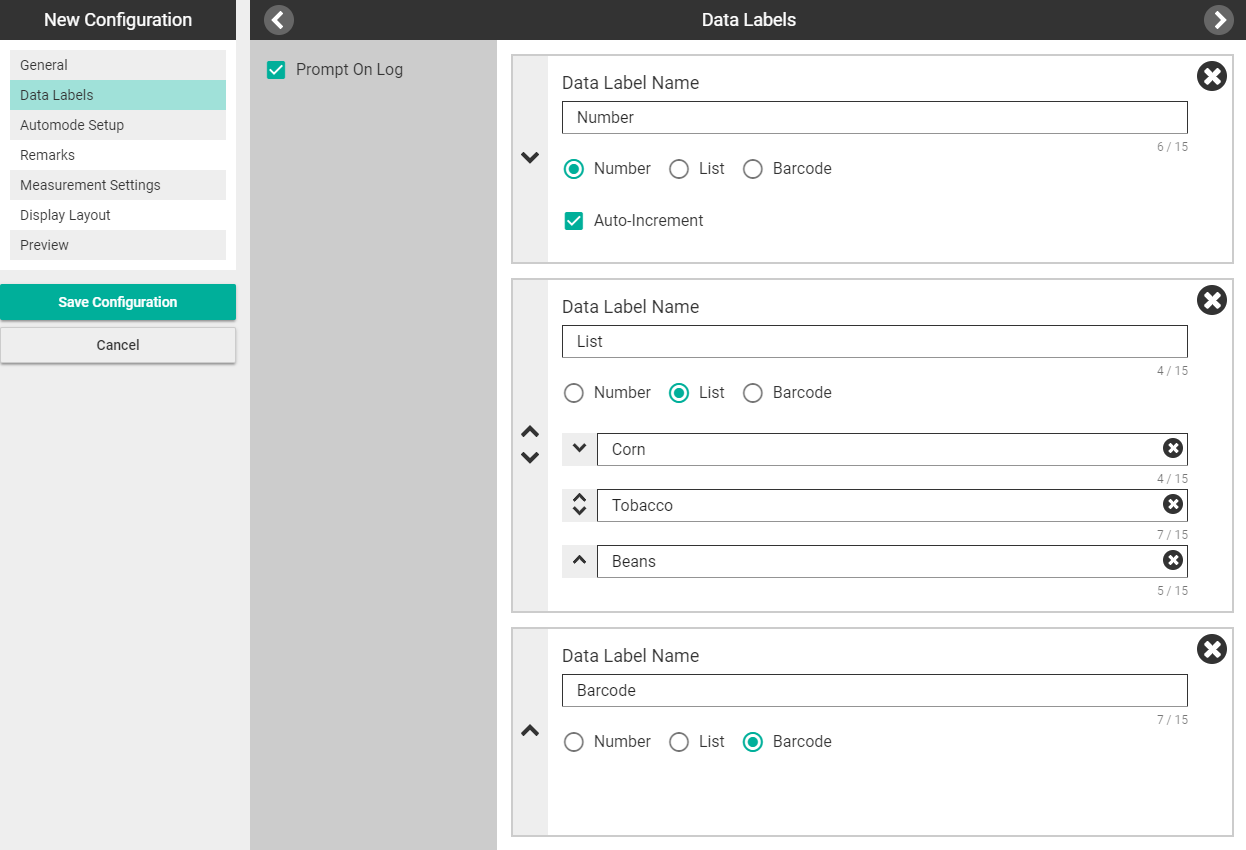
In Data Labels, you can create labels using a number, list, or barcode format. One label must be a barcode to enable the barcode scanner. Each configuration can have up to three labels.
Check Prompt On Log if you want to set a data label after taking each measurement. If Prompt On Log is not checked, you set data label values prior to taking a measurement.
Enabling Prompt On Log is useful when measuring a variety of leaves that require individual labeling, for example, when screening different genotypes.
When Prompt On Log is unchecked, each label selected prior to taking a measurement will apply to subsequent measurements until a new label is chosen.
Select New Data Label. Add a Data Label Name, then select Number, List, or Barcode.
Number: Check the Auto-Increment box for automatic numbering.
List: Add up to three selections with the plus button; drag and drop them to change their order.
Barcode: Enable the barcode scanner.
Automode Setup
In Automode Setup, select Automode, gsw, and/or F (fluorometer).
Select Automode to access the gsw and F variable options. At least one variable must be selected to enable Auto Mode.
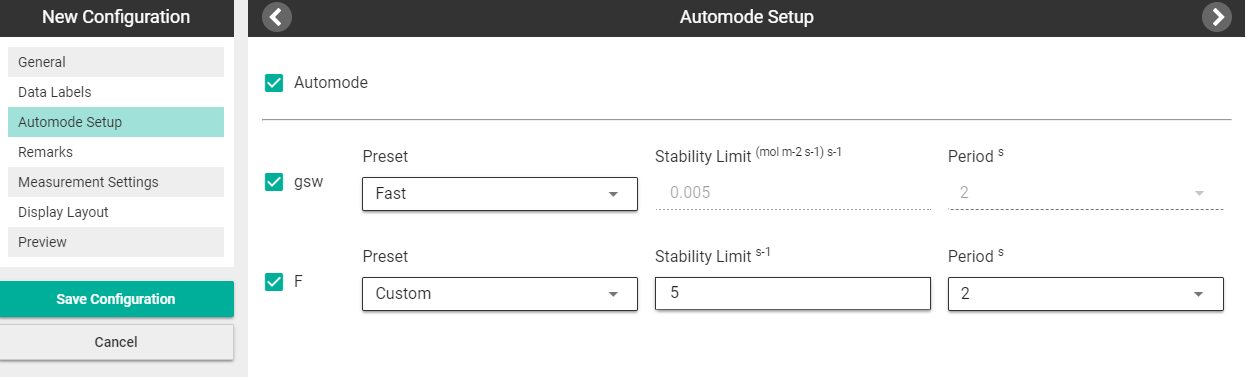
Then select the variables (gsw, F, or both), then a Preset (Fast, Medium, or Custom). If selecting Fast or Medium: the Stability Limit (gsw-specific option), Slope Limit (F-specific option), and Period over which to calculate the change are automatically determined. If selecting Custom, you can set Stability Limit, Slope Limit, and Period (1, 2, or 4 seconds). (See Table 5‑1.)
| Preset | Stability Limit (gsw) | Slope Limit (F) | Period (s) |
|---|---|---|---|
| Fast | 0.005 | 5 | 2 |
| Medium | 0.001 | 1 | 2 |
| Custom | user specified | user specified | 1, 2, or 4 |
To set the instrument to Manual mode, uncheck Automode. In manual mode, you set the display to view the F and gsw slopes and decide when to log the data by observing those variables on the instrument display (see Display Layout).
Remarks
Remarks are optional comments (e.g. Poor Clamp or Chlorotic Leaf) that can be added to a measurement to help exclude outlier data during analysis. Select Add Remark and add text. You can create up to three remarks to choose from.

Measurement Settings
In Measurement Settings, you can select values for Flow Rate and Match Frequency for the porometer, and Flash, Fluorescence Constants, and Modulation values for the fluorometer.
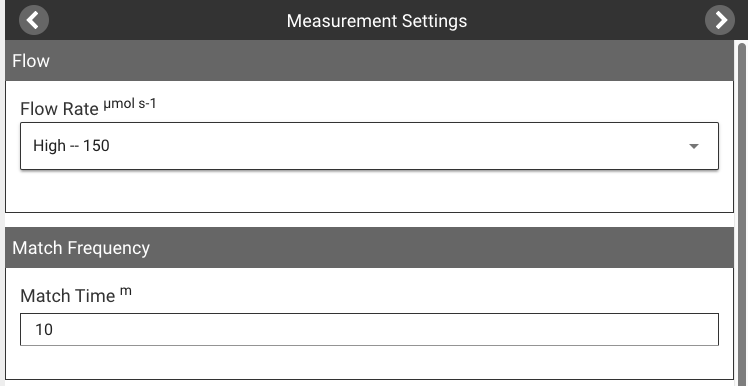
High flow is recommended for most applications to provide the fastest measurement speed with no observed reduction in sensitivity.
Match frequency determines how often the instrument will automatically match. Enter the interval in minutes.
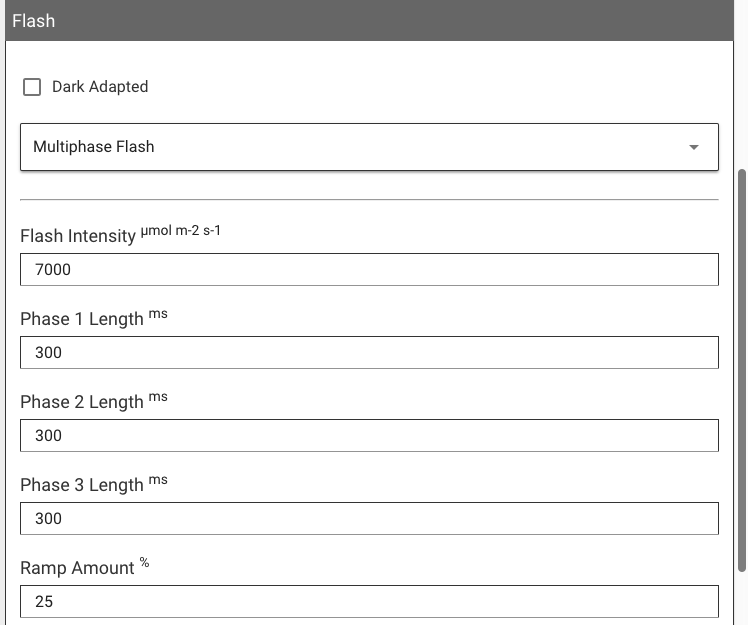
Flash sets the fluorometer flash to light (default) or dark adapted, whether the flash will be rectangular or multiphase (light-adapted measurements), and sets flash intensity and flash length.
If the Dark Adapted box is checked or the Rectangular or Multiphase Flash options are selected, values in Flash and Modulation automatically set to default.
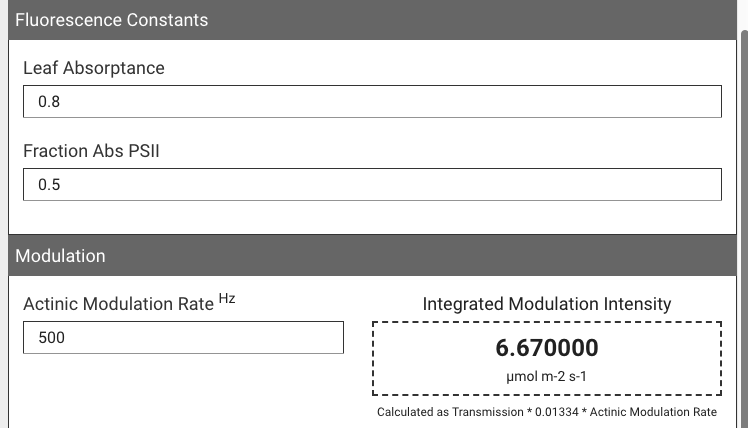
Fluorescence Constants include Leaf Absorptance and Fraction Abs PSII.
Modulation inputs the Actinic Modulation Rate. Integrated Modulation Intensity is automatically calculated.
Display Layout
In Display Layout, you can customize the layout and variables that are visible on the LI-600 Measurement screen.
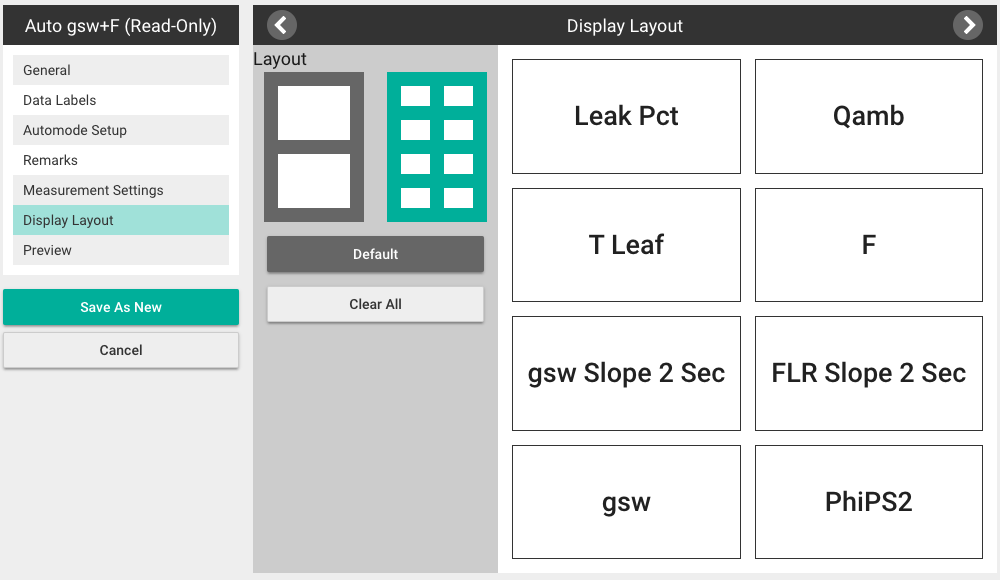
To change variables, click into the variable box then select a variable from the list. Select CLEAR to leave a variable box blank, Clear All to remove all variables, and Default to reset the layout.
All variables are recorded in the data files; this setting only indicates the variables seen in the display.
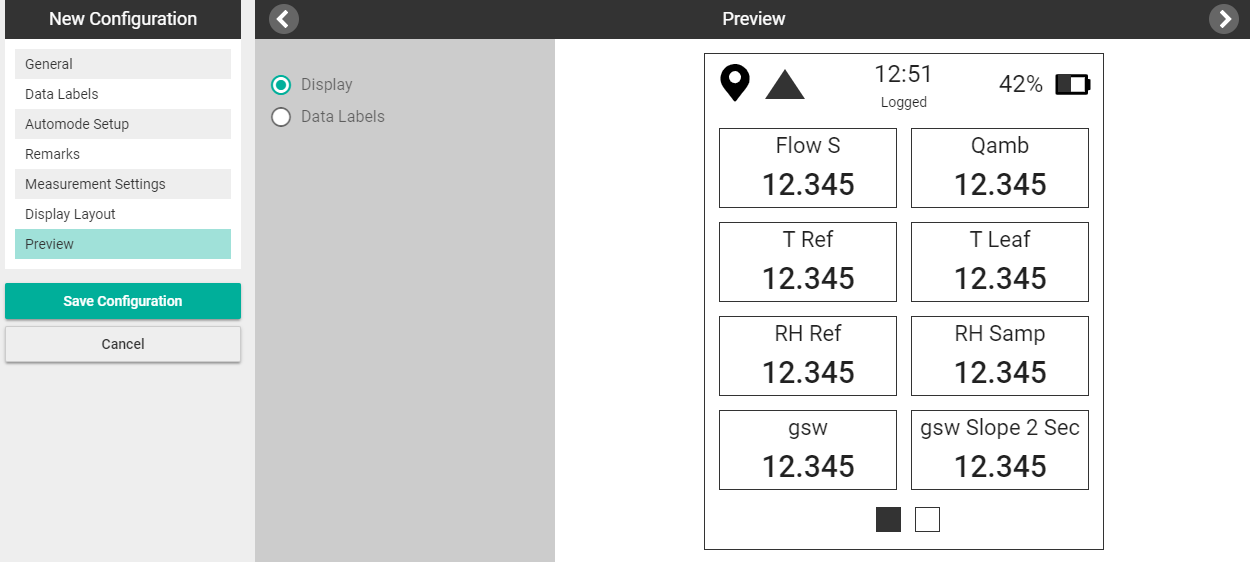
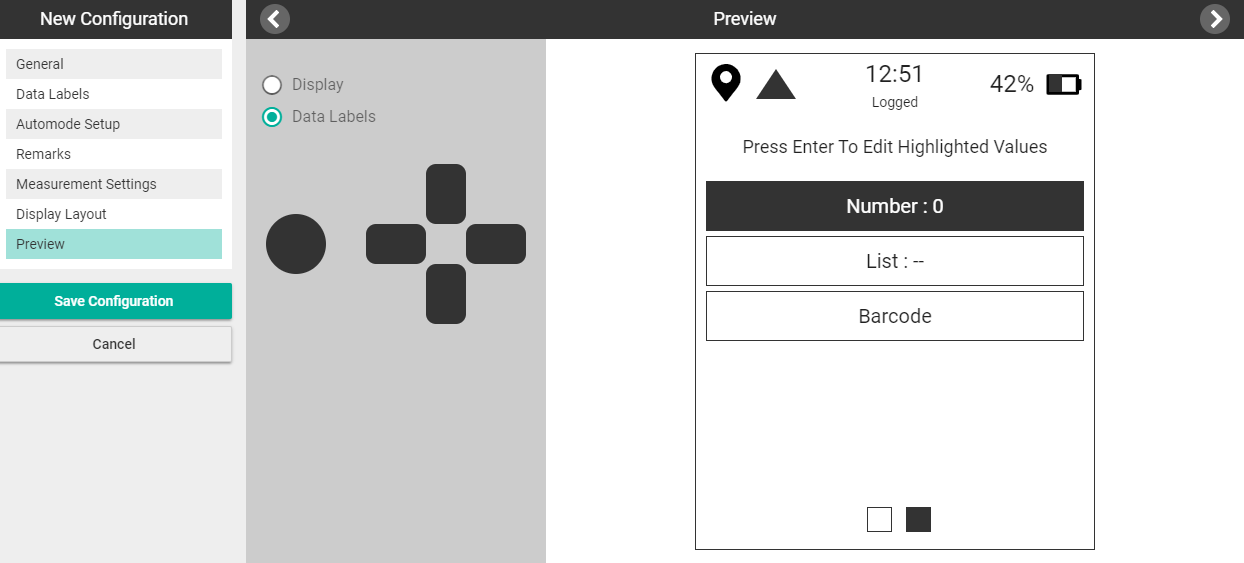
Preview
In Preview, you can view a simulation of the Measurement and Data labels screens.
Save Configuration
Select Save Configuration to save the configuration.
Upload configuration to instrument
If your instrument is not connected, go to Connection Overview from the drop-down menu and connect it. Once conneted, select the Upload button under Local Configurations to add it to the LI-600. Up to four configurations can be loaded onto the instrument at a time.