Using the computer software
The LI-600 computer software is the interface for managing configurations and data, performing user calibrations, and for generating custom barcodes. The software can be used with or without an LI-600 connected.
Download the software and connect the LI-600
Take the following steps to download the software and connect the LI-600 to your computer.
- Install the computer software, which is downloaded at licor.com/support/LI-600/software.html
- Press and hold the Enter button to power on the LI-600.
- Connect the LI-600 with your computer using the micro USB cable.
- The LI-600 will automatically connect with the computer software if the computer software and instrument firmware are up to date. If the software and firmware are not up to date, the computer software will prompt you to update.
Connection Overview
Connection Overview is the software startup screen, and shows the firmware and computer software versions. From here, you can proceed with or without a connected LI-600 or safely eject a connected instrument.
The software may display warning messages. See Software warning when connecting the LI-600 and Software warning when updating the firmware.
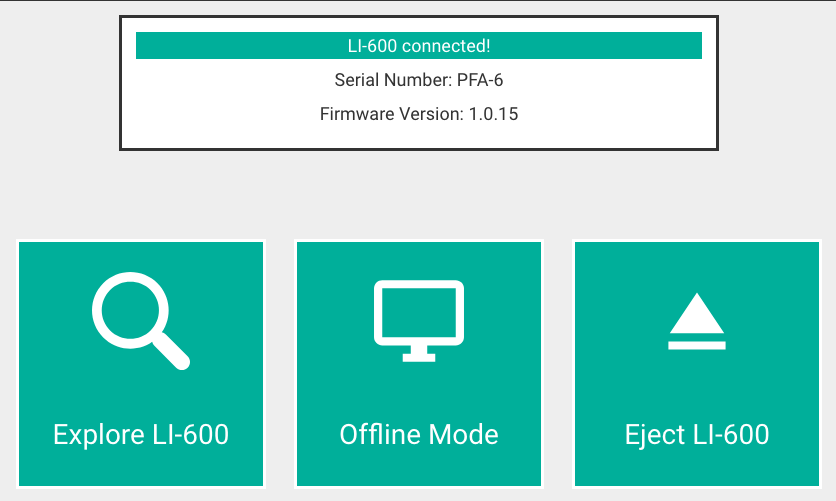
At the Connection Overview screen, you will receive one of two prompts.
LI-600 connected! An LI-600 is powered on and has been discovered by the computer software.
- Select Explore LI-600 to access Configuration Management, Data Management, Live View, Connection Overview, and Barcode Generator.
- Select Offline Mode to access the Configuration Management, Data Management, Connection Overview, and Barcode Generator options that are available without an LI-600 connected.
- Select Eject LI-600 to safely disconnect and power down the instrument.
No LI-600 detected! Connect the instrument to the computer via USB, then wait for the LI-600 connected! prompt to appear, or select Offline Mode to proceed without a connected LI-600.
Home screen
When the LI-600 is connected, select Explore LI-600 to access the Home screen. The Home screen includes a toolbar, a drop-down menu, and tiles for accessing Configuration Management, Data Management, Live View, Connection Overview, and Bar Code Generator.
Toolbar
The Toolbar includes a drop-down menu in the upper left and three buttons in the upper right.
Drop-down menu
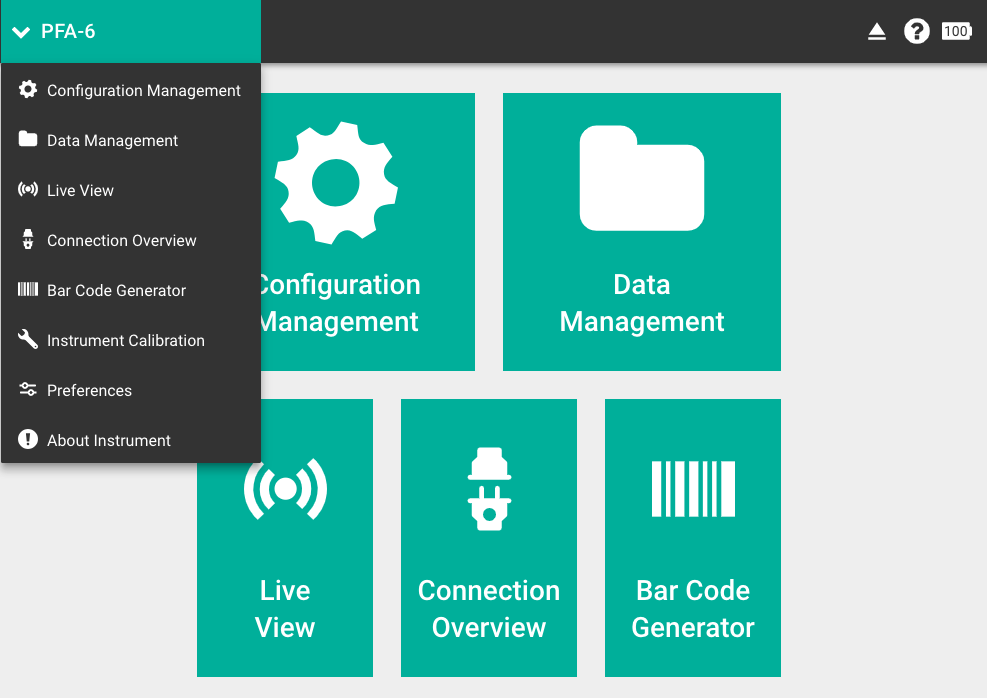
In addition to Configuration Management, Data Management, Live View, Connection Overview, and Bar Code Generator, the drop-down menu offers access to the following:
Instrument Calibration shows user calibration coefficients and user-adjustable parameters. Calibration parameters can be adjusted for the relative humidity (RH) sensors, flow sensors, and a fluorescence detector if there is a fluorometer. See Calibrating the sensors and User calibration procedures for instructions.
Factory Calibration appears in the drop-down menu when Allow Factory Calibration is checked in Preferences. Fluorometer, Intensity, Flow In, Flow Out, IRT, RH, and Miscellaneous values can be edited. Perform a factory reset, download a calibrations file from the LI-COR website, or perform a manual reset using a downloaded file. Select RH in the left menu to change the RH sensor serial number and to calibrate.
Preferences: select the text delimiter for data and log files (comma or tab). Check Allow Factory Calibration to enable Factory Calibration.
About Instrument displays the instrument serial number, instrument firmware version, instrument time, porometer serial number, fluorometer serial number, and the RH sensor serial number.
Buttons

|
Home: Goes back to the home screen. |

|
Safely Eject Instrument: Safely powers down and ejects the LI-600 from the computer software. |

|
View Help: Goes to the LI-COR support website. |

|
Battery Level: Displays the percent battery charge of the connected instrument. |
Configuration Management
When an LI-600 is connected, the Configuration Management menu shows two configuration lists: LI-600 Configurations (those stored on the instrument) and Local Configurations (those stored on the local computer).
LI-600 Configurations
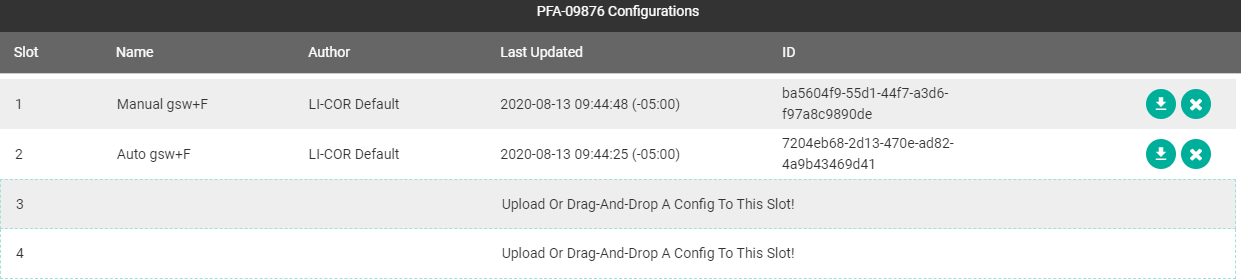
Two configurations come preloaded onto each LI-600: Manual gsw and Auto gsw for the LI-600 Porometer, and Manual gsw+F and Auto gsw+F for the LI-600 Porometer/Fluorometer. They cannot be edited but can be saved as new configurations. If a downloaded configuration has the same name as another, it will be given a randomly generated name (DL-XXX) to avoid a naming conflict. The author name LI-COR Default cannot be used for any other configurations.

|
Download To Computer: Downloads the configuration to Local Configurations. Select Download on the confirmation prompt to finish. |

|
Remove From Instrument: Removes the configuration from the LI-600. Select Remove on the confirmation prompt to finish. |
Local Configurations
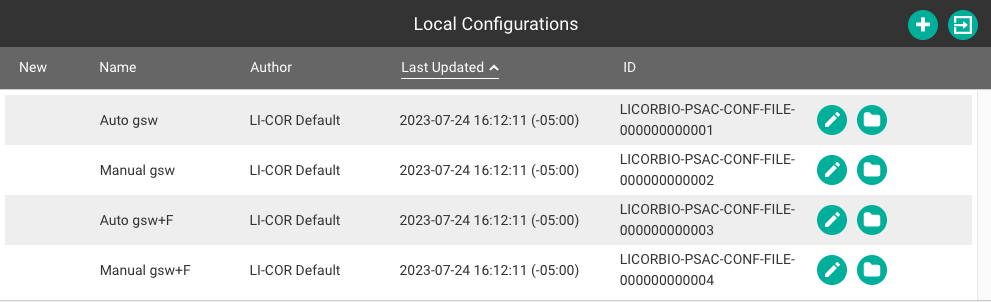
Local Configurations are the configurations created in the computer software. New indicates a configuration that has not been uploaded to an LI-600 since its creation or most recent edit. Double-click on a column heading to sort. Configurations with the same name as another are assigned a randomly generated name to avoid a naming conflict. Configurations can be exported and imported as PSAC files and shared among users.

|
Create New Configuration: Creates a new configuration and saves it to the Local Configurations list. |

|
Import Configuration: Imports a configuration PSAC file. |

|
Edit Configuration: Edits a configuration locally. Edited configurations must be re-uploaded to the LI-600. |

|
Upload To Instrument: Uploads a configuration to LI-600. To replace a configuration, select Replace. Select Upload to complete. |

|
Export To File: Exports the configuration as a PSAC file. |

|
Delete Configuration: Removes the configuration from the Local Configurations list. |
Data Management
From Data Management, you download data from a connected instrument to the software, and export it to your computer as text and Excel files.
LI-600 data
Data on LI-600 lists the date of the last data download. This section indicates the instrument’s serial number and percent of data storage used.

|
Download Instrument Data: Downloads all processed data on the LI-600 to the computer software. A data dump is also downloaded as a precaution. |
|
|
Clear Instrument Data: Removes all data from the LI-600. |
Local Files
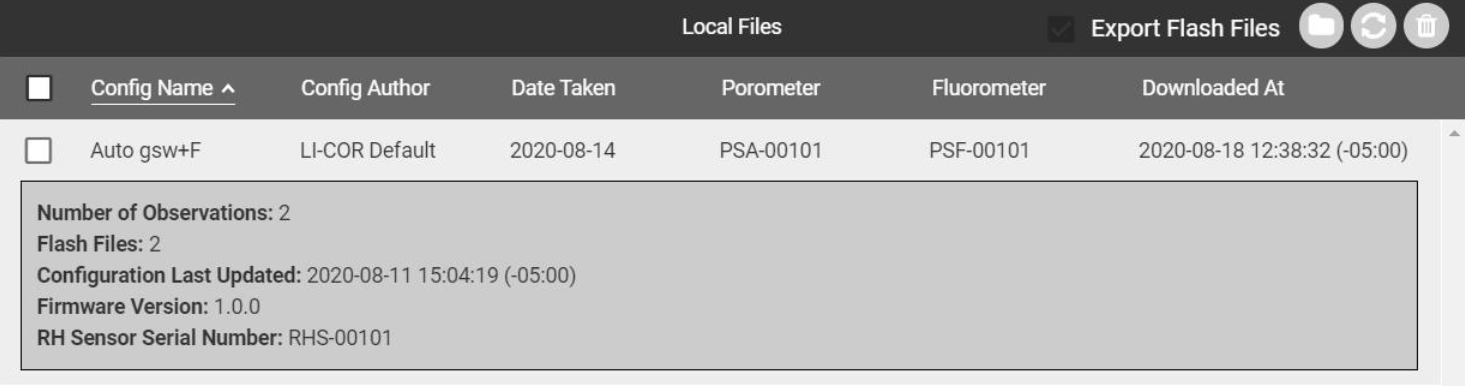
Local Files lists data and metadata stored in the computer software. You can sort the files by column and toggle the metadata view.
Exporting files
The two check boxes and icons in the upper right give you options for exporting Excel files with embedded equations and fluorometer flash files. The two icons above the check boxes are for exploring and importing data dumps (see Data dumps).

Data files are managed and exported using the buttons listed in the table below.

|
Export Selected Files: Downloads the selected data files to the computer’s local file system. |

|
Toggle Selected Metadata: Shows or hides selected metadata for the selected file. |

|
Delete Selected Files: Removes the selected data files from the Local Files. |
Live View
Live View streams data from a connected LI-600 and is useful for educational settings. Live data for each selected variable in graph format are displayed, allowing you to view and log data while taking measurements.
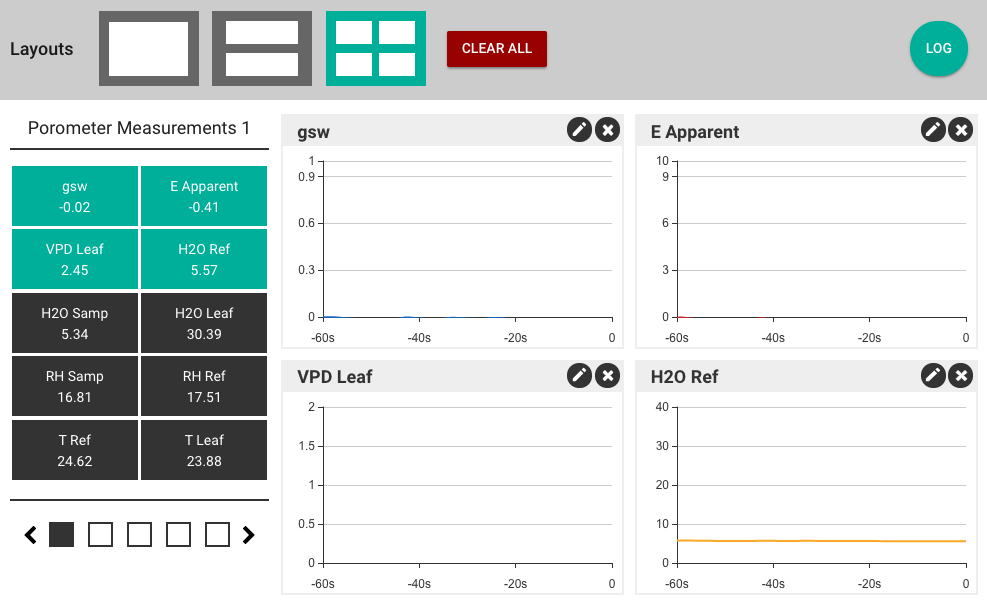
To set up your parameters, select a layout from the top of the screen. Navigate through the five variable screens by selecting one of the five squares or by using the arrows. Drag and drop the desired variables into graph boxes; not all boxes need to be filled. Select CLEAR ALL to remove all variables and reset the graph boxes.
If the screen does not adequately display units, select the graph titles to toggle between chart title and units.

|
Edit a variable's YMin, YMax, and XSize. |

|
Remove deletes a variable from the graph box. |
When taking a measurement, data will appear in real time in the graph boxes. Using the connected LI-600, match and allow the graphs to stabilize, then take a measurement. Measurement data will appear on the computer screen and any additional connected screen.
Select Log in the upper right corner to save the last sixty minutes of data on a per-second basis to the local computer; measurement data can also be downloaded from the LI-600 in the Data Management menu at any given time. If you navigate away from the Live View menu, sixty minutes of live data are automatically saved.
Connection Overview
Connection Overview returns to the computer software startup screen.
Offline Mode
Offline Mode can be accessed with or without a connected LI-600.
When you launch the software without an instrument connected, you go to the Connection Overview screen, where you choose the instrument you're working with.
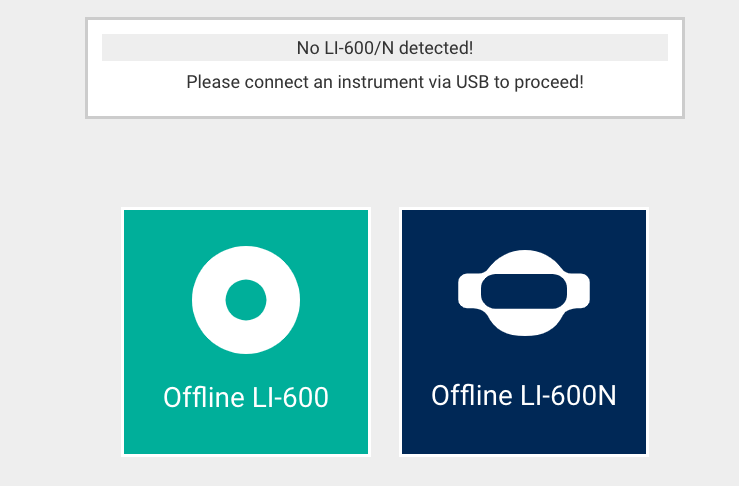
After you select an instrument, you're taken to the Offline Mode Home screen. The drop-down menu includes access to Configuration Management, Data Management, Connection Overview, Barcode Generator, and Preferences. If you have both an LI-600 and an LI-600N and want to switch instruments, go back to Connection Overview.
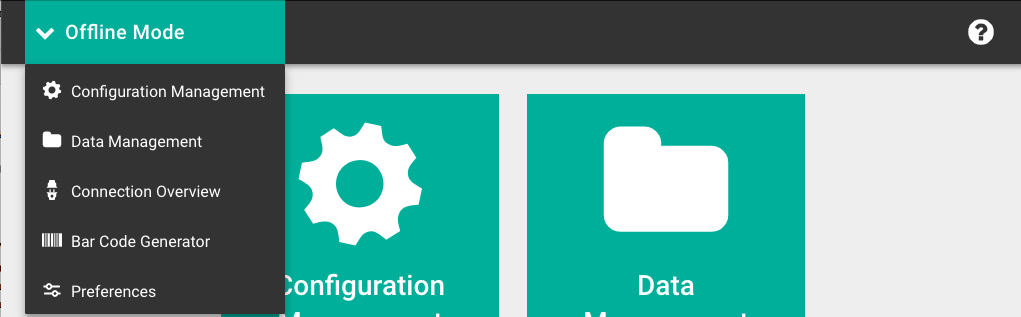
When an LI-600 or LI-600N is not connected to the software, you can create and edit configurations locally, manage data that's been downloaded from the instrument, manage preferences, and create barcodes. The functionality of these features is the same as when an instrument is connected, with the exceptions of not being able to upload configurations, download data, or view live measurements.
Barcode generator
The LI-600 computer software can generate custom barcodes for use with the LI-600 barcode scanner.
From the home screen of the LI-600 computer software, select Bar Code Generator.
Barcode generator screen
The barcode generator screen includes options for barcode format, importing and pasting text, and the barcodes text area.
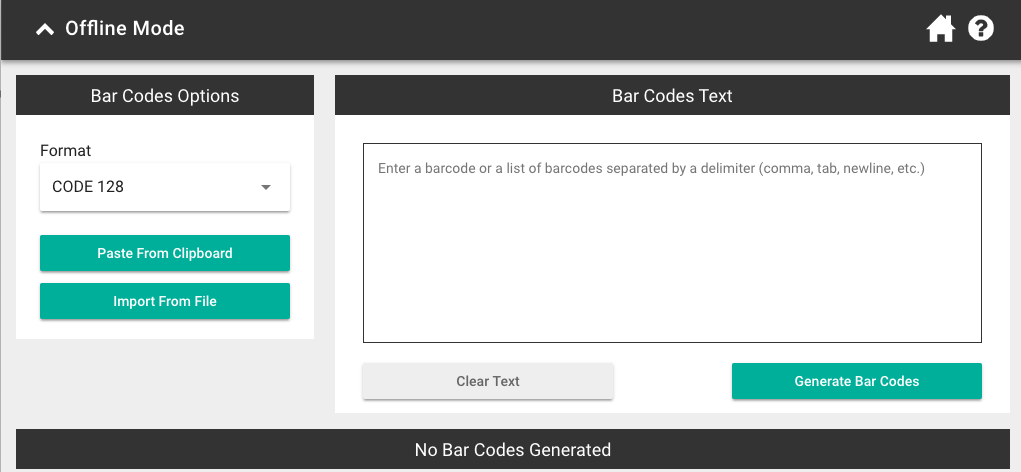
Barcodes Text: Type, paste, or import delimited text into this field. Each barcode is limited to 31 characters.
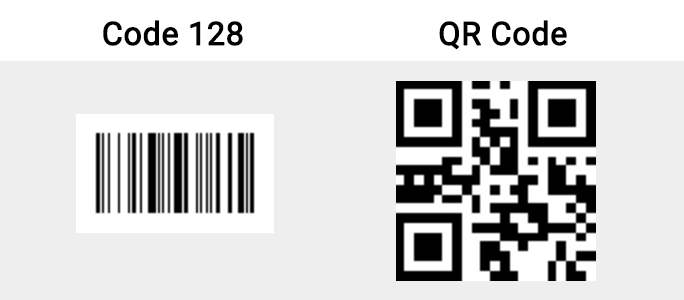
Format: Choose from CODE128 or QRCODE.
PASTE FROM CLIPBOARD: Paste delimited text that has been copied onto your computer's clipboard.
IMPORT FROM FILE: Select a delimited text file from your computer and import it to the Barcodes Text field.
CLEAR TEXT: Clear the contents of the Barcodes Text field.
GENERATE BARCODES: Generate barcodes from the text field and displays them in the bottom portion of the window. The length of the text determines the width of the barcode.
|
|
PRINT PREVIEW: View the barcodes with text as they will appear on a printed page. |
|
|
REMOVE ALL: Clear the generated barcodes. |
You can continue to add barcodes in either format until you're ready to print or save them as a PDF.
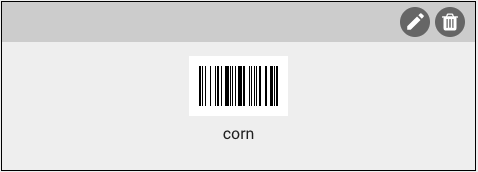
Once generated, barcodes can be edited or removed individually by using the icons in the upper right corner.
Print preview screen
The Print Preview screen displays barcodes as they will appear on a page, with options for paper size and page template.

Paper Size: U.S. Letter (8.5 x 11") or A4 (8.25 x 11.75")
Page Template: Blank page: plain paper; U.S. Letter: Avery 5163 labels 10 per page; A4: Avery L7992 labels 10 per page.
Print: Print or save as a PDF.
Done: Go back to the barcode generator screen.
When used with the LI-600 barcode scanner, the barcode text for each measurement appears in the USERDEF group in LI-600 data files.