PAM-2000 and MiniPAM Adapter
Printable PDF: 6400-06 PAM-2000 and 6400-10 MiniPam Adapter installation instructions
Instructions for installing the 6400-06 PAM-2000 and 6400-10 MiniPAM Adapters from Walz onto the LI-6400/XT Portable Photosynthesis System.
Installation
- Unhook the PAR sensor connector from the port on the side of the sensor head by gently pulling straight out. You will need to remove the tripod mounting bracket, if attached, to access the connector.
- Remove the upper half of the leaf chamber cuvette (or the 6400-02 LED Light Source) using the 3/32” hex key provided in the spare parts kit. The upper half of the leaf chamber is secured by two long screws that can be seen in front of the cuvette (Figure 1‑1).
- Before installing the 6400-06 or 6400-10 assembly, transfer (or install new) air passage O-rings from the upper leaf chamber cuvette to the adapter chamber.
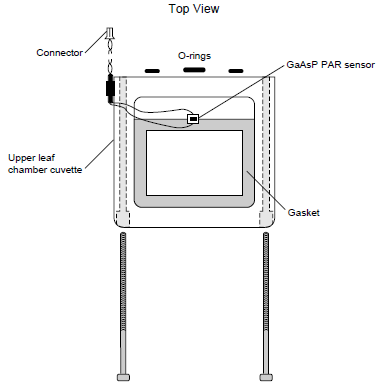
- Install the 6400-06 or 6400-10 assembly with the two long screws from Step 2. Attach the PAR sensor connector as shown in Figure 1‑2. Make sure the PAR sensor is attached to the connector near the rear of the analyzer housing, not to the log switch connector.
- If you have OPEN V2.5 or above, use the “_Options Installer” in the Config Menu to add the GB-nnn calibration of the 6400-06 or 6400-10 chamber top to your calibration file, and to generate a configuration file.

Making Measurements (PAM-2000)
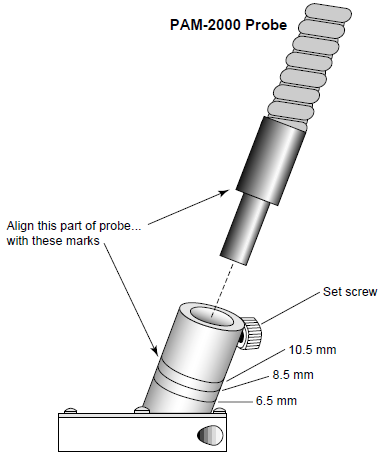
- Insert the PAM-2000 probe into the adapter chamber as shown in Figure 1‑3. The probe distance from the leaf surface can be set at 6.5, 8.5, or 10.5 mm, by aligning the large end of the probe’s barrel with the marks inscribed on the adapter, as shown in Figure 1‑3. Tighten the set screw to hold the probe in place.
- Orient the sensor head and 6400-06 chamber so that the leaf and PAR sensor are exposed to full sun as much as possible; some shading may occur regardless of the orientation, however.
Making Measurements (MiniPAM)
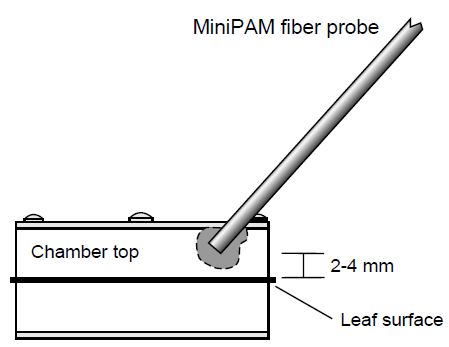
- The probe is glued into position at a distance of between 2 and 4 mm from the leaf surface. Röhm Acryfix 190 is the manufacturer’s recommended adhesive; if this is not available, an epoxy cement that dries in one hour or overnight can be substituted. Do not use an adhesive that will react with the acrylic chamber top. Apply the adhesive to the measurement end of the MiniPAM probe and insert into the adapter chamber as shown in Figure 1‑4.
- Note that Röhm Acryfix 190 and epoxy cements are permanent adhe- sives; the probe cannot be removed from the chamber after installation. If you intend to reuse the probe for other applications, you can affix the probe with an adhesive such as Dow Corning 3145 RTV or equivalent, which is a non-corrosive clear silicone sealant that will hold the probe in place, yet remain pliable enough for removal, if desired.
- Orient the sensor head and 6400-10 chamber so that the leaf and PAR sensor are exposed to full sun as much as possible; some shading may occur regardless of the orientation, however.