
Controlling custom events from a BP
SETCONTROL command
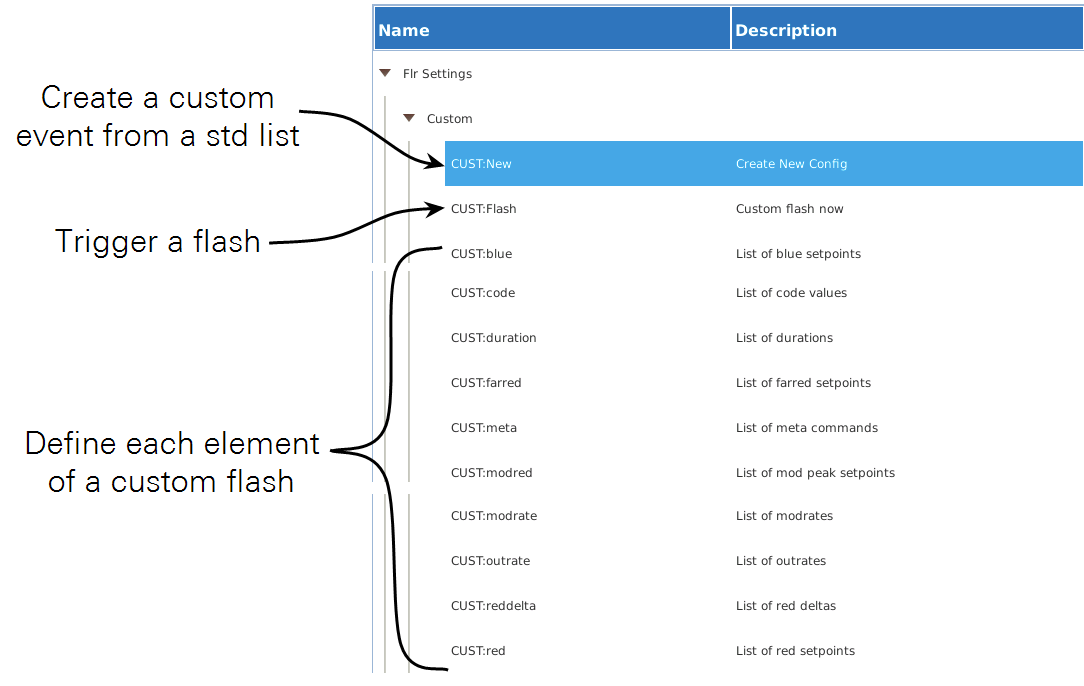
The SETCONTROL command has 12 variations for a custom event (Figure 12‑130). CUST:New lets you create a custom flash configuration based on a current standard event (MPF, RECT, etc.). CUST:Flash triggers the currently defined custom event to execute immediately. The remaining variations are for defining any of the attributes of a custom event. You are, in effect, defining a custom flash column by column using these options.
In all cases, the SETCONTROL CUST:xxx operates immediately on the fluorometer; the GUI will reflect changes that the fluorometer reports. The one exception to this in the GUI is the custom event table editor, which does not interact with the fluorometer until you exit with Apply.
The counterpart of these commands, that is, reading what the current values are rather than setting them, can be obtained. With an ASSIGN:XML statement, with the XML target set to
licor/li6840/cfg/customflash/nnnn
where nnnn is one of the following: meta, code, duration, modrate, outrate, Q_red_setpoint, Q_red_delta, Q_blue_setpoint, Q_farred_setpoint, Q_modrate.
You can use that same XML target with the BP.getXML() method to get the value in a different context, as the expression of a simple ASSIGN, in an EXEC statement, etc. For example
durs = BP.getXML(’licor/li6840/cfg/customflash/duration’)
would assign the variable durations to a string such as
'50000 100000 300000 300000 50000'
The following code snippet illustrates getting the value string for a custom flash category, modifying it, then sending it back.
:
# Get current custom event red target values (as a string)
EXEC(0,source="reds = BP.getXML(cfxml+'Q_red_setpoint')"),
:
# Do something to reds, like let the user edit it in a dialog
:
# Send it back to the fluorometer
SETCONTROL("CUST:Q_red_setpoint","reds","string"),
:
custom_flash_lib.py
The library file named /home/licor/resources/custom_flash_lib.py supports a number of custom event related tasks. To use from a BP, you reference it with an EXEC statement. The module supports three methods that duplicate New, Load , and Save on the Custom Settings interface (A quick tour). It also supports two classes (FlashStep and CustomFlashDef) that allow a custom event to be build up step by step, but in a much more convenient fashion that provided in the WHAT.
customNew(name)
Creates and loads to the fluorometer a custom configuration based on the current definition of name.
name - any of the following: default, induction, rect, mpf or dark.
customLoad(filename)
Read a custom event definition from a file and loads it in the fluorometer.
filename - The file name to be read. e.g., mydef.json, or mystuff/flash10
If the name does not end in .json, it will be supplied automatically. Also, the location of the file is forced to /home/licor/flr/custom, so if you pass filename as abcde, the file looked for will be home/licor/flr/custom/abcde.json.
customSave(filename)
Save the current custom event definition to file.
filename - The file name written (or overwritten); same rules as customLoad, above.
FlashStep and CustomFlashDef classes
Consider a custom flash "step" to be like one row in the table view definition. The FlashStep class is simply a container for information for that row. FlashStep takes a number of keywords (and member elements):
code, modrate, outrate, duration, Q_red_setpoint, Q_red_delta, Q_blue_setpoint, Q_farred_setpoint, Q_modred_setpoint.
For convenience, most have allowed shortcuts:
mod, out, dur, red, delta, blue, farred, modred
duration (or dur) can contain units us, ms, or s. No specified units implies seconds. The frequency item (modrate or mod, and outrate or out) allow units of Hz or kHz. Unspecified implies Hz.
Here are some examples of defining a step:
a = FlashStep(duration='1s', modrate='250khz', outrate=100) # Not all keywords need be specified
# Most keywords also have shortcut labels, and variable units are supported
x = FlashStep(code=20, dur='100us', mod='250khz', out='250khz', 'red'=8000)
The CustomFlashDef class is essentially a list of FlashSteps, with the method
addStep()
provided to add steps to the list. (self.steps is in fact the list). You can either pass instances of FlashStep to addStep, or use the same FlashStep keywords to create an "unnamed" step.
A practical example
The BP apps/utilities/hiq_tester.py provides a practical illustration of how to use FlashStep and CustomFlashDef. The program is designed to measure High Intensity Quenching (hiq) as a function of flash intensity on a leaf. The opening dialog, and a sample resulting graph and table, is shown in Figure 12‑131.
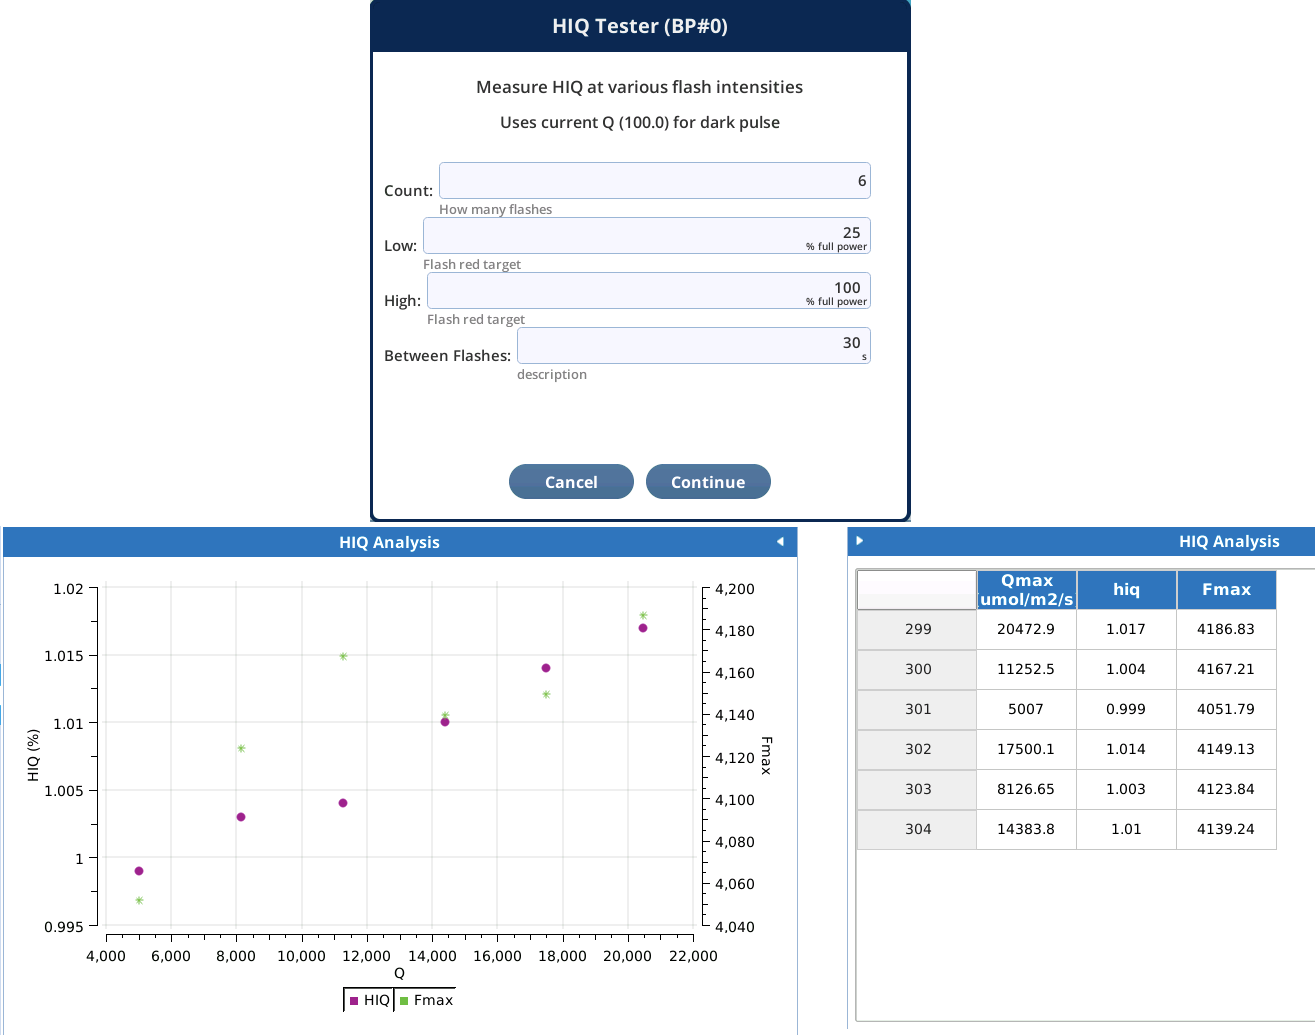
It does this measurement by performing a series of custom flashes of varying intensities between an upper and lower limit. The flash consists of a 400 ms square flash, in the middle of which is a very brief (100 µs) dark pulse (dark = whatever the actinic light intensity was before the flash). The hiq value is the ratio of the highest F during the dark pulse to the value of F just before the dark pulse.
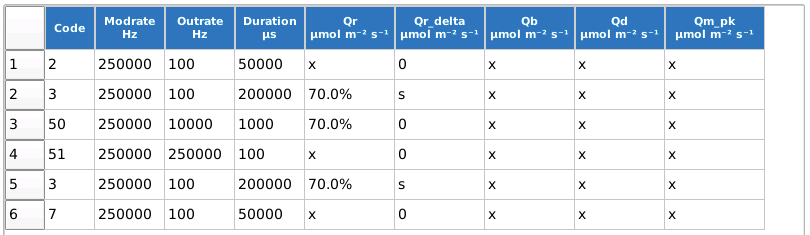
The Table Editor view of one of the flashes is shown in Figure 12‑132. The 100 µsec dark pulse is code 51.
A listing of hiq_tester is shown in .
Listing 12‑6. Abbreviated listing of hiq_tester.py.
steps=[
# custom_flash_lib - Support for CustomFlash and FlashStep classes
EXEC(1,file="/home/licor/resources/lib/custom_flash_lib.py"),
        :
# Floop over flashes, randomized order
LOOP(list="randomList(low, high, count, rounded=0)",
    var="red",
    mininc="gap",
    steps=(
        GROUP("True","Define a flash",
            steps=(
                # build a custom flash, send to flurometer
                CALL("NewCustomFlash", ['red']),
            )
        ),
    GROUP("True","Execute the flash",
        steps=(
    # Wait for result. Filename will be in 'name'
                CALL("FlashAndWait", ['4 # custom flash ', 'name']),
                GROUP("True","Update Graph and Table",
            :
                ),
            )
        ),
    )
),
# Subroutine: DEFINE(name, list_of_args)
DEFINE("NewCustomFlash",
    [['red_pct', 'Value']],
    steps=(
        # The red actinic specifier (% full scale)
        EXEC(0,source="redval='{0}%'.format(red_pct)"),
        # Create the class
        EXEC(0,source="cf=CustomFlashDef()"),
        # THe first margin step
        EXEC(0,source="margin1 = FlashStep(code=2, mod=250000, out=100, dur=50000 )"),
        # The final margin step
        EXEC(0,source="margin2 = FlashStep(code=7, mod=250000, out=100, dur=50000 )"),
        # A rectangular flash for 200 ms, square flash corrected
        EXEC(0,source="normal = FlashStep(code=3, mod=250000, out=100, dur=200000, red=redval, delta='s')"),
        # Increase output rate for 10 ms Our baseline comes from the average of this
        EXEC(0,source="dp1 = FlashStep(code=50, mod=250000, out=10000, dur=1000, red=redval)"),
        # Reduce red actinic to original value for 100 usec. Look for rise in F
        EXEC(0,source="dp2 = FlashStep(code=51, mod=250000, out=250000, dur=100, red='x')"),
        # Now we start assempling the flash, step by step. First step is margin 1
        EXEC(0,source="cf.addStep(margin1)"),
        EXEC(0,source="cf.addStep(normal)"),
        EXEC(0,source="cf.addStep(dp1)"),
        EXEC(0,source="cf.addStep(dp2)"),
        EXEC(0,source="cf.addStep(normal)"),
        EXEC(0,source="cf.addStep(margin2)"),
        # Set the meta computtions
        EXEC(0,source="cf.setMeta('+tadj 3 +dspk +fmax 3[1:] +xl +hiq 51')"),
        # Get the xml config string
        EXEC(0,source="cfxml=cf.getXML()"),
        # Send the xml string to the flurometer
        EXEC(0,source="BP.setXML('licor/li6840/cfg', cfxml)"),
        # Wait a second.
        WAIT(dur="1",units="Seconds"),
    )
),
]