
CO₂
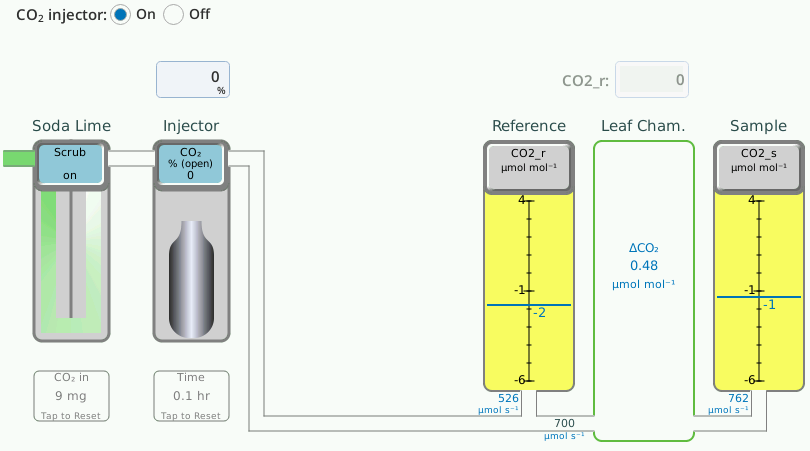
CO2 control is set under Environment > CO2. The instrument removes CO2 from the air stream using the soda lime scrubber and adds a controlled amount of CO2 with the mixer. Be sure there is a charged CO2 cartridge installed for these exercises.


In addition to the buttons, you can tap the graphics for any activated control to open the one-tap scale.
Manually control the CO2 concentration
You can control the CO2 injector and scrubber (soda lime) independently of each other. We'll begin by just operating the injector. You can control the soda lime and injector both manually, but normally you'll let the instrument control them automatically based on target value for the sample or reference gas analyzer or the leaf chamber.
- Set the flow to 700 µmol s‑1.
- Turn the CO2 Injector On.
- Set the Soda Lime to Auto. Tap the button and select Auto, if needed.
- Tap the Injector button and then tap the cartridge graphic. Tap 100% on the graphic to open the injector all the way.

- The instrument will open the CO2 injector all the way to achieve the highest CO2 possible. Observe the concentrations of CO2_r and CO2_s.
- Tap the Soda Lime button and select On. Set the Injector to 0%.
- Observe the CO2_r and CO2_s values. They should approach zero quickly.
Automatically control the concentration at ambient
- Tap the Soda Lime Scrub button and select Auto.
- Measure ambient CO2.
- To find ambient CO2, make sure flow is turned on then turn the CO2 and H2O controls off and step away from the console so you aren’t exhaling near the instrument’s air inlet. Look at CO2_r to see approximate ambient CO2. Enter that value as the setpoint.
- Tap the Reference (CO2_r) button, then enter the approximate ambient. Close the chamber.
- Observe the concentrations of CO2_r and CO2_s. It may take a minute for the values to stabilize at the setpoint. Since there is no leaf in the chamber, the ΔCO2 should be very close to zero. If the Δ is not close to zero, you may need to match the IRGAs.
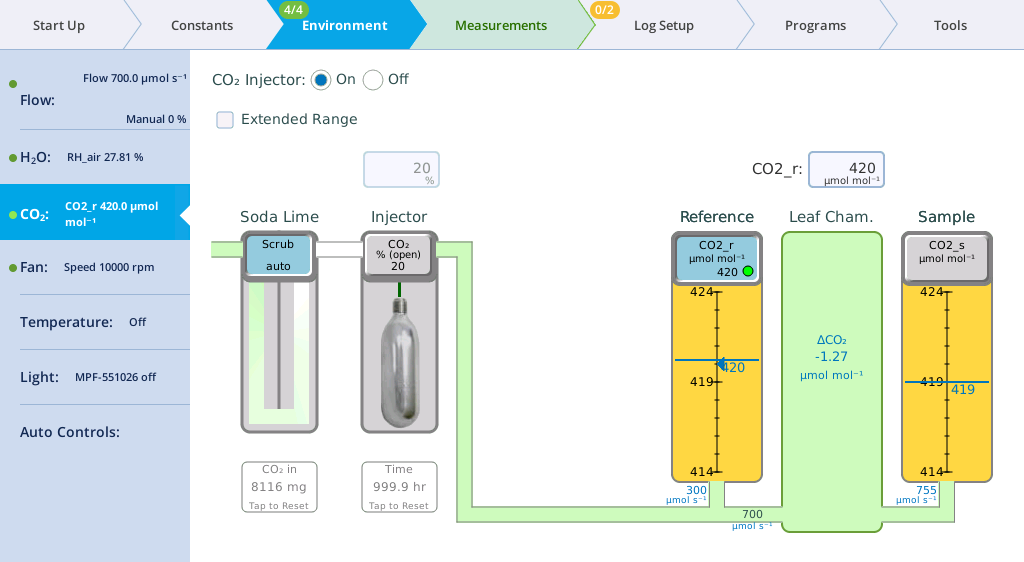
- Enter a setpoint of 5 µmol mol‑1 in the reference cell.
- Observe the reading as the instrument adjusts to achieve the setpoint.
- Try other setpoints and wait for the instrument to adjust between each one. Try 150, 500, and then 1000 µmol mol‑1.
- Observe the measurements in the reference and sample IRGAs, and the value for ΔCO2.
- Turn the CO2 injector off.
Extended control range
CO2 control has a check-box labeled Extended Range. If the air supply for the LI-6800 console is coming from a tank of compressed gas, and you wish to control CO2 concentrations between the tank's concentration and 2,000 to 3,000 ppm above it, you can connect to the Auxiliary port and bypass the soda line (Option 1 in ). Alternatively, if you connect to the Filter Cover inlet on the console (Option 2 in ), you can control from 0 up to the tank concentration with the soda lime on, or from the tank concentration to 2 or 3 thousand ppm above it with the soda lime off. This soda lime control based on target is automatic when set to "auto".
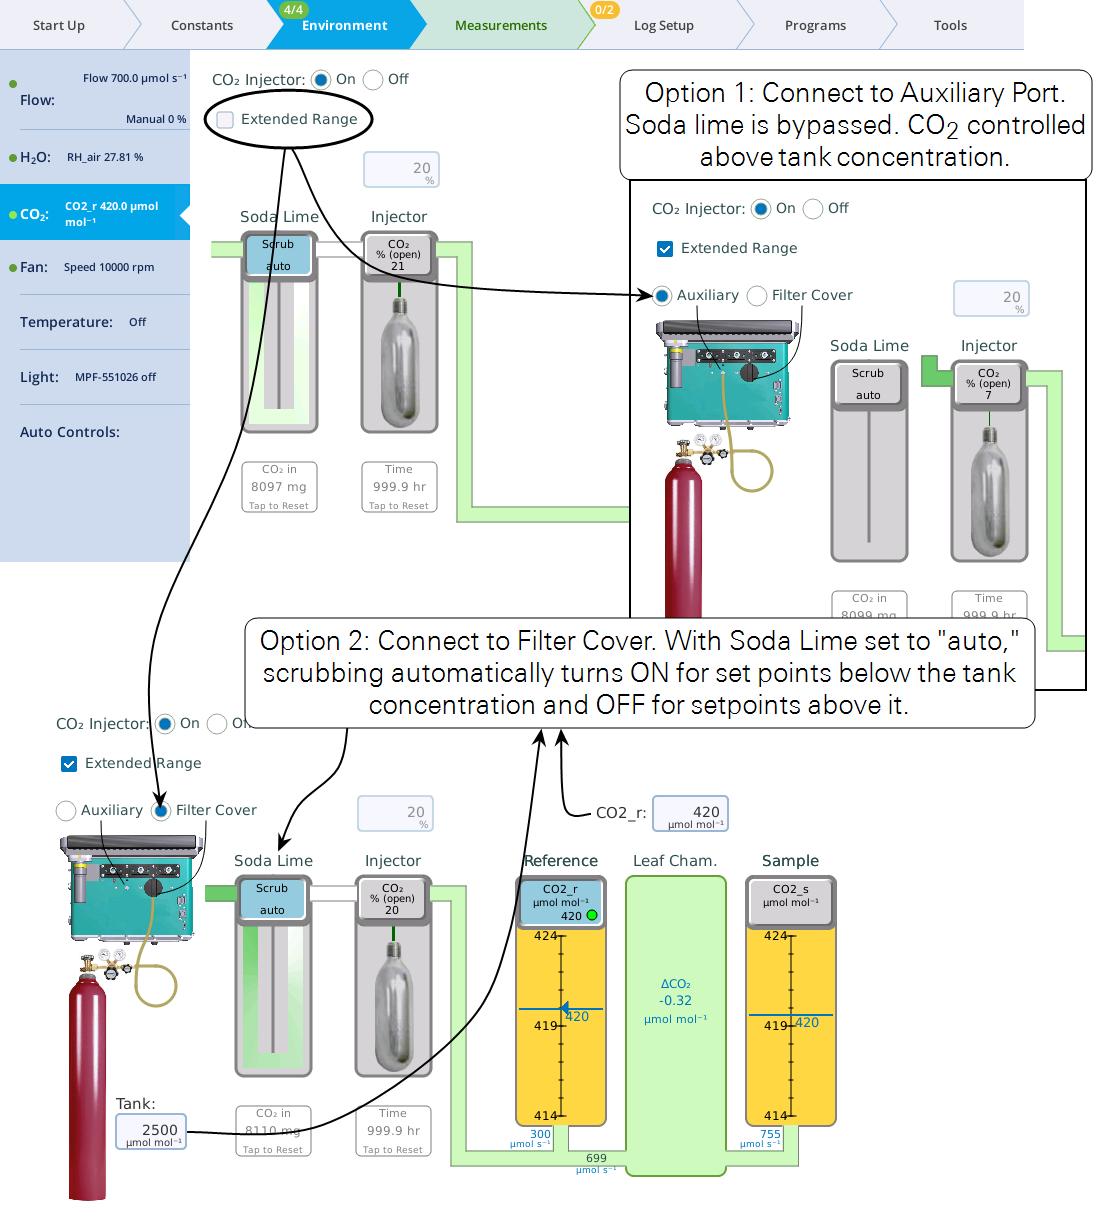
See Connecting an external air supply for details.