
If you are unpacking the LI-6800 for the first time, be sure to remove any shipping and packaging materials from the instrument. Gather the console, head, head cable, CO2 cartridge, desiccant, soda lime, some deionized water, the batteries, and charger. Go through the following pages to put everything together.
Carbon dioxide injector
The CO2 injector consists of an internal controller and an external connection that accepts an 8-gram cartridge. One cartridge will last about 8 hours from the time it is pierced (regardless of whether you use it or not). You can use the optional tank adapter kit (part number 9968-109) rather than cartridges for a larger supply. When you install a new cartridge, you can record this in the instrument (see Fresh cartridge or soda lime?).
Warning: The CO2 cartridges contain high-pressure CO2. Follow the handling precautions provided by the cartridge manufacturer. Use extreme caution if removing the cartridge while it is pressurized. Doing so will cause the compressed gas to vent quickly. If you need to remove a charged CO2 cartridge for any reason, slowly loosen the cartridge holder until the gas vents, then the cartridge can be removed. The cartridge may become extremely cold, so be careful. Keep out of sunlight, and under 50 °C. Never dispose of a full cartridge. Keep out of reach of children.
8-gram cartridges
Insert the cartridge large end first into the holder and install the holder on the console (see Figure 2‑1). Tighten it until you encounter resistance, then quickly twist the holder about ½ turn further to pierce the tip of the cartridge.
Caution: If you buy CO2 cartridges from a supplier other than LI-COR, select oil-free cartridges. If oil is drawn into the CO2 injector, the instrument will have to make a trip back to LI-COR for repairs. Store cartridges with the tip pointing up. We recommend ISI brand: http://www.isi.com/en/culinary/products/isi-chargers/soda-chargers/. Customers in Europe report success with Liss cartridges, available from http://liss-group.com/product/liss-soda-chargers/.
Tank adapter kit
A CO2 tank adapter kit (part number 9968-109) can replace the 8-gram cartridge adapter. It is useful in situations where a tank or other source of pure CO2 is available. The adapter is designed for pressures from 500 to 2000 kPa (73 to 290 psi).
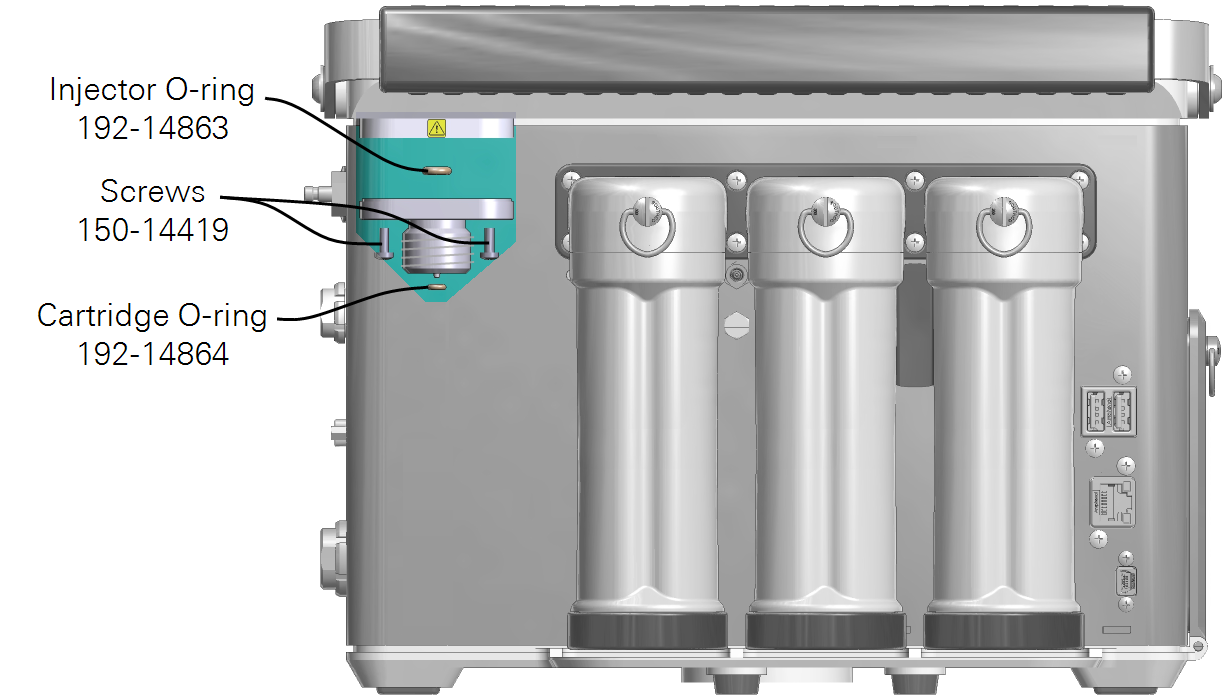
| Tank Adapter Components | Quantity | Part Number |
|---|---|---|
| Injector Plate | 1 | 9868-228 |
| Screws (M3; 8 mm length; Phillips) | 6 | 150-14419 |
| Injector O-ring (AS-106) | 3 | 192-14863 |
| Copper Fitting for 4 mm Tube | 1 | 300-14454 |
| Stainless Steel Fitting for 1/8'" Tube | 1 | 300-14455 |
Warning: Remove the CO2 cartridge before attempting to remove the injector assembly. Failure to do so can cause the cartridge to discharge quickly, which may lead to personal injury.
- Remove the cartridge injector assembly.
- It is held on by two screws.
-
- Assemble the adapter kit.
- The adapter kit has two fittings: A stainless steel fitting for 1/8" tubes and a copper fitting for 4 mm tubes. Install the adapter that works for you.
-
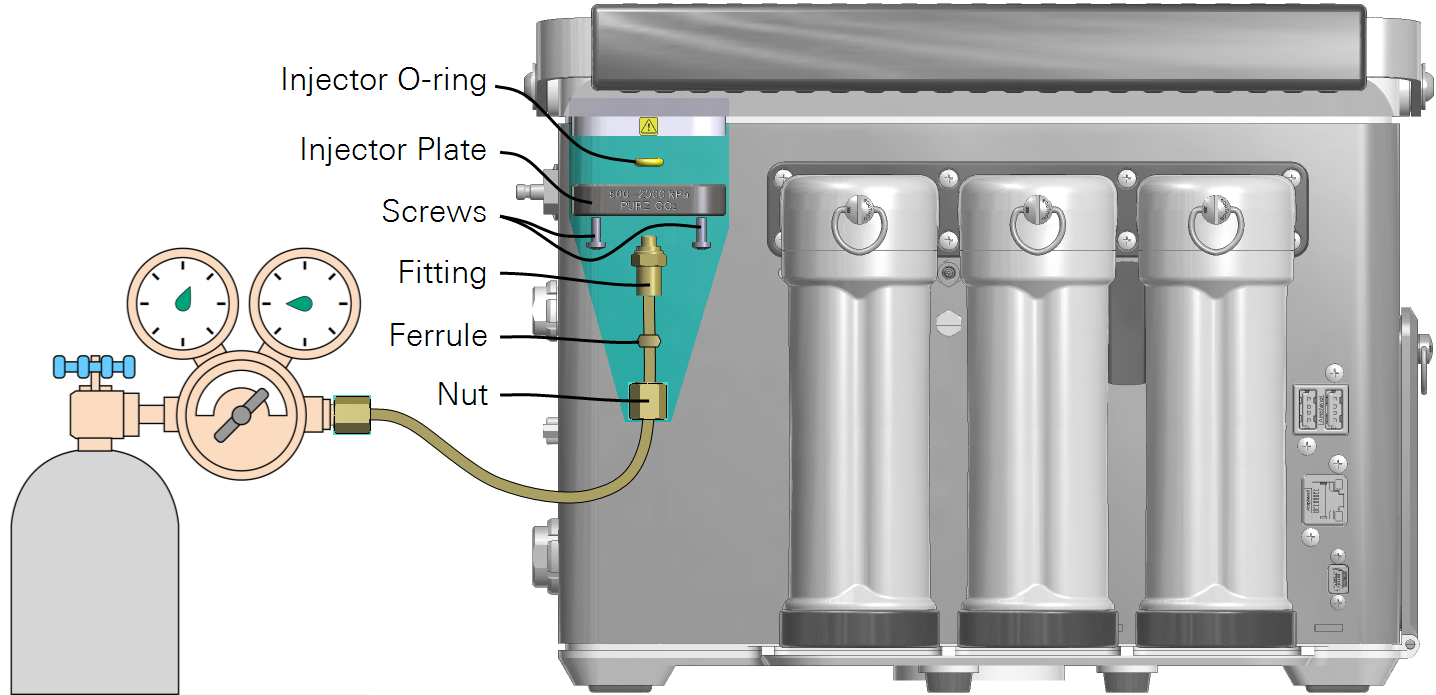
- Test the injector.
- Adjust the pressure regulator to about 1000 kPa (150 psi). Run the system test under Start Up > System Tests > Soda Lime-CO2 to verify that the injector is working as expected.
Using a buffer volume
If you are unable to use a CO2 supply, you can use a buffer volume (a large, enclosed volume of mixed air) to stabilize CO2 in the incoming air stream. When air is moved through a buffer volume, fluctuations in incoming CO2 are greatly dampened. This air can be stable enough to use for gas exchange purposes (Figure 2‑2).
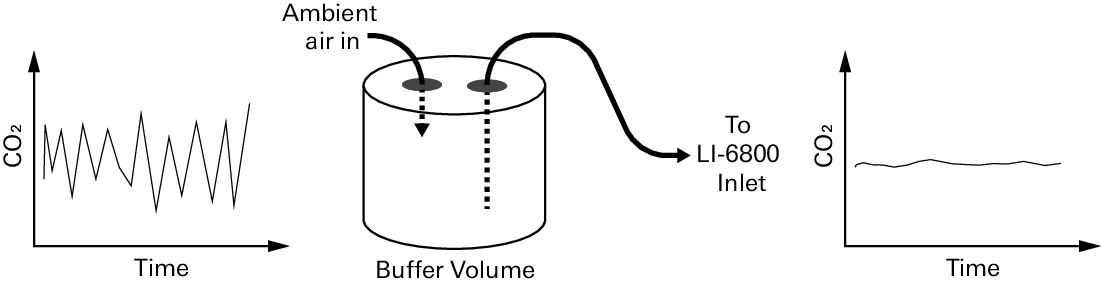
Acceptable volumes depend on the magnitude of the fluctuations that need to be dampened, but several liters is a good starting volume. A 20-liter plastic bucket will work well for most setups.
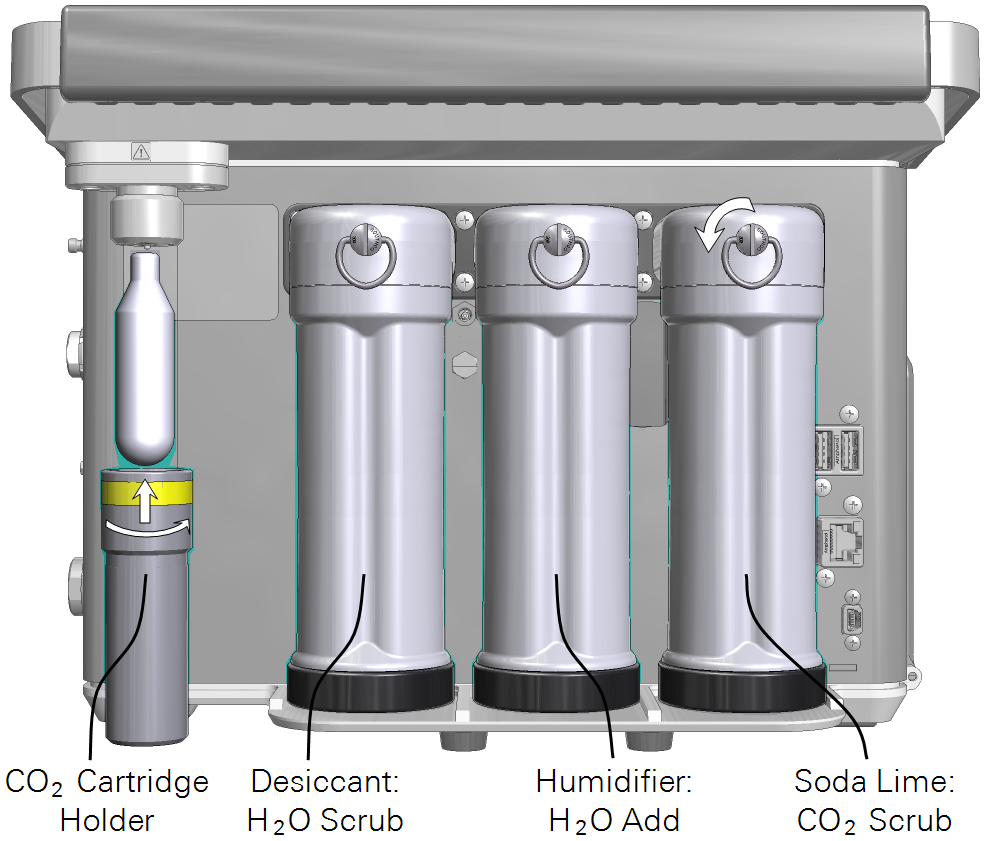
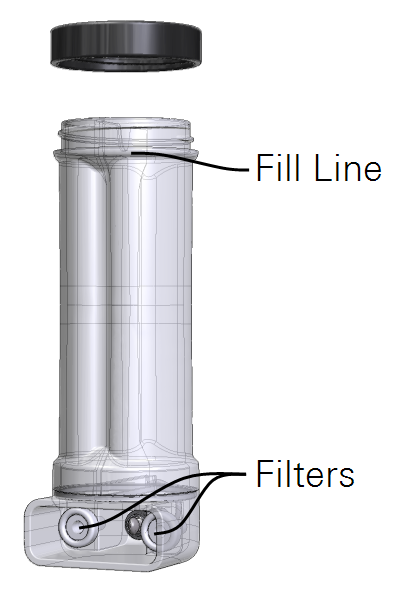
Filling the columns
Three chemical columns on the back of the instrument hold chemicals that condition the air stream. The columns—which are desiccant, humidifier, and soda lime—should remain attached to the console at all times, except when changing the chemicals. During transportation or storage, remove the humidifier column to ensure that water does not enter the console.
- Detach the columns one at a time so they do not get mixed up. Turn the clasp ¼ turn counterclockwise and pull it away from the console.
- Fill the desiccant and soda lime columns to ½ cm from the top. Leave enough room to shake the column gently to break up channeling. Fill the humidifier column with water.
- Be sure the O-ring and threads are clean and dry. Wipe them to remove dust and water before reassembling.
The desiccant column
The desiccant column holds Sorbead® Orange CHAMELEON® or Drierite® desiccant. The desiccant removes water vapor from the air. When filling the column for the first time or replacing spent desiccant, you can record this in the instrument.

LI-COR recommends Sorbead Orange CHAMELEON for the LI-6800 because indicating Drierite has been banned in some regions. Sorbead is an indicating aluminate silicate gel. However, indicating and non-indicating Drierite remain suitable options for the desiccant.
To regenerate Drierite or Sorbead
Both indicating Drierite and Sorbead can be regenerated. Indicating Drierite is blue when dry and pink when it needs to be regenerated. Sorbead Orange CHAMELEON is orange when dry and colorless when it needs to be regenerated.
- Place in an oven.
- Drierite: 60 minutes at 210 °C (425 °F).
- Sorbead: 60 to 120 minutes at 120 °C (248 °F).
- Preheat the oven. Spread a single layer of the granules in a shallow pan and heat for an hour. Less heat for a longer time will not work, nor will more heat for less time.
- Seal in a glass container while still hot.
- After the dry color is restored (blue for Drierite, orange for Sorbead), place the hot regenerated material into a glass container and close the lid while it is still hot. Do not place hot beads into a plastic jar. Store the regenerated desiccant in a sealed glass jar. Avoid plastic containers.
Note: The color of the indicating Drierite will become less distinct after successive regenerations. If Drierite or Sorbead turns black, you’ve overheated it. Sorbead beads may break over time but the performance is not affected.
The humidifier column
Instruments shipped after July, 2020 use a humidifier column with selectively permeable Nafion™ tubing to humidify the air stream. If your instrument includes the older Stuttgarter Masse humidifier column, see Stuttgarter Masse substrate.
Nafion humidity exchanger
Important: Do not put Stuttgarter Masse crushed ceramic substrate into the Nafion tubing column! Doing so may damage the tubing. Do not fill a Stuttgarter Masse crushed ceramic substrate with liquid water. The instrument will be damaged if the Stuttgarter Masse column has standing water in it. See Stuttgarter Masse substrate for more information.
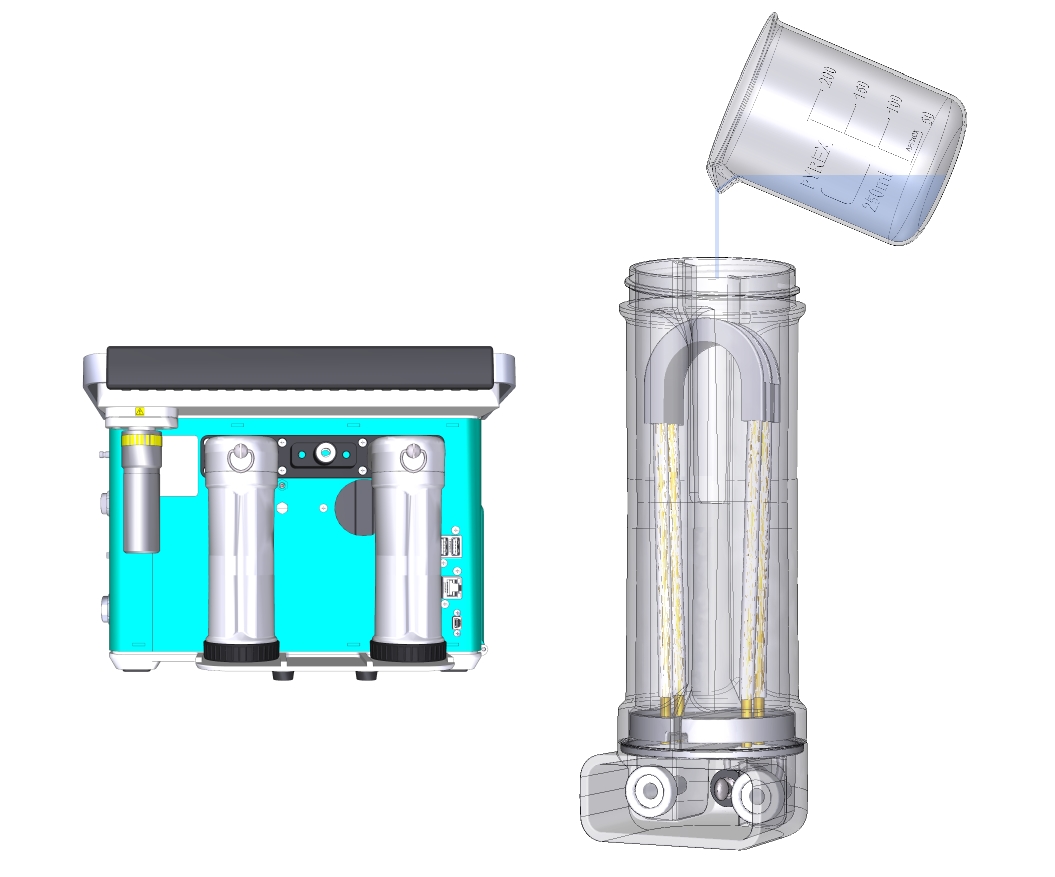
The humidifier column with Nafion tubing should be filled with filtered water. After filling, tighten the cap securely and install the column on the instrument. If any liquid is leaking from the column, remove it immediately and check the tightness of the cap. The column should not leak water under any circumstances. Remove the column each night. Empty the column before shipping or storing the instrument. When the water level in the column is below ¼ full, simply add more water.
Stuttgarter Masse substrate
Stuttgarter Masse is a porous ceramic substrate that holds liquid water. Water evaporates into the air stream as it passes through the substrate. When you wet the Stuttgarter Masse, you can record this in the instrument.
Caution: Do not add too much water to the column! If there is standing water in the column, if the air creates bubbles as it passes through the column, or if the granules form a clumpy, aqueous mess, it has too much. This may damage the instrument, requiring costly repairs. If there is too much water, pour the substrate onto a dry paper towel to soak up the extra water. After allowing the towel to absorb some water, pour the substrate back into the column.
Warning: Stuttgarter Masse is safe and nontoxic. Nevertheless, do not breathe dust. If inhaled, move to fresh air and continue breathing normally.
Adding water to the substrate
Here we describe a way to moisten the Stuttgarter Masse that will dependably saturate the substrate without adding too much water. You can follow this procedure with new (completely dry) or used (already moist) Stuttgarter Masse substrate.
- Pour about 150 mL of Stuttgarter Masse into a beaker. Add water until it covers the substrate. We recommend filtered water. Tap water will work, but minerals may build up in the substrate.
- Pour off the excess water—through your fingers or a screen—so the moistened substrate remains in the beaker.
- Dump the moistened substrate onto a stack of 3 or 4 paper towels. Allow the towels to soak up some of the water from the substrate.
- Pour the moistened substrate into the humidifier column.
- Wipe the threads on the cap and the column to remove any dry granules, then tighten the cap.
Re-wetting the substrate
When to add water? Add water when you use new Stuttgarter Masse, and periodically afterward. This is how to tell if the substrate needs more water:
- Look at the substrate. When it is wet, it will have a slightly grayish-white color. When it is dry, it will be pure white. Add water if it is visibly dry.
- If the instrument fails the humidity test under Start Up > System Tests > Drier-Humidifier or if there are no water droplets visible on the column walls.
You can either follow the procedure in Adding water to the substrate, or add 10 to 15 mL of water total to re-wet the substrate. Gently shake the column to distribute the water evenly.
The carbon dioxide scrub column
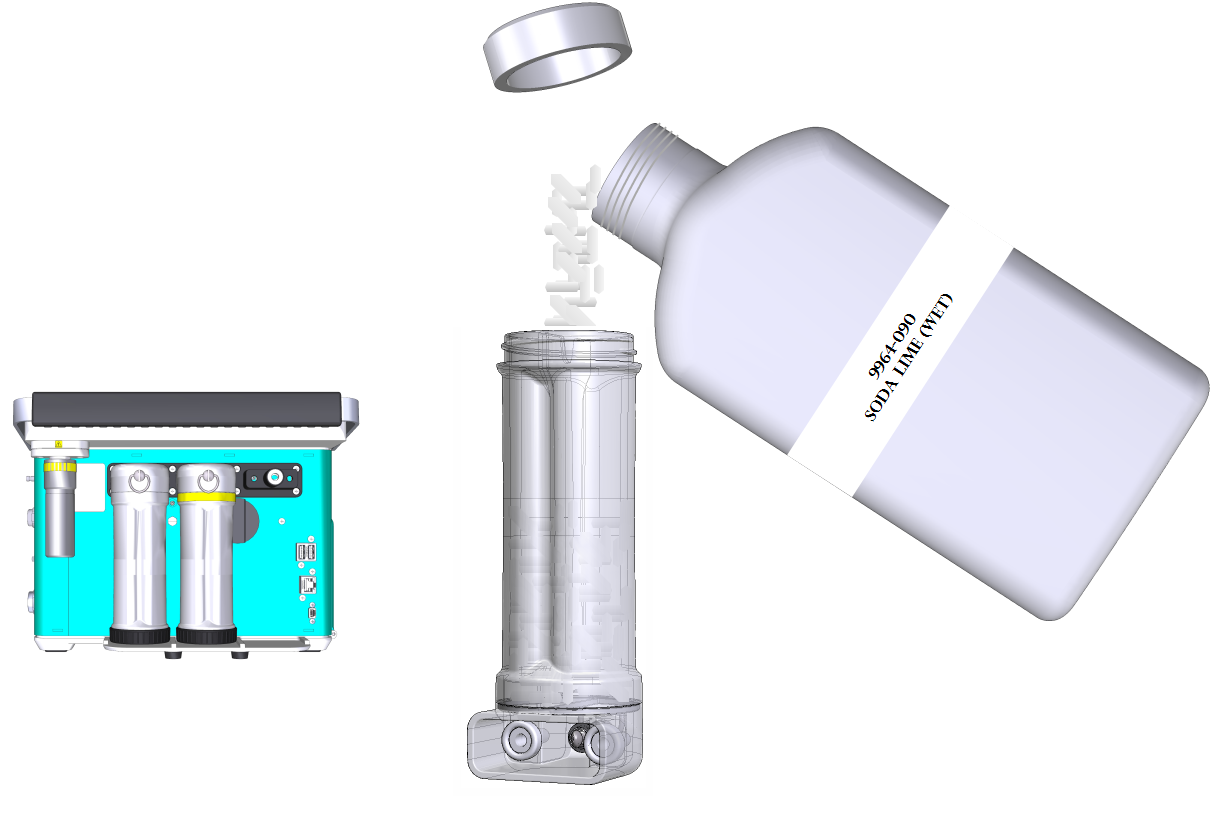
The CO2 scrub column holds soda lime (Ca(OH)2, H2O, NaOH, and KOH). Indicating soda lime changes from white to violet as it becomes discharged. How often the soda lime needs to be replaced depends upon how much CO2 has been removed from the air stream, but it typically will last for several months with regular use. Loss of capacity to scrub CO2 can be recognized by an inability to reduce the CO2 mole fraction to near zero and hold it there, but more likely by a failed system test. When you add new soda lime, you can record this in the instrument.
Warning: Soda lime causes severe burns when wet. Wear suitable gloves and eye and face protection. Keep out of reach of children. In case of contact with eyes, rinse immediately with plenty of water and seek medical advice.
To regenerate soda lime
When used in a dry environment, the scrubbing capacity of soda lime will be greatly diminished. Also, as the soda lime becomes saturated it will have reduced scrubbing capacity. Rather than replacing it with fresh soda lime, you can extend it a bit by adding a small amount of water (about 10 mL) to the soda lime tube.
When adding water to soda lime, do it slowly, letting the chemical absorb the liquid. Then, hold the tube horizontally and shake it to distribute the moistened (and clumpy) pellets. Avoid adding too much water; if liquid water gets out of the tube during operation, downstream parts will become corroded.