Communication with the MQTT protocol
The LI-7815 Trace Gas Analyzers can communicate with devices using the Message Queuing Telemetry Transport (MQTT) protocol. MQTT is a machine-to-machine communication protocol that supports many programming languages, described at github.com/mqtt/mqtt.github.io/wiki/libraries. The instrument uses the Eclipse Mosquito, an open source MQTT broker.
Here we provide basic examples that describe how to read data from the instrument in a terminal program, send and receive calibration information in a terminal program, and how to save data to a computer using a simple script written in the Python language. These tutorials are for novice users.
Terminology
Here we provide a simple summary of terminology used in MQTT. These terms are described in greater detail by other online resources.
- Server: The gas analyzer is a server that sends information.
- Client: The computer or device that is receiving information. The server can communicate with any client device that is configured to run an acceptable programming language.
- Broker: Software that mediates communication between the server (gas analyzer) and client (your computer or data logger).
- Topic: A collection of information that the servers sends.
- Subscribe: A client's request for a topic; the client subscribes to a topic. When subscribed, the publisher sends that topic to the client.
- Publish: The act of sending a topic to a client.
Basic commands in a terminal program
The instrument can be controlled from a terminal program (macOS) or command prompt program (Windows). With gas analyzers, that means you can set the zero and span calibrations, read the calibrations, and read data with diagnostics. In the following section, we describe how to perform these basic functions.
This tutorial uses Eclipse Mosquitto, an open source message broker from the Eclipse Foundation which can be downloaded from mosquitto.org/download/. Install it on your computer. We will use two components of mosquitto for this tutorial: mosquitto_pub, which "publishes" information to the instrument (as in, sets the span calibration); and mosquitto_sub, which "subscribes" to information from the instrument, such as current calibration parameters, and measurements.
Streaming data into the interface
This tutorial subscribes to the data topic. Subscribing is described in depth at mosquitto.org/man/mosquitto_sub-1.html.
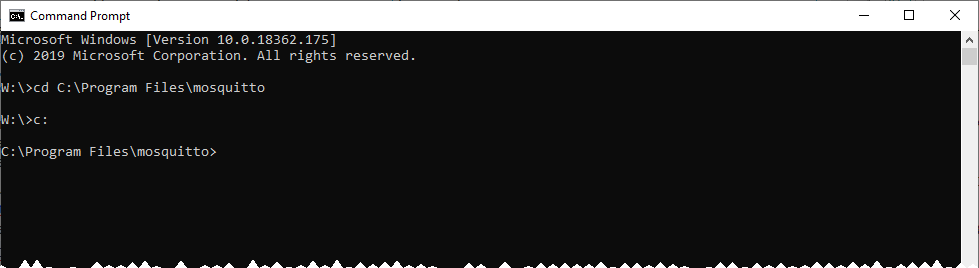
- Launch the terminal or command prompt and open the directory that has the Mosquitto apps.
- The default directory is Program Files\mosquitto.
- Enter the following command to subscribe to the topic.
mosquitto_sub -h 172.24.82.41 -t "licor/niobrara/output/concentration"-
- mosquitto_sub launches the application to subscribe.
- -h specifies a host (the gas analyzer) followed by the instrument IP address
- 172.24.82.41 is the instrument IP address. You can also enter the host name. Both are given on the instrument display.
- -t specifies that you want to subscribe to a topic.
- "licor/niobrara/output/concentration" is the topic and hierarchy.
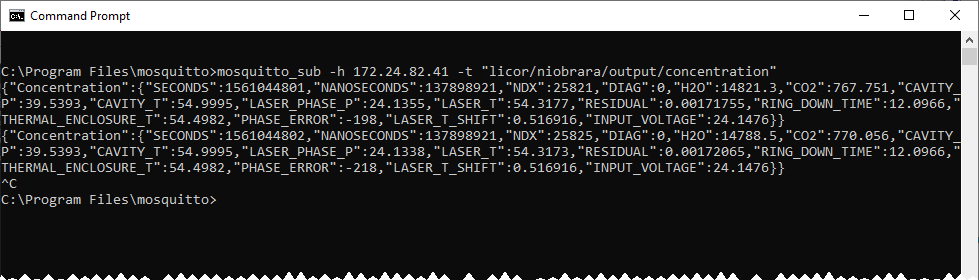
- Type Ctrl + C to stop the script.
Setting the zero calibration
This tutorial publishes to the cfg topic. Publishing is described in detail at mosquitto.org/man/mosquitto_pub-1.html. Select a quality gas and plumb it zero gas to the analyzer air inlet, letting the excess pressure vent to the room.
- To start a zero calibration, enter:
mosquitto_pub -h 172.24.82.41 -t "licor/niobrara/cfg/Start_Peak_Base_Line_Cal" -m-
- mosquitto_pub launches the application to publish (send to the instrument).
- -h specifies a host (the gas analyzer) followed by the instrument IP address
- 172.24.82.41 is the IP address. You can also enter the host name. Both are given on the instrument display.
- -t specifies that you want to subscribe to a topic.
- "licor/niobrara/cfg/Start_Peak_Base_Line_Cal" is the topic and hierarchy.
- -m specifies that you are sending a message from the command line.
- "1" is the message.
- This command initiates the baseline calibration. The process takes several minutes (up to 5 minutes). Wait until the process is finished before moving on to other commands.
- To check if the zero is complete, enter the command:
mosquitto_sub -h 172.24.82.41 -t "licor/niobrara/cfg/Start_Peak_Base_Line_Cal- The instrument will reply with "0".
- Type Ctrl + C to stop the script.
Setting the span calibration
Follow suitable spanning procedures, as described in Instrument calibration. Plumb a span gas to the analyzer air inlet. Use a span gas balanced in air (do not use a nitrogen-balanced gas).
- To start a span calibration, enter:
mosquitto_pub -h 172.24.82.42 -t "licor/niobrara/system/CO2_Span" -m "<CO2 tank in ppm>"-
- mosquitto_pub launches the application to publish (send to the instrument).
- -h specifies a host (the Trace Gas Analyzer) followed by the instrument IP address
- 172.24.82.4x is the IP address. You can also enter the host name. Both are given on the instrument display.
- -t specifies that you want to subscribe to a topic.
- "licor/niobrara/system/CO2_Span" is the topic and hierarchy for the LI-7815.
- -m specifies that you are sending a message from the command line.
- "<CO2 tank in ppm>" is the CO2 concentration in PPM.
- This initiates the span calibration in the LI-7815. The span is implemented immediately.
- To check if the span is complete, enter the command:
mosquitto_sub -h 172.24.82.42 -t "licor/niobrara/cfg/CO2_Span"- The instrument will reply with the span value (near 1) like "1.00242"
- Type Ctrl + C to stop the script.
Rebooting the instrument
To restart the instrument, send the following command:
mosquitto_pub -h 172.24.82.41 -t "licor/niobrara/system/reboot" -m "reboot"This initiates the restart cycle, beginning with a purge of the optics.
Powering off the instrument
To power off the instrument, send the following command:
mosquitto_pub -h 172.24.82.41 -t "licor/niobrara/system/shutdown" -m "shutdown"This initiates the shutdown, beginning with a purge of the optics. There is no command to power on the instrument remotely.
Basic commands with a Python script
Python scripts can be used in Windows, macOS, and Linux operating systems, and with other computing devices. Here we describe some basic processes on Windows and macOS computers.
Configuring paho-mqtt in Windows
Python is not included with Windows by default, but you can download a suitable version from the Microsoft Store.
- Download Python and install it on your computer.
- Press the Windows key (
 ) to open the search bar. Type Store and press Enter to open the store. In the store, search for Python. Install Python 3.7.
 - Launch the command prompt program.
- Press () to open the search bar. Type Command Prompt and press Enter.
- Install Eclipse Paho on your computer.
- Type pip install paho-mqtt and press Enter. The terminal program will issue a few replies as it completes the installation. Now your computer should have all of the files needed to communicate with the instrument.
Configuring paho-mqtt in Mac or Linux
Although Mac computers include Python by default, you need to install some additional libraries. This is done in the command line interface.
- Launch the terminal program.
- Type CMD + Space to open the search bar. Type Terminal, and press Return.
- Install the PIP package manager for python
- Type easy_install pip and press Return. If you get an error, type sudo easy_install pip.
- Install Eclipse Paho on your computer.
- Type pip install paho-mqtt and press Return. If you get an error, type sudo pip install paho-mqtt. The terminal program will issue a few replies as it completes the installation. Now your computer should have all of the files needed to communicate with the instrument.
Streaming data into the Terminal Program
These are basic steps you'll follow to see data streamed into a terminal program on macOS or the command prompt on Windows. Before attempting to connect with the instrument, power it on and let it warm up. Connect the network cable between the instrument and your computer or your local network.
- Create the python script to read data.
- Copy the following into a text file and save it to your computer's desktop (or another directory) with a .py extension, like read-data.py.
import paho.mqtt.client as paho

def on_subscribe(client, userdata, mid, granted_qos):
    print("Subscribed: "+str(mid)+" "+str(granted_qos))

def on_message(client, userdata, msg):
    msg = str(msg.payload)
    print(msg)


client = paho.Client()
client.on_subscribe = on_subscribe
client.on_message = on_message

client.connect("172.24.82.41", 1883)
client.subscribe("licor/niobrara/output/concentration", qos=1)
client.loop_forever()- Change the IP Address next to client.connect to match that of your instrument. The default port is 1883, so leave that as it is. Save the updated file.
- Run the Python script.
- In the terminal program, change to the directory that has the .py file saved earlier. Type cd desktop on Mac or type cd C:\Users\User.Name\Desktop if you saved them to your desktop (User.Name is a placeholder, used as an example). Then type python read-data.py to launch the script created in step 1. Data will stream into the terminal program.
- Type Ctrl + C to stop the script.
Downloading data in a date and time range
The following script will download data from instrument. The script includes a date and time range, file duration (minutes), as well as the directory that the files are saved to, all of which can be modified to suit your needs. This program uses the Python requests libraries, so we'll begin by installing those.
- Install the requests libraries.
- Launch a terminal on Mac or command prompt on Windows. Type pip install requests or sudo pip install requests in the command line tool. The terminal will issue a few replies indicating success.
- Create the python script to save the data.
- Copy the following into a text file and save it to your computer's desktop (or another directory) with a .py extension, like import-datetime.py.
import datetime
import requests
import socket
slno = 'tgXX-01009.local'
ip = socket.gethostbyname(slno)
dl1 = "http://" + ip+ ":8080/ExportAdvancedData?tmin="
dl2 = "&tmax="
tmz = "-06:00"


dt =    datetime.datetime(2019,5, 10,0,0,0)
end = datetime.datetime(2019,5, 11,0,0,0)
step = datetime.timedelta(minutes=30)

fls = []
ts5= []

while dt <= end:
   ts1 = dt.strftime('%Y-%m-%d %H:%M:%S')
   ts3 = dt.strftime('%Y-%m-%d %H-%M-%S')
   ts2 = ts1[0:10] + "T"+ts1[11:]
   ts4 = ts1[0:10] + "T"+ts3[11:] +".txt";
   ts5.append(ts4)
   fls.append(ts2)
   dt += step
print (fls)
for  i in range(0,len(fls)-1,1):
               url = dl1+fls[i]+tmz+dl2+fls[i+1]+tmz
               print(url +"\n")
               flnm = ts5[i]
               print("Downloading to File Name  " + flnm + "  from  "  + url )
               r = requests.get(url)
               with open("C:/Users/User.Name/Documents/"  + flnm, 'wb') as f:
f.write(r.content)- Modify the script for your instrument, computer, and date range:
-
- Identify the instrument: In snlo='tgXX-01009.local', replace tgXX-01009 with the serial number from your instrument. The letters XX represent numbers.
- Set the beginning time: In dt = datetime.datetime(2019,5, 10,0,0,0), specify the start date and time for the data to download. 2019,5, 10 is the year, month, and day (YYYY,M, DD). 0,0,0 is the hour, minutes and seconds (H,M,S).
- Set the ending time: In end = datetime.datetime(2019,5, 11,0,0,0), specify the end date and time for the data to download.
- Specify the file size (minutes): In step = datetime.timedelta(minutes=30), change the value 30 to the number of minutes you want.
- Set the directory to save the data: In with open("C:/Users/User.Name/Documents/" + flnm, 'wb'), specify the directory.
- Start the script from the terminal program or command prompt.
- In the terminal program, change to the directory that has the .py file saved earlier. Type cd desktop on Mac or type cd C:\Users\User.Name\Desktop if you saved them to your desktop (User.Name is a placeholder, used as an example). Then type python import-datetime.py to launch the script. This script will create 48 text files, each with 30 minutes of data recorded on May 5, 2019. The files will be created and saved to the directory you specify.
Additional commands
Python scripts can be also used to set zero/span, reboot, or shutdown the instrument by using the publish option available in the Paho MQTT python client similar to mosquito_pub. To shutdown the instrument, send the command
client.publish(“licor/niobrara/system/shutdown”,”shutdown”)