Printable PDF: Connecting the LI-8100A to an iOS or Android Device through the TP-Link Travel Router
Instructions for connection the LI-8100A to a mobile device using a wireless router.
Introduction
The 8100-565 LI-8100(A) wireless package includes a CISCO wireless card which, when installed in the LI-8100(A) Soil Gas Flux System, allows wireless communication with a smartphone/tablet. The protocol used for this communication is peer-to-peer networking (ad hoc), which is a direct connection between devices. Although Android and iOS applications are available for wireless communication with the LI-8100(A), the Android application cannot utilize the direct communication functionality with the CISCO wireless card in the LI-8100(A), as Android doesn’t support peer-to-peer networking. Apple also introduced changes to its peer-to-peer networking protocol with iOS 9.0, which doesn’t support the older CISCO wireless cards in the LI-8100(A) and makes sustained communications difficult.
Since wireless communication with a handheld device is an essential feature required for survey type measurements, the solution is to add a portable wireless router to the LI-8100A. A Wi-Fi router can provide a wired connection to the LI-8100(A) and make it available for connectivity to any device that can connect to it. Although any wireless router can be used for this purpose, a portable battery-powered travel router will suit this purpose well, as it can be easily incorporated inside the LI8100(A) case. In this document we will cover the use case of a specific wireless router, the TP-LINK portable battery powered 3G/4G wireless N router, model no. TL-MR3040. The newer LI-8100A comes with a PCMCIA card to Ethernet adapter, which is plugged into an RJ-45 cable under the control unit access panel. This cable can be unplugged, and the router can be connected to the RJ-45 junction of this adapter with a small Ethernet cable. For the older LI-8100 model, this adapter can be purchased separately (part number 6400-26) and installed in the PCMCIA card slot.
Below are the steps for using the TP-Link portable wireless router with the LI-8100(A) System. Since the LI-8100(A) computer software is available only for a Windows® computer, the steps mentioned here are applicable to a Windows® operating system.
- Configure the TP-Link wireless router. Install the supplied battery into the unit and charge it with the supplied power charger. The unit should be fully charged within 3-4 hours.
- Power the router up using the power button on the side of the unit and then select the “3G/4G” option using the selector switch on the unit.
- The default SSID (Wireless network name) and the password are provided on the inside of the router, just above the battery.
- Ensure that your laptop doesn’t have a fixed IP address.
- This can be checked by looking into the properties of the network adapter settings of wireless network card. The network adapter card settings can be accessed from the Network and Sharing Center in various Windows versions. In the network card properties, ensure that the Internet Protocol Version 4 (TCP/IPv4) properties have the option to get the IP address automatically.
- Connect your laptop wirelessly to the SSID of the TPLink router with the provided password.
- Now your laptop should be in the same network as the TP-Link network.
- Open a web browser and type 192.168.0.1 into the address bar and press Enter.
- This will open a web page with a login screen. The default username and password are both “admin”. If there are connectivity issues, you can also try to plug the router directly into the Ethernet port of your laptop and do a typical wired setup.
- The router configuration web pages allow you to change various settings of the router such as changing the SSID and password.
- More information on this can be obtained from the TP-LINK support website at: http://www.tp-link.com/en/download/TL-MR3040.html. You can also refer to the LI-COR article “Look Ma, No Wires!".
- Power the LI-8100(A) up and connect it to your laptop via the serial cable or a USB to serial adapter.
- Make sure that the Ethernet adapter is inserted into the LI-8100(A) CF card slot as the instrument is powered up, so that the LI-8100(A) recognizes the Ethernet adapter (Figure 1). Make sure that the wireless card is not plugged into the LI-8100(A), as the LI-8100(A) can only work with one network adapter at a time. Plug in an Ethernet cable between the Ethernet adapter and TP-LINK travel adapter.
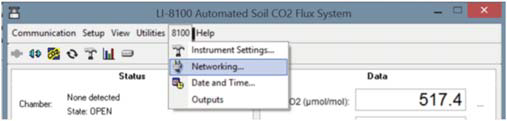
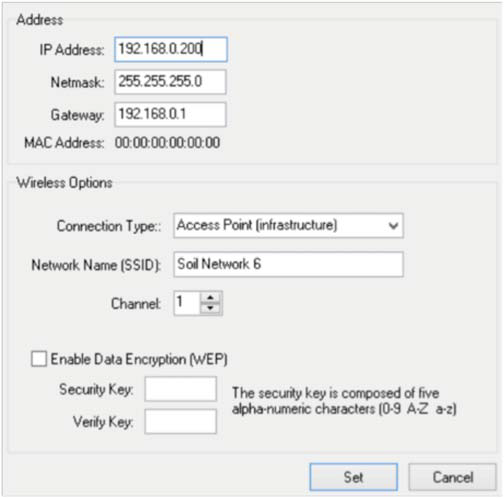
- Connect to the LI-8100(A) with the Windows Interface software and go to the networking settings in the 8100 Tab (Figure 1‑2, top), where you can provide an IP address to the LI-8100(A).
- The default DHCP range of the router is between 192.168.0.100 to 192.168.0.199 and so any device connected to the router can be automatically assigned an address in this range. Since we have to manually assign IP address to the LI-8100(A), it is better to give the IP address outside this range to avoid any potential IP conflicts. The IP address provided to the instrument should have the first three octets match to the IP address of the router, but the last octet (last set of numbers) should be different. The IP address of the modem is called the Gateway and it is always 192.168.0.1 for the TP-Link modem. The netmask (subnet mask) separates the IP address into network and host addresses and this should be 255.255.255.0. Note that we are setting the IP address for the wired connection of the LI-8100(A), and we are not changing any wireless settings. In the example given in Figure 1‑2, an IP address of 192.168.0.200 was given to the instrument. Make sure you press the Set button to confirm the settings.
- To connect to the LI-8100(A) wirelessly through your iOS or Android device, you need to first connect your handheld device to the TP-LINK wireless network.
- The TP-LINK router can automatically provide an IP address to your mobile device, so there is no need to assign a fixed IP address to your handheld device. Open the LI-8100 APP, click “Connect to Instrument” and Click “New” to enter the IP address of the LI-8100(A). Note that the LI-8100(A) can talk with only one device at a time using a single protocol.

A Note on Wireless Interference
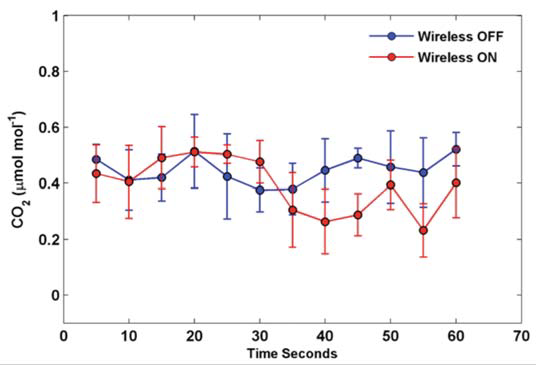
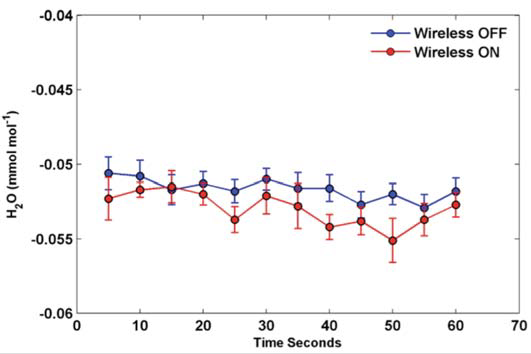
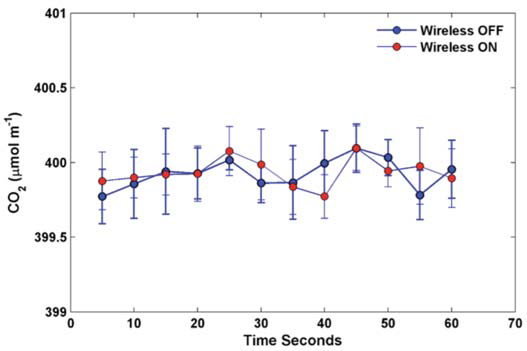
Since we have a wireless router powered on right near the LI-8100A optical bench and associated electronics, there could be concerns regarding interference of the Wi-Fi signal with the analyzer measurements. To analyze this effect, an experiment was performed with zero and span gases for CO2 flowing through the instrument under conditions where the Wi-Fi router was switched on and off. Data were collected at 1 second intervals, and the 5 second standard deviation of the CO2 and H2O signal for a period of 1 minute is presented in Figure 3 and Figure 4, respectively. The noise levels in the CO2 and H2O signals are identical or very similar with the wireless router on or off. Identical noise levels were observed in the CO2 mixing ratio with a span gas of 400 ppm flowing through the LI-8100(A) (Figure 5). In conclusion, the impact of the wireless router on the data recorded by the LI-8100(A) is very small or negligible.