
The 8100-104 and 8100-104C long-term chambers are designed to require minimal maintenance. The black neoprene collar gasket can be easily replaced if it becomes damaged; two spare gaskets (part number 6581-060) can be found in the long-term chamber gasket kit (part number 8100-612). Instructions are also given for replacing the tubing/cable assembly, replacing the thermistor assembly, and replacing the shaft seal assembly.
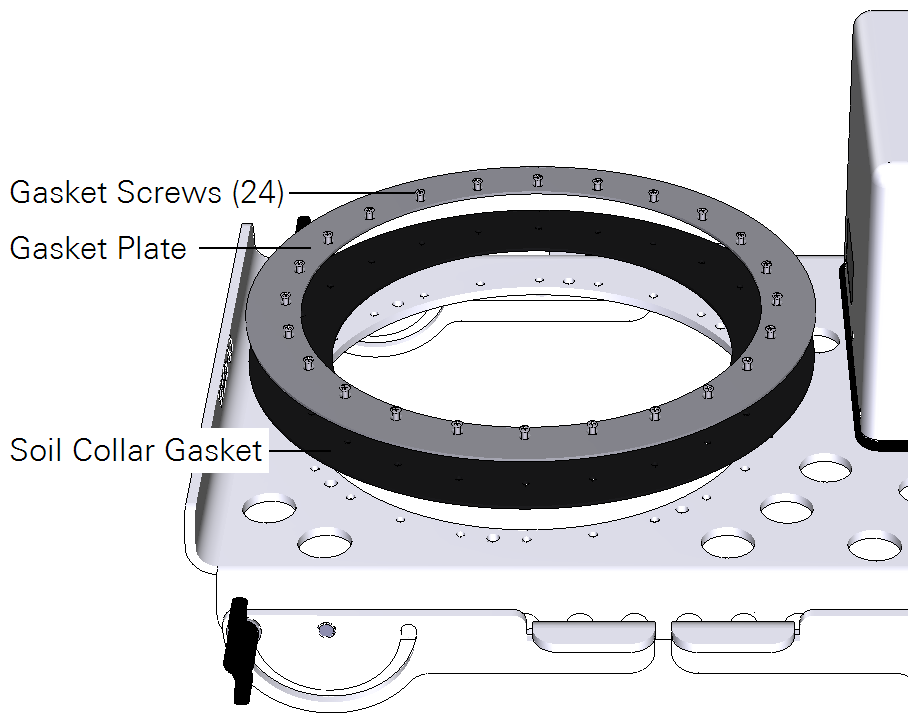
The Soil Collar Gasket should not need to be replaced unless it is cracked, brittle, or otherwise worn. To replace the gasket, move the chamber to its open position. Loosen the 24 screws on the chamber gasket plate. Remove the plate and gasket. Align the new gasket with the screw holes and re-assemble. Tighten the screws to 4 lb.-in (0.45 newton meters) of torque.
The tubing and cable assembly (part number 9981-141) may need replacement if the tubing becomes cut or damaged (most often by rodents).
- Follow these steps to replace the tubing and cable assembly:
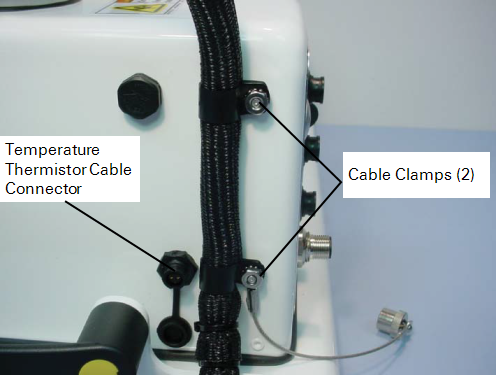
- Disconnect the temperature thermistor cable from the side of the enclosure by loosening the thumb nut and pulling the cable connector straight out.
- Remove the two cable clamps with an 11/32” nut driver.
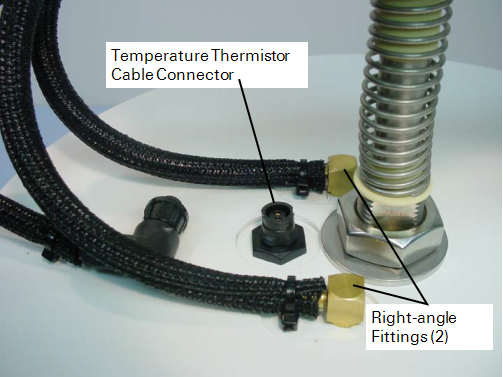
- Disconnect the temperature thermistor cable from the top of the chamber by loosening the thumb nut and pulling the cable connector straight out.
- Remove the two right-angle fittings by loosening the nuts on the underside of the chamber bowl with a 3/8” nut driver.
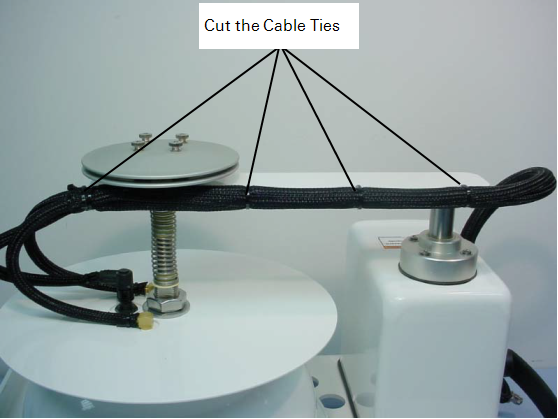
- Cut the four cable ties that secure the tubing/cable assembly to the arm assembly, and remove the tubing and cable assembly.
- On the new tubing and cable assembly, locate the end containing the right-angle fittings.
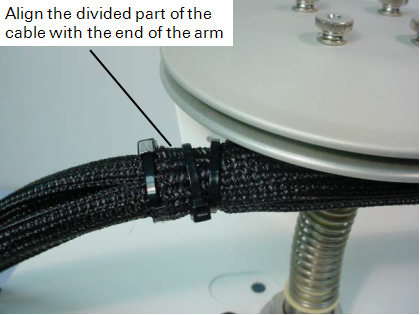
- Use a cable tie to loosely attach the tubing and cable assembly to the end of the arm nearest the pressure vent. The portion of the tubing and cable assembly that splits into three separate cables should be attached so that it is approximately even with the end of the arm.
- Loosely install the three remaining cable ties to secure the tubing and cable assembly to the arm.
- Verify that the assembly is positioned properly, and tighten the cable ties.
- Trim the excess end from the cable ties.
- Make sure the O-rings are present in the temperature cable connector and right-angle fittings. Install the two right-angle fittings by tightening the nuts on the underside of the chamber bowl with a 3/8” nut driver (it does not matter which fitting goes into each hole).
- Connect the temperature cable; make sure the connector is fully seated and the outer thumbnut is tight (you should feel a slight snap as it locks into place).
- Place the control cable cap retainer over the stud.
- Align the portion of the tubing and cable assembly that divides into three separate cables with the edge of the base plate.
- Loosely install the bottom cable clamp.
- Connect the temperature cable.
- Make sure the connector is fully seated and the outer thumbnut is tight. You should feel a slight snap as it locks into place.
- Loosely install the upper cable clamp.
- Adjust the clamps if necessary, and tighten the nuts.
The thermistor in the long-term chamber may need to be replaced if it becomes damaged or stops working. The procedure is the same for both the 8100-104 and 8100-104C chambers, but the chambers use different thermistors.
| Chamber | Thermistor Part Number |
|---|---|
| 8100-104 Opaque Long-Term Chamber | 9981-125 |
| 8100-104C Clear Long-Term Chamber | 9981-172 |
- Follow these steps to replace the temperature thermistor assembly:
- Disconnect the temperature thermistor cable from the top of the chamber by loosening the thumb nut and pulling the cable connector straight out.
- Remove the plastic retaining nut with a 5/8” open-end wrench.
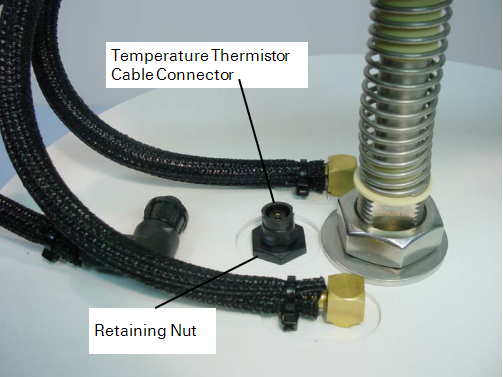
- Make sure the rubber seal is present on the bottom of the new thermistor connector body, and then install the new thermistor.
- Tighten the plastic retaining nut just enough to compress the rubber seal.
- Do not over tighten the nut (torque to 5 lb.-in. or 0.56 newton-meters).
- Connect the temperature cable; make sure the connector is fully seated and the outer thumb nut is tight (you should feel a slight snap as it locks into place).