


Preparing for measurements
In this section we describe how to use the LI-6800 for leaf-level gas exchange measurements. This information applies to any leaf chamber, including the fluorometer when in the leaf configuration.
When you turn on the instrument for the first time each day, consider the following things.
- Air supply: New CO2 cartridge and fresh chemicals?
-
- Install a new CO2 cartridge.
- H2O Scrub: If the desiccant is saturated, replace it with fresh desiccant. Drierite turns from blue to pink when saturated. Sorbead® Orange CHAMELEON® turns from orange to colorless when saturated. If the desiccant is partially saturated, remove the column and shake it to break up the pellets.
- H2O Add: The Nafion column should have liquid water in it. The older Stuttgarter Masse-filled column should show evidence of dampness, such as droplets of water condensate on the interior walls of the humidifier column (no standing liquid water).
- CO2 Scrub: If the soda lime has turned from white to violet, you can extend the performance by adding up to 10 ml of water to the soda lime and shaking the column to distribute the moistened soda lime evenly. Soda lime should last for several months with regular use - it does not need to be replaced frequently.
- Select a configuration.
- If you have a configuration file, select Load Configurations from the menu, then choose the configuration. If not, just proceed to configure the instrument.
- Run the Warmup Tests.
- Close the chamber. Under Start Up > Warmup/System Tests, select Warmup Tests and tap Start. The instrument will proceed through a series of tests, taking about 10 to 15 minutes.
- If you have a fluorometer installed, run the Fluorometer Tests.
- Review the summary for any failed tests. Test failures and warnings offer recommended solutions. More information is in Warmup tests.
- Match the IRGAs.
- Matching the IRGAs is easily accomplished whether the chamber is empty or not, but it's a good idea to do this once right before starting a measurement. Under Measurements, tap Match IRGAs on the lower right of the display. Tap Manual Match. See Matching the IRGAs for more details.
- Now you are ready to clamp onto a leaf and begin measurements.
If you are new to the LI-6800 and gas exchange measurements, you may wish to work through some of the example below to see what goes into a measurement.
- Select a plant and leaf to measure.
- Choose an adequately watered plant that is growing in full or partial sun. Select a leaf that is large enough to fill the whole chamber. Measurements will be more difficult if done on a dry, neglected houseplant that has only seen dim (for the plant) fluorescent lights its whole life. Keep the plant in position near the chamber, but don't clamp onto it just yet.
- Set the Flow controls. Under Environment > Flow:
-
- Flow: On
- Pump Speed: Auto
- Flow Setpoint: 500 µmol s-1
- Press. Valve: 0.1 kPa
- Set the H2O controls. Under Environment > H2O:
-
- Set H2O: On
- Tap VDP_leaf, and enter 1.0 kPa
- Set the CO2 controls. The instrument needs a charged CO2 cartridge. Under Environment > CO2:
-
- CO2 injector: On
- Soda Lime: Scrub Auto
- Tap CO2_r and enter a setpoint near ambient. To find ambient CO2, make sure flow is turned on then turn the CO2 and H2O controls off and step away from the console so you aren’t exhaling near the instrument’s air inlet. Look at CO2_r to see approximate ambient CO2. Enter that value as the setpoint.
- Set the Fan speed. Under Environment > Fan:
-
- Set Mixing fan: On
- Tap Fan Speed, then enter 10,000 rpm
- Set the Temperatures. Under Environment > Temperatures:
-
- Check the temperatures to see their current values
- Temperature: On
- Tleaf: On and keep the default setting.
- Set the Light level. Under Environment > Light:
-
- If you aren't using a light source, verify that Ambient is selected, then choose the source of ambient light (Sun+Sky for outside). Orient the chamber so the leaf is not shaded by the chamber walls.
- For the LED light sources, be sure that Head Light Source tab is selected. Set Control Mode to Tracking to track ambient. Enter the Color Spec of r90b10 for 90% red and 10% blue.
- For the Fluorometer, go to Environment > Auto Controls. Select a parameter (1 to 6) and set the Target to control Env Light Controls > Qin. Set the function F(t) to tracking. Set Track this variable to Qamb_out. Check the AutoRepeat box, and then tap Start. When tracking ambient, the Environment > Light tab will indicate that these parameters are under the control of the Auto Control.
- Under Constants > System Constants, check:
-
- Chamber type (ChType): Automatically selected, but check it to be sure that the chamber is selected
- Geometry: Set to the type of leaf you are measuring
- Leaf Area (S): Enter the leaf area enclosed by the chamber. Use the leaf area calculator if you need help
- K: Enter the ratio of stomata on one side of the leaf to the other. If you aren't sure, use 0.5.
- Oxygen: 21% by default (typical for ambient air). Enter the % oxygen if you are using some other air supply.
- Leaf temperature: Choose Measured if the leaf temperature thermocouple is able to make contact with the leaf. Otherwise, choose Energy Balance.
- Clamp onto the leaf.
- Let the instrument and leaf stabilize for a moment as you go through the remaining steps.
- Configure logging options under Log Files.
-
- Match Options: Select Always match for this exercise.
- Logging Options: If you are using the fluorometer, set Flr action at log: Nothing. The other settings don't matter for this tutorial.
- Open a Log File: Tap New File. Enter a name, then tap OK.
- Check the Environment tab.
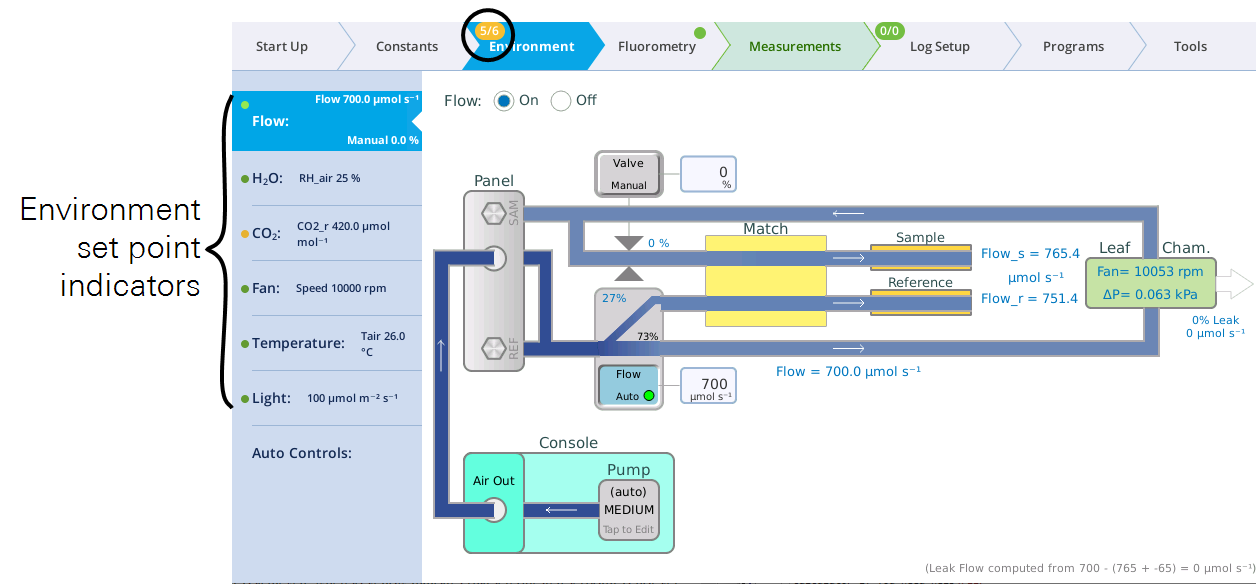
- At the top of the Environment tab, you'll see a fraction (5/6 in this case). This shows the number of setpoints achieved over the number of setpoints requested. On the subtabs under Environment, you see a green or yellow dot. Green means the setpoint is achieved, whereas yellow indicates that a requested setpoint is not yet achieved.
- Observe values on the Measurements screen.
- After the measurements are stable, press the Log button.
- The instrument will match and then log the values.