Troubleshooting
Here we provide some guidance if things are not working as expected. Problems may be related to hardware, software, or a combination of the two.
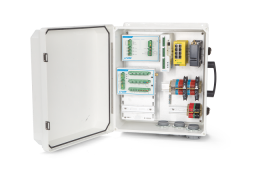
The DAqM LEDs indicate operational states. Solid green is normal for any power-in and power-out LED. Blinking green or off is normal for the data-in and data-out LEDs. Blinks occur during data transfer, so the data-in and data-out LEDs will be dark most of the time.
DRM or DAqM Power LED is red or amber
This may indicate that the power supplied is above or below the required range. Measure the voltage at the power supply source (e.g., the solar power supply or mains power supply). If it is within range (9 to 30 VDC), then measure the voltage at the DRM or DAqM power terminals. If it is too low, you are experiencing a voltage drop over the cable. Shorten a power supply cable or use a heavier gauge wire to reduce the voltage drop. If it the voltage is too high, use the TDK-Lambda DC-DC Converter to limit the voltage.
DAqM Power LED is red or amber
This indicates that a short (overcurrent) has occurred on one or more of the switched voltage outputs (SW1, SW2, or SW3). Disconnect items one at a time from the SW outputs to identify the faulty connection. The switched power outputs have multiple levels of protection. If one of the outputs is shorted, initially the DAqM limits the output to 1.1 amps and activates the red Power LED. If the short is removed quickly, the LED will change back to green almost immediately. If the short is persistent, the DAqM will shut power off to the outputs for about 60 seconds and then attempt to repower it. If the short has been resolved, the DAqM will return to normal operation. If the short persists, the red LED will remain on, and the DAqM will continue checking for the short. Depending on the severity and duration of the short, the Power LED may change from red to green immediately, or up to 60 seconds after the short is removed.
DRM V1, V2, V3, or V4 Power LED is red or amber
Short on the connected power port. A short or overcurrent has occured on the power out or connected device. The system will attempt to restore power after about one minute. If the circuit is still shorted, the DRM will continue to power off the port again until the issue is resolved.
DRM Battery LED is red or amber
Backup battery is not connected or has a fault. Check the wiring between the DRM and the battery for a bad connection and make sure the connections are secure. Measure the battery voltage. If it is low but greater than 0, the battery may be discharged, in which case you can leave it connected to the DRM so it charges. If the voltage is 0, it may be completely discharged or the internal fuse may be open. See Replacing the backup battery fuse for details.
Sensor or system power cycles continuously
This can happen if the power supply voltage is too close to the minimum power required by a sensor. For example, when you power on a component in your system, it will cause the power supply voltage to drop slightly. If it drops below the minimum required by a sensor, the sensor will power off. Now that the demanding sensor is off, the supply voltage will rise above the minimum, resulting in continuous power cycling. To solve this problem, check the voltage being delivered to your instruments. If it is close to the minimum required by a sensor, you should find a way to boost the voltage delivered. You have some options.
- Measure the voltage of your batteries. If the voltage is <12, the batteries are not fully charged, possibly resulting from age or other issues in the system. Fully charge the batteries with a battery charger or allow them to charge for several days without a load from a solar powered charger. This may resolve power cycling issues until the batteries become depleted again.
- If applicable, perform maintenance on the solar power supply. Clear dust from the solar panels, and check battery connections for corrosion and clean them if needed.
- Check other connections to be sure that they are tight.
- Shorten any long power cables or use a heavier gauge wire. Voltage will drop in a power cable due to the cable's resistance. If the power cables are longer than they need to be, shorten them to a suitable length.
- Boost the capacity of your power supply by adding panels or batteries.
Biomet data not in eddy covariance data files
If none of the biomet data are in .ghg files, this could be caused by an improper network configuration between instruments, improper wiring between components, or an improper instrument configuration. If data from some or most of the sensors are being recorded, the issue is most likely related to a configuration or the connections of individual sensors (see Logged data values are implausible for one or more sensors).
Check the software configuration of the data acquisition system, SmartFlux System and LI-7500A/RS/DS and LI-7200/RS. Confirm that they are configured properly. If you can see live data (updated once per minute) in the gas analyzer software, the devices are communicating properly. If you do not see live data, check the port configuration for the data acquisition system.
If the Blueprint Utility presented error messages during the configuration, these errors must be resolved before it will work correctly. If there is a wiring problem between DAqMs, the DRM, and the SmartFlux System, the Blueprint Utility will notify you that there is an issue. Attempt to Pull a configuration from your system to check the ability to receive data. Attempt to Push a configuration to test the ability to send a configuration. An error message indicates that communication is not working as expected. Check the wire bundles to be sure that the leads are connected to the correct terminals and that the terminals are tightened onto the bare wires. Finally, check the port configuration. Click Connect and then click Configure Port. Set the port number on the SmartFlux System that the DAqM or DRM is connected to.
Logged data values are implausible for one or more sensors
View the data in the gas analyzer software (7x00). Click Biomet > Data to see data. Follow the steps below to address the problem.
- Check the wiring and terminal connections. For a sensor that is reporting unrealistic values, first confirm that the wire leads are connected to the proper terminals and that the connections are tight.
- Examine the wire lead connections for the suspect sensor. Exposed wires may come into contact with each other, shorting the signal. If this is the case, trim excess wire from the lead and reconnect the wires to the terminals.
- If the sensor is reporting no data, check to be sure that the wire leads have not been inserted too far into the terminals. Be sure there is metal-to-metal contact between the leads, and that the datalogger terminals are not clamped onto insulation.
- Confirm that the calibration values have been entered correctly (if applicable). Check the placement of the decimal in calibration multipliers, look for misplaced positive and negative signs, and make sure that division and mulitplication are set correctly. You can verify and edit these in the program running on the DAqMs and DRMs.
- If you have eliminated all possible causes of the issue, contact LI-COR technical support. A support technician will guide you through additional steps that you can take solve the problem.
If none of the previous steps resolved the problem, it may be necessary to determine if the sensor is faulty. Read the manufacturer's documentation to troubleshoot issues with sensors. If you find a problem with a sensor, contact the manufacturer to determine the best course of action.
DRM will not power on when connected to main power supply
A symptom is that no LEDs light up when power is connected. Check the power supply voltage at the DRM. If it is between 9 and 34 V, then the DRM main fuse may be open. See Replacing the DRM fuses. If it is less than 9V, the power supply is inadequate.
DRM will not power on when powered from backup battery
Check the voltage of the battery. If it is zero, the battery's internal fuse may be open (see Replacing the backup battery fuse). If it is between 11.6 and 14 V and the Battery LED remains off (and no power is provided to the +9-30 VDC POWER IN) or red (and power is provided to the +9-30 VDC POWER IN), the backup power fuse inside the DRM may be open. See Replacing the DRM fuses.
DRM power out is not working (POWER IN LED lights up, but Vx Power LEDs do not)
If the DRM power outputs are delivering 0 volts when the DRM is powered, and the POWER IN LED lights up, check the program to be sure that they are set to ON and that they are not shutting off in response to a voltage threshold. The Vx power outputs have self-resetting fuses. V1, V2, and V3 each will reset 1 minute after opening. V4 will reset when the DRM power is cycled. So, restart the DRM.
If the power out continues to shut off, check for shorted power wires on the Vx Power outputs and anything that is powered by these outputs. For example, a DAqM that is powered by a DRM could overload the power supply if any of the DAqM's 12V OUT, SW1, SW2, or SW3 outputs are shorted. After you are have corrected any faults in the system, power it back on.
If restarting does not reset the fuses, and you are sure that the power supplies are not being shut of by the program, contact LI-COR technical support.
SDI-12 console not responding, responding slowly, or responding incompletely to queries
Do some or all of the SDI-12 sensors have the same address? If so, they will not be responsive to commands (not to mention, they will not provide data as expected either). Begin by disconnecting the power wire for one sensor and then query the system again. Repeat this until you know the addresses of all attached sensors. Then reattach the power wire for one sensor, and set the address for that sensor (see Overview of SDI-12 commands). Continue until all of the sensors are connected and the addresses are set as desired.
Important: Although not desirable, the software does allow you to set one sensor's address to the address of another sensors simply by running the command to change an address. In this case, you'll have to disconnect the power to one of the sensors and reset the other sensor's address to restore a usable configuration.
Problems connecting and pushing/pulling a configuration (no system identified)
Are the RS-485 data cables that connect DATA OUT to DATA IN or the SmartFlux System wired incorrectly? Check the wiring of your data cables. If leads are installed incorrectly or too loosely, communication errors will occur.
Has the port number been set incorrectly? If the incorrect port number is selected, the Blueprint Utility may present a message of No system identified. To resolve it, click Connect, select the SmartFlux System that hosts the DRM/DAqM, the click Port Setup and select the port that the DAqM or DRM is connected to. Then click OK. If the error persists, check the RS-485 communication cable wiring and correct any issues.