Connecting with an LI-8100A
This section assumes that you have completed all the required steps in Configuring the communication system and that you have verified that the satellite terminal can connect with the Internet.
Configuring the LI-8100A
- Configure the PC that is attached to the system so it has a static IP address.
- This is typically accomplished by changing the network settings (see Configure PC network communication).
- Connect a PC to the LI-8100A using the RS-232 cable.
- Launch the LI-8100A PC software and connect with the instrument.
-


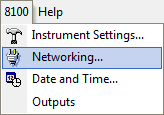
- Click 8100 > Networking... and enter an IP Address, Netmask, and Gateway.
-
- IP Address: 192.168.128.204, as specified in Table 6‑2.
- Subnet Mask: Typically it should be 255.255.255.0.
- Gateway: Set this to the IP address used to connect with the gateway: (192.168.128.100).
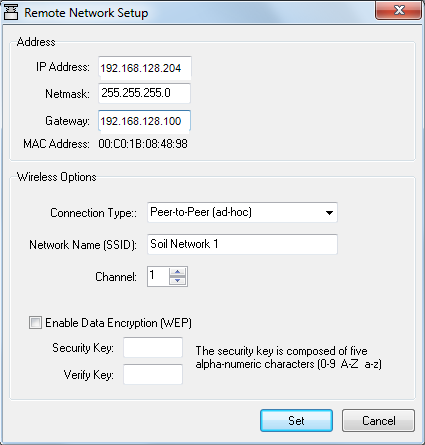
- Restart the LI-8100A after changing the network configuration.
Modify the LI-8100A configuration
If your gateway configuration supports two-way communication you can change the settings of the LI-8100A remotely.
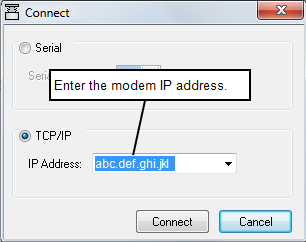
- On a computer that has Internet access, launch the LI-8100A configuration software and click the Connect button.
-
- Select TCP/IP, enter the gateway IP Address, and click Connect.
After connecting to the instrument you can check the performance and modify the configuration as you normally would.
LI-8100A file transfer
The LI-8100A software has a built-in file manager that you can use to copy files to your computer.
To transfer data:
- Connect with the LI-8100A as described in Connecting with an LI-8100A.
- Launch the File Manager (Utilities > File Manager).

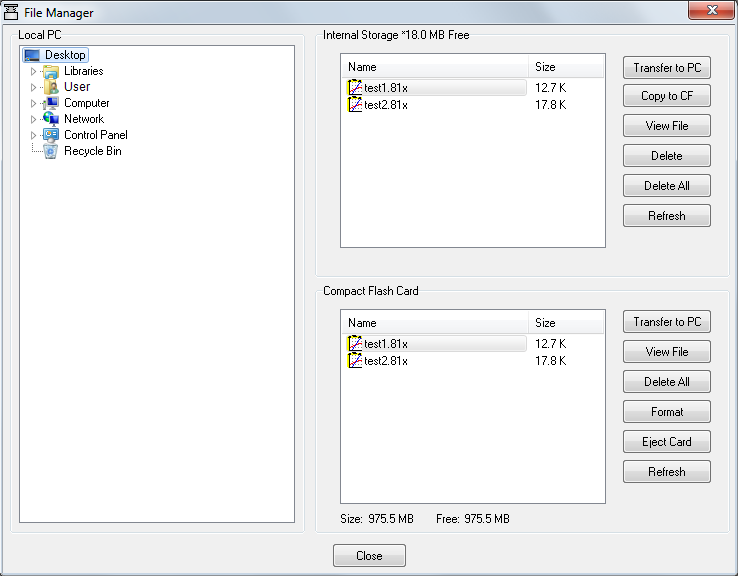
- The Local PC panel on the left displays the file directories on your computer. The Internal Storage panel on the upper right displays the LI-8100A data files currently stored on the LI-8100A internal flash memory and the free memory available. The Compact Flash Card panel on the lower right shows the files stored and memory available on the compact flash card (if it is installed).
- Move files from the LI-8100A.
- Select the file you want to transfer and select Transfer to PC or Copy to CF. When Transfer to PC is selected, the file(s) will be transferred to the selected destination in the Local PC panel.
- or
- Drag and drop the file(s) you want to transfer.
Some useful keyboard shortcuts: Most of the common keyboard shortcuts can be used when selecting and/or moving files in the LI-8100A directory list. For example, press CTRL + A to select all files, Shift + click to select a range of files, or CTRL + click to select multiple files individually. You can also ‘drag and drop’ selected files to a PC destination or to the Compact Flash card.
Copying files from internal storage
Click the Transfer to PC button to move the highlighted file(s). When you are finished moving files, you can delete selected files or all files by clicking Delete or Delete All, respectively. Click Refresh to update the file list. Click Copy to CF to move the selected files to the compact flash card. Click View File to open the entire file in a new text window. You can also drag and drop files to/from the internal storage.
Files generated by the LI-8100A are denoted with a .81x file extension, and contain all of the raw data records and summaries.
Copying files from the compact flash card
Click on Format to format the compact flash card. Note that all files on the card will be deleted. Click the Transfer to PC button to move the highlighted file(s). When you are finished moving files, you can delete all files by clicking Delete All. Click View File to open the entire file in a new text window. Click Eject Card to unmount the compact flash card and safely remove from the instrument. Click Refresh to update the file list.