This section describes procedures that you will follow after collecting data.
Procedure 3.1 - Moving Data to a Computer
- Connect the console to your computer with the USB cable. It will appear as a mass storage drive named LAI.
- Open the data folder in the LAI drive.
- Locate the LAI file (look for name it was given for logging), and drag or copy it to a directory on your computer.
Note: The LAI‑2270C Control Unit will not be recognized if it is in Logging Mode or a menu, so be sure to enter the Monitor Mode by pressing EXIT, or just turn off the control unit.
Procedure 3.2 - LAI‑2000 File Transfer - RS-232
The steps below describe how to import data from an LAI‑2000 using FV2200:
- Click the Acquire button to launch the Acquire Wizard. Enable the LAI‑2000 radio button and click Next.
- Connect the LAI‑2000 to the serial port on your computer with a 9-pin RS-232 cable. On the LAI‑2000, press FCT 31 and enter the following settings: Baud=4800; Data bits=8; Parity=none; XON/XOFF=NO.
- Press FCT 33 and enter the following: Format: Standard; Print Obs: YES.
- Click Next.
- Select the serial port that is attached to the LAI‑2000 and click Next.
- Choose whether you would like to route to a view (check Add to View), save the file, or both. You may open the files in any of the current view tabs or a new view tab, and save multiple files as one file.
- On the LAI‑2000, Press FCT 32 and enter the page range. The incoming data will be displayed in the Wizard window, as well as routed to a view and/or saved in a file, depending on what you selected.
- Click Finish and FV2200 will process the last file that was downloaded. Note that the last file received will not be processed (added to a view, or written to disk) until you click the Finish button.
Procedure 3.3 - Loading Data Files into FV2200
The FV2200 software package can be used to read data files directly from the console (connected with a USB cable), or files can be dragged to the computer and read from there (Procedure 3.1 - Moving Data to a Computer).
- Launch FV2200 on your computer (see Data Analysis with FV2200).
- Click the Open icon or File > Open and navigate to the stored file.
- Double click the file to open it, or select multiple files and click OK.
Alternatively, you can drag the data file(s) onto the main window: The file(s) will be opened in the current view, or if there are no views, one will be created. On Mac and Windows operating systems, you can drag and drop the data file(s) onto the FV2200 icon.
Procedure 3.4 - Converting LAI‑2000 file to LAI-2200C
There are a couple of ways to do this. To convert a single file, you can use the Current tab of the Details window. The advantage of this method is that you have an opportunity to specify sensor serial numbers, which are useful when doing importing and adjusting records (Procedure 3.8 - Import A and Adjust A Records - FV2200). Another method of converting formats involves saving files in a view.
Details for both methods are included in the FV2200 User Guide on the "Help" tab of FV2200.
Procedure 3.5 - Excluding Rings from Analysis - FV2200
Mask attributes can be changed in the FV2200 software so that selected rings are excluded.
- In the Main Window, select the files that you wish to recompute, and click the Recompute button (or click Edit > Recompute). The Recompute Observations dialog box will appear. Alternatively, double-click a data file to open the File Details window, select the Header tab and click Change…
- Enable the Change Mask box, then unselect the box beside each ring that is to be omitted.
- Click OK. Changes to calculations will also be displayed in the “Log” section of the Main Window.
Procedure 3.6 - Interpolating A Records - FV2200
There are a couple of ways to do this:
- For one or more files, use the Recompute tool, check the Recompute Transmittance box, and check the interpolation radio button.
- For a single file, open the Details view, click the Header tab, then click the Change... button in the Canopy Model and Mask box.
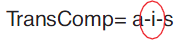
- Use the Details view, click the Current tab, and edit the middle item of the Transcomp= line to be an i, and click Keep.
- If the file has not had A records imported yet, you can specify that the A records are to be interpolated in the Import dialog box.
Procedure 3.7 - Recomputing a Data File - Console
- Go to MENU > Data > Console.
- Select a data file.
- Select Recompute to recalculate LAI or other variables.
This can also be done with FV2200 using Edit > Recompute.
Procedure 3.8 - Import A and Adjust A Records - FV2200
Detailed examples are in the FV2200 2.0 User Guide (Access in the Help menu). Here is a simplified outline:
- Open the "above" and "below" file(s). You may elect to put them into one view.
- If match files are involved, load them as well.
- Open the Import dialog (Edit > Records > Import).
- If imported readings are to be adjusted, click the Adjust box, and select the match method to be used.
- Check the appropriate boxes in the list of files, identifying the match files(s), source, and destination.
- Click OK.
Procedure 3.9 - Generating K records from Sequences

Normally, you only check one pattern (AAAA, AAA, etc.) per file. You can get away with mixing certain patterns, however, such as AAAA and AAA, or BBBA and BBA provided the sequences do not run together. In other words, 4A or 3A sequences surrounded by B records would be fine, or 3B or 2B records surrounded by A records would be fine. (You would not want to mix A sequences with B sequences, however). The order that FV2200 converts records in a file (if doing more than one sequence in the file) is this: 4A, then 3A, then 3BA, then 2BA. So, if you have 4A and 3A together, the 4As will be done first, before the 3As. If you do check more than one pattern for a file, you will see a warning. It won’t stop you; it’s just a check to see if you know what you are doing.
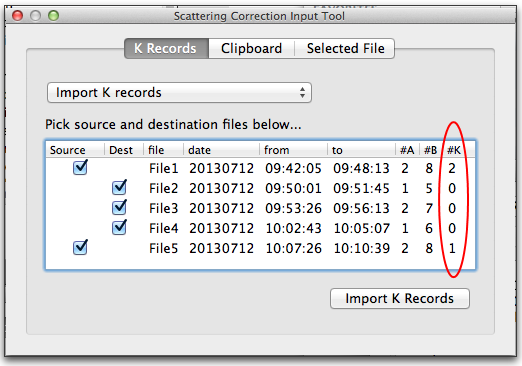
Procedure 3.10 - Importing K Records
If you have K records, but not in the right file, or need to share K records among multiple files, then follow these steps (also illustrated in Figure H‑2):
- Put the source and destination files (the files that have K records, and the files that need them) into the same view, and make that the active view.
- Open the Scattering tool (Edit > Scattering).
- Click the K Records tab.
- Set the drop-down menu to Import K Records.
- In the file list, check the Source and Dest boxes as needed.
- Click the Import K Records button.
FV2200 is smart about importing K records; it only copies the ones that are needed for any given file, based on the times of the B records in the destination files. It will always import at least one, and more if they are available and if the B record times warrant it.
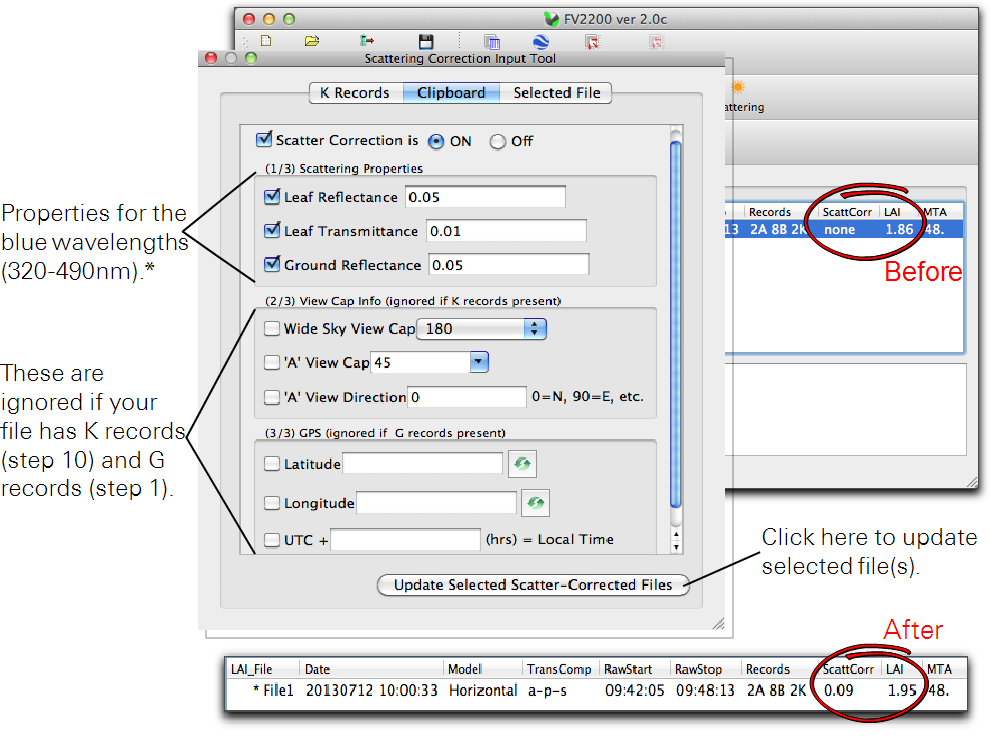
Procedure 3.11 - Set Scattering Inputs for a Group of Files
Examples are in the FV2200 2.0 User Guide (Access in the Help Menu). Here is a simplified outline:
- Put the files for which you want to do scattering correction into a common view, and make it the active one.
- If any of the files contain K Record precursors (e.g. 4A sequences), generate the K records (Procedure 3.9 - Generating K records from Sequences).
- If any of the files need to import K records, do that next (Procedure 3.10 - Importing K Records).
- If any of the files need to import A records, do that next (Procedure 3.8 - Import A and Adjust A Records - FV2200).
- If there are still files with no K records, you can generate them based on assumptions:
- Click the K Record tab in the Scattering tool (Edit > Scattering).
- Set the drop-down menu to Make K Records from Assumptions.
- Set the input fields, and select the Target files.
- Click the Generate button.
- Set remaining inputs:
- In the view, highlight the file(s) that are to receive these inputs.
- Click the Clipboard tab (Figure H‑3) in the Scattering tool (Edit > Scattering).
- Set the input values.
- Click the Update button.
Procedure 3.12 - Combining Multiple Files - FV2200
The Combine Files dialog (File > Combine) lets you pick a selection of files for which all of the data records are to be combined. The file header information of the resulting file will be based on the first file’s headers in the source list.
If you need a more customized method to combine files, you can simply cut and past from the Detail View. The thing to watch if you do that, however, is the Contributing Sensor information and the Sensor ID values of each record. The Combine Files automated routine takes care of relating sensor IDs (W1, W2, etc.) to the proper sensor in a new list. For example, if one file has one Contributing Sensor, say serial # 1234, and another file has a different one (#4321), if you combine by cut-and-pasting records, all files will have sensor ID’s of W1, and differences will be lost. The automated combine, however, will leave you with W1 and W2 records, with both sensors appearing in the Contributing Sensor list labeled appropriately as W1 and W2.
Procedure 3.13 - Determining LAI for each B record - FV2200
Double click the file to get the Details view, and click on the Gap Fractions tab.
