Storing data in memory
Readings can be stored in memory for later viewing or output to a computer. Stored readings can be any combination of the X register and the accumulated readings in the Y register. When data are stored, they automatically include area, length, average width, and maximum width.
Stored data are in a file system. A file can be as large or as small as you wish. A file must be opened before any data are stored. Closing the file precludes adding any more data to that file. Associated with each file is some header information: a number (assigned by the system), a label (entered by the user), and the time and date the file was opened (as kept by the system).
If a file is created, and no data are stored into that file (i.e., neither STORE X or STORE Y are executed), the file will not be saved when it is closed. The sequential file number will then be re-used on a subsequent file creation.
When output, a file might look something like this:
| FILE: 1 | |||||
| REM: PLOT1 | |||||
| 27 APR 2006 10:03:15 | |||||
| ENTRY | COUNT | AREA | LENGTH | AV WIDTH | MX WIDTH |
| 1 | 0 | 42.37 | 13.10 | 3.23 | 5.12 |
| 2 | 5 | 344.20 | 120.00 | 2.87 | 3.10 |
| 3 | 2 | 84.48 | 26.80 | 3.15 | 6.02 |
- FILE: A sequential number assigned by the system that you use to reference the file.
- REM: A remark entered by the user when the file is first opened.
- ENTRY: Sequential numbers identifying records in the file.
- COUNT: The number of samples represented in the record. When X values are stored, the count is always 0. Y values will always be an integer greater than 0. The count represents the number of X values that were added together before the accumulated Y value was stored in the file.
For accumulated values, the AREA value is the total leaf area of all samples, LENGTH is the total leaf length, AV WIDTH is the average width of all samples, and MX WIDTH is the maximum width of all samples.
The following sequence of events could have occurred to make the above file. It would be a good example to duplicate using your own console, as well.
- Press FILE to open a file. The display will show

- Briefly displayed...
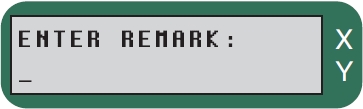
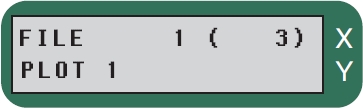
- The remark "PLOT 1" is entered by pressing this sequence of keys:
- P ↑ L ↑ O T ↑ SPACE 1 ENTER
- To type the alpha characters in the lower left corners of the keys, just press the desired key. To type the alpha characters (or the space key) in the upper left corners, press ↑ first, then the key. Typing mistakes can be corrected using the back arrow key (←).
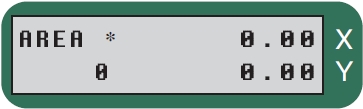
- Now the display will show
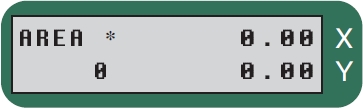
- The * indicates that a file is open.
- Measure a sample...
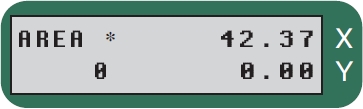
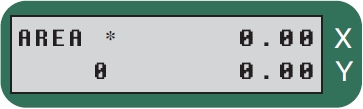
- ...and store it by pressing STORE X. The display will briefly show
- followed by
- Note the X value clears after pressing STORE X.
- Take 5 readings, following each by pressing ADD (or by pressing the scanning head button twice).
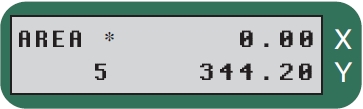
- 5 samples in Y register (accumulator).
- Now press STORE Y to store the Y register readings in the file.
- Displayed briefly...
- Note the Y value clears on STORE Y.
- Take two more readings, following each by pressing ADD. Then press STORE Y. Note that the ADD button changes functionality in Realtime Capture mode (see Using Realtime Capture Mode with the LI-3050C).
- Close the file by pressing FILE.
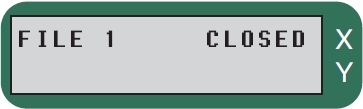
- Displayed briefly...
- The file is now similar to that shown at the beginning of this example.
Structuring files
Since you have a lot of flexibility on exactly what values to store in a file, it pays to exercise a little forethought on how to structure your files.
For example, suppose you wish to determine leaf area index in 10 different plots by measuring leaf areas on 5 plants in each plot. One way to proceed would be to use a file for each plot, so you'll have 10 files when done. Once a file is opened, measure all leaves on the first plant, pressing ADD (or press the white button on the scanning head twice) after each leaf. When done with the plant, press STORE Y. Repeat for the other 4 plants in the plot. When done with the plot, press FILE to close the file. At this point, you will have 5 entries in the file, each being the total leaf area of each of the 5 plants sampled. The COUNT column on each line indicates how many leaves per plant were measured.
The file for one plot might look something like this:
| FILE: 2 | |||||
| REM: TEST PLOT 2 | |||||
| 27 APR 2006 10:03:15 | |||||
| ENTRY | COUNT | AREA | LENGTH | AV WIDTH | MX WIDTH |
| 1 | 7 | 246.68 | 45.10 | 3.23 | 5.12 |
| 2 | 5 | 125.20 | 35.60 | 2.87 | 3.10 |
| 3 | 4 | 84.48 | 26.80 | 3.15 | 6.02 |
| 4 | 9 | 344.20 | 120.00 | 4.67 | 6.10 |
| 5 | 5 | 140.69 | 47.32 | 3.56 | 5.72 |
Another approach is to have one file per plant (giving you 50 files when done). When measuring a plant, press STORE X and ADD after each leaf measurement. After the last leaf on the plant is measured, press STORE Y to store the accumulated leaf area for that plant and then close the file. In order to know which plant goes with which plot, use the file remarks to record that information. The file for one plant might look like this:
| FILE: 3 | |||||
| REM: PLOT 2 #5 | |||||
| 27 APR 2006 10:05:18 | |||||
| ENTRY | COUNT | AREA | LENGTH | AV WIDTH | MX WIDTH |
| 1 | 0 | 42.37 | 13.10 | 3.23 | 5.12 |
| 2 | 0 | 44.20 | 12.90 | 2.87 | 3.10 |
| 3 | 0 | 24.48 | 9.78 | 3.15 | 3.67 |
| 4 | 0 | 29.50 | 10.20 | 2.83 | 2.98 |
| 5 | 0 | 34.86 | 11.50 | 2.32 | 2.76 |
| 6 | 0 | 19.33 | 8.60 | 2.14 | 2.56 |
| 7 | 6 | 194.74 | 66.08 | 2.76 | 5.12 |
Now assume that you wish to store the leaf area of each individual leaf and the total leaf area of the whole plant. Two operations need to occur after each leaf is measured; the individual leaf area data should be stored using the STORE X key and the individual leaf area data should be added to the Y value to collect the whole plant leaf area. To accomplish this, set the "CLR X ON STORE" prompt to No and the "CLR X ON ADD" prompt to Yes. This assumes that you will press STORE X before ADD. If you wish to press ADD before STORE X set "CLR X ON ADD" to No and "CLR X ON STORE" to Yes.
Still another approach is to use one file for the entire data set. Begin each plot with a cleared Y and X register, and press ADD after each leaf. When done with a plot, press STORE Y. When done, your file will have 10 entries (one for each plot), and the COUNT for each entry will reflect the total number of leaves measured.
Before you decide on how to structure your data files, you may also want to consider the potential of losing some of your data. If the console is switched OFF, or if it automatically shuts itself off due to inactivity, the current X and Y values will be lost. Any data stored in a data file (the result of pressing STORE X or STORE Y) is safe, even if the data file is not closed. The greatest potential for loss occurs when a large number of measurements are added to the accumulator (Y register) before they are stored in a data file.
The configuration of the LI-3000C can be changed to facilitate rapid data storage. This is accomplished using the CONFIG REGISTERS routine that is discussed in The Menu key.
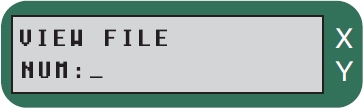
Viewing files on the display
The VIEW key allows you to look at the contents of any stored file. When the VIEW key is pressed, you will be prompted for the file number of the file to be viewed. Enter the file number to be viewed:
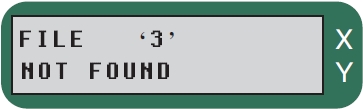
If you enter a number for which there is no file, the display will show:
Otherwise, you will be shown the header of the selected file. For a typical file the display would show:
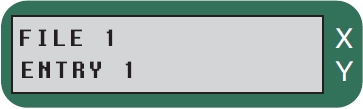
File 1 has 3 entries.
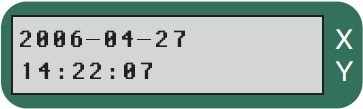
Press the ↓ key to see the next part of the file header, which is the date and time the file was created.
Press the ↓ key again to view the first of the 3 entries.
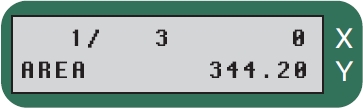
Entry 1 of 3 has 0 counts (e.g., it was stored from the X register).
The top line displays the ENTRY number (1), the total entries (3), and the COUNTS for that entry (0, indicating that it is an X value). The bottom line displays AREA, LEN, AV WD, or MX WD depending upon which has been selected using the AREA, LEN, AVG WIDTH, or MAX WIDTH keys. Try pressing these keys before proceeding.
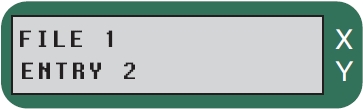
Pressing ↓ again will change to the second entry:
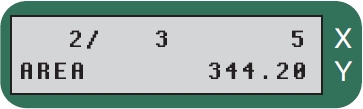
Entry 2 of 3 has 5 counts.
View mode key definitions
While viewing a file, these keys perform the following actions:
↑ and ↓ : Scroll up or down through a file.
VIEW: Prompts for a new file to view.
DEL: Deletes the file currently displayed. When DEL is pressed, the user is prompted:
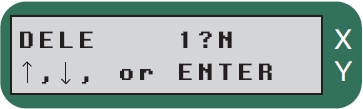
To delete the file press the ↑ key to change the N to a Y, then press ENTER. After deleting the file, View Mode is exited. To continue without deleting the file, just press ENTER.
AREA, LEN, AVG WIDTH, or MAX WIDTH: Selects the data column to be viewed. All other keys will cause view mode to be exited.
Deleting a range of files
When DEL is pressed from normal operating mode (as opposed to the file view mode), the user is prompted for a range of files to delete:
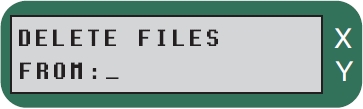
Enter the starting value.
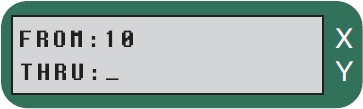
Starts deleting at file number 10. Enter the ending value.
Each file in the range that is deleted is shown on the display.
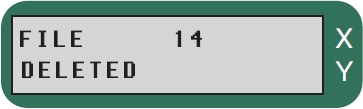
Counts through a range, or resumes area display if not found.
To exit the file delete routine, enter 0 (or press ENTER without making an entry) for either the FROM or THRU file numbers. Each file in the specified range will be sequentially “stepped” through, even if the files do not exist, so it is best to use this function only with a known range of files. To delete all files, it is best to use the Delete All Files function (see The Menu key).