
Connecting with Ethernet
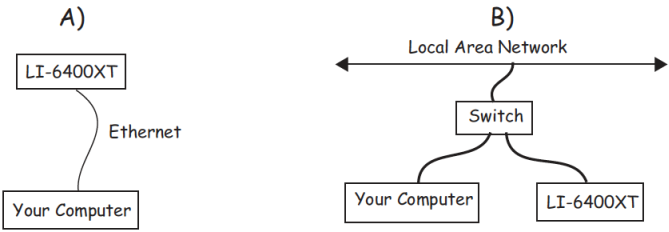
Note: If the direct connection (A) doesn’t seem to work, try plugging both computer and LI-6400XT into an Ethernet Switch, as in (B).
The LI-6400XT supports Secure Shell (SSH), SSH File Transfer Protocol (SFTP), Samba (file sharing on Windows, Mac OX, Linux, Unix), and Zero Configuration Networking.
The following sections provide step-by-step instructions to guide you through the various operations available via Ethernet connection to your LI-6400XT.
Note: For all Ethernet interactions, the LI-6400XT does not have to be in any special mode. It can be doing anything - New Measurements mode, LPL screen, etc.. The only requirement is that the console is powered on, with the network card and cable plugged in.
Installing Ethernet
- Plug in the Ethernet adapter card
- It goes in label side up. A few seconds after you plug it in, you should hear three quick beeps.
- Verify the configuration
- You can verify the configuration on the display of the LI-6400 in the The Network Status Program.
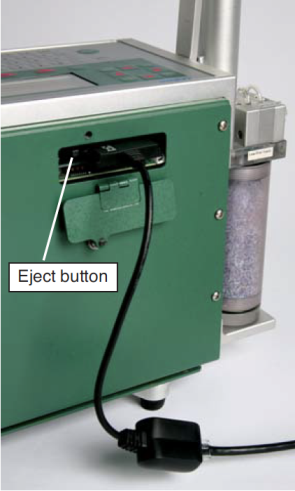
Operational hint: If network operations become unresponsive, try ejecting and re-connecting the Ethernet adapter card.
The Network Status Program
The Network Status program is accessible from either the LPL screen, or OPEN’s Utility Menu.
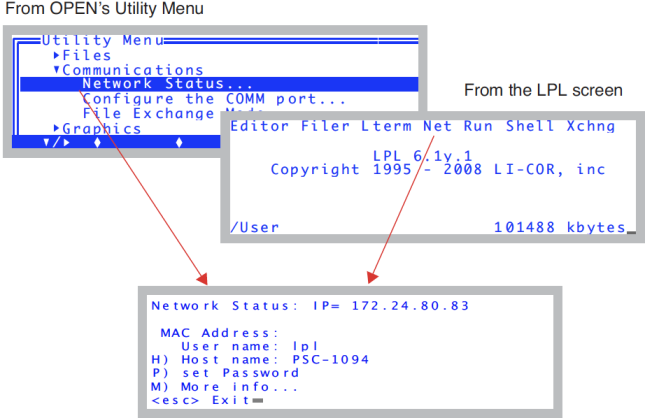
If you are successfully connected, you’ll see the IP address at the top of the display. Alternative messages include:
“Not possible” - this LI-6400 is not an XT and has no compact flash expansion slot.2
“Card not inserted” - the Ethernet card is not inserted in the compact flash slot.
“Cable not connected” - an Ethernet cable is not connected.
“Acquiring...” - The LI-6400 is still configuring itself to the network.
Normally, during the few seconds after connecting to a network, the message line will change several times between an IP address, the “Cable not connected” message, and the “Acquiring...” message, as the self-configuration takes place.
The Host name is the name the LI-6400XT will have on your LAN. By default, this will be the instrument’s serial number, but you may change it to any valid name (start with a letter, avoid spaces, case insensitive). Examples: qwerty, my6400, psc-1234, BoSox07.
The User name is always lpl (lower case LPL). The default password is also lpl. The User name and password will be needed to access the LI-6400XT for file sharing from a remote computer.
The MAC Address will be the answer to a question your IT people might ask if they need to make special allowances for you and your LI-6400XT. Otherwise, ignore it.
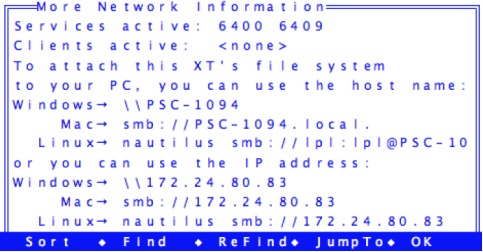
The “More info...” option (press M) will show a screen similar to Figure 11‑7.
Making the LI-6400XT Wireless
While the LI-6400XT has no inherent wireless capability, you can add it via the Ethernet card, by connecting to a wireless router (see Look Ma, No Wires! or Adding Wireless Connectivity to the LI-6400XT In Five Easy Steps).
(Windows) File Transfer with Explorer
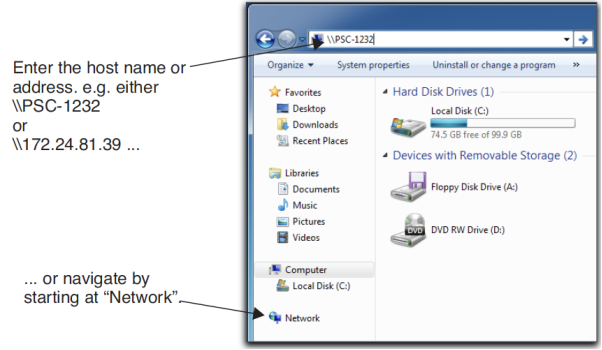
- Open an Explorer Window
- Click on, for example, “My Computer”.
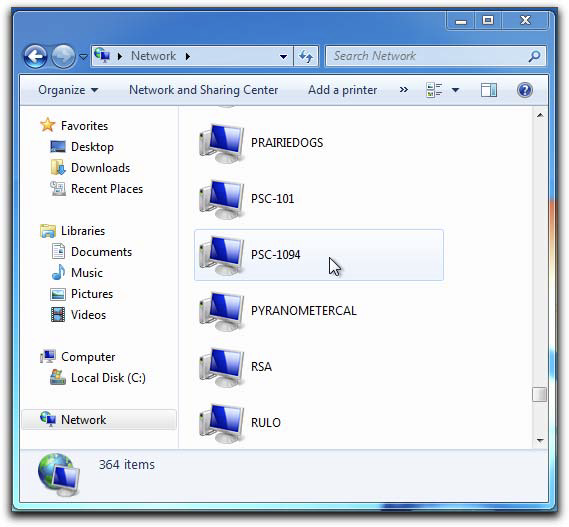
- You can either navigate to the LI-6400 by clicking on icons, or get there in one step by entering the host name. If you navigate there, you may have to go through (depending on what version of Windows you have, etc.) “My Network Places” and “Entire Network”. If you see a work group named Licor, look in that. Eventually, you should find your XT in a list:
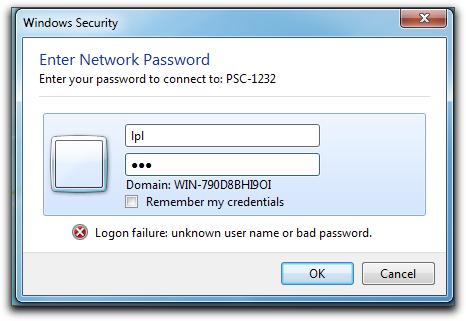
- Authenticate
- When you open the server for the first time (since login), you will have to authenticate the connection by entering the user name (lpl) and password (lpl again, unless you have changed it):
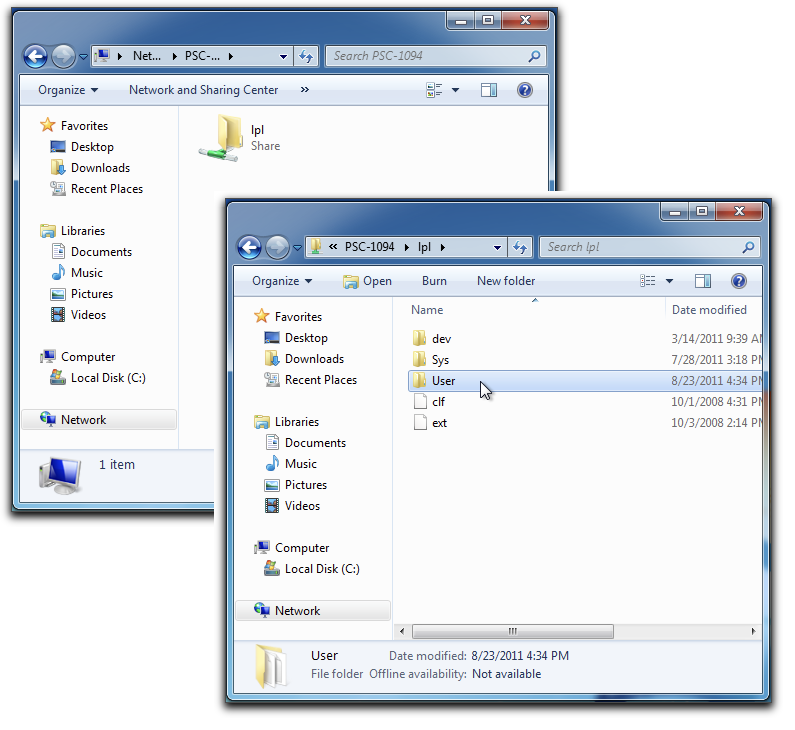
- Navigate to the User directory
- When Windows opens the LI-6400XT server, you will see an “lpl” folder. Double click it.
- This will bring you to the file system you are familiar with on the LI-6400. Your data and configuration files are in the User folder, and you can drag and drop from there to your desktop or other Explorer windows.
Opening an Explorer Window from LI6400XTerm
Another way to open an Explorer window is to start with LI6400XTerm, and click the Open File System button. (You need not be communicating with any instrument to do this.)
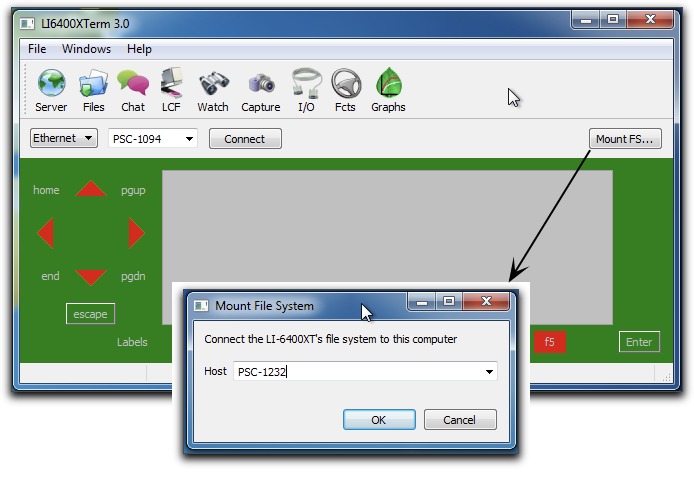
When you select an instrument from the drop down list, and click OK, you will then either be show the authentication window (Figure 11‑10), or the Explorer window for lpl (Figure 11‑11).
(Windows) File Transfer with WinSCP
WinSCP is a freely downloadable (winscp.net) Windows application that supports SFTP. It is a reliable alternative if you are having trouble making Windows recognize the LI-6400XT. For example: when we plug an LI-6400XT into the LAN here at LI-COR, it can sometimes take several minutes before it becomes “visible” in the Microsoft Windows Network. Win-SCP and LI6400XTerm, on the other hand, will find it immediately.
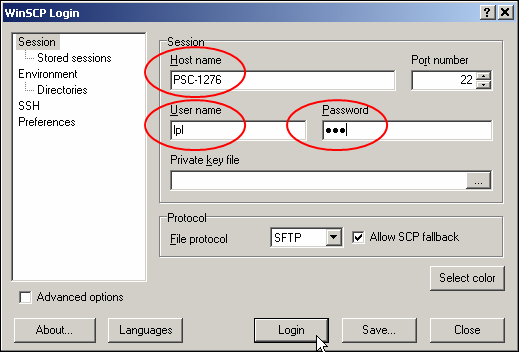
- Run WinSCP, and log in
- Once installed and launched (after a restart), WinSCP presents its connection dialog (Figure 11‑13). Enter the Host name, User name, and password, and then press Login. The host name and password should match your instrument (Figure 11‑6).
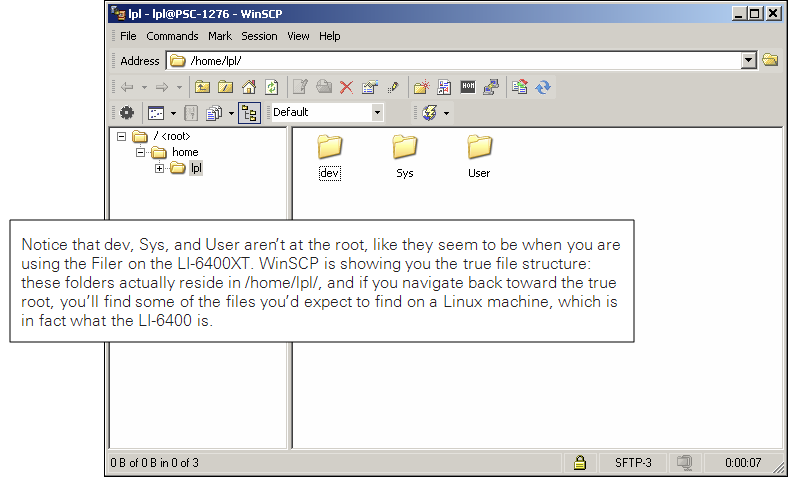
- Drag and Drop as needed
- WinSCP will open a window to the LI-6400XT’s file system, from which you can drag and drop files just like with Explorer (Figure 11‑14).
- Using WinSCP.
(Mac OS X) File Transfer with Finder
From a Mac with OS X, you can connect to the LI-6400XT with Finder, either by directly entering the host name, or navigating to it:
- Enter the host name or IP address
- Open the “Connect to Server...” dialog, under Go in Finder’s Menu Bar. Precede the host name with
smb://and put.local. behind it (Figure 11‑15). - If you enter the IP address, put “
smb://” in front of it (e.g.smb://172.24.80.33). - Verify
- You will be asked to select a share. Your only choice is lpl, so just click OK (Figure 11‑16).
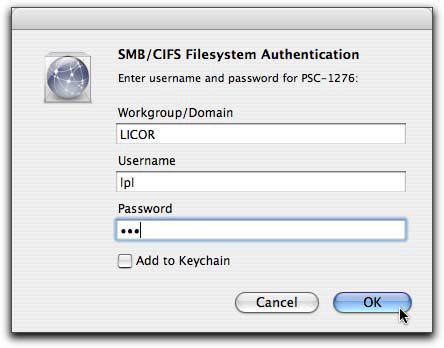
- Authenticate
- The workgroup should default to LICOR. Enter the user name (always lpl) and password (also lpl, unless you have changed it), and click OK.
- Open the LPL server
- Finder will open a window for lpl (the LI-6400XT’s file system), and add it to the Shared items on the left side of the Finder window.


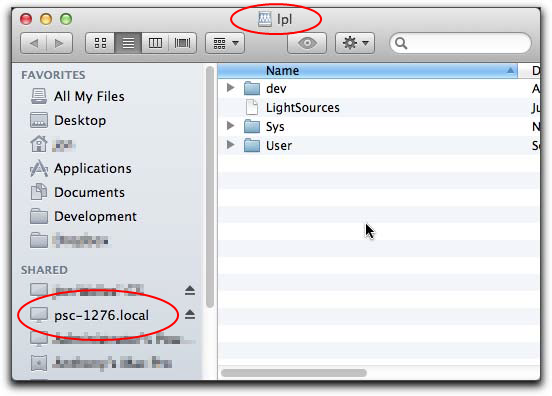
You can now drag and drop files or folders, just as if the LI-6400XT were a mass storage device connected to your computer.
When you are done, you can disconnect if you wish by selecting Eject from Finder’s File Menu, or clicking the eject icon to the right of its Shared list entry.
Opening a Finder Window with LI6400XTerm
You can also open a Finder window for the XT using LI6400XTerm, by clicking on the Mount FS button.
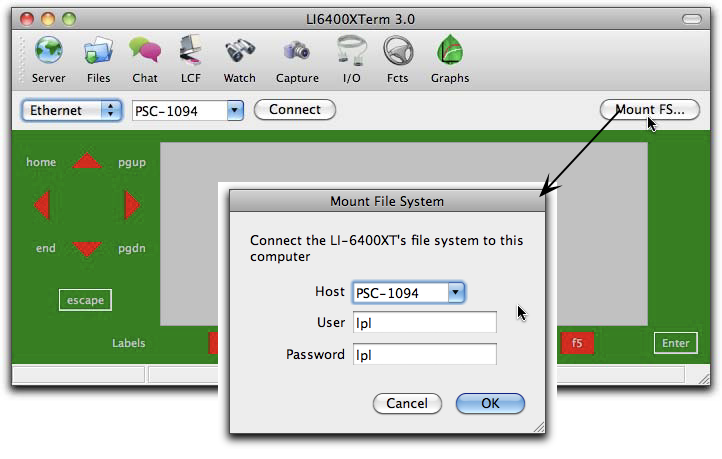
Pick the instrument, click OK, and a Finder window will open in a few seconds.
Finder mounts the LI-6400XT in the Mac file system at /Volumes/lpl.
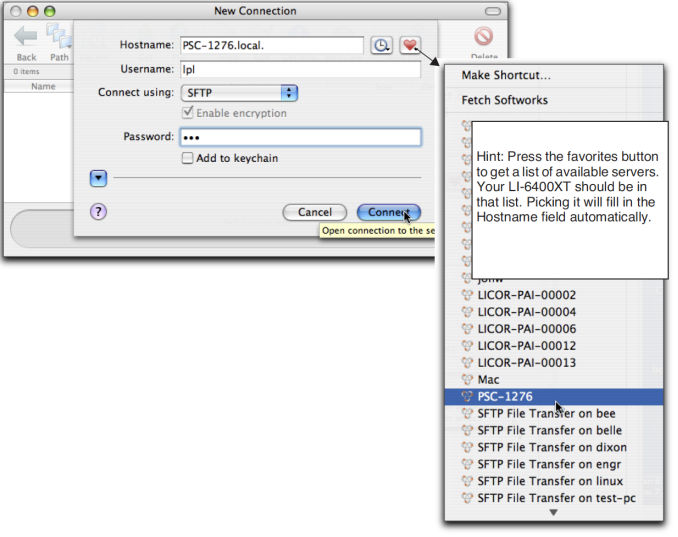
(Mac OS X) File Transfer with Fetch
Fetch is a nearly-free, downloadable (fetchsoftworks.com) file transfer application for Mac OS that supports SSH and SFTP, but with a graphical interface.
- Run the application and log in.
- The New Connection dialog lets you specify host name, user name, and password (Figure 11‑20).
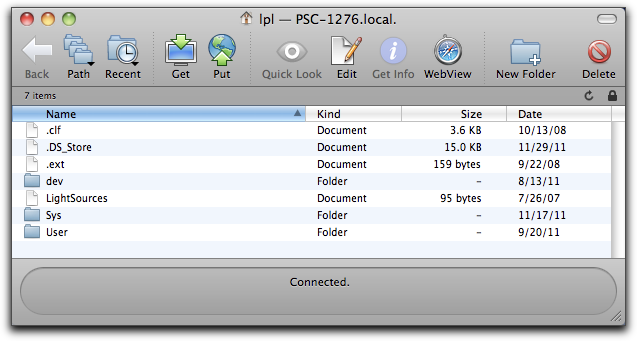
- Explore, Drag, Drop, etc.
- Once you are logged in, the LI-6400XT’s file system will appear in the Fetch window (Figure 11‑21). You can then drag, drop, and otherwise manipulate files.
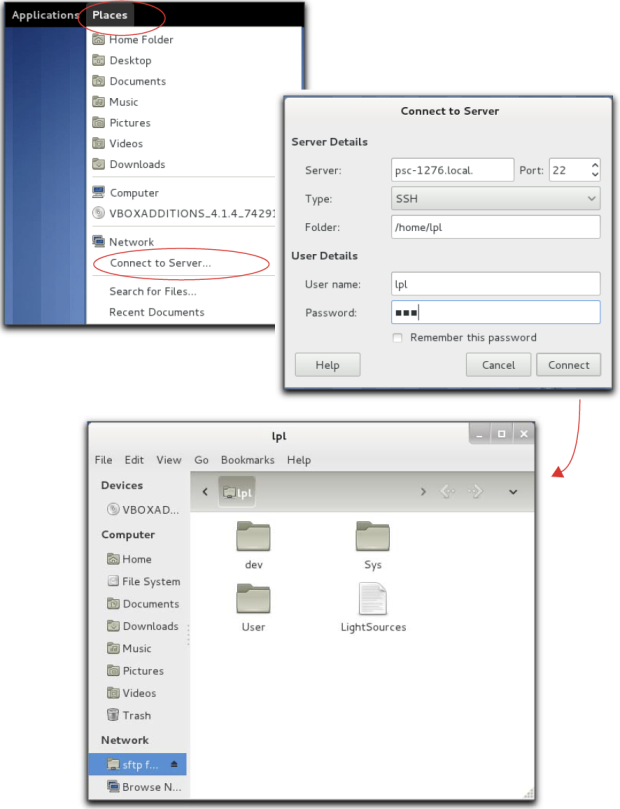
(Linux) Connecting with Nautilus
The examples below are from Fedora 15.
Method 1: “Connect to Server”
Use the “Connect to Server” entry in the Places drop down.
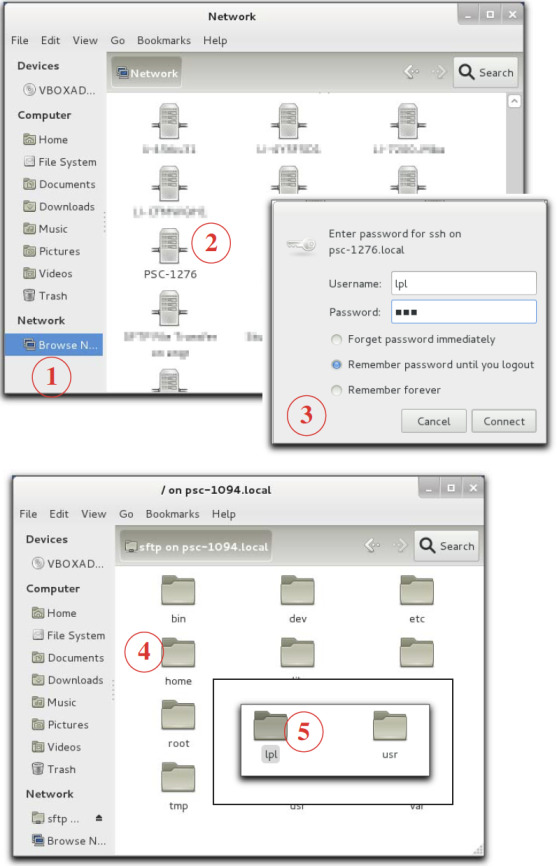
Method 2: Browse Network
From a Nautilus window, select Browse Network in the side bar, find your LI-6400XT, and double click it (Figure 11‑23).
Method 3: Launch Nautilus from a Command Line
You can start from the command line in Terminal, and launch a file browser aimed at your LI-6400XT (Figure 11‑24). The example uses psc-1276, so substitute the host name of your own LI-6400 (see The Network Status Program).

(Mac OS X, Linux) Command Line File Transfer
If you don’t mind working with a command line, you can do all manner of evil with the LI-6400XT, using rcp, rsynch, and the like. You need to know that the real path to the file system that you see on the LI-6400XT is /home/lpl/. Thus, the data file /User/data is really /home/lpl/User/ data. The user name is lpl, and the password is lpl.
Here are two simple examples:
Copy a data file named ’mydata’ from the /User directory on the LI-6400XT to the destination directory /Users/jon/test on your computer:
rcp lpl@psc-1094.local:/home/lpl/User/mydata /Users/jon/test
To copy the entire contents of the /User directory into the existing directory /Users/jon/Test, preserving file time stamps and permissions, do this:
rcp -rp lpl@psc-1094.local.:/home/lpl/User/* /Users/jon/Test
NOTE: If you have mounted the LI-6400XT’s file system to your computer, then you can treat its files as “local”, and you needn’t worry about host names and passwords. For example, with OS X, you can mount the file system with Finder ((Mac OS X) File Transfer with Finder), then all the LI-6400XT files will be in the location /Volumes/lpl. So, for example, from Terminal, you can get a list of the files in the LI-6400XT’s /User directory by typing this:
ls /Volumes/lpl/User
or you can copy the data file ’mydata’ from the /User directory on the LI-6400XT to the existing destination directory /Users/jon/test on your computer:
cp /Volumes/lpl/User/mydata /Users/jon/test