Leaf Chambers
Foam Gasket Care
It is important to take care of the foam gaskets on the leaf chambers. Never latch the chamber closed when it is not in use, as the gaskets will stay compressed if you leave the chamber closed for several hours. Black neoprene will recover from this condition overnight, but the white gaskets used with the LED light sources will not.
Foam Gasket Replacement
The two gaskets on the leaf chamber and the air seal gasket located behind the chamber gaskets should all be replaced as needed. It is important that you peel off the old gaskets correctly. There is a thin film below the gasket foam called the carrier that holds the adhesive. With a fingernail or the flat edge of a knife, try to pry up a corner of the carrier. If you only pry up the foam and adhesive, the carrier will remain on the chamber, and is difficult to scrape off. If you get underneath the carrier, the whole gasket will come off quite readily.
Frequently there is residual adhesive material on the chamber after the gaskets are removed. This can be cleaned up with acetone or other solvents, if it is a painted metal chamber part. Never use solvents on the plastic 6400-05 Conifer Chamber. Note: A product that we’ve recently come across that works very well for cleaning up gasket adhesive is Oil-Flo™, manufactured by Titan Chemical, inc. (1240 Mountain View-Alviso Rd., Sunnyvale, CA 94089, 408-734-2200). This is a water soluble, solvent-based “safety degreaser”. It even worked safely on the 6400-05 conifer chamber (acrylic), but marred an old 6200 leaf chamber (polycarbonate), so it would be wise to follow the label’s admonition to “test on plastics” before use.
The replacement gaskets are installed by removing the paper backing over the adhesive. Watch for channels where the adhesive sticks to itself when you remove the backing. If you stretch the gasket slightly, the channels disappear. If you apply the gasket to the chamber with channels, you’ll have leaks.
For part numbers for replacement gaskets, see the table Items for Chambers.
Propafilm® Replacement
Several chambers use Propafilm® (ICI Americas, Inc., Wilmington, DE), such as the standard 2x3 chamber top, the 6400-07 top and bottom, the 6400-08 bottom, the 6400-11 top, and the 6400-17 top. You will need to replace the film if it becomes torn or punctured, or excessively dirty. Replacement film (LI-COR part #250-01885) and double-sided tape (part #212-04341) can be found in the spare parts kit.
To replace the Propafilm:
- Detach the affected chamber part
- Use the 3/32” hex key provided in the spare parts kit to remove the two long screws, or (for the 6400-17) a #2 Phillips screw driver to remove four screws.
- Remove the old Propafilm and tape
- The tape has a fairly strong adhesive; if it does not peel off readily, use a mild solvent (e.g. acetone) to help dissolve the adhesive. Do not use a blade or other sharp instrument to remove the tape, as you could damage the surface of the chamber, thereby making it difficult to achieve a air-tight seal with the new Propafilm.
- Prepare the new tape
- Cut a strip of the double-sided tape that is slightly longer than the leaf chamber. Lay on a flat cutting surface, adhesive side up. The tape may be curled slightly; hold the corners down with cellophane tape, if necessary.
- Attach the tape and trim
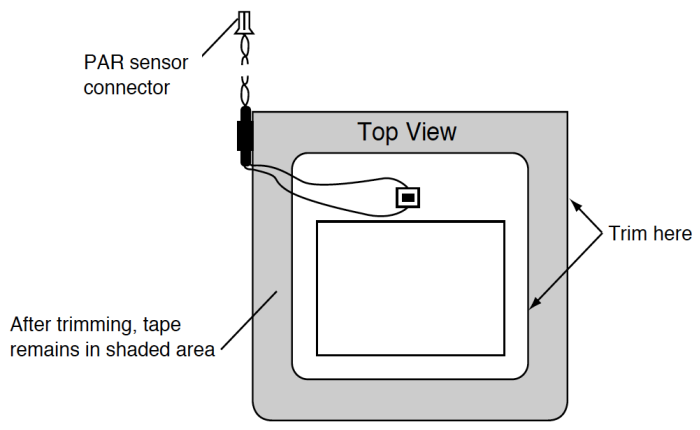
- Lower the top surface of the chamber onto the tape and press firmly. Trim the tape around the outer and inner edges of the chamber (Figure 19‑24). To get a clean cut, use a fresh blade (an Exacto knife works well) and make sure your first cut as close to the edge as possible.
-

Figure 19‑24. Trim tape at the leaf chamber edges. - Prepare a piece of Propafilm
- Cut an oversized piece of Propafilm. Stretch the film on a flat, clean surface until taut. You may want to tape the corners with cellophane tape to secure it to the cutting surface.
- Remove the backing
- Peel the backing from the tape and smooth any bubbles that may have formed.
- Attach the Propafilm
- Lay the leaf chamber onto the Propafilm. Turn the chamber over and smooth the film. Bubbles can be lanced and smoothed.
- Trim to size
- Trim the film around the outer edge of the chamber. Make your first cut is as close to the edge as possible.
- Reassemble the leaf chamber assembly.
Fluorescence Chamber Tops
The 6400-06, -10, and -14 chambers have holders for fluorescence probes built into the chamber tops. The top piece is plastic, lined on the inside with Teflon. If the inner surface is scratched, the Teflon can tear, leaving a shadow- causing blemish.
The chamber tops can be removed by removing the screws that hold it in place. There is a layer of silicone cement underneath the chamber top, but it won’t stick to the top because of its Teflon lining.
Self adhesive Teflon is available from LI-COR as part number 212-02314.
Chamber Mixing Fan
See Noise caused by the Fan Motor for a discussion of how to determine if the fan motor is about to fail.
