
Chamber Problems
The Mixing Fan
The chamber mixing fan is shown in Figure 19‑33. It is protected by a fuse (Figure 19‑9), but problems with the fan motor can also cause the flow board fuse to blow.
To verify normal operation
Use your ears. Turn the fan off and on in New Measurements mode, and you should hear the sound change. (The fan control is via f1 level 2.) If the fan isn’t behaving normally, then here are some things to check:
- Fan motor burned out?
- This typically causes a flow board or fan fuse to blow, but not until the first time New Measurements mode is entered, because that is when the system turns on the fan for the first time.
- To verify the motor is burned out, you can measure the impedance across pins 25 and 26 of the 26 pin D connector (Table 20‑2) on the back of the chamber/IRGA. Pins 25 and 26 are on the bottom row, right hand end. It should be about 63 Ohms. If it is 0 Ohms, you need a new motor.
- An alternate way to check this is to use the program Control Panel (see Control Panel on page 21-12 in the instruction manual). Power the LI-6400 on, press escape to prevent OPEN from loading, access the Filer, select the /Sys/Utility directory, and run Control Panel. Turn on the flow board (item 2), then turn on the fan (item 7 = 5000, then item 6). If that doesn’t blow a fuse, try turning on the pump as well (item 9 = 4500, then item 8).
- Connector or cable problem?
- Check the 26-pin D connector on the back of the chamber/IRGA to make sure that no pins have been pushed in, or been broken, etc. If possible, try a different cable.
- Fan blades jammed?
- (This generally won’t cause the fuse to blow.) To check the fan, open the IRGA sample cell (Cleaning the Optical Bench) and see if the fan spins freely. If it doesn’t, there may be debris wedged under the fan blades, or else the fan is not properly positioned.
A replacement motor and fan is available as part number 6400-902.
The chamber mixing fan inside the sample chamber can cause some unexpected problems in the system when it begins to wear out. The motor for the fan is a dc brush motor, and when the brushes wear down they gradually begin to run roughly on the surface of the commutator. When this happens the brushes begin to make and break contact with the commutator at a very rapid pace. This creates spikes of electrical noise as the motor current is interrupted. These noise spikes emanate from the motor and are coupled into the temperature circuits contained on the chamber head board and the leads of the block, air and leaf sensors.
We have found that this is not a problem until a short time before the brushes are completely worn out, and the motor about to die.
It is easy to test whether the fan motor is causing trouble and to determine the magnitude of the trouble.
The test involves graphing the Tblk and Tair signals on the display and observing the effects of turning the fan on and off. Follow this procedure to do the test:
- Turn the chamber mixing fan off.
- Setup graphs
- In New Measurements mode, view the graphs by pressing the right bracket ( ] ) on the keyboard. Now press the letter D to show temperature graphs. Tleaf is also included, but we are primarily interested in the effects on Tair and Tblk.
- Watch the graphs to get a baseline.
- If the LI-6400 has been turned on for 30 minutes or so, you can expect the line to travel across the screen showing little or no change in temperature. If the instrument has just been turned on you will see the lines creeping upwards as the head reaches temperature equilibrium. With the fan off, there should not be noise on these signals. If you see it vary up and down by one pixel (Y axis = 1 degree C) it means that the A-D converter is toggling between one value and the next. This is ok.
- Turn the fan on.
- Leave the graphing mode and by pressing escape. Turn the chamber mixing fan back on and then immediately return to viewing the graph to see the effects.
When the fan is turned back on, if there are no problems, you should not see any fast change in the line on the graph. Now, it is normal to see the temperatures (especially Tair) begin a slow trend upwards or downward. This is a real physical temperature change being measured.
If there is a problem caused by the fan, you will see varying degrees of noise on the signal begin to appear. It can range from 2 pixels on the screen to one or two degrees of temperature. An offset may also be observed. This shows up as a very rapid change to another level and is always accompanied by noise showing up as a jumpy line on the graph. The offset is not always present.
The Y axis will automatically adjust to contain the data, regardless of the magnitude of change. You will see the low and high readings to the side of the graph box on the screen change. So be aware that if it changes significantly, you will be seeing a bigger range on the Y axis, and it may not look as noisy as it really is. Pressing the number 3 will reveal a function key labeled Clear. This wipes out all data and it will begin to show the graph using the smallest possible range for the Y axis.
If you see the offset or the noise appear, the fan needs to be replaced. The part number for the field-installable mixing fan kit is 6400-902.
The effects of this noise show up in all calculations that use the block or air temperatures. Also the leaf temperature, as it is referenced to the block temperature. We don't recommend basing your judgment of the state of the fan’s brushes on the Leaf temperature, because unless the thermocouple is in good contact with a surface of sufficient mass, the readings tend to be a bit noisy anyway. If the thermocouple bead is sitting in the air, you will observe small fluctuations, especially if wind is passing across it.
The effects of fan motor noise can vary from none to so bad that the CO2 injector system cannot control a setpoint because the calculated CO2 concentrations are jumping too much.
This chamber mixing fan problem can also show itself in the inability to zero the leaf thermocouple. This is due to the offset caused by the fan noise being larger than the range of voltage change that the leaf thermocouple adjustment potentiometer on the bottom of the sensor head can produce. To test if the fan is the cause of inability to zero the leaf thermocouple, try the zero procedure with the fan turned off. If it will zero with the fan off, but not with the fan on, the fan is bad and needs to be replaced.
It is good practice to do the graphing test described above periodically to that you will know when the fan is nearing the end of its useful life. The noise generally begins very small and increases in severity as the brush-commutator surfaces erode. It is good to catch it early so you can order the field installable fan kit, or send it to LI-COR for repair. It can save you taking noisy data and having to re-do your work.
Bad Temperature Readings
Erroneous Block Temperature
If the block temperature reads erroneously, such as -50C, there are a couple of things to check:
- Check the cable and connectors
- Is the chamber cable plugged in? Check the 26 pin D connector on the back of the chamber/IRGA, in particular pins 22 and 10 (see Table 20‑2); is the pin pushed in? Check the cable, and for a possible break between pin 22 (on the IRGA end) and pin 1 (on the console end), and between 10 and 3.
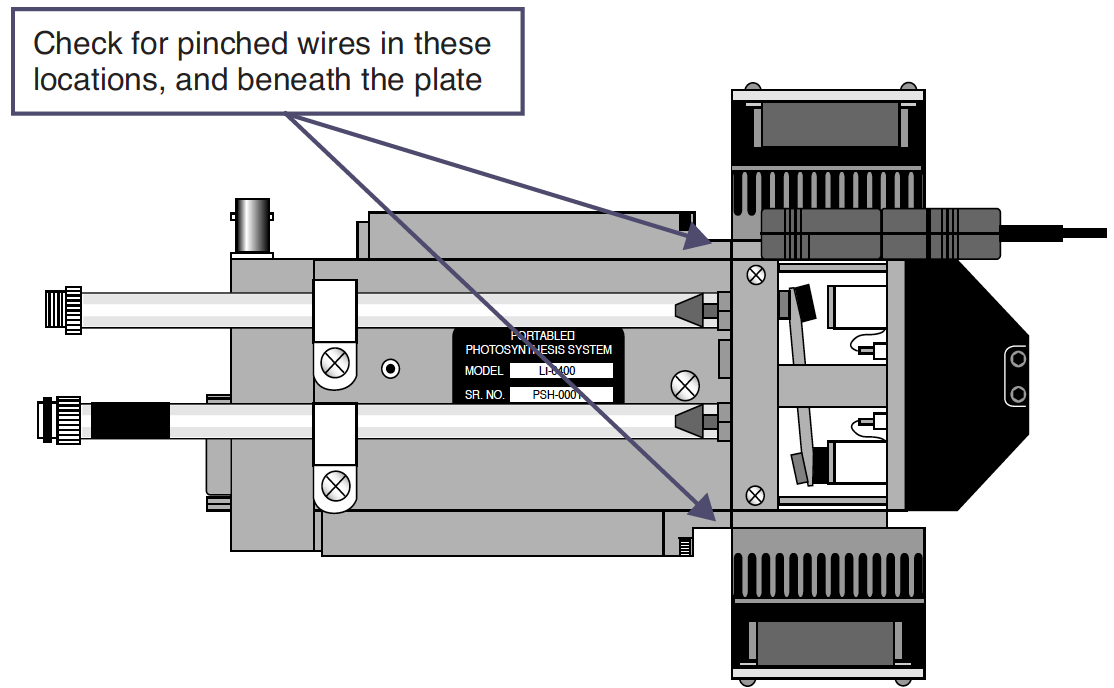
- Check for a pinched wire
- Check the metal cover (with the serial number label on it) beneath the IRGA (Figure 20‑17) and the wires that come out from beneath it. Something may be pinched.
Erroneous Leaf Temperature
Leaf temperature is referenced to block temperature. Therefore, if leaf temperature is reading a strange number, the first thing to check is the block temperature - maybe it is the problem. Otherwise...
- Is the thermocouple broken?
- If leaf temperature doesn’t respond to touch, and always reads the same as block temperature, that is a pretty good indication that the leaf temperature thermocouple is broken.
- Check the cable and connectors.
- Leaf temperature signal is carried between pins 14 (chamber end) and 4 (console end).
- Is the chamber fan working?
- Sometimes your first clue that the chamber fan is not operating is a leaf temperature sensor that is a few degrees off from where you think it should be.
- Noisy (Erratic) Temperatures
- See Noise caused by the Fan Motor.
- Can’t Zero Leaf Temperature
- See Noise caused by the Fan Motor.